
The Easiest Show-Stopper: Your No-Bake Strawberry Tart
Let me tell you a secret. The best dessert I’ve ever brought to a party took me 15 minutes and zero oven time. I was running late, my kitchen was a mess, and I needed a miracle. That’s when this No-Bake Strawberry Tart with Speculoos was born. It’s the kind of recipe that makes you look like a pastry chef while you’re secretly in your comfy pants. The magic is in the layers: crunchy spiced cookie crust, dreamy mascarpone cream, and juicy fresh strawberries. It’s love at first bite.
From Belgian Cafés to Your Kitchen Table
This tart is a happy mix of traditions. Speculoos cookies, with their warm cinnamon and spice notes, are a staple in Belgium and the Netherlands, often enjoyed with coffee. The creamy, no-bake cheesecake-style filling is a modern lifesaver. I first had something similar in a tiny Parisian pâtisserie, but it felt far too fancy to make at home. After countless experiments (some delicious, some… not), I cracked the code. This version honors that elegant French fruit tart aesthetic but uses the convenience of a no-bake method. It’s tradition, meets simplicity, meets pure joy.
Why You’ll Fall in Love With This No-Bake Strawberry Tart
You’ll love this recipe because it honestly has no downside. It’s impossibly quick, perfect for hot days when you don’t want to turn on the oven, and foolproof. The contrast of textures—the snappy crust, the smooth cream, the pop of berry—is just perfect. Plus, it’s incredibly versatile. Don’t have strawberries? Use other fruits. It’s a forgiving, friendly recipe that wants you to succeed. It’s become my go-to for last-minute guests and my most requested dish for family birthdays.
When to Whip Up This Sweet Masterpiece
This tart shines at almost any gathering! Think of it for:
- Summer BBQs: A cool, fresh ending to a grilled meal.
- Potlucks: It travels well and always gets empty plates.
- Mother’s Day or birthdays: It looks incredibly special with minimal effort.
- Weeknight treats: Because you deserve a fabulous dessert on a Wednesday!
What You’ll Need: Simple Ingredients, Big Flavor
This is the beautiful part. You only need a handful of easy-to-find items.
- For the Crust:
- 200 g (about 7 oz) Speculoos cookies (Biscoff works perfectly)
- 80 g (about 5 1/2 tbsp) unsalted butter, melted
- For the Cream Filling:
- 250 g (about 9 oz) mascarpone cheese, cold
- 250 ml (about 1 cup) heavy whipping cream, cold
- 50 g (about 1/4 cup) powdered sugar
- 1 teaspoon pure vanilla extract
- For the Topping:
- 500 g (about 1 lb) fresh strawberries, hulled and sliced
- Optional: 2 tbsp apricot jam, warmed, for a shiny glaze
No Stress Substitutions
Out of something? No worries! Here are easy swaps:
- No Speculoos? Use graham crackers or digestives. You’ll miss the spice, but it’ll still be delicious.
- No Mascarpone? Full-fat cream cheese works. Let it soften a bit first.
- Dairy-Free? Use coconut cream (chilled) and a plant-based butter for the crust.
- Other Fruits: Raspberries, blueberries, or a mix are all gorgeous.
Creating Your No-Bake Strawberry Tart: Step-by-Step
Step 1: Crush and Conquer the Crust
First, let’s make that irresistible base. Place your Speculoos cookies in a sturdy zip-top bag. Grab a rolling pin and get ready for some fun, therapeutic crushing! Roll over the bag until the cookies become fine, even crumbs. You want them to look like dark, fragrant sand. Pour these crumbs into a bowl and pour the melted, golden butter over them. Mix with a fork until every crumb is beautifully coated and the mixture holds together when pinched. Pro tip: A food processor makes this step lightning fast. This buttery, spiced mixture is the foundation of your tart.
Step 2: Press It In and Chill
Now, transfer your buttery crumbs into a 9-inch tart pan with a removable bottom. Use the bottom of a glass or a measuring cup to press the crumbs firmly and evenly across the bottom and up the sides. This compact layer is what gives you that perfect, sliceable crust. Once it’s nice and tight, pop the whole pan into the freezer for at least 10 minutes. This chills the butter, setting the crust so it’s ready for its creamy blanket. While it chills, you can get started on the best part—the filling.
Step 3: Whip Up the Dreamy Cream
This step is crucial for a light, fluffy filling. Make sure your heavy cream and mascarpone are cold. In a large, chilled bowl, pour the cold cream. Add the powdered sugar and vanilla. Using a hand mixer or stand mixer, whip on medium-high speed until you see soft peaks form. Now, add the entire tub of cold mascarpone. Continue whipping just until the mixture is thick, smooth, and holds stiff peaks. Be careful not to over-whip, or it can become grainy. You’re looking for a cloud-like, spreadable texture. The aroma of sweet vanilla is your reward.
Step 4: Assemble Your Edible Art
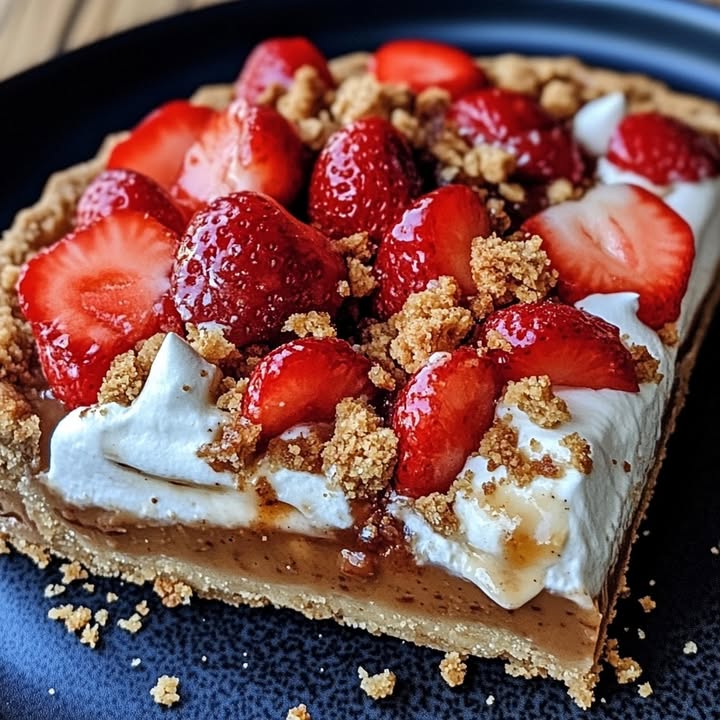
Take your chilled crust from the freezer. Spoon all of that gorgeous mascarpone cream into the center. Use an offset spatula or the back of a spoon to spread it into a smooth, even layer, reaching all the edges. Now for the jewel-like topping. Arrange your sliced strawberries in concentric circles, starting from the outside and working your way in. Overlap them slightly for a lush, professional look. Chef’s tip: For an extra glossy, pro finish, gently brush the strawberries with a little warmed apricot jam. It adds sweetness and makes them shine.
Step 5: The Final (Hardest) Step: Wait!
I know, it’s torture! But trust me, this wait is worth it. Carefully place your finished tart in the refrigerator. Let it chill and set for a minimum of 4 hours, though overnight is ideal. This resting time allows the flavors to meld together beautifully. The crust soaks up a hint of moisture from the cream, becoming perfectly firm yet tender. When you’re ready, gently push up the removable bottom of the pan, slide the tart onto a plate, slice, and get ready for the compliments to roll in.
Your Time Investment: 15 Minutes Active, 4+ Hours Chill
Prep Time: 15 minutes | Chill Time: 4 hours (or overnight) | Total Time: 4 hours 15 minutes | Servings: 8
Chef’s Secret: A Pinch of Salt
My little secret? Add a tiny pinch of flaky sea salt to the cookie crumbs before you add the butter. It sounds odd, but it makes the spicy, sweet flavors of the Speculoos *pop* in a way you can’t quite place, but you’ll definitely notice. It elevates the whole dessert from great to unforgettable.
Fun Fact: The Cookie That Traveled the World
Speculoos cookies were originally baked for St. Nicholas’ Day in December. The spices were a sign of luxury. Now, thanks to airlines serving them as a snack, they’ve become a worldwide favorite. So when you bite into that crust, you’re tasting a little piece of European history that took to the skies!
Gear You’ll Need
- 9-inch tart pan with removable bottom
- Food processor or zip-top bag & rolling pin
- Mixing bowls
- Hand mixer or stand mixer
- Offset spatula or spoon
Keeping Your Tart Fresh and Fabulous
Your No-Bake Strawberry Tart is happiest in the refrigerator. Cover it loosely with plastic wrap or place it under a cake dome. The creamy filling and fresh fruit need to stay cool.
For the best texture and flavor, enjoy it within 2 days. The crust will start to soften slightly the longer it sits, but it remains delicious. The strawberries may release a little juice, which is perfectly natural.
I do not recommend freezing this tart. The cream filling and the fresh strawberries don’t freeze and thaw well, leading to a soggy crust and watery berries. It’s truly a make-and-enjoy-fresh kind of delight.
Tips and Advice for Guaranteed Success
- Cold is Key: Keep your cream and mascarpone fridge-cold for the best whip.
- Press Firmly: A well-packed crust won’t crumble when you slice.
- Dry Your Berries: Pat strawberries dry after washing to avoid extra moisture.
- Serve Cold: Use a sharp knife dipped in hot water for clean slices.
Presenting Your Masterpiece
- Dust the edge of the plate with a little cocoa powder or crushed Speculoos.
- Add fresh mint leaves for a pop of green color.
- Serve with a dollop of extra whipped cream on the side.
- For individual portions, make mini tarts in a muffin tin.
Six Delicious Ways to Mix It Up
This recipe is a fantastic canvas. Here are six fun twists:
- Chocolate Hazelnut Dream: Use crushed chocolate wafer cookies for the crust and swirl Nutella into the mascarpone cream.
- Tropical Escape: A graham cracker crust with mango and passion fruit pieces on top.
- Lemon Berry Bliss: Add the zest of one lemon to the cream filling and top with mixed berries.
- Cookies and Cream: An Oreo cookie crust with mini chocolate chips folded into the cream.
- Peanut Butter Cup: A peanut butter cookie crust with chopped Reese’s cups on top.
- Very Berry Medley: Use a mix of raspberries, blackberries, and blueberries for a patriotic or colorful look.
Inspired by these ideas? You can find more creative spins on the classic formula in this guide to fantastic no-bake desserts.
Common Mistakes to Avoid
Mistake 1: A Soggy, Crumbling Crust
This happens if you don’t press the crumbs firmly enough or if the butter isn’t fully melted and mixed in. A loose crust will fall apart when you try to slice it. To avoid this, really take a minute to compact the crumbs with something flat and solid. Also, make sure every crumb is coated in butter—it’s the glue! A good press and a proper chill in the freezer are your best friends for a perfect base.
Mistake 2: Over-whipping the Mascarpone Cream
We’ve all been there, watching the mixer and suddenly the cream looks grainy or, worse, starts turning into butter. This happens because cream and mascarpone have a lot of fat. They whip up fast. The key is to stop as soon as the mixture forms stiff peaks and looks smooth. If you overdo it, there’s no going back. Pro tip: Whip the heavy cream to soft peaks first, *then* add the mascarpone and finish whipping. It gives you more control.
Mistake 3: Skipping the Long Chill Time
I know it’s tempting to slice right in. But if you don’t let the tart set for at least 4 hours, you’ll have a messy, soft slice that doesn’t hold its shape. The chilling time is when the magic happens. The crust sets, the flavors marry, and the filling firms up. Planning is key. Make it the night before for a stress-free, picture-perfect dessert the next day. Patience truly is a virtue here.
For more guidance on building balanced plates with desserts like this, the USDA’s MyPlate guide for healthy meal planning is a great resource for everyday eating.
Frequently Asked Questions (FAQ)
Can I make this tart ahead of time?
Absolutely! This is one of its best features. You can assemble the entire tart up to 24 hours in advance. Just keep it covered in the refrigerator until you’re ready to serve. The crust might soften a tiny bit, but the flavors will be even better as they have more time to meld together. It’s the ultimate make-ahead party dessert.
My mascarpone cream is runny. What did I do wrong?
A runny cream usually means either your ingredients weren’t cold enough, or you didn’t whip them long enough. Make sure your bowl and beaters are cold too. If it’s still too soft after whipping, you can try popping the whole bowl into the freezer for 10-15 minutes, then whipping it again briefly. Starting with truly cold ingredients is the best prevention.
What can I use instead of a tart pan?
No tart pan? No problem! A springform pan works wonderfully. You can also use a pie dish, though serving might be messier. For individual portions, line a muffin tin with parchment paper liners and press the crust into the bottom of each cup. You’ll have adorable personal-sized tarts!
Can I use frozen strawberries?
I don’t recommend it for the topping. Frozen strawberries release too much water as they thaw, which will make your tart soggy and dilute the cream. They are great for purees or sauces on the side, but for the beautiful fresh look and texture of this tart, fresh is definitely best.
How do I get clean, neat slices?
Use a sharp, thin-bladed knife. Dip the knife in very hot water and wipe it dry before each cut. The heat helps slice cleanly through the creamy filling without dragging. Make a clean, confident cut for the prettiest pieces. It’s a simple trick that makes a huge difference in presentation.
Is there a way to make this recipe lighter?
You can make some adjustments for a lighter version. Use light mascarpone or Neufchâtel cheese if you can find it. For the crust, you can slightly reduce the butter—just make sure it still holds together. The fruit is naturally low in calories, so load it up! Remember, dessert is about enjoyment, and balance is key in an overall healthy approach to no-bake treats.
Yes, this recipe is very adaptable! Graham crackers are the most common substitute and work perfectly. Digestive biscuits, vanilla wafers, or even ginger snaps would add their own unique flavor. Just follow the same weight or volume measurement for a consistent base.
How long will leftovers keep?
Leftovers will keep, covered, in the refrigerator for 2-3 days. The crust will continue to soften, and the strawberries may weep a little juice, but it will still taste delightful. It’s always best fresh, but I’ve never had any last more than two days anyway!
Can I add gelatin to the cream to make it firmer?
You can, but it’s not necessary if you chill the tart properly. Adding gelatin (about 1 teaspoon, bloomed and melted) will give you a very firm, cheesecake-like texture that slices incredibly cleanly. It’s a great pro tip if you need it to sit out at a buffet for a little longer.
The butter leaked out of my crust in the pan. Why?
This means there was likely too much butter for the amount of cookie crumbs. The excess butter has nowhere to go but out. Next time, if your mixture seems very greasy after mixing, you can add an extra tablespoon or two of cookie crumbs to soak it up. You want it to look like wet sand, not a buttery pool.
This No-Bake Strawberry Tart is more than a recipe; it’s a little piece of kitchen magic. It proves that stunning desserts don’t require fancy skills or hours of work. They just need a few great ingredients and the willingness to try something simple and spectacular. So grab those Speculoos, pick the reddest strawberries you can find, and get ready for your new favorite dessert. Happy no-baking!
Equipment
- Plaque à tarte de 9 pouces
- Robot culinaire
- Spatule décalée
- Grands bols
- Fouet électrique
Ingredients
- 200 g biscuits Speculoos
- 80 g beurre non salé, fondu
- 250 g fromage mascarpone, froid
- 250 ml crème épaisse, froide
- 50 g sucre glace
- 1 cuillère à café extrait de vanille
- 500 g fraises, équeutées et tranchées
- 2 cuillères à soupe confiture d'abricot, tiédie pour le glaçage
Instructions
- Écrasez les biscuits Speculoos dans un sac de congélation ou un robot culinaire jusqu'à obtenir des miettes fines.
- Mélangez les miettes avec le beurre fondu jusqu'à ce qu'elles soient complètement enrobées.
- Appuyez sur le mélange de biscuits dans un moule à tarte de 9 pouces et mettez au congélateur pendant au moins 10 minutes.
- Dans un grand bol refroidi, fouettez la crème épaisse, le sucre glace et la vanille jusqu’à formation de pics mous.
- Ajoutez le fromage mascarpone à la crème fouettée et fouettez jusqu’à ce que le mélange soit épais et lisse.
- Étalez le mélange de mascarpone dans la croûte refroidie uniformément.
- Disposez les fraises tranchées sur le dessus en cercles concentriques.
- Passez les fraises à l'aide de confiture d'abricot tiède pour obtenir de la brillance, si désiré.
- Réfrigérez la tarte pendant au moins 4 heures avant de servir.
Notes
Nutrition

Hi, I’m Olivia Parker, the founder of BakingSecret.com and a lifelong lover of all things sweet and homemade. I grew up in a small town in Oregon, where the smell of fresh cookies in my family’s kitchen sparked my passion for baking. Over the years, I turned that passion into a mission: to help home bakers feel confident, inspired, and creative.
After studying food science and working in several artisan bakeries across the U.S., I decided to create a space where everyone from beginners to seasoned bakers can find reliable recipes, expert tips, and a warm, welcoming community. BakingSecret.com is my way of sharing the magic of baking with the world. When I’m not testing new recipes, you’ll find me exploring farmers’ markets, collecting vintage cookbooks, or perfecting my sourdough technique.