
Discover the Magic of Three Chocolate Mousse: A Heavenly Dessert
Imagine a dessert that combines the rich, velvety textures of three types of chocolate into one delightful mousse. This Three Chocolate Mousse is not just a treat; it’s a symphony of flavors that will make your taste buds sing. I first made this for a family gathering, and it was an instant hit, with everyone asking for seconds and even thirds!
The Story Behind the Three Chocolate Mousse
I remember the first time I tasted this Three Chocolate Mousse. It was at a friend’s birthday party, and I was instantly captivated by its smooth, creamy texture and the perfect balance of dark, milk, and white chocolate. This recipe has roots in traditional French patisserie, where the art of creating light, airy mousses is celebrated. Over the years, it has evolved, becoming a modern classic that can be easily adapted to suit different tastes and occasions.
Why You’ll Love This Recipe
This Three Chocolate Mousse is a true delight for chocolate lovers. The combination of semi-sweet, milk, and white chocolate creates a multi-layered flavor profile that is both rich and balanced. What’s more, it’s surprisingly simple to make, requiring just a few key ingredients and some basic kitchen skills. Whether you’re a seasoned baker or a beginner, you’ll find joy in creating this delectable dessert.
Perfect Occasions to Prepare This Recipe
This Three Chocolate Mousse is perfect for a variety of events, from casual family dinners to elegant dinner parties. It’s a standout dessert for birthdays, anniversaries, and any celebration where you want to impress. The beautiful layers and luxurious texture make it a showstopper on any table.
Ingredients
- 300g melted semi-sweet chocolate
- 3 boxes of cream (600g)
- 3 tablespoons unflavored gelatin powder
- 300g melted milk chocolate
- 300g melted white chocolate
Substitution Options
If you don’t have all the ingredients, here are some easy substitutions:
- You can use heavy cream instead of boxed cream.
- If you prefer, you can substitute the semi-sweet and milk chocolate with dark chocolate.
- For a nutty twist, add a tablespoon of hazelnut or almond extract to the white chocolate layer.
Preparation Section
Step 1: Prepare the Gelatin
In a small bowl, mix the gelatin powder with 3 tablespoons of cold water. Let it sit for about 5 minutes until it becomes spongy. While it’s blooming, you can start melting your chocolate.
Step 2: Melt the Chocolates
Melt the semi-sweet, milk, and white chocolates in three separate bowls using a double boiler or in the microwave. Stir each until smooth and set aside. The sweet aroma of melting chocolate will fill your kitchen, making it feel like a cozy, indulgent space.
Step 3: Whip the Cream
In a large mixing bowl, whip the cream until it forms soft peaks. Be careful not to overwhip, as this can make the mousse too stiff. The cream should be light and airy, ready to be folded into the chocolate.
Step 4: Combine the Ingredients
Divide the whipped cream into three equal parts. Fold one part into each melted chocolate, creating a smooth, uniform mixture. The colors will blend beautifully, creating a visual treat even before you taste it.
Step 5: Add the Gelatin
Gently fold the spongy gelatin into the semi-sweet chocolate mixture. This will help the mousse set and give it a luscious, creamy texture. Mix well to ensure the gelatin is fully incorporated.
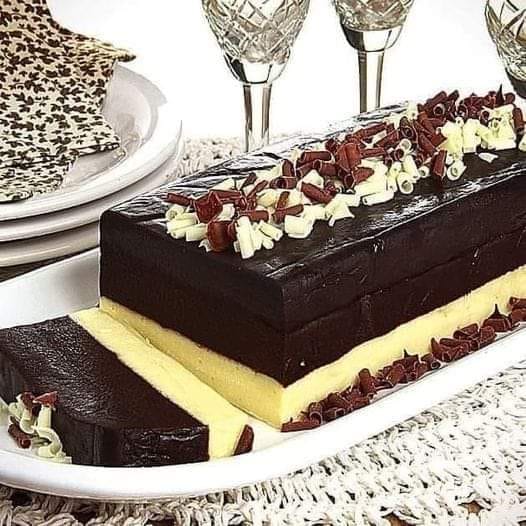
Step 6: Layer the Mousse
Pour the semi-sweet chocolate mousse into a large serving dish or individual ramekins. Repeat with the milk and white chocolate layers, carefully pouring them on top. The layers should be distinct but also blend slightly, creating a beautiful, swirled effect.
Step 7: Chill and Serve
Cover the Three Chocolate Mousse with plastic wrap and refrigerate for at least 2 hours, or until set. When ready to serve, garnish with fresh berries or a sprinkle of cocoa powder for an extra touch.
Chef’s Tip: Perfect Texture
To get the perfect texture, make sure the chocolate is warm but not hot when you mix it with the cream. This will help the mousse set smoothly and avoid any lumps.
Timing
– Prep Time: 20 minutes
– Cooking Time: 10 minutes (for melting the chocolate)
– Resting Time: 2 hours
– Total Time: 2 hours and 30 minutes
Chef’s Secret: Adding a Dash of Vanilla
A little vanilla extract can enhance the flavor of the mousse, especially in the white chocolate layer. Just a teaspoon will do wonders, adding a subtle, sweet note that complements the chocolate perfectly.
Extra Info
Did you know that white chocolate isn’t actually chocolate? It’s made from cocoa butter, sugar, and milk solids, but it doesn’t contain cocoa solids, which gives the typical chocolate its color and flavor. This makes it a great base for adding different flavors and extracts.
Necessary Equipment
– Double boiler or microwave-safe bowls
– Mixing bowls
– Electric mixer or whisk
– Measuring cups and spoons
– Ramekins or a large serving dish
– Plastic wrap
Storage
Store the Three Chocolate Mousse in the refrigerator, covered with plastic wrap, for up to 3 days. For longer storage, you can freeze it in an airtight container for up to 1 month. Thaw it in the refrigerator before serving to maintain its creamy texture.
Freezing the mousse is a great way to prepare it in advance and save it for special occasions. Just make sure to let it thaw slowly in the fridge to avoid any icy texture. If you’re planning to serve it at a party, you can also freeze it in individual portions, making it easy to grab and thaw as needed.
Tips and Advice
– Make sure all your ingredients are at room temperature before starting to mix.
– Use high-quality chocolate for the best flavor.
– Don’t overwhip the cream; it should be light and fluffy.
– If you want a smoother mousse, strain the chocolate mixture through a fine-mesh sieve before folding in the cream.
Presentation Tips
– Layer the mousse in clear glasses to showcase the beautiful layers.
– Top with fresh fruits like raspberries or strawberries for a pop of color.
– Dust with a bit of cocoa powder or a sprinkle of sea salt for a sophisticated touch.
Healthier Alternative Recipes
If you’re looking for healthier versions of this Three Chocolate Mousse, here are some ideas:
– **Avocado Chocolate Mousse**: Replace the cream with ripe avocados for a creamy, healthy twist.
– **Coconut Milk Chocolate Mousse**: Use coconut milk instead of cream for a dairy-free option.
– **Date-Sweetened Chocolate Mousse**: Sweeten the mousse with dates for a natural, less processed alternative.
– **Greek Yogurt Chocolate Mousse**: Substitute some of the cream with Greek yogurt for a lighter, protein-rich version.
– **Silken Tofu Chocolate Mousse**: Use silken tofu for a creamy, vegan-friendly option.
– **Almond Milk Chocolate Mousse**: Replace the cream with almond milk for a nutty, dairy-free variation.
Common Mistakes to Avoid
Mistake 1: Overmixing the Mousse
Overmixing can cause the mousse to become grainy and lose its light, airy texture. To avoid this, gently fold the whipped cream into the melted chocolate, being careful not to mix too vigorously. Pro Tip: Use a spatula to fold the cream in, lifting and turning the mixture gently to incorporate it evenly.
Mistake 2: Not Using the Right Type of Cream
Using low-fat or light cream can result in a mousse that doesn’t set properly. Stick to heavy cream or whipping cream, which has a higher fat content and helps the mousse achieve a smooth, creamy consistency. Pro Tip: Check the label to ensure it contains at least 35% fat.
Mistake 3: Neglecting to Chill the Mousse
Skipping the chilling step can lead to a runny, unappetizing mousse. Make sure to chill the mousse for at least 2 hours, or until it’s set. This allows the gelatin to firm up and the flavors to meld together. Pro Tip: For a firmer set, you can chill it for up to 4 hours.
Mistake 4: Using Low-Quality Chocolate
Using inferior chocolate can ruin the flavor and texture of your mousse. Opt for high-quality, real chocolate with a high cocoa content. This will ensure a rich, smooth, and delicious result. Pro Tip: Look for chocolate bars with a high percentage of cocoa, such as 70% or higher for the best flavor.
Mistake 5: Not Letting the Gelatin Bloom
Failing to let the gelatin bloom can result in a lumpy mousse. Always let the gelatin sit in cold water for a few minutes until it becomes spongy before adding it to the chocolate. Pro Tip: Use a fork to break up any clumps before adding it to the chocolate to ensure a smooth mixture.
FAQ
Can I use a different type of cream?
Yes, you can use heavy cream or whipping cream instead of boxed cream. Just make sure it has a high enough fat content (at least 35%) to help the mousse set properly.
Is this recipe suitable for a lactose-intolerant diet?
While the original recipe uses cream, you can substitute it with coconut milk or almond milk to make it lactose-free. Just be aware that the texture might be slightly different.
How long does the mousse need to chill?
The mousse needs to chill in the refrigerator for at least 2 hours, or until it’s set. For a firmer set, you can chill it for up to 4 hours.
Can I make this recipe ahead of time?
Absolutely! You can make the mousse up to a day in advance and store it in the refrigerator. Just cover it with plastic wrap to prevent it from drying out.
What if I don’t have gelatin?
If you don’t have gelatin, you can use agar-agar, a plant-based alternative, in the same amount. Just make sure to follow the instructions on the package for proper hydration.
Can I use a different type of chocolate?
Sure! You can experiment with different types of chocolate, such as dark chocolate or even flavored chocolates like orange or raspberry. Just keep in mind that the flavor profile will change slightly.
How do I make the mousse layers distinct?
To make the layers distinct, pour each layer carefully and gently. You can also use a spoon to create a clear separation between the layers. Make sure each layer is cool and slightly set before adding the next.
Can I add other flavors to the mousse?
Yes, you can add a dash of vanilla extract, a pinch of cinnamon, or a tablespoon of your favorite liqueur to the mousse for extra flavor. Be creative and experiment with different combinations!
What if my mousse is too thick?
If your mousse is too thick, you can add a little more whipped cream to thin it out. Start with a small amount and mix gently until you achieve the desired consistency.
Can I make this recipe without a double boiler?
Yes, you can melt the chocolate in the microwave. Just heat it in short intervals, stirring between each, to prevent burning. Be careful not to overheat the chocolate.
Is this recipe kid-friendly?
Definitely! Kids love the rich, creamy texture and the layers of different chocolates. It’s a fun and delicious treat for all ages.
Enjoy making and sharing this Three Chocolate Mousse with your loved ones. It’s not just a dessert; it’s a delightful experience that brings people together. And if you’re looking for more delightful treats, check out our other dessert recipes for more inspiration. Happy cooking!
Equipment
- Double boiler or microwave-safe bowls
- Mixing bowls
- Electric mixer or whisk
- Ramekins or a large serving dish
- Plastic wrap
Ingredients
- 300 g semi-sweet chocolate melted
- 600 g cream 3 boxes
- 3 tbsp unflavored gelatin powder
- 300 g milk chocolate melted
- 300 g white chocolate melted
Instructions
- In a small bowl, mix the gelatin powder with 3 tablespoons of cold water and let it sit for about 5 minutes until it becomes spongy.
- Melt the semi-sweet, milk, and white chocolates in three separate bowls using a double boiler or microwave, stirring until smooth and setting aside.
- In a large mixing bowl, whip the cream until it forms soft peaks, being careful not to overwhip.
- Divide the whipped cream into three equal parts and fold one part into each melted chocolate.
- Gently fold the spongy gelatin into the semi-sweet chocolate mixture until fully incorporated.
- Pour the semi-sweet chocolate mousse into a serving dish or ramekins, repeating with the milk and white chocolate layers.
- Cover with plastic wrap and refrigerate for at least 2 hours, or until set. Garnish with fresh berries or cocoa powder before serving.
Notes
Nutrition

Hi, I’m Olivia Parker, the founder of BakingSecret.com and a lifelong lover of all things sweet and homemade. I grew up in a small town in Oregon, where the smell of fresh cookies in my family’s kitchen sparked my passion for baking. Over the years, I turned that passion into a mission: to help home bakers feel confident, inspired, and creative.
After studying food science and working in several artisan bakeries across the U.S., I decided to create a space where everyone from beginners to seasoned bakers can find reliable recipes, expert tips, and a warm, welcoming community. BakingSecret.com is my way of sharing the magic of baking with the world. When I’m not testing new recipes, you’ll find me exploring farmers’ markets, collecting vintage cookbooks, or perfecting my sourdough technique.