
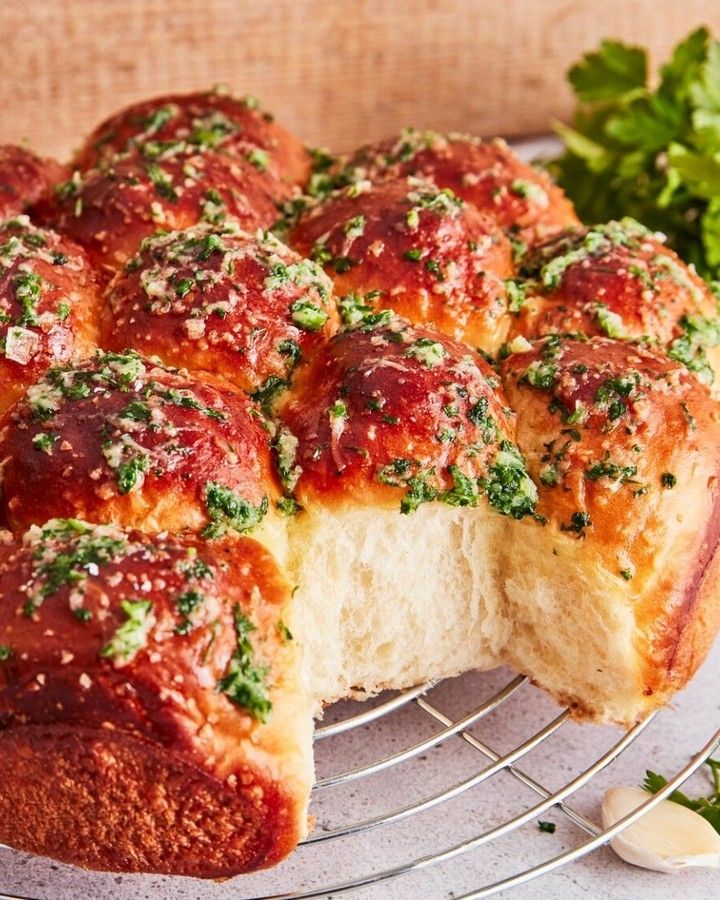
Get Ready to Savor the Irresistible Aroma of Garlic Buttermilk Buns!
Imagine stepping into your kitchen and being greeted by the warm, inviting scent of freshly baked garlic buttermilk buns. These delightful treats are not just any ordinary buns; they are a perfect blend of creamy buttermilk, rich garlic, and a hint of herbs that will make your taste buds dance with joy. I first tried this recipe at a friend’s potluck, and it was love at first bite. Since then, I’ve perfected it, and every time I bake them, my family and friends can’t get enough.
The Story Behind Garlic Buttermilk Buns
Garlic buttermilk buns have a rich history that dates back to traditional baking in many cultures. In the past, buttermilk was a common ingredient in many households, often used as a way to add a tangy flavor and a tender texture to baked goods. Over time, the addition of garlic and herbs has made these buns a modern favorite. The combination of the creamy buttermilk and the aromatic garlic creates a unique and delicious flavor profile that is hard to resist. Whether you’re enjoying them as a side dish or as a snack, these buns are a testament to how simple ingredients can create something truly special.
Why You’ll Love This Recipe
One of the best things about this recipe is its simplicity. With just a few key ingredients, you can create buns that are not only flavorful but also have a soft, pillowy texture. The buttermilk adds a subtle tang, while the garlic and herbs bring a burst of flavor. Plus, the aroma of these buns baking in your oven is simply heavenly. It’s a recipe that’s easy to follow, and the results are always impressive, making it a go-to for both novice and experienced bakers.
Perfect Occasions to Prepare Garlic Buttermilk Buns
These garlic buttermilk buns are versatile and can be a hit at various occasions. They are perfect as a side dish for a cozy family dinner, a must-have for holiday feasts, and a crowd-pleaser at potlucks and parties. Their rich, savory flavor complements a wide range of dishes, from hearty stews to light salads. Whether you’re hosting a gathering or just looking for a comforting treat, these buns are sure to be a favorite.
Ingredients for 15 Pieces
- For the Dough:
- 280 ml cold buttermilk
- 460 g wheat flour (Type 550)
- 50 g sugar
- 1 tsp salt
- 1 tsp dry yeast
- 2 eggs (size M)
- 45 g soft butter
- Apart from That:
- Salt flakes for sprinkling
- Some flat-leaf parsley (approx. 2 tbsp, finely chopped)
- 4 cloves of garlic
- 30 g soft butter
- tsp salt
- Some flour to work with
- Some softened butter for the mold
Substitution Options
If you don’t have all the ingredients on hand, here are some substitutions you can use:
- Buttermilk: If you don’t have buttermilk, you can make a substitute by adding 1 tablespoon of lemon juice or white vinegar to 1 cup of milk and letting it sit for 5 minutes.
- Flour: While wheat flour Type 550 is ideal, you can use all-purpose flour if needed. Just keep in mind that the texture might be slightly different.
- Butter: Margarine can be used as a substitute for butter, but it will change the flavor slightly.
Preparation
Step 1: Create the Flour Cooking Piece
Start by combining 180 ml of buttermilk and 35 g of flour in a small saucepan. Stir the mixture until it’s smooth using a whisk. Heat the mixture over medium heat, stirring constantly, until it thickens and has a mashed potato-like consistency, which should take about 3-5 minutes. This step is crucial as it helps to develop the gluten and gives the buns their signature texture.
Step 2: Cool the Flour Cooking Piece
Once the flour cooking piece is ready, transfer it to a small bowl. Cover the bowl with cling film, making sure the film is touching the surface of the cooking piece to prevent a skin from forming. Allow it to cool completely. This step is important because adding hot ingredients to the dough can kill the yeast and affect the rise of the buns.
Step 3: Mix the Dry Ingredients
In a mixing bowl, combine 425 g of flour, sugar, salt, and yeast. Separate one egg, keeping the yolk and the white separate. Add the cooled flour cooking piece, 100 ml of cold buttermilk, one whole egg, one egg yolk, and the soft butter to the mixing bowl. Knead all the ingredients on low speed with the dough hook of a stand mixer until no more flour is visible. This initial mixing helps to incorporate all the ingredients evenly.
Step 4: Knead the Dough
Increase the speed to medium and continue kneading for about 8-10 minutes until you have a very smooth, elastic dough that is still a little sticky. Don’t be tempted to add more flour; the slight stickiness is normal and will help the dough rise beautifully. If some of the dough sticks to the edge of the bowl, scrape it down with a dough card. The dough should feel supple and bouncy when it’s ready.
Timing
To make these garlic buttermilk buns, you’ll need about 2 hours from start to finish. This includes:
- Prep Time: 30 minutes
- Cooking Time: 20 minutes
- Resting Time: 1 hour 10 minutes (including rising times)
- Total Time: 2 hours 10 minutes
Chef’s Secret
One of my secret tips for making these buns extra special is to let the dough rest in the refrigerator overnight. This slow fermentation enhances the flavor and texture of the buns, making them even more delectable. Give it a try; you won’t be disappointed!
Extra Info
Did you know that buttermilk was originally a byproduct of churning butter? Traditional buttermilk is the liquid left after churning, which is why it has a tangy flavor. Modern buttermilk is made by adding lactic acid bacteria to milk, but it still retains that unique, creamy texture that makes it perfect for baking.
Necessary Equipment
To make these garlic buttermilk buns, you’ll need the following equipment:
- Stand mixer with a dough hook
- Small saucepan
- Mixing bowls
- Dough card
- Baking mold (buttered or lined with parchment paper)
- Oven
Storage
Storing these buns is easy. Once they are cooled, place them in an airtight container at room temperature. They will stay fresh for up to 3 days. If you want to extend their shelf life, you can store them in the refrigerator for up to a week. For long-term storage, you can freeze the buns. Simply wrap them in plastic wrap and place them in a freezer bag. They will last for up to 3 months in the freezer. When you’re ready to enjoy them, let them thaw at room temperature or reheat them in the oven for a few minutes.
Tips and Advice
To make your garlic buttermilk buns even better, here are a few tips:
- Use Room Temperature Butter: Soft butter mixes more easily into the dough, resulting in a smoother and more uniform texture.
- Don’t Over-Knead: Over-kneading can lead to a tough and chewy texture. Stop kneading once the dough is smooth and elastic.
- Let the Dough Rest: Allowing the dough to rest and rise properly is key to achieving light and fluffy buns. Be patient and let the yeast do its magic.
Presentation Tips
When it comes to presenting these buns, there are a few ideas to make them look extra special:
- Herb Garnish: Sprinkle some finely chopped parsley or chives on top of the buns before serving.
- Garlic Butter Spread: Melt some garlic butter and brush it over the buns for a glossy, golden finish.
- Serving Board: Arrange the buns on a rustic wooden board and serve with a side of softened butter or a dip of your choice.
Healthier Alternative Recipes
If you’re looking for some healthier variations of these buns, here are six options you might enjoy:
- Whole Wheat Garlic Buns: Replace half of the all-purpose flour with whole wheat flour for added fiber and a nuttier flavor.
- Herb-Infused Olive Oil Buns: Use olive oil instead of butter and add a mix of fresh herbs like rosemary, thyme, and oregano for a Mediterranean twist.
- Greek Yogurt Garlic Buns: Substitute some of the buttermilk with Greek yogurt for a tangy and creamy texture.
- Chia Seed Garlic Buns: Add a tablespoon of chia seeds to the dough for a boost of omega-3 fatty acids and a slight crunch.
- Kale and Garlic Buns: Fold in some finely chopped kale for a nutrient-packed, vibrant green bun.
- Quinoa Garlic Buns: Mix in some cooked quinoa for a protein-rich, textured bun that’s both hearty and healthy.
These variations offer a great way to enjoy the flavors of garlic and buttermilk while incorporating some healthier ingredients. Experiment and find the one that suits your taste and dietary preferences.
Common Mistakes to Avoid
Mistake 1: Using Warm Buttermilk
Using warm buttermilk instead of cold can activate the yeast prematurely, leading to a less effective rise and a denser texture. Always use cold buttermilk to maintain the right temperature for the yeast to work properly.
Mistake 2: Over-Kneading the Dough
Over-kneading the dough can result in a tough and chewy texture. Knead the dough until it’s smooth and elastic, but still a bit sticky. This will ensure that the buns are light and airy.
Mistake 3: Not Letting the Dough Rise Properly
Skipping or rushing the rising process can lead to flat and dense buns. Make sure to let the dough rise in a warm, draft-free area until it doubles in size. This step is crucial for achieving the perfect texture.
Mistake 4: Adding Too Much Flour
Addition of too much flour can make the dough too dry and tough. If the dough is a bit sticky, that’s okay. Resist the urge to add more flour, as the slight stickiness contributes to the buns’ soft and pillowy texture.
Mistake 5: Not Preheating the Oven
Not preheating the oven can result in uneven baking and a less desirable texture. Always preheat your oven to the specified temperature before placing the buns inside. This ensures that they bake evenly and come out perfectly golden.
By avoiding these common mistakes, you’ll be well on your way to creating the perfect batch of garlic buttermilk buns. Happy baking!
FAQ
Can I use regular milk instead of buttermilk?
Yes, you can use regular milk, but the flavor and texture will be slightly different. To make a buttermilk substitute, add 1 tablespoon of lemon juice or white vinegar to 280 ml of milk and let it sit for 5 minutes before using it in the recipe.
What type of flour is best for these buns?
Wheat flour Type 550 is ideal for this recipe, but you can use all-purpose flour as a substitute. Just keep in mind that the texture might be slightly different.
How long should I let the dough rise?
You should let the dough rise until it doubles in size, which usually takes about 1 hour. The exact time can vary depending on the temperature and conditions in your kitchen.
Can I make these buns without a stand mixer?
Yes, you can make these buns without a stand mixer. Knead the dough by hand on a floured surface until it’s smooth and elastic. This might take a bit longer, but it’s definitely possible.
Can I add other herbs besides parsley?
Absolutely! You can add other herbs like rosemary, thyme, or chives to give the buns a different flavor profile. Just make sure to chop them finely and sprinkle them over the buns before baking.
How do I store leftover buns?
Store the buns in an airtight container at room temperature for up to 3 days. For longer storage, you can refrigerate them for up to a week or freeze them for up to 3 months. When you’re ready to enjoy them, let them thaw at room temperature or reheat them in the oven.
Can I use margarine instead of butter?
Yes, you can use margarine as a substitute for butter. However, the flavor and texture might be slightly different. Butter adds a rich, creamy flavor that margarine doesn’t quite match.
What is the purpose of the flour cooking piece?
The flour cooking piece, also known as a tangzhong, helps to develop the gluten in the dough and gives the buns a softer, more tender texture. It also helps the buns stay fresher for a longer period.
Can I make the dough ahead of time?
Yes, you can make the dough ahead of time and let it rest in the refrigerator overnight. This slow fermentation enhances the flavor and texture of the buns, making them even more delectable.
Are these buns suitable for vegetarians?
Yes, these buns are suitable for vegetarians. They do not contain any meat or animal-derived products other than the eggs and butter, which are acceptable in most vegetarian diets.
If you loved this recipe, you might also enjoy our other sweet and savory breads, like the stuffed mozzarella pretzels or the cinnamon apple bites. And if you’re a fan of cornbread, don’t miss our honey butter cornbread. Each of these recipes is a delightful addition to your baking repertoire.
Happy baking, and I hope you enjoy these garlic buttermilk buns as much as I do. Remember, the key to a delicious and nutritious meal is mindful food preparation. Enjoy the process and savor the delicious results!
Equipment
- Stand mixer with a dough hook
- Small saucepan
- Mixing bowls
- Dough card
- Baking mold (buttered or lined with parchment paper)
Ingredients
- 280 ml cold buttermilk
- 460 g wheat flour (Type 550)
- 50 g sugar
- 1 tsp salt
- 1 tsp dry yeast
- 45 g soft butter
- Some flat-leaf parsley (approx. 2 tbsp, finely chopped)
- 4 cloves of garlic
- 30 g soft butter (for garlic mixture)
- 1 tsp salt (for garlic mixture)
- Some flour to work with
- Some softened butter for the mold
Instructions
- Combine 180 ml of buttermilk and 35 g of flour in a small saucepan and stir until smooth, then heat until thickened like mashed potatoes.
- Transfer the flour mixture to a bowl, cover with cling film, and let it cool completely.
- In a mixing bowl, combine 425 g of flour, sugar, salt, and yeast; add cooled flour mixture, 100 ml cold buttermilk, one whole egg, one egg yolk, and butter.
- Knead the mixture on low speed until no more flour is visible.
- Increase speed to medium and knead for 8-10 minutes until you have a smooth, elastic dough.
Notes
Nutrition

Hi, I’m Olivia Parker, the founder of BakingSecret.com and a lifelong lover of all things sweet and homemade. I grew up in a small town in Oregon, where the smell of fresh cookies in my family’s kitchen sparked my passion for baking. Over the years, I turned that passion into a mission: to help home bakers feel confident, inspired, and creative.
After studying food science and working in several artisan bakeries across the U.S., I decided to create a space where everyone from beginners to seasoned bakers can find reliable recipes, expert tips, and a warm, welcoming community. BakingSecret.com is my way of sharing the magic of baking with the world. When I’m not testing new recipes, you’ll find me exploring farmers’ markets, collecting vintage cookbooks, or perfecting my sourdough technique.