
Introduction: The Joy of No Bake Peanut Butter Cheesecake
Last summer, my oven decided to quit working on the hottest day of July. I had promised my kids a special dessert for their backyard movie night. That’s when I discovered the magic of no bake peanut butter cheesecake. I threw together what I had in my pantry, crossed my fingers, and popped it in the fridge. Three hours later, I served what became our family’s most requested dessert. No broken oven needed.
A no bake peanut butter cheesecake is exactly what it sounds like. It’s a rich, creamy dessert that combines the smooth taste of peanut butter with tangy cream cheese. You mix everything together, pour it into a crust, and let your refrigerator do all the work. No preheating. No watching through the oven door. No risk of burning the edges.
This dessert has saved me more times than I can count. Birthday parties in August when turning on the oven feels like torture. Last-minute potluck invitations. Those days when I want something sweet but can’t stand the thought of heating up my kitchen. It works every single time.
The best part? You can make this recipe your own. Try a no bake peanut butter cheesecake with oreo crust if you love chocolate. Cut it into no bake peanut butter cheesecake bars for easier serving at parties. Switch up the crust with a no bake peanut butter cheesecake with graham cracker crust for a classic taste. The base recipe stays the same. You just pick your favorite twist.
I’ve served this dessert to picky eaters, health-conscious friends, and complete strangers at church gatherings. Everyone asks for the recipe. Some people even refuse to believe I didn’t bake it. The texture is that good.
Why Choose No Bake Peanut Butter Cheesecake?
Making desserts shouldn’t feel like running a marathon. Traditional baked cheesecakes require water baths, specific temperatures, and careful timing. One wrong move and you get cracks across the top or a soggy bottom. I’ve been there. I’ve made those mistakes. That’s why I love the no bake version so much more.
Time is the biggest advantage. Most baked cheesecakes need an hour in the oven plus cooling time. My no bake cheesecake takes about 15 minutes of actual work. The rest is just waiting for it to set in the fridge. I can make it in the morning before work and have it ready by dinner. I can make it during naptime and serve it after dinner. The flexibility is amazing.
Your kitchen stays cool. This matters more than you might think. During summer months, running an oven for an hour can raise your home’s temperature by several degrees. Your air conditioner works harder. Your energy bill goes up. Making a no bake peanut butter cheesecake keeps your kitchen comfortable and your utility costs down.
Beginner bakers love this recipe because it’s nearly impossible to mess up. You don’t need to worry about oven temperatures or baking times. You can’t overbake it or underbake it. The most complicated step is mixing ingredients until they’re smooth. If you can use a hand mixer or stir vigorously with a spoon, you can make this dessert.
The taste is what keeps people coming back. Peanut butter and cream cheese create this incredible combination. The peanut butter adds a nutty sweetness and creamy texture. The cream cheese brings tang and richness. Together, they balance each other perfectly. It’s not too sweet. It’s not too heavy. It sits right in that perfect middle zone.
My nephew hates most desserts. He says they’re too sugary or too boring. But he eats two slices of this cheesecake every time I make it. My friend who follows a no bake peanut butter cheesecake keto version loves that she can adjust the recipe to fit her diet. My mother-in-law, who has been baking for 40 years, admits this tastes just as good as her traditional baked version.
The texture deserves its own paragraph. When you cut into a properly set no bake peanut butter cheesecake, the knife slides through like butter. The filling is dense but not heavy. Creamy but not runny. It holds its shape on the plate. Each bite melts on your tongue. You get that satisfying cheesecake experience without any of the typical pitfalls.
Kids can help make this dessert. My daughter loves crushing graham crackers for the crust. My son enjoys mixing the filling. They feel proud serving something they helped create. Traditional baked cheesecakes require hot ovens and delicate handling. This version is safe for little hands to help with almost every step.
Party planning becomes easier with no bake peanut butter cheesecake bars. You can make them days in advance. They slice cleanly. Guests can grab one and keep mingling. No plates needed if you use paper cups or napkins. I’ve brought these to office parties, school functions, and neighborhood cookouts. They transport well and always disappear first.
You have options for dietary needs too. A no bake peanut butter cheesecake without cool whip uses heavy cream instead. This makes it more natural and less processed. Looking for something quick? Try a jello no bake peanut butter cheesecake mix as your starting point. Need it sweeter and richer? A no bake peanut butter cheesecake with sweetened condensed milk delivers extra creaminess.
The recipe scales beautifully. Make a small version for two people. Double it for a crowd. Use different pan sizes to change the thickness. I’ve made thin versions that serve 16 people and thick versions that serve 8. Both work perfectly. You just adjust the chilling time slightly.
Storage is simple. Cover it with plastic wrap and keep it in the fridge. It stays fresh for up to five days. The texture actually improves after the first day as the flavors blend together. I often make mine two days before I plan to serve it. This makes entertaining stress-free since one major item is already done.
Looking through sites like peanut butter cheesecake allrecipes, you’ll find hundreds of variations. Some add chocolate chips. Others swirl in jelly. You can top it with whipped cream, chopped peanuts, or chocolate sauce. The basic recipe is your canvas. You paint it however you want.
Cost matters for most of us. This dessert uses simple ingredients you probably already have. Cream cheese, peanut butter, sugar, and a crust. Maybe some vanilla extract. That’s it for the basic version. You’re not buying special equipment or exotic ingredients. A 9-inch cheesecake costs me about $8 to make. Compare that to $6 per slice at most restaurants.

How to Make No Bake Peanut Butter Cheesecake
Now that you know why this dessert works so well, let’s get into the actual making part. I promise it’s easier than you think.
First thing you need is your crust. I usually go with a no bake peanut butter cheesecake with graham cracker crust because it’s what I grew up with. You’ll need about 2 cups of graham cracker crumbs. I buy the boxed crumbs to save time, but crushing whole crackers works just as well. My kids actually prefer crushing them in a ziplock bag with a rolling pin. It’s loud and messy, but they burn off energy while I prep other ingredients.
Mix those crumbs with 6 tablespoons of melted butter and 2 tablespoons of sugar. The mixture should look like wet sand. When you squeeze a handful, it should hold together. If it’s too dry, add another tablespoon of melted butter. Press this into the bottom of a 9-inch springform pan. I use the bottom of a measuring cup to really pack it down. You want it firm and even. Stick it in the fridge while you make the filling.
Here’s the thing though. If you want a no bake peanut butter cheesecake with oreo crust, just swap the graham crackers for about 24 Oreos. I don’t even remove the cream filling anymore. It adds extra sweetness and makes the crust darker. Pulse them in a food processor until they’re fine crumbs, then mix with 5 tablespoons of melted butter. You need less butter because Oreos already have fat in them.
Now for the star of the show. The filling for your no bake peanut butter cheesecake starts with cream cheese. Use 16 ounces, which is two of those standard blocks. Let them sit at room temperature for at least 30 minutes before you start. This is crucial. Cold cream cheese creates lumps no matter how much you mix it. I learned this the hard way at my sister’s baby shower. Lumpy cheesecake isn’t cute.
Beat that softened cream cheese with an electric mixer for about 2 minutes. You want it completely smooth and fluffy. Then add 1 cup of creamy peanut butter. Not the natural kind that separates. Use the regular stuff like Jif or Skippy. The natural versions are too oily and don’t set properly. I tried it once thinking I’d be healthier. The cheesecake never firmed up. It was basically peanut butter soup on a crust.
Add 1 cup of powdered sugar and 1 teaspoon of vanilla extract. Beat everything together until it’s perfectly combined. Scrape down the sides of your bowl a few times. Little pockets of unmixed cream cheese love to hide there.
Next comes the part that gives it that light, airy texture. You need to fold in whipped topping. I typically use an 8-ounce container of Cool Whip because it’s convenient. But if you’re making a no bake peanut butter cheesecake without cool whip, just whip 1 cup of heavy cream with 2 tablespoons of sugar until stiff peaks form. The homemade whipped cream version tastes cleaner and less artificial. My mother-in-law can tell the difference immediately.
Folding is different from mixing. Use a rubber spatula and gently scoop from the bottom up and over the top. Rotate your bowl as you go. You want to keep as much air in the mixture as possible. If you just stir it vigorously, you’ll deflate everything and end up with a dense, heavy cheesecake. Take your time here. It should take about a minute of gentle folding.
Pour this gorgeous filling over your chilled crust. Smooth the top with a spatula. I like to make little swirls on top for texture. Cover it tightly with plastic wrap and refrigerate for at least 4 hours. Overnight is even better. The flavors meld together and the texture becomes perfectly firm.
When you’re ready to serve it, run a knife under hot water before slicing. Wipe the knife clean between each cut. This gives you those beautiful, clean slices that look like they came from a bakery. I learned this trick from my neighbor who used to work at Cheesecake Factory.
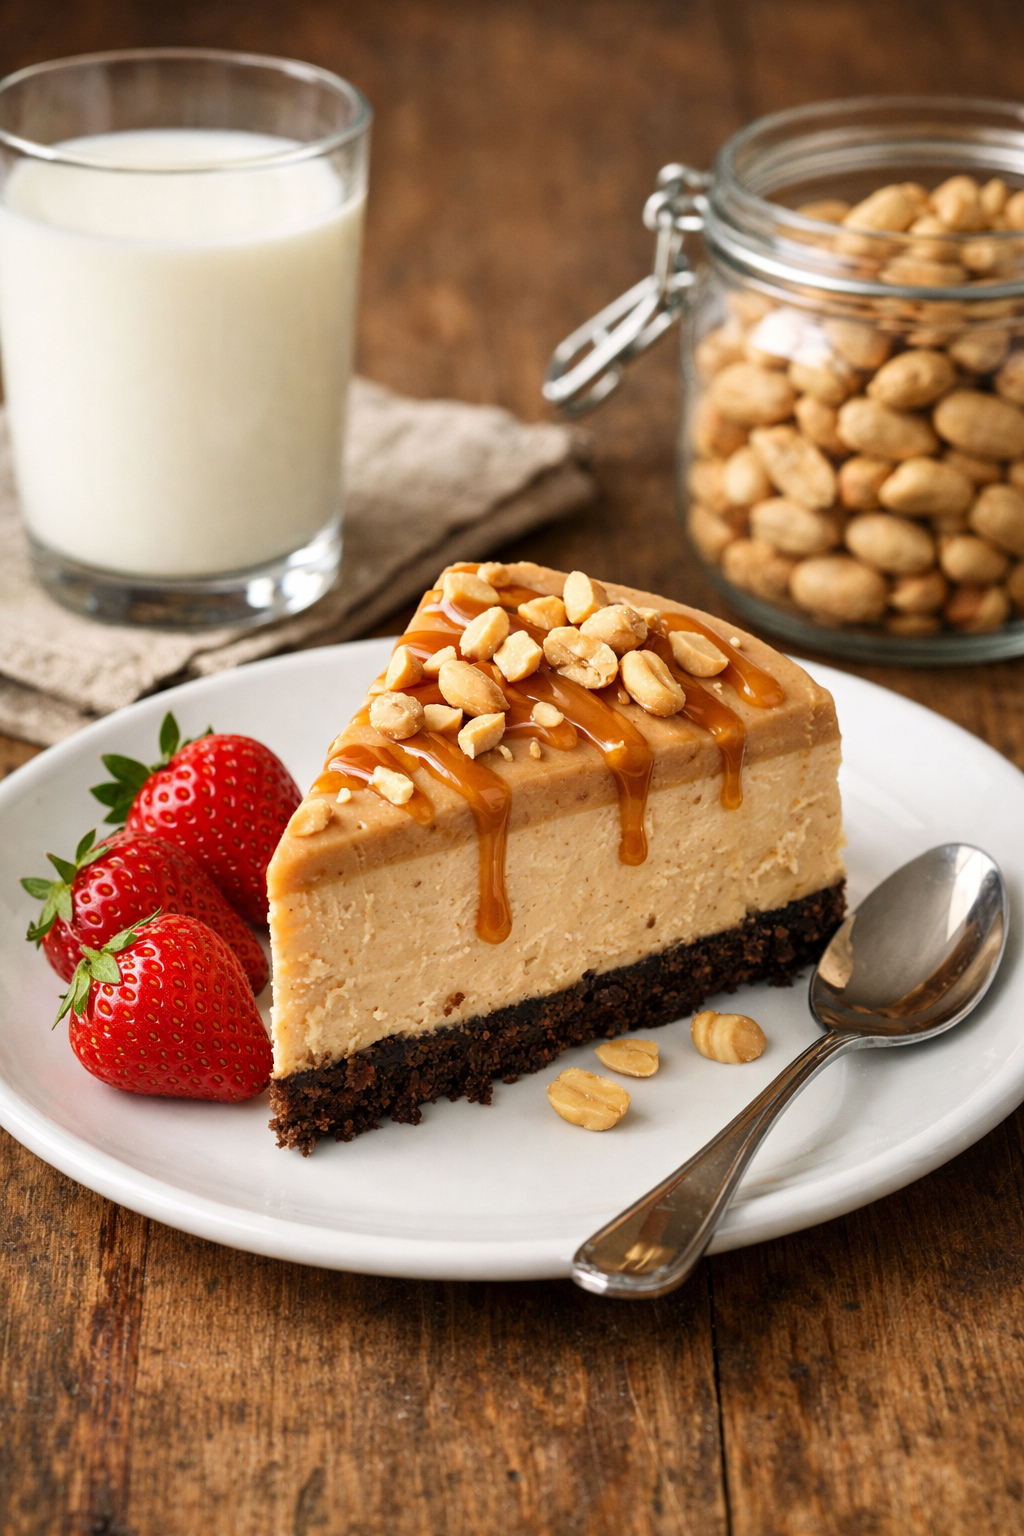
Funny enough, the garnishes and toppings matter more than I thought they would. A plain cheesecake tastes amazing, but adding something on top makes it look professional. I usually drizzle melted peanut butter and chocolate sauce in a crosshatch pattern. Takes 2 minutes and makes everyone think I spent hours decorating.
Chopped peanuts around the edge add crunch. Mini peanut butter cups pressed into the top make kids go crazy. A dollop of whipped cream with a drizzle of honey looks elegant for dinner parties. The possibilities go on forever. Last Thanksgiving, I pressed crushed pretzels on top for a sweet-and-salty situation that had people talking for weeks.
Variations and Substitutions for Your No Bake Cheesecake
Once you master the basic recipe, the fun really starts. I’ve probably made 20 different versions at this point.
The jello no bake peanut butter cheesecake mix is great if you’re completely new to this. Jello makes a boxed version that you just add milk to and mix. It’s not quite as rich as homemade, but it works in a pinch. I keep a box in my pantry for emergencies. My cousin brought one to a camping trip last summer because it required zero skill and minimal supplies.
For those following specific diets, a no bake peanut butter cheesecake keto version is totally doable. Swap the powdered sugar for powdered erythritol or monk fruit sweetener. Use full-fat cream cheese and natural peanut butter without added sugar. The crust needs to be almond flour based instead of graham crackers. Mix 2 cups of almond flour with 6 tablespoons of melted butter and 2 tablespoons of your keto sweetener. My friend Sarah makes this every week and swears it satisfies her sweet tooth without kicking her out of ketosis. If you’re interested in other dietary-friendly options, check out this dairy free cheesecake for more ideas.
The no bake peanut butter cheesecake with sweetened condensed milk version is insanely rich. You replace the powdered sugar with about 3/4 cup of sweetened condensed milk. This makes it denser and sweeter. It’s almost like a peanut butter fudge in cheesecake form. I only make this version for special occasions because it’s so decadent. My dad requests it every Father’s Day.
By the way, making no bake peanut butter cheesecake bars is just using a 9×13 pan instead of a round springform. Everything else stays the same. I double the crust recipe to make sure it covers the whole bottom. These bars are perfect for potlucks because you can cut them into small squares and serve way more people. I’ve gotten 24 servings from one pan before.
Want a chocolate version? Use chocolate graham crackers or a full Oreo crust. Add 1/4 cup of cocoa powder to your filling along with the other ingredients. Top it with chocolate ganache made from melted chocolate chips and heavy cream. This version reminds me of those cookies and cream cheesecake recipes, but with peanut butter instead.
I experimented with adding chocolate chips once. Folded in about 1/2 cup of mini chocolate chips right before spreading the filling into the crust. It worked beautifully. Every bite had little bursts of chocolate. My nephew said it tasted like a Reese’s cup in cheesecake form. That’s basically the highest compliment a 12-year-old can give.
Caramel sauce is another game-changer. Drizzle it over the top right before serving, or swirl it into the filling for a marbled effect. I use store-bought caramel because making it from scratch stresses me out. Nobody has ever complained about that shortcut.
For people avoiding gluten, the no bake peanut butter cheesecake filling is naturally gluten-free already. You just need to fix the crust situation. Use gluten-free graham crackers or make a crust from crushed gluten-free cookies. Almond flour crust works great too. I’ve served this to my friend with celiac disease multiple times without any issues. There’s more information about this in my gluten free cheesecake recipe post if you need specifics.
Some people like adding jam or jelly for contrast. Spread a thin layer of raspberry or strawberry jam over the crust before adding the filling. Or swirl it into the top of the filling with a knife for a pretty pattern. The tartness of the jam cuts through the richness of the peanut butter. It’s similar to how fruit brightens up desserts like lemon blueberry cheesecake cake.
The no bake peanut butter cheesecake tasty version I saw online uses Nutter Butter cookies for the crust. Talk about peanut butter overload. My son made this for his birthday last year. Every single layer had peanut butter in it. His friends absolutely demolished it.
Honestly, the beauty of this dessert is how forgiving it is. You can adjust sweetness levels. Change up textures. Add mix-ins. Use different crusts. Every single version I’ve tried has worked. Some I liked better than others, but none were failures. That’s rare in baking.
Serving and Storing Your No Bake Peanut Butter Cheesecake
Alright, so you’ve made this beautiful no bake peanut butter cheesecake and it’s been chilling in your fridge for hours. Now comes the part that actually intimidated me when I first started making cheesecakes. How do you cut it without making a mess? How do you make it look as good as it tastes?
First thing, give yourself enough chilling time. I know I mentioned 4 hours minimum earlier, but honestly, overnight is when this dessert really hits its stride. The texture firms up completely. The flavors develop depth. I’ve served it after just 4 hours and it was fine, but that extra time makes a noticeable difference. Plan ahead if you can.
When you’re ready to serve, fill a tall glass with hot water. Dip your knife in, let it sit for about 10 seconds, then wipe it completely dry with a clean towel. Make your first cut. Before the second cut, repeat the whole process. Hot knife, wipe dry, cut. It seems tedious, but this is the secret to those Instagram-worthy slices. Cold cheesecake sticks to cold knives. The heat releases it cleanly.
If you’re using a springform pan, run that hot knife around the edge first before releasing the spring. I once skipped this step and half my cheesecake stuck to the sides of the pan. My husband still brings it up at family gatherings. Not my finest moment.
For presentation, I like serving each slice on a small dessert plate with a fork on the side. Simple works. But if you’re trying to impress someone, add a small dollop of whipped cream, a drizzle of chocolate sauce, and maybe a few chopped peanuts right on the plate next to the slice. Takes 30 seconds and suddenly your dessert looks like it cost $12 at a restaurant.
Here’s something I didn’t realize until my third or fourth time making this. Room temperature matters for eating, not just for prep. If you serve the cheesecake straight from the fridge, it’s firm but almost too cold. The flavors are muted. Let it sit out for about 10-15 minutes before serving. The texture softens just slightly and all those peanut butter and cream cheese flavors come forward. My sister taught me this after she spent a summer working at a dessert shop.
For parties, I actually prefer making no bake peanut butter cheesecake bars these days. Cut them into squares, put each one in a paper cupcake liner, and arrange them on a platter. People can grab one easily. No plates needed. No knife required. I brought these to my office holiday party last year and they were gone in 15 minutes. Found out later that three people took extras and hid them in the break room fridge for later.
Storage is where this dessert really shines compared to other options. After you’ve cut what you need, just cover the remaining cheesecake tightly with plastic wrap. Press it directly onto the exposed surface to prevent it from drying out. Then cover the whole pan with another layer of plastic or aluminum foil. Stick it back in the fridge.
A properly stored no bake peanut butter cheesecake lasts up to 5 days in the refrigerator. I’ve actually had mine last 6 or 7 days and still taste great, but I usually tell people 5 days to be safe. The texture stays creamy. The crust doesn’t get soggy. Everything holds up remarkably well. This makes it perfect for meal prep desserts or making ahead for events.
The flavor actually improves over the first 48 hours. Something about the ingredients melding together creates a richer, more cohesive taste. Day three cheesecake hits different than day one cheesecake. Both are delicious, but there’s a depth that develops with time. My mother-in-law always makes hers three days before serving for this exact reason.
Freezing is totally an option too, and honestly, it changed how I approach entertaining. You can freeze the entire cheesecake or individual slices. I prefer slicing it first, then wrapping each piece individually in plastic wrap and placing them all in a freezer-safe container or bag. This way, I can pull out exactly how many servings I need without thawing the whole thing.
A frozen no bake peanut butter cheesecake lasts up to 3 months. I’ve tested this multiple times because I got overly ambitious one weekend and made four cheesecakes. We ate one fresh and froze the rest. Pulled out slices randomly over the next few months. Every single one tasted just as good as the day I made it.
To thaw, move frozen slices to the fridge and let them defrost overnight. Don’t use the microwave or leave them on the counter. Slow thawing in the refrigerator maintains that perfect texture. I learned this the hard way when I tried to speed-thaw a slice for an unexpected guest. It got weirdly watery and separated. Not cute.
Here’s a random trick I discovered by accident. Frozen cheesecake slices are actually amazing eaten semi-frozen. Like, let them thaw for just 30 minutes so they’re still cold and firm but not rock hard. It’s almost like peanut butter cheesecake ice cream. My kids prefer it this way during summer. I thought they were weird at first, but I tried it and now I get it.
If you’re bringing this dessert somewhere, transport it in the pan with the lid on or covered tightly. Keep it in a cooler with ice packs if you’re traveling more than 20 minutes. Cheesecake and heat don’t mix. I once brought one to a picnic without proper cooling and it turned into peanut butter soup by the time we were ready for dessert. Learn from my mistakes.
By the way, leftover crust crumbs from your no bake peanut butter cheesecake with graham cracker crust or Oreo version don’t need to go to waste. I keep them in a ziplock bag in the freezer. They’re perfect for sprinkling on top of ice cream or adding to a yogurt parfait. Waste not, want not, right?
One thing worth mentioning is that this dessert doesn’t do well sitting out at room temperature for extended periods. After about 2 hours, the cream cheese starts to get soft and the texture suffers. If you’re at a party or gathering, keep it refrigerated until right before you plan to serve it. I usually ask the host if I can store it in their fridge and bring it out when we’re ready for dessert. Most people appreciate that I’m being mindful of food safety, especially folks like my aunt who’s super careful about these things. Speaking of smart kitchen habits, sites like Healthline have great resources on time-saving cooking methods that don’t compromise food quality, which applies perfectly to make-ahead desserts like this one.
For holiday gatherings, I make my cheesecake two days early. Day one, I prep it and let it set overnight. Day two, I add any toppings or garnishes and let it sit another night. Day three, I serve it. This timeline has never failed me. Everything is completely set. Flavors are developed. I’m not stressed or rushed.
Individual serving cups are another presentation option I love. Instead of making one large cheesecake, divide the filling among 8-10 small cups or jars. Put a tablespoon of crust mixture in the bottom of each cup, add the filling, and chill. These are perfect for portion control and they look adorable at parties. I made these for my daughter’s birthday party and the kids went crazy for them. They felt like they each got their own special dessert.
The versatility of this dessert when it comes to storage and serving honestly makes it one of my top recommendations for anyone who wants to look like a baking genius without the stress. Whether you’re exploring more options from the collection of cheesecake recipes available or sticking with this peanut butter version, the techniques for serving and storing remain pretty consistent across all no-bake varieties.
Your cheesecake should bring joy, not anxiety. Master these serving and storage tips, and you’ll always have a show-stopping dessert ready whenever you need it.
Frequently Asked Questions About No Bake Peanut Butter Cheesecake
Can I use a different type of crust for no bake peanut butter cheesecake?
Absolutely. The crust is one of the most flexible parts of this recipe. Graham crackers are traditional, but you can use Oreos, vanilla wafers, Nutter Butters, gingersnaps, or even pretzels for a salty-sweet combination. For gluten-free versions, try almond flour mixed with melted butter and a bit of sweetener. The key is getting the right texture, which should look and feel like wet sand that holds together when pressed. Just maintain the same ratio of about 2 cups of crumbs to 5-6 tablespoons of melted butter.
Is there a way to make no bake peanut butter cheesecake without cool whip?
Yes, and it’s actually pretty easy. Replace the 8-ounce container of Cool Whip with 1 cup of heavy whipping cream. Add 2 tablespoons of sugar to the cream and beat it with a mixer until stiff peaks form. Then gently fold this homemade whipped cream into your peanut butter and cream cheese mixture exactly as you would with Cool Whip. The homemade version tastes cleaner and less artificial, though it does require a few extra minutes of work. I prefer this method when I’m serving the cheesecake to guests who appreciate natural ingredients.
How do I make a keto-friendly version of no bake peanut butter cheesecake?
Making a keto version requires just a few swaps. Replace regular powdered sugar with powdered erythritol, monk fruit sweetener, or your preferred keto sweetener in the same amount. Use natural peanut butter without added sugars. For the crust, mix 2 cups of almond flour with 6 tablespoons of melted butter and 2 tablespoons of keto sweetener. Make sure your cream cheese is full-fat, and use real whipped cream instead of Cool Whip if possible. These substitutions keep the carb count low while maintaining that creamy, rich texture that makes this dessert so satisfying.
What are some creative toppings for no bake peanut butter cheesecake?
The topping possibilities are endless and really let you customize the dessert. I love drizzling melted chocolate and peanut butter in a crosshatch pattern. Chopped Reese’s cups, crushed peanuts, or peanut butter chips add texture and visual appeal. For something fruity, try strawberry or raspberry sauce to cut through the richness. Caramel sauce, sea salt, mini chocolate chips, or even crumbled bacon for the adventurous work beautifully. You can also create layers by spreading jam or Nutella on top before adding whipped cream and nuts.
How long does no bake peanut butter cheesecake last in the fridge?
When properly stored, your cheesecake will stay fresh in the refrigerator for up to 5 days. Make sure to cover it tightly with plastic wrap pressed directly against any cut surfaces, then cover the entire pan with another layer of wrap or aluminum foil. The texture and flavor actually improve over the first two days as everything melds together. I’ve personally kept mine for 6 days and it was still delicious, but I recommend the 5-day guideline to be safe. The crust stays firm and the filling remains creamy throughout this time.
Can I freeze no bake peanut butter cheesecake?
Yes, this cheesecake freezes beautifully for up to 3 months. You can freeze the whole cheesecake or slice it first and freeze individual portions, which I prefer for convenience. Wrap each slice tightly in plastic wrap, then place them in a freezer-safe container or bag. To thaw, transfer frozen slices to the refrigerator and let them defrost overnight. Never thaw at room temperature or in the microwave, as this can make the texture watery and separated. Some people even enjoy eating it semi-frozen, which gives it an ice cream-like consistency.
Are there any no bake peanut butter cheesecake recipes on Allrecipes?
Yes, if you search for peanut butter cheesecake allrecipes, you’ll find numerous variations with user reviews and ratings. Allrecipes is a great resource because you can read through comments from people who’ve actually made the recipes and see what modifications they tried. Some versions use different sweeteners, add chocolate layers, or incorporate mix-ins like chocolate chips. The community aspect helps you troubleshoot potential issues before you even start. I often browse there when I’m looking for new twists on classic recipes like this one.
How do I make no bake peanut butter cheesecake bars?
Making bars instead of a round cheesecake is super simple. Just use a 9×13-inch pan instead of a springform pan. I recommend doubling the crust recipe to ensure full coverage of the larger bottom surface. Everything else stays exactly the same, you just press the crust into the rectangular pan, add the filling, smooth it out, and refrigerate. Once it’s set, cut it into squares or rectangles. These bars are perfect for parties because they’re easier to serve and transport, plus you get more servings from one batch.
What is the difference between no bake peanut butter cheesecake and regular baked cheesecake?
The main difference is obviously that one goes in the oven and one doesn’t. Baked cheesecakes have a denser, firmer texture with a slightly tangy flavor from the eggs that cook during baking. No bake versions are lighter and fluffier because they rely on whipped cream or Cool Whip for structure instead of eggs. No bake cheesecakes are faster, easier for beginners, keep your kitchen cool, and are nearly impossible to mess up. Baked versions require precise temperatures, water baths, and careful timing to avoid cracks. Both taste amazing, but the no bake version wins on convenience.
Is no bake peanut butter cheesecake suitable for people with lactose intolerance?
The traditional recipe contains cream cheese and often Cool Whip or heavy cream, all of which contain lactose. However, you can make dairy-free versions using lactose-free cream cheese alternatives or cashew cream cheese. Replace the whipped topping with coconut whipped cream made from chilled canned coconut milk. The butter in the crust can be swapped for coconut oil or dairy-free butter. While these substitutions change the flavor profile slightly, they still create a delicious dessert that people with lactose intolerance can enjoy without discomfort.
Whether you’re making this for the first time or the fiftieth, remember that the best part of this dessert is how it brings people together without stressing you out in the kitchen. Give it a try, trust the process, and don’t be afraid to make it your own.
Equipment
- Mixing Bowl
- Electric Mixer
- Rubber Spatula
- 9-inch Springform Pan
- Plastic Wrap
Ingredients
- 2 cups graham cracker crumbs or 24 Oreos
- 6 tablespoons melted butter (5 tablespoons for Oreo crust)
- 2 tablespoons sugar
- 16 ounces cream cheese softened
- 1 cup creamy peanut butter
- 1 cup powdered sugar
- 1 teaspoon vanilla extract
- 8 ounces Cool Whip or heavy cream (1 cup for no Cool Whip version)
- optional toppings melted peanut butter, chocolate sauce, chopped peanuts, mini peanut butter cups, raspberry or strawberry jam, caramel sauce
Instructions
- Prepare the crust by mixing graham cracker crumbs or Oreos with melted butter and sugar.
- Press the mixture into the bottom of a 9-inch springform pan and refrigerate while preparing the filling.
- Beat the softened cream cheese with an electric mixer until smooth and fluffy.
- Add peanut butter, powdered sugar, and vanilla extract to the cream cheese, mixing until fully combined.
- Gently fold in Cool Whip or homemade whipped cream until the mixture is light and airy.
- Pour the filling into the chilled crust and smooth the top.
- Cover with plastic wrap and refrigerate for at least 4 hours or overnight.
- Slice using a hot knife for clean cuts and serve with optional toppings.
Notes
Nutrition

Hello! I’m Sarah Mitchell, and I’m passionate about bringing creativity and innovation to baking. My love for baking started in high school when I first tried my hand at decorating cupcakes for a class project. What began as a fun hobby quickly became a full-time passion. I’ve spent the past decade working in bakeries and dessert shops, honing my skills in everything from simple cookies to intricate wedding cakes.
After working in some of the top bakeries across the country, I realized that baking was about more than just following recipes — it was about infusing your personality into each creation. At BakingSecret.com, I love creating recipes that push boundaries while staying true to the heart of classic baking. I specialize in creating delicious and visually stunning pastries that will wow your guests.
When I’m not baking, I enjoy teaching baking classes, trying out new cake decoration techniques, and traveling to find inspiration in global dessert traditions. I’m so excited to share my tips and tricks with you to help elevate your baking game!