
Welcome to My Strawberry Cheesecake Cake Recipe
Last summer, I made a cake for my niece’s birthday that changed everything. She wanted something special, something that wasn’t just another chocolate or vanilla cake. I decided to combine two of her favorite desserts into one show-stopping creation. The moment I brought out that strawberry cheesecake cake, her eyes lit up like fireworks. Everyone at the party kept asking for the recipe, and some even took photos before diving in for seconds.
That’s when I knew I had created something worth sharing. Welcome to my kitchen, where I’m going to walk you through making this incredible strawberry cheesecake cake recipe that works perfectly for any occasion. Whether you’re planning a birthday celebration or just want to treat your family to something amazing, this cake delivers every single time.
I’ll guide you through each step of the process, making it simple and fun. You don’t need to be a professional baker to pull this off. Trust me, if I can do it while managing my chaotic kitchen with kids running around, you can absolutely make this cake shine.
The best part? This recipe looks fancy enough to impress your guests, but it’s actually straightforward to make. No complicated techniques or hard-to-find ingredients. Just honest, delicious baking that results in a dessert everyone will remember.
Why Choose This Strawberry Cheesecake Cake Recipe?
Let me tell you why this particular strawberry cheesecake birthday cake recipe has become my go-to dessert. First, the combination of creamy cheesecake and sweet, tangy strawberries creates something truly magical. It’s like getting two desserts in one bite, and who doesn’t love that?
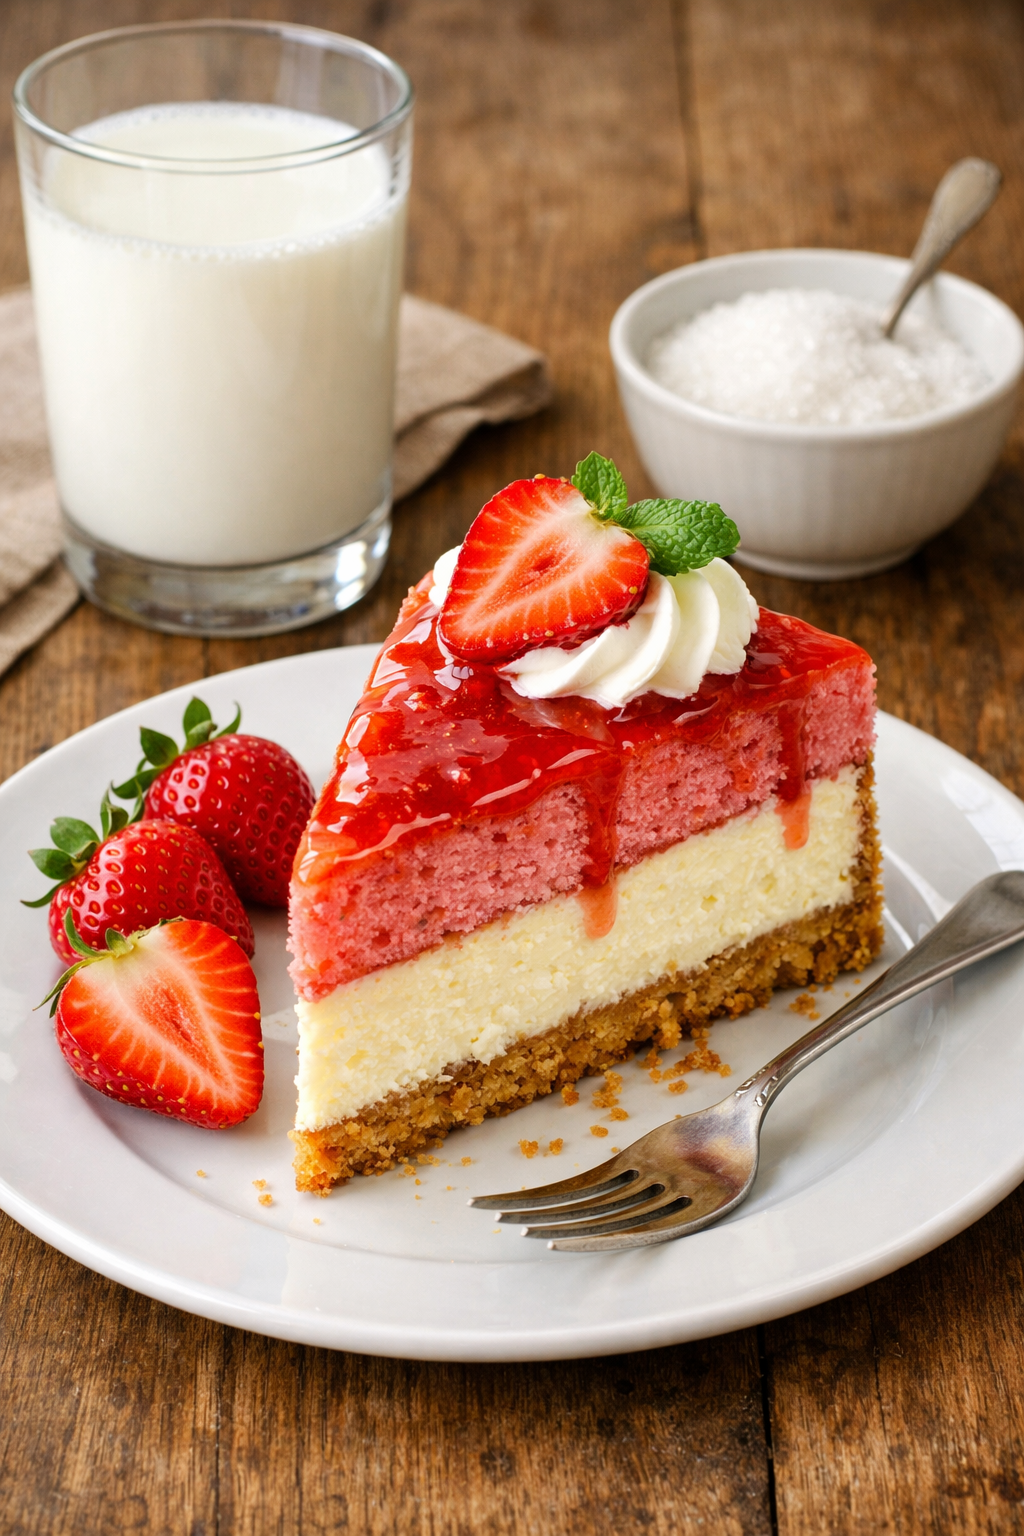
The layers work together beautifully. You get the soft, moist cake on the bottom, then a rich cheesecake layer that melts in your mouth, topped with fresh strawberries that add brightness and color. Each component complements the others without overpowering anything.
This isn’t one of those recipes where you take a bite and think something’s missing. Every element has a purpose. The strawberries cut through the richness of the cheesecake. The cake base provides structure and adds another layer of flavor. The cream cheese frosting ties it all together.
Perfect for Any Event
I’ve made this easy strawberry cheesecake cake for dozens of different occasions now. It works just as well for a casual Saturday afternoon gathering as it does for milestone celebrations. My neighbor requested it for her book club meeting. My sister wanted it for her anniversary dinner. A friend asked me to make it for her daughter’s graduation party.
The versatility really stands out. You can dress it up with fancy decorations for formal events or keep it simple and rustic for everyday celebrations. I’ve topped it with chocolate shavings, fresh mint leaves, and even edible flowers depending on the occasion.
For birthdays, this cake absolutely shines. Kids love the fruity flavor and pretty pink color. Adults appreciate the sophisticated cheesecake element. It pleases everyone at the table, which makes party planning so much easier.
You can also make it ahead of time, which saves stress on the day of your event. I usually bake it the night before, let it chill overnight, and add the final touches an hour before serving. This makes hosting feel manageable instead of overwhelming.
Easy Without Compromising Quality
Now, I know what you might be thinking. A cake that combines regular cake layers with cheesecake sounds complicated. But hear me out. This strawberry cheesecake cake recipe breaks down into manageable steps that anyone can follow.
I’ve streamlined the process over many attempts. My first version took me nearly four hours and left my kitchen looking like a disaster zone. Now I can make it in under two hours, including prep and baking time. The cleanup is easier too because I figured out which shortcuts actually work.
You won’t need any special equipment beyond what most home bakers already have. A standard mixer works fine. Regular cake pans do the job. Nothing fancy or expensive required.
The ingredients are easy to find too. Your regular grocery store should have everything you need. I’m not sending you on a hunt for obscure items or specialty products. Just grab some cream cheese, fresh strawberries, standard baking supplies, and you’re set.
Taste and Presentation Combined
Here’s something important: this cake looks as good as it tastes. I’ve served desserts before that were delicious but didn’t photograph well or looked messy when sliced. This one cuts beautifully, showing off those pretty layers.
When you bring this to the table, people notice. The vibrant red strawberries against the white cream and golden cake create an eye-catching contrast. It looks like something from a professional bakery, which makes you feel proud.
But the real test is the taste. I’ve watched people take their first bite and pause, savoring the flavors. The texture combination keeps things interesting. You get creamy, fluffy, and fruity all at once.
The strawberries provide natural sweetness without being cloying. The cheesecake adds richness without feeling heavy. The cake itself stays moist for days, which means leftovers still taste amazing.
My Promise to You
I’m committed to making this baking experience enjoyable for you. Throughout this recipe, I’ll share the tips I’ve learned through trial and error. I’ll point out where people commonly make mistakes so you can avoid them. I’ll explain why certain steps matter so you understand the process.
You’ll get my honest advice about what works and what doesn’t. If there’s a shortcut that saves time without sacrificing quality, I’ll tell you. If something requires patience, I’ll explain why rushing won’t help.
By the end, you’ll have a strawberry cake recipe that becomes part of your regular rotation. You’ll feel confident making it again and again. And you’ll have a dessert that brings joy to everyone who tries it.
This isn’t just another cheesecake recipe thrown online. It’s a tested, refined version that accounts for real-life baking conditions. I’ve made this in different ovens, at different altitudes, and in various weather conditions. It works consistently.
So let’s get started. Your kitchen is about to smell amazing, and you’re about to create something truly special.

Gathering Your Ingredients for Success
Now that you’re ready to dive in, let’s talk about what you’ll actually need to create this masterpiece. I’m going to break this down into three parts since we’re essentially making three different components that come together beautifully.
For the cake layers themselves, you’ll need all-purpose flour (about two and a half cups), granulated sugar (one and three-quarter cups), baking powder (two teaspoons), salt (half a teaspoon), unsalted butter at room temperature (three-quarters of a cup), four large eggs, whole milk (one cup), and vanilla extract (two teaspoons). I also add a pinch of almond extract, though that’s totally optional. It just gives a subtle depth that people can’t quite identify but absolutely love.
The cheesecake layer requires full-fat cream cheese (sixteen ounces, which is two standard blocks), granulated sugar (two-thirds of a cup), two large eggs, sour cream (half a cup), vanilla extract (one teaspoon), and a tablespoon of all-purpose flour. That little bit of flour helps stabilize the cheesecake layer so it doesn’t crack or sink weirdly. I learned that trick after my third attempt came out looking like a lunar landscape.
For the strawberry filling and topping, grab two pounds of fresh strawberries. Yes, fresh makes a real difference here. You’ll also need sugar (about half a cup, depending on how sweet your berries are), cornstarch (two tablespoons), lemon juice (one tablespoon), and a tiny pinch of salt to bring out the fruit flavor.
Here’s the thing about finding quality ingredients. I used to think cream cheese was cream cheese, but the store brand I initially used had a grainy texture that never quite smoothed out. Now I stick with Philadelphia or a comparable quality brand. The texture difference is noticeable. Same goes for butter—when it’s a primary ingredient, quality matters. I’m not saying you need fancy European butter, but skip the cheapest option.
For strawberries, I hit up the farmer’s market when they’re in season. The flavor is incomparable to those sad, pale berries you sometimes see in January. If fresh strawberries aren’t available or look questionable, frozen can work in the filling portion, though I’d still use fresh for decoration. Just thaw them completely and drain the excess liquid first.
If you’re adapting this recipe because of dietary restrictions, I’ve got some substitutions that actually work. For a gluten free cheesecake recipe variation, you can swap the all-purpose flour in the cake with a good quality gluten-free baking blend. Just make sure it contains xanthan gum or add a quarter teaspoon yourself. The cheesecake layer is naturally gluten-free except for that tablespoon of flour, which you can easily replace with cornstarch.
Greek yogurt can substitute for sour cream if that’s what you have on hand. The tang is similar enough that most people won’t notice. I’ve also used half-and-half instead of whole milk in a pinch, though the cake comes out slightly less rich.
Preparing Your Cake Layers Like a Pro
Alright, let’s get into the actual baking. Start by preheating your oven to 350 degrees Fahrenheit. I know it’s tempting to skip preheating, but trust me on this one. An oven that hasn’t reached full temperature will throw off your baking times and potentially leave you with a dense, sunken cake.
Grab two nine-inch round cake pans and prepare them properly. I grease them with butter, then line the bottoms with parchment paper circles, then grease the parchment too. It seems excessive, but after you’ve had a cake stick and break apart while trying to remove it, you’ll understand my paranoia.
In your largest mixing bowl, cream together that room-temperature butter and sugar until it looks pale and fluffy. This takes about three to four minutes with an electric mixer on medium-high speed. Room temperature is key here—cold butter won’t incorporate properly and you’ll end up with lumps. If you forgot to take it out ahead of time, cut it into small pieces and let it sit near your preheating oven for ten minutes.
Add the eggs one at a time, mixing well after each addition. Then pour in your vanilla extract and that optional almond extract if you’re using it. In a separate bowl, whisk together your flour, baking powder, and salt. With your mixer on low speed, alternate adding the dry ingredients and the milk to the butter mixture, starting and ending with the dry ingredients. This method keeps the batter from becoming tough.
Divide the batter evenly between your two prepared pans. I actually weigh them on my kitchen scale to make sure they’re equal, because nothing’s more annoying than lopsided cake layers. Bake for twenty-five to thirty minutes, until a toothpick inserted in the center comes out clean or with just a few moist crumbs. The tops should spring back when you gently press them.
Let them cool in the pans for ten minutes, then turn them out onto wire racks to cool completely. Seriously, completely cool. I know you’re excited, but assembling this cake with warm layers will melt your frosting and turn everything into a mess. Ask me how I know.
Creating the Perfect Cheesecake Layer
While your cake layers are cooling, let’s make the cheesecake component. This part is actually easier than it sounds. Make sure your cream cheese is at room temperature, otherwise you’ll be fighting lumps forever. I usually set it out when I start preheating the oven.
Beat the cream cheese on medium speed for about two minutes until it’s smooth and creamy. Scrape down the sides of the bowl—there’s always cream cheese hiding up there. Add the sugar and beat until combined, then add the eggs one at a time, mixing on low speed just until incorporated. Overbeating at this stage can add too much air, which leads to cracks.
Mix in the sour cream, vanilla, and that tablespoon of flour. The mixture should be smooth and pourable but still thick. Pour this into a nine-inch springform pan that you’ve prepared the same way as the cake pans—greased, parchment-lined, and greased again.
Here’s where it gets a bit different. You’ll bake this at 325 degrees Fahrenheit for about forty to forty-five minutes. The center should still jiggle slightly when you shake the pan. It’ll firm up as it cools. Let it cool in the pan for an hour, then refrigerate for at least four hours or overnight. This needs to be completely set before you assemble your cake.
By the way, if you love the combination of cheesecake and cake layers, you might also enjoy my lemon blueberry cheesecake cake, which uses a similar technique with different flavors.
Making Strawberry Filling That Shines
The strawberry component is what makes this cake truly special. I make both a thick filling for between the layers and keep some fresh berries for the top. Hull and slice about a pound of strawberries and toss them in a medium saucepan with the sugar, cornstarch, lemon juice, and salt.
Cook this over medium heat, stirring frequently, until it comes to a boil and thickens. This takes about eight to ten minutes. You’ll know it’s ready when you can drag your spoon through it and see the bottom of the pan for a second before the mixture flows back together. Remove it from heat and let it cool completely. It’ll thicken even more as it cools.
The remaining pound of strawberries stays fresh. I hull them and slice them for decorating the top of the cake. Some I leave whole if they’re particularly pretty. Visual appeal matters when you’re presenting something you’ve worked hard on.
Assembling Your Strawberry Cheesecake Cake
This is where everything comes together, literally. Make sure all your components are completely cool before you start. I usually do my assembly the day after baking, which also helps the flavors meld together nicely. If you’ve never worked with no bake peanut butter cheesecake before, that’s another great option when you want to skip the oven entirely, though this baked version has a texture I really prefer.
Place your first cake layer on whatever plate or cake stand you’re using. Spread about half of the cooled strawberry filling over the top, leaving a quarter-inch border around the edge. Carefully remove the cheesecake from its springform pan and place it on top of the strawberry layer. This is the trickiest part—I use two large spatulas to lift and transfer it. Move slowly and don’t panic if it cracks a little. Nobody will see it once the cake is assembled.
Spread the remaining strawberry filling on top of the cheesecake layer, then place your second cake layer on top. Now you’ve got this beautiful tower of deliciousness that needs frosting.
For the frosting, I make a simple cream cheese buttercream. Beat eight ounces of softened cream cheese with half a cup of softened butter until smooth. Gradually add about three cups of powdered sugar and two teaspoons of vanilla extract, beating until light and fluffy. Add a tablespoon or two of heavy cream if it seems too thick.
Spread a thin layer of frosting around the entire cake to seal in any crumbs. This is called a crumb coat. Refrigerate for thirty minutes, then apply the final layer of frosting. I like leaving some of the cake visible in a semi-naked style, but you can cover it completely if you prefer. The technique is similar to what I use for my pumpkin and cheesecake bars, though those are obviously much simpler.
Arrange your fresh strawberry slices on top however you like. I usually do concentric circles starting from the outside and working in, but sometimes I just scatter them artistically and call it rustic.
Refrigerate the assembled cake for at least two hours before serving. This helps everything set and makes slicing much cleaner. It’ll keep in the refrigerator for up to five days, covered. The cake stays surprisingly moist, and honestly, I think it tastes even better on day two after the flavors have mingled.
Tips and Tricks for a Perfect Strawberry Cheesecake Cake
Let me share some wisdom I’ve gained from making this strawberry cheesecake cake recipe more times than I can count. These tips will save you from the mistakes I made when I was figuring everything out. Some of them seem small, but they make a real difference in how your cake turns out.
First, temperature control is huge. I can’t stress this enough. When recipes say room temperature, they mean it. I used to think cold cream cheese would eventually blend in if I just mixed longer. Wrong. All that does is incorporate too much air and create a weird texture. Take your dairy products out of the fridge at least an hour before you start baking. They should feel cool but not cold when you touch them.
Here’s something I learned the hard way: don’t open your oven door constantly to check on things. Every time you peek, the temperature drops by about twenty-five degrees. I ruined my first cheesecake layer because I kept opening the door to see if it was done. The temperature fluctuations caused it to crack like crazy and sink in the middle. Set your timer and trust it.
When you’re making the cake layers, measure your flour correctly. I used to just scoop the measuring cup directly into the flour bag, which packs it down and gives you way too much flour. Now I spoon it into the measuring cup and level it off with a knife. This simple change made my cakes lighter and more tender. Understanding basic cooking fundamentals like proper measuring techniques really does impact your results.
Another mistake people make with this strawberry cheesecake birthday cake recipe is rushing the cooling process. I get it, you’re excited and hungry. But warm components will wreck your assembly. The frosting melts, the layers slide around, and you end up with a leaning tower that looks drunk. Plan ahead so you’re not tempted to rush.
For the strawberry filling, don’t skip the lemon juice. It brightens the flavor and keeps the strawberries from tasting flat. I once forgot it and the filling was just okay instead of amazing. That little bit of acid makes everything pop.
When you’re spreading the cream cheese frosting, dip your spatula in hot water and wipe it dry between swipes. This creates those smooth, professional-looking surfaces you see in bakery cakes. Cold frosting is hard to spread smoothly, but a warm spatula glides right through it.
Achieving the Best Texture and Flavor
The texture of this easy strawberry cheesecake cake depends on a few key factors. Let’s talk about the cake layers first. Don’t overmix once you add the flour. Mix just until you can’t see dry flour anymore, then stop. Overmixing develops too much gluten, which makes the cake tough and chewy instead of tender and soft.
For the cheesecake layer, low and slow is your friend. That lower temperature helps it cook evenly without the edges overcooking while the center stays raw. Some people like using a water bath for cheesecake, but honestly, I’ve found it unnecessary for this recipe since it’s sandwiched between cake layers anyway. The slight imperfections won’t show.
Fresh strawberries make a massive difference in flavor. I made this once in February with sad grocery store strawberries that had no smell and tasted like crunchy water. The cake was fine, but it wasn’t spectacular. Wait for strawberry season if you can, or use high-quality frozen berries in the filling and save fresh ones just for decoration. The flavor intensity is worth it.
Here’s a tip for keeping your cake layers moist: brush them with simple syrup before assembly. Mix equal parts sugar and water, heat until the sugar dissolves, let it cool, and brush it on each layer. This adds moisture and a touch of sweetness. I started doing this after noticing bakery cakes always stayed moist for days.
The cream cheese frosting benefits from being made ahead. I usually make it the day before and keep it in the fridge, then let it come to room temperature before using it. This gives the flavors time to meld together. Just beat it again briefly before spreading to restore that fluffy texture.
Don’t forget salt. I add a pinch to the strawberry filling and the frosting. Salt doesn’t make things taste salty—it enhances all the other flavors and prevents everything from tasting one-dimensional and boring. It’s a small detail that elevates the whole dessert.
Creative Ways to Decorate Your Cake for Different Occasions
Decoration is where you can really make this strawberry cake recipe your own. For birthdays, I like covering the top completely with fresh strawberry slices arranged in a spiral pattern, then adding birthday candles right into the berries. It looks festive and the candles stay secure.
For more elegant events like bridal showers or anniversaries, I’ve used white chocolate shavings around the sides and topped the cake with whole strawberries that I’ve dipped halfway in white chocolate. It looks expensive but takes maybe fifteen extra minutes. You can also add fresh flowers—just make sure they’re food-safe and pesticide-free. I usually tuck them between strawberries on top.
During holidays, I adapt the decorations. For Valentine’s Day, I arrange strawberries in a heart shape on top and dust everything with powdered sugar. For the Fourth of July, I add blueberries to create an American flag design with strawberries and whipped cream. It’s the same cheesecake recipe base, but the presentation makes it feel special for the occasion.
Funny enough, some of my favorite versions have been the simplest. Sometimes I just pile fresh strawberries on top in a casual, overflowing way and add a few mint leaves for color contrast. It has that rustic, homemade charm that people find really appealing. Not everything needs to be perfectly symmetrical.
If you’re making this for kids, consider adding some fun elements. I’ve used strawberry slices to create butterflies or flowers on top. Sprinkles around the base make it feel more playful. Colorful candles or small toy decorations work great too, though obviously remove those before serving.
For a semi-naked look that’s really trendy right now, apply just enough frosting to barely cover the cake layers, letting some of the cake show through. Then pile strawberries generously on top so they cascade down the sides slightly. It looks effortless and sophisticated at the same time.
You can also play with different piping techniques if you’re comfortable with a pastry bag. I’m not great at fancy piping, but even simple stars or rosettes around the top edge make it look more finished. Practice on a plate first if you’re nervous.
Frequently Asked Questions
Can I use frozen strawberries in this recipe?
Yes, but with some adjustments. Frozen strawberries work fine for the cooked filling since they’ll break down anyway. Just thaw them completely and drain the excess liquid before cooking, otherwise your filling will be too watery. For decoration, I really recommend using fresh berries since frozen ones get mushy when thawed and don’t hold their shape. If you absolutely must use frozen for the top, partially thaw them so they’re still firm when you arrange them, then serve the cake quickly before they fully defrost.
How long does the cake need to cool before serving?
The assembled cake should refrigerate for at least two hours before serving, though overnight is even better. This gives everything time to set properly and makes slicing much cleaner. I usually assemble mine the evening before I need it and let it chill overnight. The individual components should cool completely before assembly—cake layers need about an hour at room temperature, and the cheesecake layer needs at least four hours in the fridge. Patience here prevents a melted, sliding mess.
Is this a good recipe for beginners?
Honestly, it’s more intermediate level because you’re juggling multiple components. If you’ve never baked before, I’d suggest making a simpler cake first to get comfortable with the basics. But if you’ve made boxed cakes or basic recipes and want to level up, this is totally doable. Just read through the entire recipe before starting, give yourself plenty of time, and don’t try making it for the first time the morning of an important event. Practice makes perfect with this one.
Where can I find a strawberry cheesecake cake near me?
Many local bakeries can make custom layer cakes combining cheesecake and regular cake, though you’ll usually need to order ahead. Chain stores like Whole Foods or high-end grocery bakeries sometimes offer similar combinations. Honestly though, making it yourself gives you control over quality and freshness, plus it costs way less than ordering from a bakery. If you’re short on time, some bakeries will sell you just the cake layers, and you can make the cheesecake and filling yourself to save time.
Can I make this recipe without a springform pan?
You can, though it’s trickier. Use a regular nine-inch cake pan lined with parchment paper, making sure the parchment extends up the sides. After baking and cooling the cheesecake completely, you can lift it out using the parchment overhang. Another option is to skip the baked cheesecake layer and make a no-bake version that you spread directly onto the first cake layer. It changes the texture slightly, but still tastes great. Or honestly, just buy a springform pan—they’re inexpensive and useful for so many recipes.
How do I store leftover strawberry cheesecake cake?
Keep it in the refrigerator, covered loosely with plastic wrap or in a cake carrier. It’ll stay good for four to five days, though the strawberries start getting a bit soft after day three. I’ve found it actually tastes better on day two after the flavors meld together. Don’t leave it at room temperature for more than two hours because of the cream cheese components. If you want to freeze it, do so before adding the fresh strawberries on top, wrap it really well, and it’ll keep for up to two months.
Can I make this cake ahead of time?
Absolutely, and I actually recommend it. The cake layers can be baked up to two days ahead, wrapped tightly, and stored at room temperature. The cheesecake layer should be made at least a day ahead anyway since it needs long chilling time. The strawberry filling keeps in the fridge for three days. Assemble everything the night before serving, then add final decorative touches a few hours before the event. This spreads out the work and reduces stress considerably.
What can I substitute for sour cream in the cheesecake layer?
Greek yogurt works really well as a substitute and provides the same tangy flavor and creamy texture. Use full-fat Greek yogurt for best results—the low-fat versions can make the cheesecake too loose. Plain regular yogurt also works if you strain it through cheesecloth for an hour to remove excess liquid. In a pinch, you can use additional cream cheese instead, though you’ll lose some of that nice tang that balances the sweetness.
Why did my cheesecake layer crack?
Cracks usually happen from temperature shock or overbaking. Make sure your cream cheese is room temperature before mixing, avoid overbeating air into the batter, and don’t open the oven door while it’s baking. The cheesecake should still jiggle in the center when you remove it—it continues cooking as it cools. Let it cool gradually at room temperature for an hour before refrigerating. The good news is that cracks don’t matter much in this recipe since the cheesecake is hidden between cake layers anyway.
Can I use a different type of berry?
Definitely! Raspberries, blueberries, or blackberries all work beautifully with this same technique. You can even do a mixed berry version using a combination. Adjust the sugar in the filling based on how tart your berries are—raspberries and blackberries are more tart than strawberries, so they might need a bit more sugar. The cooking time for the filling stays about the same regardless of which berry you choose.
By the way, if you’re falling in love with cheesecake variations like I have, you’ll find tons more inspiration browsing through all the cheesecake recipes I’ve tested and shared over the years. There’s something magical about that creamy, tangy combination that works in so many different ways.
Making this strawberry cheesecake cake might seem ambitious at first, but I promise you’ll feel so proud when you slice into those beautiful layers and watch everyone’s faces light up. Take your time, trust the process, and don’t stress about perfection. Even if it’s not Instagram-perfect, it’ll still taste absolutely incredible. Happy baking!
Equipment
- Mixing bowls
- Electric mixer
- Spatulas
- 9-inch round cake pans
- Springform pan
Ingredients
- 2.5 cups all-purpose flour
- 1.75 cups granulated sugar divided
- 2 tsp baking powder
- 0.5 tsp salt
- 0.75 cup unsalted butter at room temperature
- 4 large eggs
- 1 cup whole milk
- 2 tsp vanilla extract
- almond extract (Optional) Pinch
- 16 oz full-fat cream cheese
- 0.67 cup granulated sugar for cheesecake layer
- 2 large eggs for cheesecake
- 0.5 cup sour cream
- 1 tsp vanilla extract for cheesecake
- 1 tbsp all-purpose flour for cheesecake
- 2 lbs fresh strawberries
- 0.5 cup granulated sugar for strawberry filling
- 2 tbsp cornstarch
- 1 tbsp lemon juice
- salt (for strawberry filling) pinch
Instructions
- Preheat the oven to 350°F (175°C).
- Prepare two 9-inch round cake pans by greasing and lining with parchment paper.
- In a mixing bowl, cream together butter and sugar until pale and fluffy.
- Add eggs one at a time, mixing well after each addition, then add vanilla and almond extract (if using).
- In a separate bowl, whisk together flour, baking powder, and salt, then alternate adding dry ingredients with milk until just combined.
- Divide the batter between prepared pans and bake for 25-30 minutes, until a toothpick comes out clean.
- Cool in pans for 10 minutes, then turn out onto wire racks to cool completely.
- To make the cheesecake layer, beat cream cheese until smooth, then add sugar and eggs one at a time.
- Mix in sour cream, vanilla, and flour until smooth, then pour into a prepared springform pan.
- Bake cheesecake at 325°F (160°C) for 40-45 minutes, until the center jiggles slightly.
- Allow cheesecake to cool for an hour, then refrigerate for at least 4 hours or overnight.
- For the strawberry filling, combine 1 pound of hulled and sliced strawberries with sugar, cornstarch, lemon juice, and salt in a saucepan.
- Cook over medium heat, stirring until boiling and thickened, about 8-10 minutes. Let cool completely.
- Retain another pound of sliced strawberries for decoration.
- Assemble the cake: Place the first cake layer on a serving plate, spread half of the cooled strawberry filling on top, then add the cheesecake layer.
- Spread remaining strawberry filling on top of the cheesecake, and add the second cake layer.
- For frosting, beat cream cheese and butter until smooth, then add powdered sugar and vanilla.
- Apply a crumb coat of frosting, refrigerate for 30 minutes, then add the final coat of frosting.
- Decorate with fresh strawberry slices and refrigerate for at least 2 hours before serving.
Notes
Nutrition

Hello! I’m Sarah Mitchell, and I’m passionate about bringing creativity and innovation to baking. My love for baking started in high school when I first tried my hand at decorating cupcakes for a class project. What began as a fun hobby quickly became a full-time passion. I’ve spent the past decade working in bakeries and dessert shops, honing my skills in everything from simple cookies to intricate wedding cakes.
After working in some of the top bakeries across the country, I realized that baking was about more than just following recipes — it was about infusing your personality into each creation. At BakingSecret.com, I love creating recipes that push boundaries while staying true to the heart of classic baking. I specialize in creating delicious and visually stunning pastries that will wow your guests.
When I’m not baking, I enjoy teaching baking classes, trying out new cake decoration techniques, and traveling to find inspiration in global dessert traditions. I’m so excited to share my tips and tricks with you to help elevate your baking game!