
A Slice of Bliss: My Caramel Chocolate Coffee Cheesecake Story
Picture this: it’s a lazy Sunday afternoon. The rain is tapping on the window, and you crave something rich, something that feels like a warm hug. That’s how my Caramel Chocolate Coffee Cheesecake obsession started. I wanted a dessert that captured the comfort of my morning latte, the joy of dark chocolate, and the luscious pull of caramel. After many happy (and delicious) kitchen experiments, this showstopper was born. It’s the kind of dessert that makes people stop talking and just… sigh with happiness. Let me show you how to make it!
From Classic to Dreamy: The Cheesecake’s Journey
Cheesecake has been a beloved treat for centuries, from ancient Greece to New York delis. But we home bakers love to play! This Caramel Chocolate Coffee Cheesecake is a gorgeous mash-up of modern flavors. It takes the creamy, tangy base we all adore and swirls in the bold, aromatic kick of coffee and the deep richness of chocolate. The homemade caramel on top? That’s the final, utterly indulgent ribbon of sweetness that ties it all together for a truly unforgettable dessert.
Why You Will Absolutely Adore This Cheesecake
This isn’t just another cheesecake. It’s a multi-sensory experience! First, you get the crunchy chocolate crust. Then, the impossibly smooth, marbled filling hits you with a perfect coffee-chocolate duet. Finally, the silky salted caramel topping adds a buttery finish. It’s surprisingly straightforward to make, but looks and tastes like it came from a high-end bakery. It’s the ultimate treat for anyone who loves the grown-up combination of coffee and chocolate.
When to Serve This Showstopping Dessert
This cheesecake is your secret weapon for making any occasion special. It’s perfect for:
- Dinner parties: Impress your friends with a dessert that looks gorgeous and tastes even better.
- Holidays: It’s a wonderful, decadent alternative to traditional pies.
- Birthdays: For the coffee and chocolate lover, it’s better than any store-bought cake.
- Just because: Sometimes, a Tuesday deserves a slice of pure joy.
What You’ll Need for Your Caramel Chocolate Coffee Cheesecake
Gather these simple ingredients. Using full-fat, room-temperature items is key for the creamiest texture!
For the Chocolate Cookie Crust:
- 2 cups (200g) chocolate cookie crumbs (like Oreos, filling scraped out)
- 1/4 cup (60g) unsalted butter, melted
For the Cheesecake Filling:
- 3 (8 oz / 225g) packages cream cheese, softened
- 1 cup (200g) granulated sugar
- 3 large eggs, at room temperature
- 1/2 cup (120ml) heavy cream
- 2 tbsp instant coffee granules dissolved in 2 tbsp hot water
- 1/2 cup (100g) semi-sweet chocolate, melted and slightly cooled
For the Caramel Topping & Garnish:
- 1/2 cup (100g) granulated sugar
- 2 tbsp water
- 1/4 cup (60ml) heavy cream, warmed
- 2 tbsp unsalted butter, softened
- Whipped cream, chocolate shavings, and extra caramel for garnish
Easy Swaps: Ingredient Substitutions
No worries if you’re missing something! Here are some easy fixes:
- Cookie Crumbs: Graham cracker crumbs work beautifully for a different texture.
- Instant Coffee: Use 1-2 tablespoons of very strong brewed espresso or coffee, cooled. Reduce the heavy cream in the filling by the same amount.
- Semi-Sweet Chocolate: Dark chocolate or milk chocolate can be used, depending on your sweetness preference.
- Heavy Cream: Full-fat sour cream or Greek yogurt can substitute in the filling for a slight tang.
How to Make Your Dream Cheesecake
Follow these steps for a perfectly silky, crack-free Caramel Chocolate Coffee Cheesecake. Take your time and enjoy the process!
Step 1: Create the Chocolate Crust
First, preheat your oven to 350°F (175°C). Get your springform pan ready by greasing it and lining the bottom with a round of parchment paper. This little step is a lifesaver for clean slices later! In a bowl, mix the dark, fine cookie crumbs with the melted, golden butter. It will look and smell like damp sand. Press this mixture firmly and evenly into the bottom of your pan. Pop it in the fridge to set while you make the magical filling. Pro tip: Use the bottom of a flat glass or measuring cup to press the crumbs down for a super firm, even base.
Step 2: Make the Marbled Filling
In a large bowl, beat the softened cream cheese and granulated sugar together until the mixture is completely smooth, creamy, and no lumps remain. This is the foundation of your creamy dream! Add the eggs, one at a time, beating well after each. Pour in the heavy cream and that fragrant, strong dissolved coffee. The batter will become beautifully pale and take on a lovely tan coffee color. Now, pour half of this coffee batter into a separate bowl. Stir the rich, melted chocolate into one portion. You’ll have two bowls: one coffee, one decadent chocolate.
Step 3: Swirl and Bake to Perfection
Retrieve your chilled crust from the fridge. Pour the coffee batter over it first, smoothing it out. Then, gently pour the chocolate batter on top. Take a knife or a skewer and swirl it through the two batters just a few times. You want pretty marbling, not a muddy mix! Now, for the secret to a smooth top: the water bath. Wrap the bottom and sides of your springform pan tightly with heavy-duty foil. Place it in a larger roasting pan and pour hot water into the larger pan until it comes about halfway up the side of the springform. Carefully slide this setup into the oven and bake for 55-65 minutes. The edges will be set, but the center will have a slight, confident jiggle.
Step 4: The Patient Cool-Down
This step is non-negotiable for the perfect texture! When the baking time is up, turn off the oven. Crack the oven door open with a wooden spoon and let the cheesecake cool slowly inside for a full hour. This gentle cooling helps prevent dramatic cracks. After that hour, remove it from the oven and the water bath. Let it cool completely on a rack, then refrigerate it for at least 4 hours, but overnight is truly best. This long chill sets the flavors and gives you that perfect, sliceable texture.
Step 5: Craft the Homemade Caramel Topping
While your cheesecake chills, you can make the caramel. In a clean, light-colored saucepan, combine the sugar and water. Cook over medium heat. Do not stir. Just swirl the pan occasionally until the sugar dissolves and turns a deep amber color. It will smell incredible! Take it off the heat and carefully whisk in the warm heavy cream—it will bubble up dramatically. Once smooth, whisk in the butter until glossy. Let this caramel cool and thicken for about 15-20 minutes before pouring it over your chilled cheesecake.
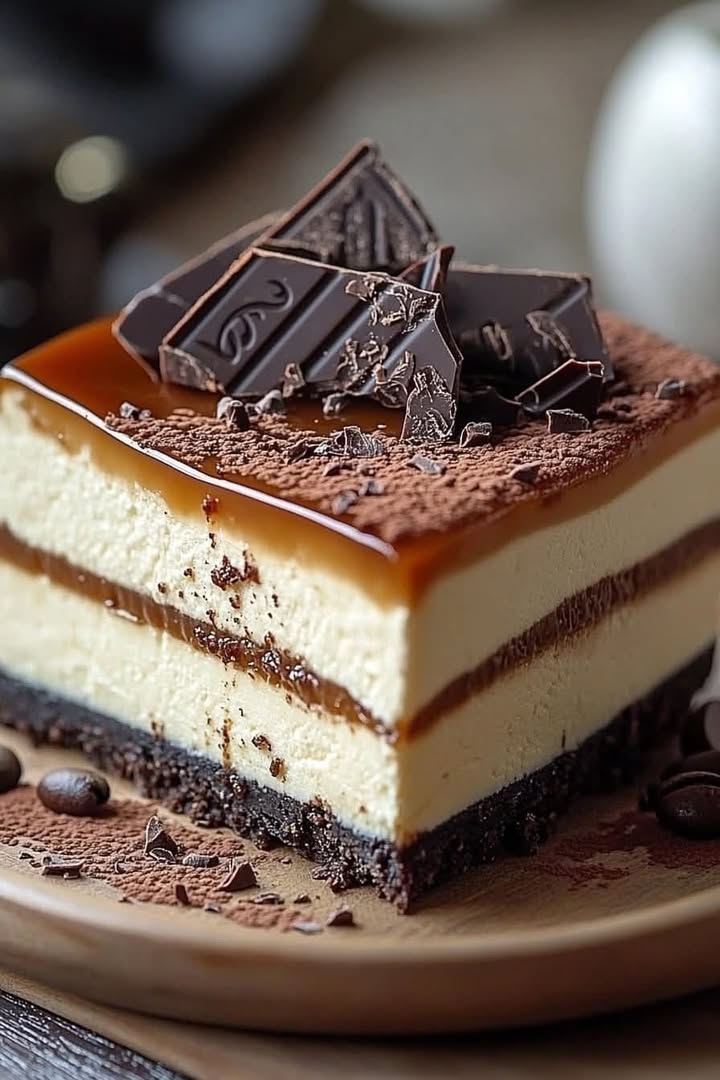
Step 6: The Grand Finale – Garnish and Serve!
Unlock and remove the springform pan side. Pour your cooled caramel over the top, letting it drip seductively down the sides. Pipe or dollop fresh whipped cream around the edges. Sprinkle generously with dark chocolate shavings or curls. For that final touch, add a light extra drizzle of caramel. Now, take a deep breath and admire your masterpiece before slicing! Chef’s Tip: For super clean slices, dip your knife in hot water and wipe it clean between each cut.
Your Cheesecake Timeline
| Prep Time: | 30 minutes |
| Bake Time: | 55-65 minutes |
| Cooling Time (in oven): | 1 hour |
| Chill Time: | 4+ hours (overnight ideal) |
| Total Time: | About 6.5 hours (mostly inactive) |
The #1 Secret: Room Temperature is Everything
My single biggest tip for the creamiest, lump-free filling is to ensure all your refrigerated ingredients (cream cheese, eggs, heavy cream) are truly at room temperature before you start mixing. This allows them to blend together seamlessly, preventing a grainy texture. Cold ingredients are the main culprit for lumps in your batter.
A Sweet Fact About That Caramel
That amber-colored magic we call caramel is the result of a fascinating scientific process called caramelization. When sugar is heated, its molecules break down and re-form into new compounds, creating over a hundred different flavor notes! That’s why homemade caramel has a much more complex, buttery, and deep flavor than anything you can buy in a jar.
Gather Your Kitchen Tools
You don’t need fancy equipment, but these basics are essential:
- 9-inch springform pan
- Heavy-duty aluminum foil (for the water bath)
- Large roasting pan
- Electric mixer (hand or stand)
- Mixing bowls
- Saucepan for caramel
- Whisk and spatula
How to Keep Your Cheesecake Fresh
This Caramel Chocolate Coffee Cheesecake stores beautifully. Cover it tightly with plastic wrap or store it in an airtight cake carrier in the refrigerator. It will stay fresh and delicious for up to 5 days. The flavors actually deepen and meld even more on day two!
For longer storage, you can freeze the cheesecake (without the caramel and whipped cream garnish). Wrap the whole cheesecake or individual slices tightly in plastic wrap, then a layer of foil. It will keep for up to 2 months.
To serve a frozen slice, simply thaw it overnight in the refrigerator. Add fresh caramel, whipped cream, and chocolate shavings right before serving for the best texture and presentation.
Foolproof Tips for Cheesecake Success
- Don’t Overbeat: Once you add the eggs, mix just until they are incorporated. Overbeating incorporates too much air, which can cause the cheesecake to puff and then crack as it cools.
- Water Bath is Key: Don’t skip the water bath! It creates a steamy environment that cooks the cheesecake gently and evenly, preventing a dry texture and those dreaded top cracks.
- Patience is a Virtue: Rushing the cooling process is a common mistake. Letting it cool in the turned-off oven and then chilling thoroughly is what gives you that classic, creamy cheesecake texture.
Make it Look Like a Million Bucks
Serve each slice on a clean plate. Add a small dollop of whipped cream on the side. You can even place a few whole coffee beans or a delicate chocolate straw on the plate for a restaurant-worthy look. A light dusting of cocoa powder over the whipped cream is always elegant. For a fun party idea, set up a cheesecake bar with bowls of different toppings like crushed toffee bits, sea salt flakes, or fresh berries for guests to customize their slice.
Love This? Try These Other Decadent Recipes!
If this cheesecake was a hit, you simply must explore more delicious desserts. If you love the marbled effect, my Nutella marbled muffins are a quicker but equally joyful bake. For the ultimate chocolate fix, this decadent chocolate layer cake is pure heaven. Dive into another rich, dark chocolate adventure with this incredibly moist dark chocolate layer cake recipe. And if you’re in a cheesecake mood, these fun and crunchy blueberry crunch cheesecake bars are a delightful twist.
Common Mistakes to Avoid for a Perfect Cheesecake
Mistake 1: Using Cold Ingredients
This is the biggest roadblock to a smooth filling. Cold cream cheese won’t blend smoothly with sugar, leading to a lumpy batter. Cold eggs can also cause the batter to curdle. Always plan ahead. Take your cream cheese, eggs, and heavy cream out of the fridge at least an hour before you start baking. The cream cheese should feel soft to the touch.
Mistake 2: Skipping the Water Bath
Many bakers think the water bath is too fussy and skip it. This almost guarantees a cracked top and a dense, rubbery texture near the edges. The water bath provides gentle, moist heat. It’s like giving your cheesecake a steamy spa treatment, ensuring it cooks evenly and stays creamy from edge to center. Wrap your pan well with foil and don’t be afraid of the hot water!
Mistake 3: Overbaking the Cheesecake
A perfectly baked cheesecake should still jiggle slightly in the center when you gently shake the pan. If you wait for it to look completely firm like a cake, you’ve overbaked it. It will continue to set as it cools. The “jiggle” should be a small, smooth movement in the middle, about the size of a quarter. The edges will be puffed and set. Remember, the residual heat from the turned-off oven will finish the cooking process.
Mistake 4: Rushing the Cooling and Chilling
Immediately moving a hot cheesecake to the cold fridge causes a temperature shock. This leads to major cracking and sinking. The slow cooling process—first in the oven with the door cracked, then on the counter, then in the fridge—is just as important as the baking itself. This gradual change lets the delicate structure set firmly. For the absolute best texture and flavor, let it chill overnight.
Your Caramel Chocolate Coffee Cheesecake Questions, Answered
Can I use brewed coffee instead of instant granules?
Yes, you can! The goal is to get a strong coffee flavor without adding too much extra liquid. To substitute, use 2 tablespoons of very strong, freshly brewed espresso or dark coffee. Let it cool completely before adding it to the batter. Since this adds liquid, you might consider reducing the heavy cream in the filling by 1 tablespoon to compensate, though the recipe is forgiving. The instant coffee is convenient because it dissolves without adding much volume, but real coffee works beautifully too.
Why did my caramel turn out grainy or crystallized?
Sugar crystals are tricky! Granulated sugar can easily crystallize if even a single grain sticks to the side of the pan during cooking. To prevent this, make sure your saucepan is completely clean before you start. When you combine the sugar and water, you can gently swirl the pan to help it dissolve, but avoid stirring with a spoon once it starts heating. If you see sugar crystals forming on the side of the pan, use a wet pastry brush to wash them down. Following these steps should give you a smooth, glossy caramel every time.
How do I know when the cheesecake is done baking?
Don’t rely on time alone—use the “jiggle test.” Around the 55-minute mark, give the oven rack a gentle shake. The edges of the cheesecake should look puffed and set, but the center (about a 2-3 inch circle) should have a slight, creamy jiggle. It should not look liquid or sloshy. Think of the consistency of softly set Jell-O. It will firm up dramatically as it cools. Remember, it continues to cook from residual heat after you turn the oven off, so taking it out at this stage prevents overbaking.
Can I make this cheesecake ahead of time?
Absolutely, and I highly recommend it! Cheesecake is one of the best make-ahead desserts. You can bake it and let it chill in the refrigerator for up to two full days before you plan to serve it. In fact, the flavor gets even better as it sits. I often add the caramel topping the day I plan to serve it. You can also freeze the fully chilled, un-topped cheesecake for up to two months. Thaw it overnight in the fridge before adding your toppings and serving.
My cheesecake cracked on top. What did I do wrong?
Don’t worry, it still tastes amazing! Cracks usually happen from a sudden temperature change or overbeating/overbaking. To prevent them next time, ensure you used a water bath to provide gentle heat. Don’t open the oven door during baking. Make sure you let it cool slowly in the turned-off oven. Also, avoid overmixing the batter after adding the eggs, as this adds too much air. If a crack does appear, just cover it beautifully with whipped cream, caramel, and chocolate shavings. Nobody will ever know!
Can I use a store-bought caramel sauce?
You can, in a pinch. A good quality jarred caramel sauce will work. However, homemade caramel has a deeper, richer, buttery flavor that really takes this dessert to the next level. It’s also free of preservatives. If you do use store-bought, I recommend warming it slightly so it pours easily over the chilled cheesecake. You can also add a pinch of sea salt to a store-bought sauce to mimic that gourmet taste.
What’s the best way to get clean slices?
A hot, clean knife is your best friend! For picture-perfect slices, run a sharp, thin-bladed knife under very hot water. Wipe it completely dry with a towel. Make a clean cut, then wipe the blade clean and reheat it for the next slice. This method cuts through the firm cheesecake and sticky caramel without dragging and making a mess. It ensures every slice looks as good as the first.
Is there a way to make this recipe lighter?
You can make some adjustments, but they will change the texture. For a slightly lighter version, you could use light cream cheese and reduce-fat sour cream in place of the heavy cream. The texture will be less rich and a bit firmer. Using a sugar substitute that works for baking is an option for the filling. Remember, desserts are about enjoyment and balance within a healthy diet. For great tips on food balance, you can check out helpful resources.
Can I make this without a springform pan?
A springform pan is ideal because the removable sides make it easy to get the cheesecake out without damaging it. If you don’t have one, you can use a regular 9-inch cake pan. You must line it very well with parchment paper, leaving overhang on the sides to use as “handles” to lift the chilled cheesecake out. Be very careful when doing this, as it’s a bit more delicate. The water bath step becomes even more important to ensure even cooking.
How can I tell if my caramel sugar is ready?
Watch the color, not the clock! As the sugar melts and cooks, it will go from clear, to a light straw color, and finally to a deep amber. It should smell rich and nutty, not burnt. For this recipe, you want it to be a medium to dark amber color, similar to the color of an old penny. If you have a candy thermometer, it should read between 340°F and 350°F (171°C – 177°C). The moment it reaches that color, take it off the heat and add the cream.
I hope this guide gives you all the confidence to bake this stunning dessert. It’s truly a crown jewel in my collection of favorite cheesecake recipes.
Go Bake Some Memories!
There you have it—the recipe for what might just become your new favorite dessert. This Caramel Chocolate Coffee Cheesecake is more than just a list of ingredients; it’s a project filled with love that ends in pure, shared joy. The moment you see that perfect swirl, smell the coffee and chocolate baking, and finally drizzle on that glossy homemade caramel, you’ll feel like a baking superstar. So, gather your ingredients, take a deep breath, and get ready to create something truly special. Trust me, every single bite is worth the effort. Now, go preheat that oven and get started!
Equipment
- Grand bol
- Fouet
- Spatule
- Plaque à pâtisserie
- Papier sulfurisé
Ingredients
- 2 tasses chapelures de biscuits au chocolat (type Oreos, garniture retirée)
- 1/4 tasse beurre non salé fondu
- 3 paquets fromage à la crème ramolli
- 1 tasse sucre granulé
- 3 grands œufs à température ambiante
- 1/2 tasse crème épaisse
- 2 cuil. à soupe granulés de café instantané dissous dans 2 cuil. à soupe d'eau chaude
- 1/2 tasse chocolat semi-sucré fondu et légèrement refroidi
- 1/2 tasse sucre granulé
- 2 cuil. à soupe eau
- 1/2 tasse crème épaisse chauffée
- 2 cuil. à soupe beurre ramolli
- q.s. crème fouettée pour garnir
- q.s. copeaux de chocolat pour garnir
- q.s. caramel supplémentaire pour garnir
Instructions
- Préchauffez votre four à 175°C et préparez un moule à charnière de 23 cm graissé et tapissé de papier sulfurisé.
- Mélangez les chapelures de biscuits au chocolat avec le beurre fondu et pressez fermement au fond du moule; réfrigérez.
- Dans un grand bol, battez le fromage à la crème et le sucre jusqu'à obtenir un mélange lisse. Ajoutez les œufs un à un, en battant bien après chaque ajout, puis incorporez la crème épaisse et les granulés de café dissous.
- Versez la moitié de la pâte dans un autre bol et incorporez le chocolat fondu pour créer deux pâtes séparées.
- Versez la pâte de café sur la croûte, puis versez délicatement la pâte au chocolat par-dessus. Tournez légèrement avec un couteau ou une brochette.
- Enveloppez le moule à charnière dans du papier d'aluminium et placez-le dans un grand plat de cuisson. Ajoutez de l'eau chaude au plat de cuisson jusqu'à mi-hauteur des côtés du moule à charnière.
- Faites cuire pendant 55 à 65 minutes jusqu'à ce que les bords soient pris avec un léger mouvement au centre. Éteignez le four et laissez refroidir à l'intérieur pendant une heure.
- Démoulez et laissez refroidir complètement sur une grille, puis réfrigérez pendant au moins 4 heures ou une nuit.
- Pour le caramel, mélangez le sucre et l'eau dans une casserole et faites cuire à feu moyen jusqu'à ce qu'il devienne ambré. Retirez du feu et incorporez la crème chaude et le beurre jusqu'à ce que le mélange soit lisse.
- Versez le caramel refroidi sur le cheesecake refroidi et décorez avec de la crème fouettée et des copeaux de chocolat. Servez et régalez-vous !