
The Cherry Chocolate Mousse Cake: A Symphony of Sweetness
Have you ever wanted a dessert that feels like a hug? Something that stops the conversation with a quiet “wow” as everyone takes their first bite? This Cherry Chocolate Mousse Cake is that dessert. It’s my secret weapon for dinner parties, a labor of love that combines the deep, dark notes of chocolate with the bright, cheerful pop of cherry. I swear, the moment you unmold it and see that glossy chocolate coating, you’ll feel like a pastry champion.
A Little History on this Chocolate & Cherry Delight
Chocolate and cherry are one of those timeless pairings, like bread and butter. The combination feels classic and modern all at once. While the exact origin of mousse cake is a bit of a delicious mystery, the elegance of airy mousse encased in a firm shell has been charming guests for generations. In my home, this recipe became a tradition after I brought it to a summer potluck. It disappeared in minutes, and I’ve been tweaking it ever since to reach this perfect balance of silky mousse, crunchy base, and fruity surprise. It’s a celebration of contrasts, and it never fails to delight.
Why You’ll Absolutely Love This Recipe
This isn’t just another cake. It’s an experience. First, the process is strangely therapeutic—watching hot cream melt chocolate into a velvety pool is pure joy. Second, it’s incredibly versatile. Made in one large springform pan, it’s a stunning centerpiece. Made in individual ramekins, it’s a personalized treat. Best of all, most of the work is done ahead of time. You get to relax while it sets in the fridge, making you the cool, calm, and collected host who somehow produced a gourmet masterpiece.
Perfect Occasions for Your Cherry Chocolate Delight
This cake shines when you want to impress without stress. It’s perfect for anniversary dinners, where its elegance sets the mood. It’s a show-stopper at holiday gatherings, especially with a few festive decoration tips. I love making it for birthdays as a sophisticated alternative to frosted cake. Honestly, any Tuesday that needs a little sparkle is a good occasion too.
What You’ll Need: The Ingredients List
- For the Base: 1 1/2 cups crushed chocolate biscuits, 1/4 cup melted butter.
- For the Chocolate Mousse: 1 1/2 cups semi-sweet chocolate, 1 cup heavy cream, 1/4 cup powdered sugar, 1 tsp vanilla extract, 1 cup pitted cherries.
- For the Chocolate Coating: 1 1/2 cups dark chocolate, 1 tbsp coconut oil (optional).
- For Garnish: Fresh or candied cherries.
No Cherries? No Problem! Handy Substitutions
Out of an ingredient? Don’t fret. Here are some easy swaps:
- Biscuits: Graham crackers or digestive biscuits work perfectly.
- Heavy Cream: For a lighter mousse, you can use whipping cream, but ensure it has a high fat content (at least 30%) to whip properly.
- Fresh Cherries: Frozen cherries (thawed and patted dry) are excellent. You could also use a high-quality cherry jam swirled into the mousse.
- Dark Chocolate Coating: Semi-sweet or milk chocolate will also work for a sweeter finish.
Creating Your Cherry Chocolate Mousse Cake: Step-by-Step
Step 1: Crafting the Crunchy Base
Start by turning your chocolate biscuits into fine crumbs. I use a food processor for speed, but a zip-top bag and a rolling pin work just as well—plus, it’s a great way to release a little stress! Mix the crumbs with the melted butter until they resemble wet sand. The smell is already incredible. Press this mixture firmly into the bottom of your pan. This layer is the foundation, so take a moment to make it even. Chill it while you work on the mousse, letting the butter firm up to create that perfect crisp bite.
Pro tip: For extra flavor, add a pinch of salt to the crumb mixture. It enhances the chocolate beautifully.
Step 2: Whipping Up the Dreamy Mousse
This is where the magic happens. Chop your chocolate finely so it melts evenly. Heat the cream until you see small bubbles form around the edges—just before a boil. Pour it over the chocolate and let it sit. Be patient! After two minutes, stir slowly. You’ll see it transform into a smooth, glossy ganache. In a separate bowl, whip the remaining cream with powdered sugar and vanilla until soft peaks form. This cloud of sweet cream is what gives the mousse its airy texture. Gently fold the whipped cream into the chocolate mixture. Finally, fold in your cherries with care, trying to keep them whole for juicy bursts in every slice.
Chef’s secret: Ensure your whipped cream and chocolate ganache are both at room temperature when you combine them. If one is too cold, the mousse can seize or become grainy.
Step 3: Assembling and Setting
Pull your chilled base from the fridge. Pour the cherry-studded mousse over the top. Use a spatula to smooth it into an elegant, level layer. Now, the hardest part: walk away. Let the cake set in the refrigerator for at least four hours, though overnight is ideal. This slow setting allows the mousse to firm up perfectly, so it holds its shape when sliced but melts luxuriously on the tongue.
Step 4: The Glossy Chocolate Coat
The grand finale! Melt your dark chocolate gently with the coconut oil, which gives an extra-shiny finish and makes the coating easier to work with. Let it cool slightly so it’s still fluid but not hot. Remove your set cake from the pan. Pour the melted chocolate over the top, using a spatula to gently coax it over the edges for that beautiful drip effect. The contrast of the dark shell against the lighter mousse is stunning. Act quickly here for the smoothest finish.
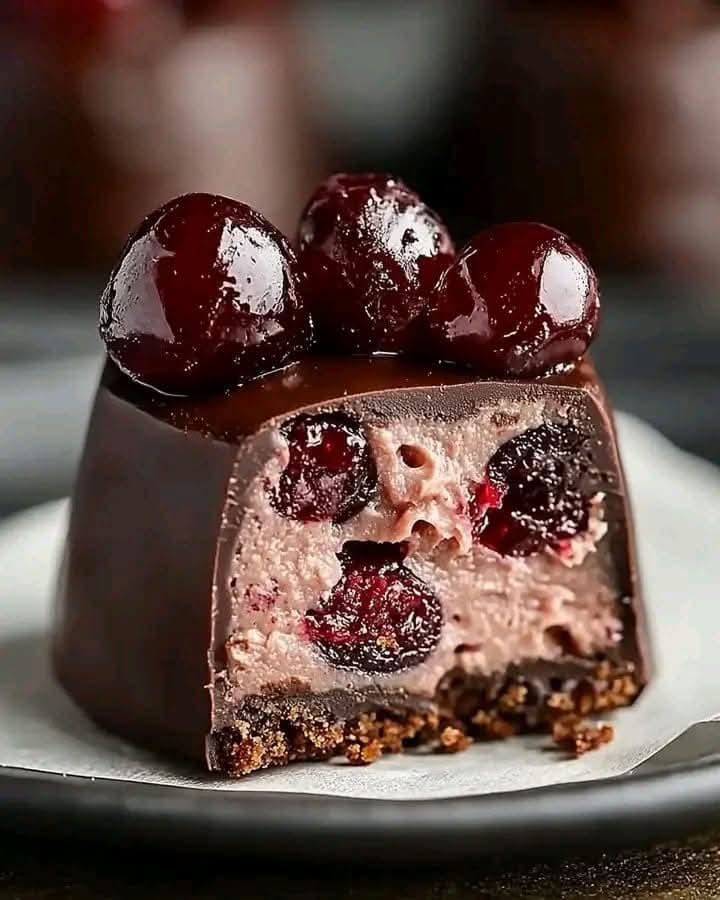
Step 5: The Final Decoration
This is your chance to be an artist. While the chocolate coating is still wet, place your fresh or candied cherries on top. The cherries anchor the design and tell everyone exactly what’s inside. Let the cake set again for 15 minutes in the fridge so the coating hardens. Then, step back and admire your creation. It’s a masterpiece of layers, textures, and flavors, ready to delight.
Timing is Everything
- Prep Time: 30 minutes
- Setting Time: 4 hours (minimum) or overnight
- Decoration Time: 15 minutes
- Total Time: 4 hours 45 minutes (plus overnight chilling recommended)
My Chef’s Secret for the Perfect Mousse
The key to an ethereally light mousse is in the fold. Use a large, flexible spatula and cut through the center of the mixture, folding it over itself with a gentle, rotating motion. Stop the moment no white streaks remain. Over-mixing will deflate all the air you just whipped in, resulting in a dense mousse instead of a cloud.
A Sweet Bit of Extra Info
Did you know the word “mousse” simply means “foam” in French? It’s the perfect description. This dessert is all about capturing air and flavor in a delicate, edible foam. The cherry addition is a nod to classic Black Forest flavors, making this cake feel both familiar and excitingly new.
Necessary Equipment Checklist
- 8 or 9-inch springform pan or individual dessert molds
- Food processor or zip-top bag and rolling pin (for crumbs)
- Medium and large mixing bowls
- Saucepan
- Whisk and spatula
- Electric hand mixer or stand mixer
Storing Your Masterpiece
This Cherry Chocolate Delight must be stored in the refrigerator. Cover it loosely with plastic wrap or place a cake dome over it to protect it from absorbing other food odors. Properly stored, it will keep beautifully for up to 3 days.
For longer storage, you can freeze the cake before adding the final chocolate coating. Wrap the set mousse cake tightly in plastic wrap and then foil. It can be frozen for up to 1 month. Thaw overnight in the refrigerator before adding the glossy chocolate coating and serving.
I do not recommend freezing the cake after the chocolate coating has been applied, as condensation during thawing can ruin the shiny finish.
Tips and Advice for Flawless Results
- Chill Your Bowl: For faster, higher whipped cream, chill your mixing bowl and beaters in the freezer for 10 minutes before starting.
- Cherry Prep: Pat your cherries very dry after pitting. Extra moisture can thin out the mousse.
- Clean Slices: For picture-perfect cuts, dip your knife in hot water and wipe it dry between each slice.
Inspired Presentation Ideas
Make your cake the star of the table! For an elegant garnish, dust the top with a light snowfall of cocoa powder or edible gold dust. Try a layered style by drizzling thin lines of melted white chocolate over the dark coating. Plate presentation is key—serve slices on dark plates to make the glossy chocolate and red cherries pop. For a rustic look, add a small sprig of mint next to the cherries. Give it a holiday touch by scattering crushed pistachios or slivered almonds around the base for texture and color.
Healthier Alternative Ideas
- Nutty Base: Replace biscuit crumbs with a blend of finely ground almonds and dates for a gluten-free, nutrient-dense foundation.
- Avocado Mousse: For a dairy-free version, blend ripe avocado with melted chocolate, a touch of maple syrup, and frozen cherries for a shockingly creamy and rich mousse.
- Yogurt Swirl: Substitute half the heavy cream in the mousse with thick Greek yogurt. It adds protein and a delightful tang that complements the cherries.
- Mini Portions: Make the recipe in a silicone mini-muffin pan. You get all the flavor in a controlled, portion-sized treat, perfect for satisfying a sweet tooth without overindulging.
- Berry Swap: Use fresh raspberries or chopped strawberries instead of cherries for a different, equally delicious fruity profile.
- Sweetener Adjustment: Reduce the powdered sugar in the whipped cream by half and use a high-quality dark chocolate (70% cocoa or higher) for a less sweet, more sophisticated dessert.
Ideas for Your Next Baking Adventure
If you loved the rich chocolate elements of this mousse cake, you might want to explore other decadent creations. For a classic baked treat, this Decadent Chocolate Cake is a crowd-pleaser. Or, dive into the world of layered desserts with a stunning Dark Chocolate Layer Cake. For something with a fun twist, these Blueberry Crunch Cheesecake Bars offer a fantastic mix of textures. And coffee lovers simply must try the sophisticated blend in this Caramel Chocolate Coffee Cheesecake.
Common Mistakes to Avoid
Mistake 1: Using Hot Cream with Cold Ingredients
Pouring hot cream over cold chocolate or mixing warm ganache into cold whipped cream can cause the fat to seize. This creates a grainy, lumpy mousse instead of a smooth one. Always ensure your chopped chocolate is at room temperature before adding the hot cream. Let the ganache cool to room temperature before folding it into the whipped cream.
Mistake 2: Over-whipping the Cream
Whipped cream should be at soft peaks—billowy and smooth. If you whip it to stiff peaks, it becomes grainy and difficult to fold in smoothly. This can lead to a dense, broken mousse. Stop your mixer when the cream holds its shape but the tip of the peak folds over when you lift the beater.
Mistake 3: Skipping the Full Setting Time
Impatience is the enemy of a perfect mousse cake. If you try to coat or slice the cake before it’s fully set, the mousse will collapse, and the layers will bleed together. Respect the fridge time! A full 4 hours is the minimum, but overnight chilling guarantees clean, professional-looking slices.
Mistake 4: Adding Wet Cherries
Frozen cherries release a lot of water when they thaw. If you don’t pat them thoroughly dry, that extra liquid will thin out your mousse, preventing it from setting properly and making the texture weepy. Always thaw frozen cherries and dry them completely with paper towels before folding them in.
A Note on Indulgence and Balance
While this cake is a celebration dessert, enjoying treats as part of a varied diet is key. For more on finding a harmonious approach to food, you can read about the principles of dietary balance from trusted health sources. Remember, the best diet is one where you can savor a slice of something special, made with love and quality ingredients.
For more inspiring dessert ideas like this one, feel free to browse our full collection of delicious cake and cupcake recipes.
Frequently Asked Questions
Can I make this Cherry Chocolate Mousse Cake ahead of time?
Absolutely! In fact, I highly recommend it. This cake needs time to set properly, making it the perfect make-ahead dessert. You can assemble the cake (base and mousse) up to two days in advance. Store it covered in the fridge. Add the glossy chocolate coating and final decorations on the day you plan to serve it for the freshest look and best texture.
My chocolate coating cracked when I cut the cake. What did I do wrong?
This usually happens if the chocolate coating was applied too thickly or if it was too cold when sliced. For a thinner, more flexible shell, you can add a bit more coconut oil to the melting chocolate. Also, make sure to use a very sharp, thin-bladed knife that has been dipped in hot water and wiped dry. The heat will glide through the chocolate cleanly without causing it to shatter.
Can I use milk chocolate instead of dark or semi-sweet?
You can, but be mindful of the sweetness. Milk chocolate is much sweeter and softer than dark chocolate. If using it for the mousse, the dessert will be very sweet. If using it for the coating, it may not set as firmly. For best results, I recommend sticking with semi-sweet or dark chocolate (between 55-70% cocoa) for a balanced, grown-up flavor that contrasts nicely with the sweet cherries.
Do I have to use a springform pan?
While a springform pan makes unmolding incredibly easy, it’s not strictly required. You can use a regular cake pan lined with enough overhang of plastic wrap or parchment paper to create “handles” to lift the set cake out. Individual serving glasses or ramekins are also a wonderful, no-fuss option—simply layer the crumb base and mousse directly in them.
How do I prevent the cherries from sinking to the bottom of the mousse?
This is a common concern! The trick is to ensure your mousse mixture is thick enough before adding the cherries. Let the chocolate ganache cool until it’s almost at room temperature and has begun to thicken slightly before folding in the whipped cream. A thicker base will help suspend the cherries. Also, fold them in very gently at the very last moment before pouring.
Is there a way to make this dessert alcohol-free?
This recipe is naturally alcohol-free! The rich flavor comes purely from the quality chocolate, real vanilla, and fresh fruit. If you see other recipes that include liqueur, you can safely omit it without needing to substitute anything else. The cake will be just as delicious and family-friendly.
Can I use cherry jam or preserves instead of fresh cherries?
Yes, this is a great hack, especially when fresh cherries are out of season. Use about 3/4 cup of a good-quality, thick cherry jam or preserves. After pouring the plain mousse into the pan, dollop spoonfuls of the jam on top and use a knife or skewer to swirl it gently through the mousse. This creates beautiful ribbons of flavor.
Why did my mousse turn out lumpy?
Lumps usually occur if the chocolate wasn’t fully melted or if the hot cream was too hot and caused the fat to separate. Ensure your chocolate is finely chopped. Heat the cream until it’s just simmering, not boiling. Let it sit on the chocolate for a full 2-3 minutes before stirring to allow the residual heat to melt everything gently. Stir slowly from the center outward.
How long can the finished cake sit out at room temperature?
Because it’s a dairy-based mousse, it shouldn’t sit out for more than 1-2 hours at room temperature. For food safety and to maintain its perfect texture, keep it refrigerated until just before serving. Serve on chilled plates if your gathering is outdoors or in a warm room.
Can I make a vegan version of this cake?
You can certainly try! Use vegan dark chocolate. For the mousse, substitute full-fat coconut milk (chilled) for the heavy cream—the solid part can be whipped. Use a plant-based butter in the base. Agar-agar might be needed as a stabilizer since the setting properties will be different. It requires some experimentation, but a rich, plant-based version is definitely possible.
Your New Signature Dessert Awaits
There you have it. The Cherry Chocolate Mousse Cake isn’t just a recipe; it’s a confidence-builder. It teaches you about texture, timing, and the pure joy of creating something beautiful. The next time you need a dessert that whispers elegance and shouts deliciousness, you know exactly what to make. Gather your ingredients, take your time, and get ready for the compliments. You’ve earned them.
Equipment
- Grand bol
- Fouet
- Spatule
- Plaque à pâtisserie
- Papier sulfurisé
Ingredients
- 1 1/2 tasse biscuits au chocolat écrasés
- 1/4 tasse beurre fondu
- 1 1/2 tasse chocolat semi-sucré
- 1 tasse crème épaisse
- 1/4 tasse sucre en poudre
- 1 cuil. à café extrait de vanille
- 1 tasse cerises dénoyautées
- 1 1/2 tasse chocolat noir
- 1 cuil. à soupe huile de coco facultatif
- q.s. cerises fraîches ou confites pour la décoration
Instructions
- Écrasez les biscuits au chocolat en miettes fines et mélangez-les avec le beurre fondu.
- Appuyez le mélange de biscuits dans le fond d'un moule à charnière et réfrigérez.
- Faites chauffer la crème jusqu'à ce que de petites bulles se forment, puis versez-la sur le chocolat finement haché et laissez reposer.
- Mélangez le chocolat pour former une ganache lisse.
- Battez la crème restante avec le sucre en poudre et la vanille jusqu'à ce que des pics souples se forment.
- Incorporez délicatement la crème fouettée dans le mélange de chocolat, puis ajoutez les cerises dénoyautées.
- Versez la mousse sur le fond réfrigéré et lissez, puis placez au réfrigérateur pendant au moins 4 heures.
- Faites fondre le chocolat noir avec l'huile de coco et laissez refroidir légèrement.
- Versez le chocolat fondu sur la mousse prise et étalez avec une spatule.
- Décorez avec des cerises fraîches ou confites, puis réfrigérez pendant 15 minutes supplémentaires pour prendre.