
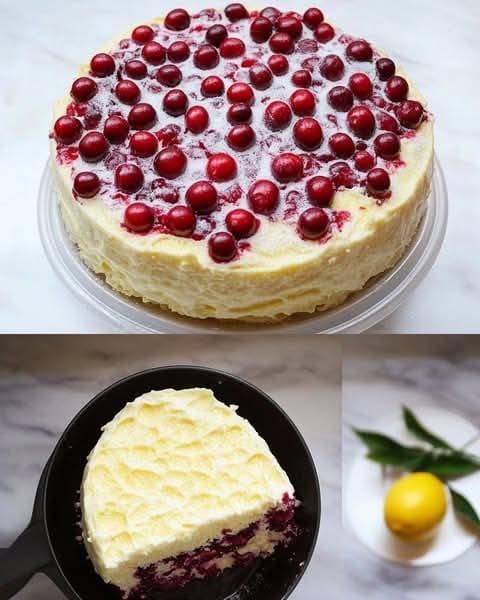
Sunshine on a Plate: Introducing Lemon Cranberry Delight
Have you ever wanted to capture the taste of a bright, cheerful day in a dessert? That’s exactly what this Lemon Cranberry Delight cake does. It’s a fluffy, citrus-kissed sponge hugging a jewel-bright, tangy cranberry filling. One bite and you get the sunny lift of lemon and the cheerful zing of berries. It’s the cake I make when my family needs a little pick-me-up, and it never fails to bring smiles.
My Journey with This Zesty Treat
This recipe was born from a happy accident. I had a bag of fresh cranberries left from the holidays and a bowl of lemons on the counter. I wondered what would happen if I paired their bold flavors in a simple, elegant cake. After a few tries (some too tart, some too sweet), I landed on this perfect balance. The airy sponge soaks up the cranberry goodness without getting soggy, and the gelatin sets the filling just right for clean slices. It’s become my go-to for book club and my daughter’s spring recital. It feels special without being fussy.
Why You’ll Adore This Lemon Cake with Cranberry Filling
This cake is a winner for so many reasons. First, the flavors are a perfect dance – the lemon is fresh and inviting, while the cranberry adds a sophisticated, tangy punch. It’s beautiful to look at with its vibrant red filling layered in soft yellow cake. Best of all, it’s surprisingly straightforward. The steps are clear, and most of the work is hands-off baking and chilling time. You end up with a stunning dessert that looks like you spent all day in the kitchen.
When to Serve Your Lemon Cranberry Delight
This versatile cake fits any occasion. It’s light enough for a summer garden party but festive enough for Thanksgiving or Christmas dessert. I love it for Easter brunch or a Mother’s Day tea. It’s also my secret weapon for potlucks – it travels well and always stands out on the table. Honestly, it’s just as wonderful for a simple Tuesday night treat with a cup of tea.
What You’ll Need: Ingredients List
For the Lemon Cake Base:
- 5 medium eggs
- 180 g sugar
- A pinch of salt
- Vanilla extract, to taste
- 170 g flour
- ½ tsp baking powder (optional, for extra lift)
- 30 g vegetable oil
- 20 g fresh lemon juice
- Zest from 1 lemon
For the Cranberry Filling:
- 450 g fresh or frozen cranberries
- 100-150 g sugar (adjust to your taste)
- 12 g powdered gelatin
- 80 g water
Flexible Swaps: Ingredient Substitutions
Don’t fret if you’re missing something! This recipe is forgiving.
- Cranberries: Frozen work just as well as fresh. You can also use other tart berries like raspberries or blackberries.
- Lemon Juice: Fresh is best, but bottled lemon juice will work in a pinch.
- Vegetable Oil: Any neutral oil like canola or a light olive oil is fine. Melted, cooled butter can be used for a richer flavor.
- Gelatin: For a vegetarian option, you can use an equivalent amount of agar-agar, but follow the package instructions for setting.
Creating Your Lemon Cranberry Delight: Step-by-Step
Let’s bake! Clear your counter, put on some music, and get ready to make something wonderful.
Step 1: Bake the Lemon Sunshine
Preheat your oven to 175°C (350°F). Grease and line a 22 cm round cake pan. Now, let’s get airy. In a large bowl, beat the eggs, sugar, and salt with a mixer on high speed. Watch it transform from grainy yellow to a pale, voluminous, ribbon-like batter. This takes about 7-10 minutes – don’t rush it! This air is the foundation of your cake’s beautiful texture. Sift the flour and baking powder over this fluffy cloud. Use a spatula to gently fold it in, turning the mixture with care to keep all that precious air. Finally, drizzle in the oil, lemon juice, and zest, folding just until combined. Pour the batter into your prepared pan and bake for 25-30 minutes. Your kitchen will smell incredible. The cake is done when it’s golden and springs back at your touch.
Pro tip: To test for doneness without opening the oven door too early, use a toothpick. If it comes out clean, your cake is ready.
Step 2: Cook the Ruby Red Filling
While the cake cools, let’s make the star filling. In a saucepan, combine the cranberries and sugar. Cook over medium heat. Listen for the gentle pops as the berries burst, releasing their deep, ruby juice and a wonderfully tart aroma. Stir occasionally for 5-7 minutes until you have a saucy, jam-like mixture. For a super smooth filling, blend this and then push it through a fine sieve to remove the skins. I sometimes leave a few bits for texture. In a small bowl, mix the gelatin with the 80g of water and let it sit for 5-10 minutes until it looks spongy. Gently heat this bloomed gelatin (in the microwave for 10-second bursts works) until it becomes a clear liquid. Stir this liquid into your warm cranberry puree until fully dissolved, then let it cool to room temperature. It will start to thicken slightly.
Step 3: Assemble the Masterpiece
Once your cake is completely cool, it’s time for the fun part. Using a long serrated knife, slice the cake horizontally into 2 or 3 even layers. Take your time and use a gentle sawing motion. Place the bottom layer on your serving plate. Spread a generous, even layer of the cranberry filling right to the edges. Place the next cake layer on top and repeat. You can leave the top bare for a rustic look or add a final thin layer of filling. Now, the hardest part: patience. Carefully transfer your cake to the refrigerator. Let it chill for at least 3 hours, or better yet, overnight. This allows the gelatin in the filling to set perfectly, ensuring you get clean, beautiful slices.
Chef’s secret: For ultra-clean slices, dip your knife in hot water and wipe it dry between each cut.
Timing Your Baking Success
- Prep Time: 30 minutes
- Baking Time: 30 minutes
- Filling Prep & Assembly: 20 minutes
- Chilling Time: 3 hours (minimum)
- Total Time: 4 hours 20 minutes (mostly hands-off chilling)
A Little Baking Secret
For an even more intense lemon flavor, you can brush the warm cake layers with a simple syrup made from equal parts lemon juice and sugar before assembling. This adds moisture and a powerful citrus punch.
The Story of the Cranberry
Native to North America, cranberries are one of only three major fruits native to this continent (along with blueberries and Concord grapes). They’re harvested in fall, often using a method called “wet harvesting,” where fields are flooded, and the buoyant berries are collected from the water’s surface. That tart flavor comes from natural acids, which also help preserve the berry, making it a fantastic ingredient for fillings and sauces.
Your Kitchen Tools
You don’t need fancy equipment for this. Gather these basics:
- 22 cm (9-inch) round cake pan
- Parchment paper
- Stand mixer or hand mixer
- Large mixing bowl and spatula
- Saucepan
- Blender or food processor (optional, for smooth filling)
- Fine mesh sieve
- Serrated bread knife for slicing layers
Keeping Your Lemon Cranberry Delight Fresh
Because of the fresh berry filling, this cake needs to be stored in the refrigerator. Cover it loosely with plastic wrap or place it in a cake carrier. It will keep beautifully for up to 3 days. The flavors actually meld and improve after the first day.
You can also freeze the unfilled cake layers individually. Wrap them tightly in plastic wrap and then aluminum foil. They can be frozen for up to 2 months. Thaw at room temperature before filling and assembling.
The cranberry filling can be made ahead and stored in an airtight container in the fridge for up to 5 days. Let it come to room temperature and give it a stir before using.
Tips for a Flawless Cake
- Ensure your eggs are at room temperature. They whip up to a much greater volume than cold eggs.
- When folding, use a gentle hand and a wide spatula. You want to keep the air in the batter.
- Let the cake cool completely before slicing and filling. A warm cake will melt the gelatin and make the filling runny.
- If your cranberries are very tart, lean towards the higher amount of sugar. Taste the puree as it cooks and adjust.
Presenting Your Creation
This cake is a stunner on its own, but a few simple touches make it extra special. A dusting of powdered sugar on top looks like a light snowfall. You can garnish with fresh cranberries, lemon zest twists, or even edible flowers. For serving, a dollop of softly whipped cream or a scoop of vanilla bean ice cream on the side is pure heaven.
Love This? Try These Other Fruity Cakes!
If you enjoyed the balance of sweet cake and tart fruit in this Lemon Cranberry Delight, our website has more wonderful recipes you might love. For a truly decadent option, our rich and moist chocolate cake is a classic for a reason. If you’re fascinated by elegant, molded desserts, the Chocolate Lemon Mousse Domes offer a stunning combination. For a no-bake, crowd-pleasing option, the Funfetti Oreo Icebox Cake is always a hit. And for another beautiful berry layer cake, explore the Cherry-Blackberry Symphony.
Common Mistakes to Avoid
Mistake 1: Under-Whipping the Eggs
This is the most common pitfall. If you don’t whip the eggs and sugar long enough, your cake won’t get that essential light, fluffy texture. It might bake up dense or flat. The mixture should be very pale yellow and thick enough that when you lift the beaters, the batter falls in a ribbon that holds its shape on the surface for a few seconds. Be patient – this step is non-negotiable for the perfect crumb.
Mistake 2: Adding Hot Filling to the Cake
Pouring warm or hot cranberry filling onto your cake layers is a recipe for disaster. The heat will melt the delicate crumb, make the layers soggy, and prevent the gelatin from setting properly. Always, always let the filling cool to room temperature. It should feel just slightly warm to the touch, not hot, before you spread it.
Mistake 3: Skipping the Chill Time
I know it’s tempting to slice into your beautiful cake right away. But if you don’t let it chill for the full 3+ hours, the filling won’t be set. You’ll end up with a messy, runny slice instead of a neat, elegant one. The chilling time is what gives the cake its structure and makes it easy to serve. Think of it as the filling’s time to firm up and become the perfect texture.
Connecting Flavor to Fullness
The bright, tangy flavors in this cake aren’t just delicious; they can also play a role in how satisfying we find a dessert. Foods with strong, complex flavors can influence our satiety signals, helping us feel more content with a reasonable portion. So enjoying a slice of this vibrant cake can be a truly fulfilling experience.
For more baking inspiration just like this, explore our full collection of favorite cake and cupcake recipes where you’ll find everything from simple snacking cakes to grand celebration desserts.
Frequently Asked Questions
Can I use frozen cranberries?
Absolutely! Frozen cranberries work perfectly in this recipe. There’s no need to thaw them first. Just add them directly to the saucepan with the sugar. You may need to add a minute or two to the cooking time since they start out colder, but the process and results are identical to using fresh berries.
My cake didn’t rise very much. What went wrong?
The most likely culprit is the egg mixture. It must be whipped until it’s very thick, pale, and has significantly increased in volume. If the eggs were cold or you didn’t whip them long enough, the cake will be dense. Also, be very gentle when folding in the flour. Aggressive stirring will deflate all the air you just worked so hard to incorporate. Make sure your baking powder is fresh, too.
Can I make this cake ahead of time?
Yes, this is a fantastic make-ahead dessert. You can bake the cake layers up to two days in advance. Let them cool completely, then wrap them tightly in plastic wrap and store at room temperature. The cranberry filling can be made up to 5 days ahead and stored in the fridge. Assemble the cake the day before you need it so it has plenty of time to set in the refrigerator.
Is there a substitute for gelatin?
For a vegetarian version, you can use agar-agar, which is derived from seaweed. However, the substitution is not 1:1. Typically, you use about half to three-quarters the amount of agar-agar powder compared to gelatin. Always follow the setting instructions on the agar-agar package, as it requires boiling to activate.
My filling is too runny. How can I fix it?
If your filling hasn’t set after chilling, the gelatin may not have fully dissolved or activated. You can gently reheat the filling in a saucepan over low heat until it liquefies. Sprinkle an additional half teaspoon of gelatin over a tablespoon of cold water, let it bloom, then dissolve it into the warm filling. Mix well and let it cool again before re-assembling.
Can I use a different pan size?
You can, but it will affect the baking time and height of the cake. A 9-inch round pan (22 cm) is ideal. If you use an 8-inch pan, the batter will be deeper and will need a few more minutes to bake through. If you use a larger pan, like a 10-inch, the layers will be thinner and will bake faster. Always check for doneness with a toothpick a few minutes before the recipe suggests.
Why is my cranberry filling so tart?
Cranberries are naturally very tart. The sugar in the recipe balances that, but personal taste varies. Always taste your filling after cooking and before adding the gelatin. You can stir in more sugar, a tablespoon at a time, until it reaches your preferred balance of sweet and tart. Remember, it will be slightly less sweet once layered with the cake.
Can I turn this into cupcakes?
You sure can! Divide the cake batter into lined muffin tins, filling each cup about 2/3 full. Bake at the same temperature for about 15-20 minutes, or until a toothpick comes out clean. Once cool, you can core the center of each cupcake and pipe in the chilled cranberry filling for a fun, handheld version of this dessert.
How do I get perfectly even cake layers?
Use a kitchen scale for the most accuracy. After baking and cooling, weigh the entire cake. Then, divide that weight by the number of layers you want (2 or 3). When slicing, use a serrated knife and mark the side of the cake at the correct height all the way around before you start cutting. Turn the cake slowly as you cut, following your score marks.
Can I freeze the assembled cake?
I don’t recommend freezing the fully assembled cake with the cranberry filling, as the texture of the set filling can become watery when thawed. It’s better to freeze the plain cake layers separately and make the filling fresh when you’re ready to assemble and serve.
A Dessert to Remember
This Lemon Cranberry Delight is more than just a cake. It’s a burst of sunshine and cheer in every slice. The process of making it is as enjoyable as eating it. From whipping the lemony batter to watching the cranberries pop into a ruby glaze, it’s a baking project that feels special. I hope it brings as much joy to your table as it has to mine. Now, go preheat that oven and get ready for the compliments to roll in.
Equipment
- Grand bol
- Fouet
- Spatule
- Moule à gâteau
- Papier sulfurisé
Ingredients
- 5 œufs
- 180 g sucre
- 1 g sel
- q.s. extrait de vanille au goût
- 170 g farine
- 0.5 cuil. poudre à lever facultatif, pour un meilleur levé
- 30 g huile végétale
- 20 g jus de citron frais
- 1 zeste d'un citron
- 450 g canneberges fraîches ou congelées
- 100-150 g sucre supplémentaire ajustez selon votre goût
- 12 g gélatine en poudre
- 80 g eau
Instructions
- Préchauffez votre four à 175°C et graissez un moule à gâteau rond de 22 cm.
- Dans un grand bol, battez les œufs, le sucre et le sel avec un mixeur à haute vitesse pendant 7-10 minutes jusqu'à ce que le mélange soit pâle et volumineux.
- Tamisez la farine et la poudre à lever (si utilisée) sur le mélange battu et incorporez délicatement.
- Incorporez l'huile végétale, le jus de citron et le zeste de citron en pliant jusqu'à ce que le tout soit juste combiné.
- Versez la pâte dans le moule préparé et faites cuire pendant 25-30 minutes jusqu'à ce qu'elle soit dorée et rebondie.
- Alors que le gâteau refroidit, préparez la garniture de canneberges en combinant les canneberges et le sucre dans une casserole et en faisant cuire à feu moyen pendant 5-7 minutes jusqu'à obtenir une consistance de sauce.
- Pour une garniture lisse, mélangez le mélange et passez-le à travers un tamis fin si désiré.
- Dans un petit bol, mélangez la gélatine avec l'eau et laissez-la reposer pendant 5-10 minutes jusqu'à ce qu'elle soit spongieuse.
- Chauffez la gélatine réhydratée jusqu'à ce qu'elle soit claire et incorporez-la dans la sauce aux canneberges tiède jusqu'à dissolution.
- Après que le gâteau ait complètement refroidi, tranchez-le horizontalement en 2 ou 3 couches.
- Étalez la garniture de canneberges uniformément sur la couche inférieure, ajoutez la couche suivante et répétez.
- Optionnellement, ajoutez une dernière fine couche de garniture de canneberges sur le dessus.
- Réfrigérez le gâteau assemblé pendant au moins 3 heures ou toute la nuit avant de servir.