
A Dessert That Changed Everything for Me
I’ll never forget the first time I tasted cheesecake brulee at a tiny French bistro in Brooklyn. The moment my spoon cracked through that glassy caramel top, I knew I’d found something special. The sugar shell shattered like thin ice, revealing the creamiest cheesecake I’d ever tasted underneath. That single bite made me realize that some of the best creations come from taking two amazing things and bringing them together in unexpected ways.
Cheesecake brulee does exactly that. It takes the rich, smooth texture of classic cheesecake and adds the dramatic, crackling sugar crust that makes crème brûlée so addictive. You get two beloved desserts in one perfect bite. The contrast between the cool, creamy filling and the warm, crispy topping creates an experience that feels both familiar and completely new.
This dessert isn’t something you throw together on a random Tuesday night. It’s what you make when you want to show someone you care. It’s what you serve when you want your dinner guests to remember the meal for weeks. The extra effort pays off every single time.
Where These Two Classics Come From
Cheesecake has been around for thousands of years. The ancient Greeks served it to athletes during the first Olympic games. They believed it gave competitors energy and strength. The Romans took the recipe and spread it across Europe as their empire grew. Each region added its own twist over the centuries.
The New York-style cheesecake we know today became popular in the early 1900s. A Jewish deli owner named Arnold Reuben claimed he invented it. Whether that’s true or not, Americans fell in love with the dense, creamy version made with cream cheese. It became a staple in diners and bakeries across the country.
Crème brûlée has a different story. The French and Spanish both claim they invented it. Some food historians trace it back to 17th century France. Others point to a similar Spanish dessert called crema catalana that appeared even earlier. The name means “burnt cream” in French, which perfectly describes the torched sugar on top.
Both desserts earned their place as classics over hundreds of years. They stood the test of time because people couldn’t get enough of them. Combining these two icons into cheesecake brulee was only a matter of time. Someone had to do it, and I’m grateful they did.
What Exactly Is Cheesecake Brulee?
Let me break down what makes this dessert so special. At its core, cheesecake brulee starts with a traditional cheesecake base. You make it with cream cheese, eggs, sugar, and usually some vanilla. The mixture bakes until it sets into that signature smooth, dense texture. Some recipes include sour cream or heavy cream to make it even richer.
The magic happens after the cheesecake cools. You sprinkle a thin layer of sugar across the top. Then comes the fun part. You use a kitchen torch to melt and caramelize that sugar until it turns golden brown and hardens into a crispy shell. Some people use their oven’s broiler if they don’t have a torch, though a torch gives you more control.
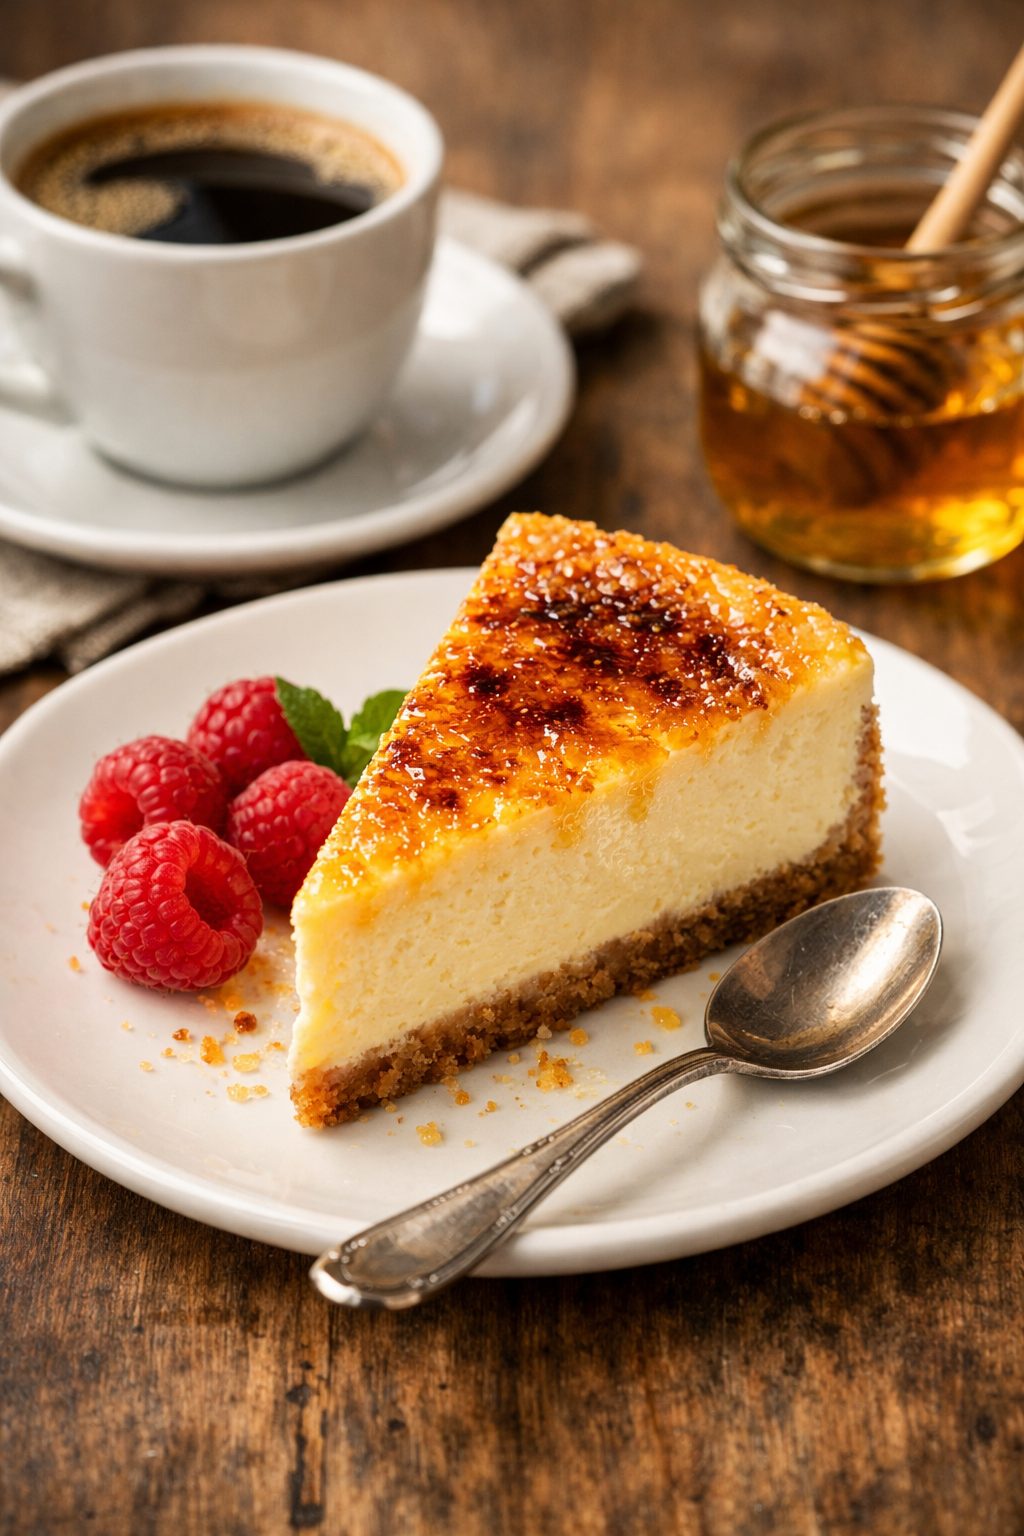
The result is a dessert with two distinct layers working together. The bottom layer offers that classic cheesecake experience – cool, creamy, and tangy. The top layer provides texture and a deep caramel flavor that you don’t find in regular cheesecake. When you take a bite, your spoon breaks through the crunchy top and sinks into the soft filling below.
The Taste and Texture Experience
I always tell people that eating cheesecake brulee is like experiencing three different sensations at once. First, you hear the crack of the sugar shell breaking. That sound alone makes you smile. Then you feel the contrast between the brittle caramel and the velvety cheesecake. Your taste buds pick up the slight bitterness of the burnt sugar against the sweet, tangy cream cheese.
The cheesecake itself should melt on your tongue. It shouldn’t feel heavy or gummy. A good cheesecake brulee has a silky texture that seems almost impossible to achieve. The filling should taste rich without being overwhelming. You want people to finish their serving and immediately think about having another piece.
The caramelized sugar adds complexity to every bite. When sugar heats up and caramelizes, it develops deeper flavors. You get notes of butterscotch, toffee, and even a hint of toasted nuts. This layer isn’t just about adding crunch. It transforms the whole flavor profile of the dessert.
Endless Ways to Make It Your Own
One of my favorite things about cheesecake brulee is how adaptable it is. You can stick with a classic vanilla version, or you can get creative with flavors. I’ve made versions with fresh berries mixed into the filling. I’ve topped finished slices with raspberry sauce or strawberry compote. The tartness of the fruit cuts through the richness perfectly.
Chocolate lovers can add melted dark chocolate to the cheesecake batter. The result is like a chocolate crème brûlée meets chocolate cheesecake. I’ve also experimented with coffee by mixing espresso powder into the filling. That version tastes like a fancy Italian dessert you’d pay $15 for at a restaurant.
Spices open up even more possibilities. A pinch of cinnamon or cardamom can make your cheesecake brulee feel warm and cozy. During fall, I add pumpkin puree and pumpkin pie spices. At Christmas, I’ve made peppermint versions by mixing in crushed candy canes. The base recipe stays the same, but the flavors change completely.
You can also play with the crust. Graham crackers are traditional, but I’ve used crushed Oreos, vanilla wafers, and even gingersnaps. Each type of cookie or cracker brings its own personality to the finished dessert. Some people skip the crust entirely and make crustless cheesecake brulee in ramekins.
The size and presentation offer flexibility too. You can make one large cheesecake and brulee the whole top. You can portion it into individual ramekins for a restaurant-style presentation. Mini versions work great for parties where people want just a taste of something sweet. Each format works as long as you get that satisfying sugar crust on top.

Making Your Own Cheesecake Brulee From Scratch
Now that you know how versatile this dessert can be, let me walk you through actually making it. I remember standing in my kitchen the first time, feeling a bit nervous about whether I could pull it off. Turns out, if you can make regular cheesecake, you can absolutely make cheesecake brulee. The extra step of torching the sugar is honestly the easiest part.
You’ll need cream cheese as your foundation. I always buy full-fat cream cheese, never the low-fat stuff. Trust me on this. Those two blocks sitting at room temperature for about an hour make all the difference. Cold cream cheese creates lumps no matter how much you mix it. Room temperature cream cheese blends into silk.
Grab some granulated sugar for both the filling and the bruleed top. You’ll need eggs to help everything set properly. Vanilla extract brings out all the other flavors. Heavy cream or sour cream adds extra richness. For the crust, graham crackers work perfectly, along with melted butter and a bit more sugar. And of course, you need extra sugar specifically for caramelizing on top. I like superfine sugar for the brulee part because it melts more evenly.
Equipment-wise, you need a springform pan if you’re making a full-sized cheesecake. Or grab some ramekins for individual servings. Either way works beautifully. A food processor makes crushing graham crackers super easy, though you can also put them in a bag and smash them with a rolling pin. That actually feels pretty satisfying after a long day.
The kitchen torch is where people get intimidated. Don’t be. These little torches cost around twenty dollars and they’re ridiculously fun to use. If you really don’t want to buy one, your oven’s broiler can work in a pinch. But honestly, the torch gives you so much more control. Plus, you’ll find yourself looking for excuses to torch other things once you have one.
Walking Through Each Step of the Process
Start with your crust. Mix those crushed graham crackers with melted butter and sugar until everything looks like wet sand. Press this mixture firmly into the bottom of your pan. I use the bottom of a measuring cup to really pack it down. Nobody wants a crust that falls apart when you cut into it. Bake the crust for about ten minutes, then let it cool while you make the filling.
Here’s where technique really matters. Beat your room temperature cream cheese until it’s completely smooth. This takes longer than you think. Keep mixing until you see zero lumps whatsoever. Then add your sugar and beat it again until fluffy. This is when air gets incorporated, which helps create that light texture despite how rich the dessert is.
Add eggs one at a time. This is crucial. If you dump all the eggs in at once, you’ll overmix trying to incorporate them. Overmixing creates cracks and a dense texture. One egg, mix until just combined. Next egg, same thing. Finally, stir in your vanilla and cream. The batter should look silky and move slowly when you tilt the bowl.
Pour this gorgeous mixture over your cooled crust. Now comes something I learned the hard way. You need a water bath. Place your springform pan inside a larger roasting pan. Fill the roasting pan with hot water until it comes about halfway up the sides of your cheesecake pan. This water bath keeps everything cooking gently and evenly. It prevents cracks and creates that perfect creamy texture. The first time I skipped this step, my cheesecake looked like the Grand Canyon.
Bake at a lower temperature than you’d expect. Around 325°F works well. You’re looking for the edges to be set while the center still jiggles slightly when you shake the pan. This usually takes about an hour, sometimes a bit more. The cheesecake will continue cooking as it cools, so pulling it out when it still looks slightly underdone is actually perfect.
Let it cool gradually. Turn off the oven, crack the door, and let the cheesecake sit there for an hour. Then move it to the counter for another hour. Finally, refrigerate it for at least four hours, though overnight is better. I know this seems like forever, but rushing this part ruins everything. Similar to how pumpkin pie cheesecake recipe needs proper chilling time, patience here pays off big time.
Creating That Perfect Caramelized Sugar Crust
This is the moment that transforms regular cheesecake into cheesecake brulee. Take your completely chilled cheesecake and sprinkle an even layer of superfine sugar across the entire top. You want enough to create a crust, but not so much that you end up with a thick candy shell. About two tablespoons for a full cheesecake works well. For individual ramekins, a teaspoon each does the trick.
Tilt the pan gently and tap the sides to spread the sugar evenly. Any bare spots won’t brulee properly, and any piles of sugar will burn before melting. Getting this layer uniform makes everything easier.
Now grab your kitchen torch. Hold it about three inches from the surface. Keep it moving in small circles. You’ll see the sugar start to bubble and turn golden. Don’t focus on one spot too long or you’ll burn it. The goal is an even amber color across the whole surface. Some darker spots add character, but you don’t want anything black.
The sugar will look wet and bubbly at first. Give it about two minutes to cool and harden. You’ll actually hear it crackling as it sets. That’s the sound of success right there. The final crust should look like glass and feel hard when you tap it gently with a spoon.
If you’re using a broiler instead, watch it like a hawk. Place your cheesecake on the top rack and keep the oven door open. The sugar can go from perfect to burnt in literally fifteen seconds. I’ve lost count of how many times I’ve seen people walk away for “just a second” and come back to a smoking disaster. Just like when making pecan pie cheesecake bars, timing matters tremendously when you’re dealing with sugar and heat.
Avoiding the Most Common Cheesecake Brulee Mistakes
Let me save you from the mistakes I made when I started. First, don’t overbake. An overbaked cheesecake tastes grainy and dry instead of creamy. Remember that jiggle in the center when you pull it out. If the whole thing looks completely firm in the oven, you’ve already gone too far.
Temperature really matters with cream cheese. I can’t stress this enough. Cold cream cheese will never blend smoothly no matter how long you beat it. Those little lumps stay there and ruin the texture. Set it out early or microwave it for ten seconds if you forgot. Room temperature is your friend.
Don’t torch the sugar too far in advance. The crust starts absorbing moisture from the cheesecake after about an hour. It loses that satisfying crack and becomes soft. Brulee it right before serving for maximum impact. Your guests will be way more impressed if they see you torch it anyway.
Cracking is the biggest frustration for most people. Besides using a water bath, make sure you’re not opening the oven door constantly to check on things. Every time you open that door, the temperature drops suddenly. Cheesecake hates temperature changes. Set a timer and trust the process.
Serving This Stunner to Wow Your Guests
Presentation takes this dessert from homemade to restaurant-quality. I love serving individual portions in those cute little ramekins. Each person gets their own personal brulee to crack into. It feels special. You can find ramekins at any kitchen store, and they’re useful for so many other things too.
Fresh berries make the perfect garnish. The bright colors pop against the golden caramel. Raspberries, blueberries, and blackberries all work beautifully. I usually arrange a small handful on the side of each plate. Sometimes I’ll add a tiny sprig of mint for color. Strawberries work great too, especially if you’re going for a strawberry cheesecake without baking vibe but with that bruleed twist.
A drizzle of sauce elevates everything. Raspberry coulis adds tartness that cuts through the richness. Caramel sauce creates a double-caramel situation that caramel lovers go crazy for. Dark chocolate sauce makes it feel more decadent. I keep a squeeze bottle in my kitchen specifically for making pretty drizzles on dessert plates.
Funny enough, a light dusting of powdered sugar right before serving photographs beautifully. It doesn’t add much flavor since you’ve already got that sweet crust, but it makes the whole thing look professional. Cinnamon works too if you’re serving a spiced version.
Pairing Drinks and Planning the Perfect Occasion
Coffee and cheesecake brulee were made for each other. The slight bitterness of espresso balances all that sweetness and cream. I’ve served this dessert after dinner parties with tiny cups of strong coffee, and people literally asked for the recipes for both. A cappuccino works just as well if you want something a bit lighter.
Tea drinkers shouldn’t feel left out. Earl Grey’s bergamot notes complement the vanilla beautifully. Chai tea echoes any warm spices you might have added to your cheesecake. Even a simple chamomile tea provides a gentle contrast that lets the dessert shine.
For something more special, try a dessert wine. Port has that deep, sweet flavor that doesn’t compete with the cheesecake. Late harvest Riesling brings fruity notes that work especially well if you’ve topped your brulee with berries. Moscato d’Asti is lighter and bubbly, which feels celebratory. During fall, I’ve paired pumpkin swirl cheesecake variations with spiced rum, and that same idea works here.
This dessert fits so many occasions. Dinner parties are the obvious choice. When you want to end a meal with something memorable, cheesecake brulee delivers every time. Holidays work perfectly too. I’ve made this for Thanksgiving, Christmas, and even Easter brunch.
Here’s something people don’t always think about. Cheesecake brulee makes an incredibly romantic dessert for two. Make it in small ramekins, light some candles, and torch the sugar right at the table. The whole experience feels intimate and special. Way better than ordering takeout dessert.
Birthday celebrations deserve cheesecake brulee instead of regular cake sometimes. Adults especially appreciate something sophisticated instead of another sheet cake with buttercream. You can even stick a candle right through that sugar crust if you want. Just brulee around where the candle will go.
Making Cheesecake Brulee Lighter and Healthier
Here’s the thing about dessert. Nobody expects it to be health food. But that doesn’t mean we can’t make smarter choices without sacrificing the experience. I’ve spent years tweaking my cheesecake brulee recipe to find versions that feel less heavy without losing what makes it special in the first place.
Neufchâtel cheese works surprisingly well instead of regular cream cheese. It has about a third less fat, but the texture stays creamy enough that most people can’t tell the difference. I discovered this by accident when I grabbed the wrong package at the store one day. The cheesecake turned out lighter and slightly fluffier than usual. My dinner guests that night had no idea they were eating a lower-fat version.
Greek yogurt is another game-changer. Replace half your cream cheese with full-fat Greek yogurt and you’ll cut calories while adding protein. The tanginess actually improves the flavor profile. You get that signature cheesecake taste but with a brighter, fresher quality. I’ve made batches using two-thirds Greek yogurt and one-third cream cheese that came out absolutely perfect.
Natural sweeteners open up interesting possibilities. Honey adds moisture and a floral sweetness that refined sugar can’t match. Maple syrup brings warm notes that work especially well in fall-spiced versions. Coconut sugar caramelizes beautifully for the bruleed top and has a lower glycemic index than white sugar. When making nutritious choices in your desserts, these alternatives let you enjoy treats while being mindful of your health goals.
Monk fruit sweetener has become my secret weapon lately. It measures cup-for-cup like sugar but has zero calories. The flavor is clean and sweet without that weird aftertaste some artificial sweeteners leave behind. I’ve used it in both the filling and for the caramelized top with excellent results.
Adapting Cheesecake Brulee for Special Diets
Dietary restrictions don’t mean missing out on this dessert. I’ve worked with friends and family members who have various needs, and we’ve figured out how to make cheesecake brulee work for almost everyone.
Going gluten-free is probably the easiest adaptation. The filling already has no flour in most recipes. Just swap regular graham crackers for gluten-free ones. Or use crushed gluten-free cookies, almond flour mixed with butter and sugar, or even ground nuts pressed into the pan. Pecans make an especially rich, nutty crust that complements the creamy filling beautifully.
Dairy-free versions take more creativity but they absolutely work. Cashew cream cheese has become widely available and it’s shockingly similar to the real thing. Soak raw cashews overnight, blend them until silky smooth, and you’ve got the base for an incredible vegan cheesecake. Coconut cream adds richness without overwhelming coconut flavor if you use refined coconut oil.
I made a completely dairy-free cheesecake brulee for my cousin’s wedding last year. She’s vegan and I wanted her to have something special. I used cashew cream, coconut cream, and agar-agar powder to help it set properly. The bruleed top worked exactly the same as always. When I torched that sugar crust, it looked identical to the traditional version. She cried when she tasted it. Not because it was perfect, but because someone took the time to make sure she didn’t feel left out.
Lactose-free cream cheese exists now too. Several major brands make it, and it behaves exactly like regular cream cheese in recipes. This option works great for people who are lactose intolerant but not fully dairy-free. You get all the authentic flavor and texture without the digestive issues.
Creative Flavor Twists That’ll Blow Your Mind
Once you’ve mastered the basic technique, the flavor possibilities become endless. I keep a running list in my phone of combinations I want to try. Some work better than others, but experimenting is half the fun.
Pumpkin spice cheesecake brulee turns up at my house every October without fail. Mix pumpkin puree into your filling along with cinnamon, nutmeg, ginger, and a pinch of cloves. The orange color looks gorgeous under that golden caramel crust. Top it with whipped cream and you’ve got something that makes pumpkin pie look boring by comparison.
Lemon brings a whole different energy to this dessert. Add lemon zest and fresh lemon juice to your batter. The brightness cuts through all that richness in the most refreshing way. I’ve served lemon cheesecake brulee at summer dinner parties and people went absolutely wild for it. The caramelized sugar adds a bittersweet note that plays perfectly with the citrus.
Matcha cheesecake brulee sounds weird until you try it. That earthy, slightly bitter green tea flavor transforms this into something sophisticated and unexpected. Use high-quality matcha powder or it’ll taste grassy and unpleasant. Good matcha costs more but it’s worth every penny. The pale green filling under the amber crust looks stunning too.
Salted caramel takes this dessert into dangerous territory. Make caramel sauce, swirl it through your cheesecake batter, and sprinkle flaky sea salt on top before bruleeing. The combination of sweet, salty, bitter, and tangy hits every taste receptor you’ve got. I’ve had people literally lick their plates clean.
Coffee and chocolate together create something that tastes like the fanciest cafe dessert you’ve ever had. Dissolve instant espresso powder in your cream, add melted dark chocolate to your batter, and prepare for compliments. This version pairs incredibly well with after-dinner drinks.
Berry compote swirled through the batter before baking creates beautiful marbled patterns. Blueberry, raspberry, or mixed berry all work wonderfully. The fruit adds moisture and a pop of color that makes each slice look like art.
Tips for Perfecting Your Technique Over Time
The first cheesecake brulee you make probably won’t be perfect. That’s completely normal. I’ve been making this dessert for years and I still learn new things. Each time you make it, you’ll get a better feel for how the sugar caramelizes, when the filling is perfectly set, and how all the elements come together.
Keep notes about what works and what doesn’t. I have a little notebook in my kitchen where I write down adjustments after every baking session. “Needed five more minutes” or “Too much vanilla” or “Perfect!” These notes help me replicate success and avoid repeating mistakes.
Don’t be afraid to brulee more than once. If your first attempt at the sugar crust doesn’t look quite right, you can add another thin layer and torch it again. Sometimes I do two lighter coats instead of one thick one. It gives you more control over the color and prevents burning.
Temperature variations between ovens make a huge difference. Your oven might run hot or cold compared to mine. Use an oven thermometer to check the actual temperature. This simple tool has saved so many batches of cheesecake from overcooking or undercooking.
Practice your torching technique on just sugar spread on a plate before you do it on an actual cheesecake. This lets you get comfortable with how the flame works and how quickly sugar caramelizes. It’s way less stressful than learning on a dessert you spent hours making.
Building Your Cheesecake Brulee Confidence
I get messages from people all the time saying they’re intimidated by this dessert. They think it’s too fancy or complicated for them. But honestly, if you can follow directions and measure ingredients, you can make cheesecake brulee. The steps are straightforward. The timing matters, but it’s not difficult.
Start with individual ramekins instead of a full-sized cheesecake if you’re nervous. Smaller portions bake faster and more evenly. They’re more forgiving if something goes slightly wrong. Plus, if you mess up one ramekin, you’ve still got five others that might turn out great.
Make the components separately at first if the whole process feels overwhelming. Bake the crust one day. Make the filling and bake it the next day. Brulee it right before serving. Breaking it into stages makes it feel less daunting. You’ll build confidence with each step before putting everything together start to finish.
By the way, everyone makes mistakes when they’re learning. I once forgot to wrap my springform pan properly in the water bath and ended up with water seeping into my cheesecake. Another time I torched the sugar so aggressively it turned black and tasted like burnt rubber. These disasters taught me more than my successes ever did.
For more inspiration and related recipes, check out the full cheesecake collection where you’ll find everything from classic styles to creative variations that’ll keep your baking adventures exciting.
The most important thing is to enjoy the process. Yes, you want your cheesecake brulee to turn out delicious. But the act of making something beautiful with your own hands brings its own satisfaction. The smell of vanilla and cream cheese filling your kitchen, the sound of sugar crackling under the torch, the look on someone’s face when they taste what you made – these moments matter just as much as the final result.
Now it’s your turn to create something amazing. Grab those ingredients, set aside an afternoon, and make yourself a cheesecake brulee that’ll make you proud. Take a picture when you’re done. Share it with someone who’ll appreciate the effort you put in. And definitely save me a slice if you’re feeling generous.
Frequently Asked Questions About Cheesecake Brulee
What is the difference between cheesecake brulee and traditional cheesecake?
The main difference is the caramelized sugar crust on top. Traditional cheesecake has a smooth top surface, while cheesecake brulee features a layer of torched sugar that creates a crispy, glassy shell. This addition brings both textural contrast and deeper caramel flavors that you don’t get in regular cheesecake. The filling itself is usually very similar between the two styles. The bruleed top transforms the eating experience by adding that satisfying crack when your spoon breaks through.
Can I make cheesecake brulee without a kitchen torch?
Yes, you can use your oven’s broiler instead. Place your chilled cheesecake on the top rack with the broiler on high and watch it constantly. The sugar should caramelize in about two to three minutes, but it can burn incredibly fast. Keep the oven door slightly open so you can monitor the color closely. A kitchen torch gives you much better control and costs around twenty dollars, but the broiler method works if you’re careful and attentive.
How do I store leftover cheesecake brulee?
Store it covered in the refrigerator for up to five days. The tricky part is the bruleed sugar crust, which will soften over time as it absorbs moisture from the cheesecake. If you know you’ll have leftovers, only brulee the portions you’re serving immediately. Keep the rest plain in the fridge and torch fresh sugar on each piece right before eating it. This way every serving has that perfect crispy top.
Is cheesecake brulee suitable for people with lactose intolerance?
Traditional cheesecake brulee contains lots of dairy and isn’t suitable for lactose-intolerant individuals. However, you can make lactose-free versions using lactose-free cream cheese, which several brands now produce. You can also create completely dairy-free versions using cashew cream cheese and coconut cream as substitutes. These alternatives require some recipe adjustments but can produce results that are surprisingly close to the original in both taste and texture.
Can I use a different type of sugar for the caramelized topping?
Superfine or caster sugar works best because it melts quickly and evenly. Regular granulated sugar works too, though it takes slightly longer to caramelize. Brown sugar creates a deeper, more molasses-like flavor that some people love. Avoid powdered sugar because the cornstarch it contains prevents proper caramelization. Coconut sugar caramelizes beautifully and adds a subtle caramel flavor even before torching. Experiment to find what you like best.
How long does it take to make cheesecake brulee from start to finish?
The active preparation time is about thirty minutes. Baking takes around an hour to ninety minutes depending on size. Then you need to let it cool gradually for about two hours before refrigerating for at least four hours, though overnight is ideal. So realistically, you’re looking at a minimum of eight hours from start to finish, with most of that being passive cooling and chilling time. Plan to make it the day before you want to serve it.
What are some popular flavor variations of cheesecake brulee?
Popular variations include chocolate, which adds richness and depth, and lemon, which brings brightness and cuts through the heaviness. Pumpkin spice versions are incredibly popular during fall months. Coffee or espresso creates a sophisticated flavor that pairs wonderfully with the caramel crust. Berry variations using raspberry, strawberry, or blueberry add fruity freshness. Matcha offers an earthy, unique twist that looks beautiful. Each variation maintains the classic bruleed top while changing the filling’s flavor profile.
Is cheesecake brulee a good choice for a beginner baker?
It’s moderately challenging but absolutely doable for beginners who follow instructions carefully. The techniques aren’t complicated, but they require patience and attention to detail. Start with individual ramekins rather than a full-sized cheesecake for a more forgiving first attempt. The water bath and gradual cooling are the trickiest parts, but once you understand why these steps matter, they become easier. Don’t let fear hold you back, just give yourself time and don’t rush the process.
Can I freeze cheesecake brulee for later?
You can freeze the cheesecake itself before adding the bruleed sugar layer. Wrap it tightly in plastic wrap and then aluminum foil to prevent freezer burn. It’ll keep for up to three months. Thaw it overnight in the refrigerator before serving. Add the sugar crust right before serving since the bruleed top doesn’t freeze well. The texture changes when frozen and thawed, losing that perfect crispy quality that makes it special.
Why did my cheesecake brulee crack on top?
Cracks usually happen from temperature shock or overbaking. Make sure you’re using a water bath to keep temperatures gentle and even. Don’t open the oven door repeatedly during baking, as temperature fluctuations cause cracking. Let the cheesecake cool gradually instead of moving it straight from a hot oven to a cold counter. Overbaking also causes cracks, so remove it when the center still jiggles slightly. The good news is that the bruleed sugar layer will hide minor cracks anyway.
Equipment
- Springform Pan or Ramekins
- Food Processor or Rolling Pin and Bag For crushing graham crackers
- Kitchen Torch
- Mixing Bowls
- Hand or Stand Mixer
Ingredients
- 16 oz full-fat cream cheese at room temperature
- 3/4 cup granulated sugar
- 3 large eggs
- 1 teaspoon vanilla extract
- 1/2 cup heavy cream or sour cream
- 1 cup crushed graham crackers
- 1/4 cup melted butter
- 2 tablespoons granulated sugar for bruleeing superfine recommended
Instructions
- Preheat the oven to 325°F (160°C).
- In a bowl, mix crushed graham crackers with melted butter and sugar until combined.
- Press the cracker mixture firmly into the bottom of a springform pan or ramekins.
- Bake the crust for about 10 minutes, then let it cool.
- Beat the room temperature cream cheese until smooth.
- Add the granulated sugar and beat until fluffy.
- Add eggs one at a time, mixing until just combined after each addition.
- Stir in vanilla extract and heavy cream or sour cream until the batter is silky.
- Pour the filling over the cooled crust.
- Prepare a water bath by placing the springform pan in a larger roasting pan with hot water halfway up the sides.
- Bake for about 60 minutes, until the edges are set but the center still jiggles.
- Allow the cheesecake to cool gradually in the oven for 1 hour with the door cracked.
- Move to the counter for 1 hour, then refrigerate for at least 4 hours, ideally overnight.
- Before serving, sprinkle an even layer of superfine sugar on top of the cheesecake.
- Using a kitchen torch, caramelize the sugar until golden and hard, making sure to keep it moving to avoid burning.
- Let the bruleed top cool and harden before serving.
Notes
Nutrition

Hello! I’m Sarah Mitchell, and I’m passionate about bringing creativity and innovation to baking. My love for baking started in high school when I first tried my hand at decorating cupcakes for a class project. What began as a fun hobby quickly became a full-time passion. I’ve spent the past decade working in bakeries and dessert shops, honing my skills in everything from simple cookies to intricate wedding cakes.
After working in some of the top bakeries across the country, I realized that baking was about more than just following recipes — it was about infusing your personality into each creation. At BakingSecret.com, I love creating recipes that push boundaries while staying true to the heart of classic baking. I specialize in creating delicious and visually stunning pastries that will wow your guests.
When I’m not baking, I enjoy teaching baking classes, trying out new cake decoration techniques, and traveling to find inspiration in global dessert traditions. I’m so excited to share my tips and tricks with you to help elevate your baking game!