
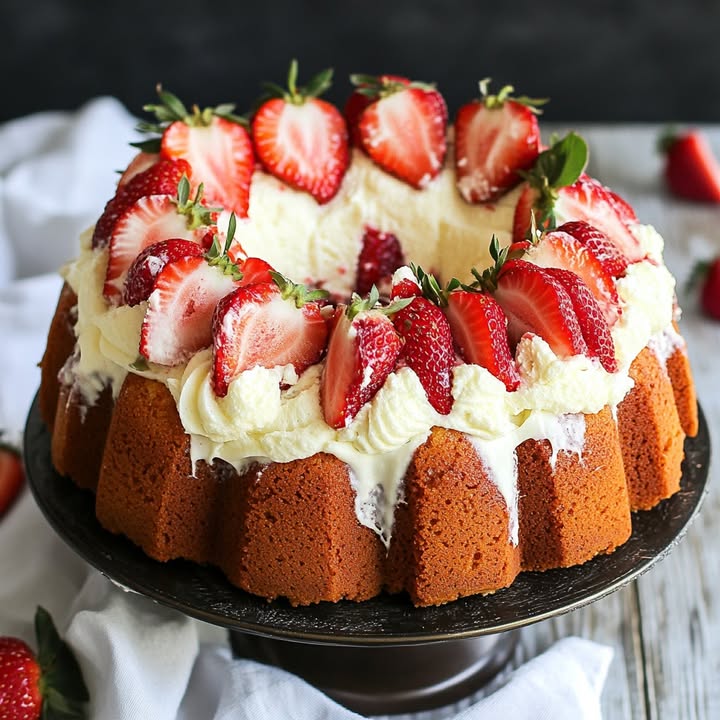
A Slice of Sunshine: My Homemade Strawberry Cream Cheese Pound Cake
There’s a certain magic that happens when fresh strawberries meet rich cream cheese and butter in a warm oven. The whole house smells like a happy memory. This Homemade Strawberry Cream Cheese Pound Cake is my absolute go-to when I want to bake something that feels like a hug. It’s not just a cake. It’s a golden, velvety celebration in a loaf pan.
The Story Behind the Strawberry Cream Cheese Cake
The classic pound cake is an old friend. It’s been around for centuries, originally made with a pound each of butter, sugar, eggs, and flour. My twist adds two secret weapons: tangy cream cheese for incredible moisture and juicy strawberries for a burst of spring flavor. I first made this for my daughter’s picnic birthday party. Let’s just say the cake was gone long before the sandwiches! It bridges the gap between traditional baking and a fresh, fruity delight.
Why You’ll Fall In Love With This Recipe
You will love this strawberry pound cake because it’s incredibly forgiving and always impressive. The cream cheese guarantees a melt-in-your-mouth crumb that stays moist for days. The strawberries caramelize slightly as they bake, creating little pockets of sweet-tart jam. It’s simpler than a layer cake but tastes just as special. Every bite is a perfect balance of rich, buttery cake and bright berry goodness.
Perfect Occasions for This Berry Dessert
This cake is a star at any gathering. It’s elegant enough for a Mother’s Day brunch or a baby shower. It’s sturdy enough to pack for a summer picnic or a beach day. I love serving it with afternoon tea or coffee. It’s also my favorite “just because” bake. A slice of this strawberry cream cheese cake can turn an ordinary Tuesday into a small, delicious celebration.
Gathering Your Ingredients
Quality ingredients make a big difference here. Use the best, ripest strawberries you can find.
- 1 cup unsalted butter, softened
- 1 (8 ounce) block cream cheese, softened
- 2 cups granulated sugar
- 4 large eggs
- 1 teaspoon vanilla extract
- 2 1/2 cups all-purpose flour
- 1/2 teaspoon baking powder
- 1/2 teaspoon salt
- 1 1/2 cups diced fresh strawberries, lightly tossed in 1 tablespoon flour
- Optional: powdered sugar or glaze for topping
Easy Swaps: Substitution Options
Don’t have an ingredient? No problem! Here are some easy swaps:
- Strawberries: Frozen strawberries (thawed and well-drained) work in a pinch. You can also use other berries like raspberries or blueberries.
- Cream Cheese: Full-fat Greek yogurt can substitute in part, but the texture will be less rich.
- All-Purpose Flour: For a slightly denser cake, you can use a 1:1 gluten-free flour blend.
- Topping: Instead of powdered sugar, try a simple lemon glaze or a drizzle of melted white chocolate.
How to Make Your Strawberry Cream Cheese Pound Cake
Let’s bake! Follow these simple steps for the perfect moist pound cake.
Step 1: Prep and Preheat
Start by preheating your oven to 325°F (165°C). This lower temperature is key for a even bake without a dark crust. Generously grease a 9×5-inch loaf pan or a bundt pan with butter or baking spray. The aroma of butter and sugar will soon fill your kitchen, I promise! Pro tip: For a bundt cake, make sure to get into every nook of the pan to prevent sticking.
Step 2: Cream the Butter, Cheese, and Sugar
In a large mixing bowl, combine your softened butter and cream cheese. Beat them together with the granulated sugar for a good 3-4 minutes. You want the mixture to become very pale, fluffy, and light. This step incorporates air, which is the foundation of your cake’s tender texture. It should look like a creamy, dreamy cloud.
Step 3: Add Eggs and Vanilla
Crack in your eggs, one at a time. Beat well after each addition until it’s fully blended. This patience ensures a smooth, emulsified batter. Then, pour in that lovely vanilla extract. Its warm fragrance will blend beautifully with the rich dairy notes. The batter will now be silky and slightly glossy.
Step 4: Whisk the Dry Ingredients
In a separate bowl, whisk together your all-purpose flour, baking powder, and salt. This isn’t just mixing. You are evenly distributing the leavening agent so your cake rises perfectly. The fine, snowy mound of flour is ready to become part of something wonderful. Chef’s tip: Sifting the flour here can make your cake extra light.
Step 5: Combine Wet and Dry
Gradually add the flour mixture to the creamy butter bowl. Mix on low speed until the flour is just incorporated. A few streaks are okay. Over-mixing is the enemy of a tender pound cake! The batter will be very thick, luxuriously smooth, and hold its shape on a spoon.
Step 6: Fold in the Strawberries
Take your diced strawberries that have been lightly tossed in a tablespoon of flour. The flour coating is crucial—it helps suspend the berries in the batter so they don’t all sink to the bottom. Gently fold them in with a spatula until you see a beautiful marbling of red throughout the golden batter.
Step 7: Bake to Golden Perfection
Pour the batter into your prepared pan. Smooth the top with your spatula. Place it in the center of your preheated oven. Bake for 60-70 minutes. The cake will rise, turn a deep golden brown, and smell absolutely divine. Pro tip: Ovens vary, so start checking at 60 minutes with a toothpick or skewer.
Step 8: Cool and Dress Up
When the toothpick comes out clean, take the cake out. Let it cool in the pan on a wire rack for 15 minutes. This lets it set so it won’t break. Then, carefully turn it out onto the rack to cool completely. Once cool, dust it with a snowfall of powdered sugar or drizzle with a simple glaze for a beautiful finish.
Your Baking Timeline
| Activity | Time |
|---|---|
| Prep Time | 20 minutes |
| Cooking Time | 70 minutes |
| Cooling Time | 1 hour (recommended) |
| Total Time | About 1 hour 30 minutes + cooling |
Chef’s Secret for the Best Pound Cake
My biggest secret? Room temperature ingredients are non-negotiable. Your butter, cream cheese, and eggs must be truly soft. This allows them to emulsify completely, creating a batter that traps tiny air bubbles. Those bubbles give you a fine, even crumb instead of a dense, greasy brick. Take the time to let them sit out. It makes all the difference.
A Little Cake Trivia
Did you know the name “pound cake” comes from its original recipe formula? It literally used a pound of butter, a pound of sugar, a pound of eggs, and a pound of flour. Our modern versions are a bit lighter, but the spirit of a rich, simple, and satisfying cake remains. Adding fruit like strawberries is a delicious American twist that’s become a beloved classic.
Necessary Equipment
You don’t need fancy tools for this homemade cake.
- 9×5-inch loaf pan or 10-cup Bundt pan
- Stand mixer or hand mixer
- Large and medium mixing bowls
- Whisk and spatula
- Measuring cups and spoons
- Wire cooling rack
Storing Your Masterpiece
Once completely cool, you can store this strawberry cream cheese cake right on the counter. Just wrap it tightly in plastic wrap or place it in an airtight container. It will stay wonderfully moist and delicious for up to 3 days at room temperature.
If you want to keep it longer, the fridge is your friend. Wrapped well, it will last for up to a week. The cold will firm up the texture, so I like to let a slice sit out for 15 minutes before serving. It brings back that soft, perfect crumb.
For long-term storage, this cake freezes beautifully. Wrap the whole loaf or individual slices in plastic wrap, then in foil. Freeze for up to 3 months. Thaw overnight in the refrigerator or at room temperature for a few hours.
My Best Tips and Advice
- Don’t over-mix after adding flour. Mix until you no longer see dry spots. Over-mixing develops gluten and leads to a tough cake.
- Use a kitchen scale. For the most accurate results, weigh your flour. Too much flour is a common cause of dry cake.
- Test for doneness properly. A few moist crumbs on the toothpick are okay. If it comes out with wet batter, it needs more time.
- Let it cool. I know it’s hard, but cutting into a warm cake causes it to crumble. Let it set for the cleanest slices.
Presentation Tips to Impress
Make your cake look as good as it tastes!
- Serve thick slices on a pretty plate with a dollop of freshly whipped cream.
- Add a few fresh strawberry slices and a mint leaf on the side for a pop of color.
- For a brunch, bake it in a floral Bundt pan for a stunning, intricate shape.
- Dust with powdered sugar through a fine-mesh sieve for a professional, even sprinkle.
Healthier Alternative Recipes
Want to lighten things up? Here are six tasty variations:
- Greek Yogurt Swap: Replace half the cream cheese with full-fat plain Greek yogurt. It adds protein and a nice tang while reducing fat.
- Whole Wheat Berry Cake: Use half whole wheat pastry flour for added fiber. The nutty flavor pairs wonderfully with the berries.
- Reduced-Sugar Version: Cut the granulated sugar by 1/4 cup. The strawberries provide plenty of natural sweetness.
- Dairy-Free Delight: Use vegan butter and plant-based cream cheese. Make sure your vegan butter block is meant for baking.
- Lemon-Zested Cake: Add the zest of one lemon to the batter. The citrus brightens all the flavors without adding calories.
- Mini Loaf Cakes: Bake in mini loaf pans. Portion control is easier, and they make adorable gifts straight from the oven.
If you’re looking for other decadent dessert ideas, you must try our velvety Pumpkin Creme Brulee Cheesecake for a fall feast. For a cozy, comforting treat, my Pecan Pie Bread Pudding is always a crowd-pleaser. Fans of sweet and salty combos adore these Trisha Yearwood Butterscotch Bars. And for a cookie that melts in your mouth, nothing beats these Maple Brown Sugar Cookies.
Common Mistakes to Avoid
Mistake 1: Using Cold Ingredients
This is the number one reason a pound cake turns out dense. Cold butter and cream cheese won’t cream properly with the sugar. They can’t trap the necessary air. Your batter will look curdled when you add the eggs. Always plan ahead. Take your dairy and eggs out of the fridge at least an hour before you start baking.
Mistake 2: Skipping the Flour on the Strawberries
It seems like a small, skip-able step. It’s not! Fresh strawberries are full of water. Without a light coating of flour, they release that moisture and sink straight to the bottom during baking. You’ll get a soggy layer of fruit at the base. Tossing them gently in that single tablespoon of flour is your best defense for perfectly suspended berries.
Mistake 3: Overbaking the Cake
Because it’s such a dense batter, we fear it’s not cooked in the middle. So we leave it in too long. An overbaked pound cake becomes dry and crumbly. Remember, it continues to cook as it cools in the pan. Your best tool is a toothpick. Insert it near the center. If it comes out with a few clinging moist crumbs, it’s done. It shouldn’t have wet batter.
Mistake 4: Cutting the Cake While Hot
The temptation is real when your kitchen smells amazing. But cutting into a hot cake is a disaster. The structure hasn’t set yet. It will squish and crumble, giving you messy, gummy slices. Let it cool in the pan, then on a rack. Wait until it’s just warm or at room temperature. Your patience will be rewarded with perfect, neat slices.
Baking with wholesome, quality ingredients is a joyful part of taking care of ourselves and our loved ones. For more great ideas on balancing indulgence with well-being, you can find resources on building a heart healthy diet from trusted sources.
This Strawberry Cream Cheese Pound Cake is just one of many joyful bakes. For more inspiration, why not browse our entire collection of delightful cake and cupcake recipes? You’re sure to find your next favorite.
Your Strawberry Pound Cake Questions, Answered
Can I use frozen strawberries instead of fresh?
Yes, you can, but you need to be careful. Thaw the frozen strawberries completely in a colander over a bowl. Press them gently to remove as much excess liquid as possible. Then, pat them very dry with paper towels. Toss them in the flour as directed. Using frozen berries without draining will add too much moisture and can make your batter soggy and dense. The color might also bleed more into the batter.
Why did my strawberries sink to the bottom of the cake?
This usually happens for two reasons. First, the strawberries were not tossed in flour. The flour coating is essential to help them stick to the batter. Second, the berries might have been too wet or the batter was too thin. Always make sure your diced strawberries are dry and your batter is nice and thick. Also, avoid over-mixing after adding the fruit, as this can break down the batter’s structure.
How do I know when the pound cake is fully baked?
Don’t just rely on the clock! Start checking at the 60-minute mark. Insert a long toothpick or a thin skewer into the very center of the cake. If it comes out clean or with just a few dry crumbs clinging to it, the cake is done. The top should be a deep golden brown, and the edges will just be starting to pull away slightly from the sides of the pan. The cake will also spring back lightly when you gently press the center.
Can I make this cake in a different pan, like a Bundt pan?
Absolutely! This recipe works beautifully in a well-greased and floured 10-cup Bundt pan. The baking time might be slightly less, so start checking for doneness around 50-55 minutes. The key to getting it out cleanly is to grease every single crevice of the Bundt pan with butter or baking spray, then dust it lightly with flour. Let it cool in the pan for exactly 15 minutes before inverting it onto a rack.
My cake is browning too fast on top. What should I do?
Ovens can have hot spots. If you see the top getting dark brown before the center is baked, simply tent it with a piece of aluminum foil. Loosely lay the foil over the top of the pan. This will shield the cake from direct heat and slow down the browning, allowing the inside to finish cooking without burning the crust. It’s a simple baker’s trick that saves many a cake!
How should I store this cake, and how long does it last?
Once completely cooled, wrap the cake tightly in plastic wrap or store it in an airtight container. At room temperature, it will stay fresh and moist for 3-4 days. You can also refrigerate it for up to a week. The fridge will make it firmer, so let slices sit out for 15 minutes before serving. For longer storage, freeze the whole loaf or individual slices for up to 3 months.
Can I leave out the cream cheese?
You can, but you’ll lose what makes this cake special. The cream cheese adds a subtle tang, incredible richness, and most importantly, tons of moisture. Without it, you’ll have a more standard butter pound cake. If you must substitute, you could try using full-fat sour cream or Greek yogurt in the same amount, but the texture and flavor will be different.
What can I use if I don’t have a stand mixer or hand mixer?
You can make this cake by hand with a sturdy wooden spoon and some elbow grease! The key is to make sure your butter and cream cheese are very, very soft. Cream them with the sugar vigorously until the mixture lightens in color. Add the eggs one at a time, beating well after each. It will take longer and be a bit of a workout, but it’s totally possible and very satisfying.
Is there a way to make a glaze for the top?
A simple glaze is a lovely finish. Whisk together 1 cup of powdered sugar with 1-2 tablespoons of milk or lemon juice until smooth. You want it thick but pourable. Drizzle it over the completely cooled cake. For a strawberry glaze, puree a few fresh strawberries, strain out the seeds, and use the juice in place of the milk. It adds a beautiful pink color and extra berry flavor.
Can I add other fruits to this pound cake recipe?
Yes, this recipe is very versatile with fruit. Blueberries, raspberries, diced peaches, or even chopped apples work wonderfully. The rule is the same: toss your fruit in a little flour before folding it in. If using very juicy fruit like peaches, pat them dry first. The baking time remains largely the same. Each fruit will give you a deliciously unique homemade cake.
Ready to Bake Your Own?
There you have it. My full-hearted guide to the most delicious Strawberry Cream Cheese Pound Cake. It’s a recipe built on happy moments and shared with love. I hope it brings as much joy to your kitchen as it has to mine. So preheat that oven, grab your prettiest pan, and get ready to bake a memory. Don’t forget to share a slice with someone you love.
Equipment
- Grand bol
- Fouet
- Spatule
- Plaque à pâtisserie
- Papier sulfurisé
Ingredients
- 1 tasse beurre non salé, ramolli
- 1 bloc de 8 onces fromage à la crème, ramolli
- 2 tasses sucre granulé
- 4 grands œufs
- 1 cuillère à café extrait de vanille
- 2.5 tasses farine tout usage
- 0.5 cuillère à café poudre à lever
- 0.5 cuillère à café sel
- 1.5 tasses fraises fraîches, coupées en dés légèrement enrobées de 1 cuillère à soupe de farine
- q.s. sucre glace ou glaçage pour garnir
Instructions
- Préchauffez votre four à 325°F (165°C) et graissez un moule à pain de 9x5 pouces ou un moule à bundt.
- Dans un grand bol, combinez le beurre ramolli et le fromage à la crème, puis battez avec le sucre granulé pendant 3-4 minutes jusqu'à ce qu'ils deviennent légers et aérés.
- Ajoutez les œufs un par un, en mélangeant bien après chaque addition, puis incorporez l'extrait de vanille.
- Dans un autre bol, fouettez ensemble la farine, la poudre à lever et le sel.
- Mélangez progressivement les ingrédients secs dans le mélange humide jusqu'à ce qu'ils soient juste combinés.
- Incorporez délicatement les fraises enrobées de farine jusqu'à ce qu'elles soient uniformément réparties.
- Versez la pâte dans le moule préparé et lissez le dessus.
- Faites cuire pendant 60-70 minutes ou jusqu'à ce qu'un cure-dent en ressorte propre.
- Laissez le gâteau refroidir dans le moule pendant 15 minutes avant de le transférer sur une grille pour refroidir complètement.
Notes
Nutrition

Hi, I’m Olivia Parker, the founder of BakingSecret.com and a lifelong lover of all things sweet and homemade. I grew up in a small town in Oregon, where the smell of fresh cookies in my family’s kitchen sparked my passion for baking. Over the years, I turned that passion into a mission: to help home bakers feel confident, inspired, and creative.
After studying food science and working in several artisan bakeries across the U.S., I decided to create a space where everyone from beginners to seasoned bakers can find reliable recipes, expert tips, and a warm, welcoming community. BakingSecret.com is my way of sharing the magic of baking with the world. When I’m not testing new recipes, you’ll find me exploring farmers’ markets, collecting vintage cookbooks, or perfecting my sourdough technique.