
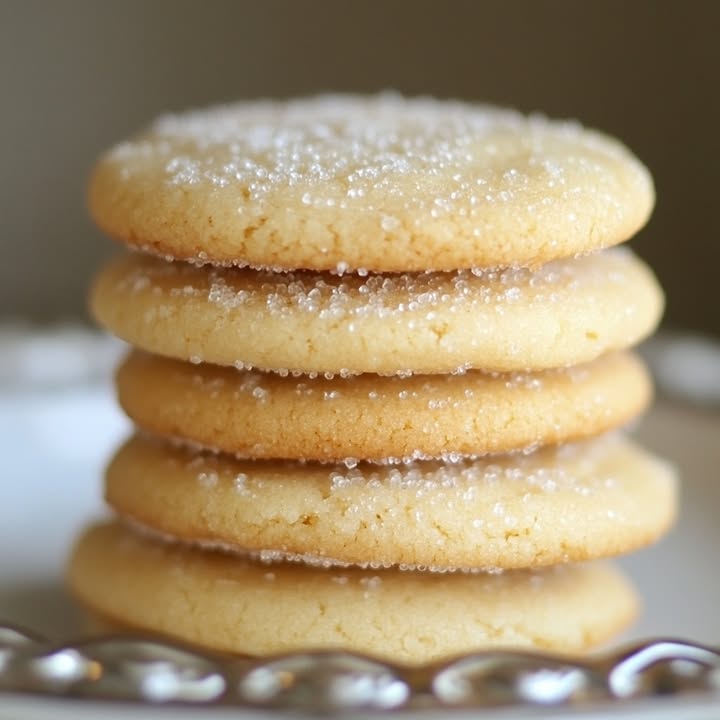
Kentucky Butter Cake Cookies: A Handheld Taste of the South
Is there anything better than the smell of butter and vanilla baking in your kitchen? I made these little gems last Sunday, and my family ate the whole batch before they even cooled completely. These Kentucky Butter Cake Cookies are truly special. They are soft, buttery, and soaked in a warm, sweet glaze. It’s like having a slice of that famous Southern cake, but in a perfect, portable cookie form. They are my new favorite treat to share.
The Story Behind the Butter
The original Kentucky Butter Cake is a classic. It’s a simple, dense pound cake drenched in a buttery sauce. Stories say it was a favorite at church potlucks and family reunions. My version takes all that wonderful flavor and makes it cookie-sized. This twist is perfect for today’s busy bakers. You get all the comfort of the traditional dessert without waiting for a whole cake to bake and cool. It’s a little piece of Southern hospitality you can hold in your hand.
Why You’ll Fall in Love With This Recipe
You will adore these cookies for so many reasons! First, the flavor is incredible. It’s rich, buttery, and pure comfort. Second, they are surprisingly easy to make. The dough comes together in one bowl. The glaze is simple. You don’t need any fancy equipment. Finally, they are just so satisfying. The soft, tender cookie with its shiny, sweet topping is a guaranteed crowd-pleaser. They make your house smell amazing, too!
Perfect Occasions for These Sweet Treats
Think of these cookies as your new go-to for any gathering. They are a star at bake sales and school events. Pack them for a picnic or a road trip. Serve them on a pretty plate for a brunch or afternoon tea. They are a wonderful homemade gift wrapped in a cellophane bag with a ribbon. Honestly, a quiet Tuesday afternoon with a cup of coffee is also a perfect occasion for a Kentucky Butter Cake Cookie.
What You’ll Need: Ingredients
Let’s get our ingredients ready! The beauty here is in the simplicity.
- For the cookies: 1 cup unsalted butter (softened), 1 cup granulated sugar, 1 large egg, 1 tablespoon vanilla extract, 2 ¼ cups all-purpose flour, ½ teaspoon baking powder, ¼ teaspoon salt.
- For the glaze: ¼ cup unsalted butter, ½ cup granulated sugar, 1 tablespoon water, 1 teaspoon vanilla extract.
Handy Substitutions
Out of something? No worries! Here are some easy swaps.
- Butter: Salted butter works fine. Just omit the extra salt in the cookie dough.
- Vanilla: Try using almond extract for a different, lovely flavor.
- Glaze Sugar: You can use light brown sugar in the glaze. It will give a deeper, caramel-like taste.
Let’s Bake: Making Kentucky Butter Cake Cookies
Ready to bake? Let’s go step by step. It’s a fun and simple process.
Step 1: Prep and Preheat
First, turn your oven on to 350°F (175°C). This gives it time to get perfectly hot. Line your baking sheets with parchment paper. The paper prevents sticking and makes cleanup a dream. Getting everything ready first makes the baking flow smoothly. You won’t be scrambling for a pan later.
Step 2: Cream the Butter and Sugar
In a big mixing bowl, beat the softened butter and sugar together. Use a hand mixer or stand mixer. Beat it for about 2-3 minutes. You want it to become light in color and fluffy. This step adds air to your dough. It’s the secret to a soft, not dense, cookie. Pro tip: Your butter is ready when you can easily press your finger into it and leave a dent.
Step 3: Add the Egg and Vanilla
Now, beat in the large egg and that glorious tablespoon of vanilla. Mix just until everything is smooth and combined. The vanilla smell will start to fill your kitchen. It’s the best part! Scrape down the sides of the bowl to make sure all the butter gets mixed in. The batter will look creamy and rich.
Step 4: Combine the Dry Ingredients
In a separate bowl, whisk together the flour, baking powder, and salt. This spreads the leavening and salt evenly. Gradually add this dry mixture to your wet butter mixture. Mix on low speed until the flour disappears. Stop as soon as the dough comes together. Overmixing can make your cookies tough. The dough will be soft and slightly sticky.
Step 5: Scoop and Space the Dough
Use a tablespoon or a small cookie scoop to form dough balls. Roll them gently in your hands. Place them about 2 inches apart on your prepared baking sheets. They need room to spread a little bit as they bake. This spacing is key for perfect, round cookies.
Step 6: Bake to Golden Perfection
Slide the baking sheets into your preheated oven. Bake for 10 to 12 minutes. Watch for lightly golden edges. The centers should still look soft and set. They will firm up as they cool. Do not overbake! Let them cool on the pan for 5 minutes. They are too fragile to move right away.
Step 7: Make the Warm Glaze
While the cookies cool slightly, make the magic glaze. In a small saucepan, melt the butter over low heat. Stir in the sugar, water, and vanilla. Keep heating and stirring until the sugar dissolves completely. The mixture should be smooth and syrupy. Do not let it boil. Chef’s tip: Use a whisk to help dissolve the sugar quickly without lumps.
Step 8: Glaze the Warm Cookies
Here’s the secret step! While the cookies are still warm on the pan, spoon or brush the warm glaze over the tops. The warm cookie will soak up that buttery syrup. This gives them that classic Kentucky Butter Cake moisture and flavor. Let the glaze set and become shiny before serving. It takes about 15 minutes.
Your Baking Timeline
This recipe works beautifully with your schedule.
- Prep Time: 15 minutes
- Cooking Time: 12 minutes
- Cooling & Glazing Time: 15 minutes
- Total Time: About 40 minutes
- Yield: 24 delicious cookies
- Calories: Approximately 160 per cookie
Chef’s Secret for the Best Cookies
My secret trick is all in the glaze timing. Apply the glaze while the cookies are still on the warm baking sheet. The residual heat helps the cookies drink in the buttery syrup. It creates that signature moist texture inside. If you wait until they are cold, the glaze just sits on top like frosting. Still tasty, but not quite the same!
A Little Extra Cookie Info
Vanilla is the star here. Using a full tablespoon of real vanilla extract might seem like a lot. Trust me, it’s not! It gives these simple cookies a deep, warm flavor. It complements all that beautiful butter. If you love learning about how ingredients work, check out the FDA’s advice on food temperature control for safe baking practices.
Necessary Kitchen Tools
You don’t need much! Here’s your list:
- Large mixing bowl
- Hand mixer or stand mixer
- Measuring cups and spoons
- Whisk and spatula
- Baking sheets
- Parchment paper
- Small saucepan
- Cookie scoop or tablespoon
Storing Your Kentucky Butter Cookies
These cookies store wonderfully. Once the glaze is completely set, place them in an airtight container. You can layer them between sheets of parchment paper. They will stay soft and fresh at room temperature for up to 4 days.
For longer storage, you can freeze them. Freeze the unglazed, baked cookies on a sheet first. Then pack them in a freezer bag. When you’re ready, thaw them and make a fresh batch of warm glaze. It tastes just-baked!
Remember, because of the butter glaze, I don’t recommend refrigerating them. The cold can change their tender texture and make them hard.
My Best Tips and Advice
- Always use room temperature butter and egg. This helps the ingredients blend smoothly.
- Scoop the dough with a cookie scoop for uniform size and even baking.
- Let the cookies cool on the pan. They are very soft when hot and will break.
- If your glaze hardens while you’re working, just warm it gently again on the stove.
Presentation Ideas to Impress
Make these cookies look extra special!
- Stack them on a vintage cake stand for a party.
- Add a tiny sprinkle of sea salt on top of the glaze for a fancy touch.
- Pack them in a small gift box with a doily for a lovely present.
- Serve them alongside a scoop of vanilla ice cream for an amazing dessert.
Healthier & Fun Recipe Variations
Want to mix things up? Try one of these six delicious twists!
- Lemon Butter Cookies: Add the zest of one lemon to the dough and use lemon juice in the glaze for a citrus burst.
- Brown Sugar Spice: Swap the white sugar in the dough for brown sugar and add a pinch of cinnamon and nutmeg.
- Maple Glaze: Replace the water in the glaze with real maple syrup for a fall flavor.
- Almond Joy: Mix ½ cup of shredded coconut and ¼ cup of chopped almonds into the dough.
- Mini Chocolate Chip: Fold ¾ cup of mini chocolate chips into the dough for a classic favorite.
- Orange Blossom: Use orange zest in the dough and a drop of orange extract in the glaze.
Common Mistakes to Avoid
Avoid these simple errors for perfect cookies every time.
Mistake 1: Using Cold, Hard Butter
This is the biggest mistake. Cold butter won’t cream properly with the sugar. Your dough will be dense and your cookies won’t spread right. Your butter should be soft enough to easily press with your finger. Plan ahead and take it out of the fridge an hour before baking.
Mistake 2: Overmixing the Dough
Once you add the flour, mix just until it disappears. Overmixing develops the gluten in the flour. This makes cookies tough and chewy, not soft and tender. A few streaks of flour are okay. They will blend in when you scoop the dough.
Mistake 3: Overbaking the Cookies
These cookies bake fast! They are done when the edges are just turning light golden brown. The centers will look soft and slightly underdone. They will continue to cook on the hot pan. Overbaking leads to dry, crunchy cookies instead of soft, buttery ones.
Mistake 4: Glazing Cold Cookies
The magic of a Kentucky Butter Cake Cookie is the glaze soaking in. If you let the cookies cool completely before glazing, the syrup just forms a hard shell on top. Always spoon the warm glaze over the warm cookies for that signature moist texture.
Frequently Asked Questions
Can I use salted butter instead of unsalted?
Yes, you absolutely can. It’s a common substitution. If you use salted butter, simply omit the extra ¼ teaspoon of salt called for in the cookie dough. The salt in the butter will be enough. The flavor might be very slightly different, but your cookies will still be delicious. This is a great tip when you’re in a pinch and it’s all you have in the fridge.
Cookie spread is often about butter temperature and oven heat. If they spread too much, your butter may have been too soft or warm. Chilling the dough for 20 minutes before baking can help. If they didn’t spread enough, your butter might have been too cold, or you may have packed too much flour into your measuring cup. Always spoon flour into the cup and level it off for the most accurate amount.
Can I make the dough ahead of time?
You can! The dough can be covered and refrigerated for up to 2 days. Let it sit at room temperature for about 15-20 minutes before scooping. The dough can also be frozen for up to 3 months. Thaw it overnight in the refrigerator before using. This is a great way to have fresh-baked cookies ready in minutes whenever you want them.
My glaze became sugary and grainy. What happened?
A grainy glaze means the sugar didn’t fully dissolve. Make sure you are heating the glaze over low heat. Stir it constantly until the sugar is completely melted into the butter and water. You should not see any sugar crystals. If it starts to cool and harden while you’re glazing cookies, just warm it gently again on the stove.
For a perfectly round cookie, use a cookie scoop. It portions the dough evenly. Also, if your cookies bake into odd shapes, you can fix it! Right when they come out of the oven, take a round cookie cutter slightly larger than the cookie. Place it over the warm cookie and gently swirl it around. This trims the edges and creates a neat circle.
Can I double this recipe?
Yes, this recipe doubles very well. Just use a very large bowl or mix in two batches. Make sure you have enough baking sheets ready. You may need to bake in more batches if your oven can’t fit multiple sheets at once. Rotating the sheets halfway through baking helps them bake evenly when you have more than one in the oven.
What’s the best way to measure flour for this recipe?
The best way is the “spoon and level” method. Do not scoop the flour directly with your measuring cup. Instead, use a spoon to lightly fill the measuring cup. Then, take the flat edge of a knife to level off the top. This prevents you from accidentally packing in too much flour. Too much flour makes dry, crumbly cookies.
These Kentucky Butter Cake Cookies are meant to be soft and tender. They have a delicate crumb inside, thanks to the creamed butter and sugar. The edges are lightly golden and slightly firmer. The warm glaze keeps the interior incredibly moist. If you prefer a crunchy cookie, this is not the right recipe for you!
Can I add nuts or other mix-ins?
Of course! About ½ to ¾ cup of finely chopped pecans or walnuts would be lovely in this dough. Fold them in after you’ve mixed in the flour. You could also add a handful of toffee bits for a buttery crunch. Just remember that heavy add-ins might make the cookies spread a bit differently. I encourage you to explore our whole collection of cookie and biscuit recipes for more inspiration.
They are fantastic with a hot cup of coffee, tea, or a cold glass of milk. For a dessert, try pairing them with fresh berries and a dollop of whipped cream. Their buttery flavor also goes well with tart flavors like lemon sorbet. They are so good, they often don’t need anything else at all!
There you have it! Your guide to making the most wonderful, buttery, glazed cookies. They are a little taste of Southern comfort that’s easy to make and impossible to resist. I hope your family loves them as much as mine does. Now, go preheat that oven and enjoy the baking magic. Happy baking!
Equipment
- Grand bol
- Fouet
- Spatule
- Plaque à pâtisserie
- Papier sulfurisé
Ingredients
- 1 tasse beurre non salé (ramolli)
- 1 tasse sucre granulé
- 1 grand œuf
- 1 cuillère à soupe extrait de vanille
- 2.25 tasses farine tout usage
- 0.5 cuillère à café poudre à lever
- 0.25 cuillère à café sel
Instructions
- Préchauffez le four à 175 °C (350 °F) et tapissez les plaques à pâtisserie de papier sulfurisé.
- Dans un grand bol, battez le beurre ramolli et le sucre jusqu'à ce que le mélange soit léger et mousseux (2-3 minutes).
- Ajoutez l'œuf et l'extrait de vanille, mélangez jusqu'à obtenir une pâte lisse.
- Dans un autre bol, mélangez la farine, la poudre à lever et le sel. Ajoutez progressivement au mélange humide en mélangeant à faible vitesse jusqu'à ce que le tout soit bien incorporé.
- Formez des boules de pâte et placez-les à environ 5 cm d'écart sur les plaques à pâtisserie.
- Faites cuire pendant 10 à 12 minutes jusqu'à ce que les bords soient dorés et que le centre paraisse encore moelleux.
- Pendant que les biscuits refroidissent, faites fondre le beurre dans une petite casserole, puis ajoutez le sucre, l'eau et l'extrait de vanille jusqu'à dissolution.
- Versez ou badigeonnez le glaçage tiède sur les biscuits chauds ; laissez prendre pendant environ 15 minutes avant de servir.
Notes
Nutrition

Hi, I’m Olivia Parker, the founder of BakingSecret.com and a lifelong lover of all things sweet and homemade. I grew up in a small town in Oregon, where the smell of fresh cookies in my family’s kitchen sparked my passion for baking. Over the years, I turned that passion into a mission: to help home bakers feel confident, inspired, and creative.
After studying food science and working in several artisan bakeries across the U.S., I decided to create a space where everyone from beginners to seasoned bakers can find reliable recipes, expert tips, and a warm, welcoming community. BakingSecret.com is my way of sharing the magic of baking with the world. When I’m not testing new recipes, you’ll find me exploring farmers’ markets, collecting vintage cookbooks, or perfecting my sourdough technique.