
The Magic of a Truly Easy Chocolate Cake
You know that moment. A kid has a last-minute bake sale, friends are stopping by, or you just need a chocolate hug in cake form. There’s no time for fuss. I’ve been there more times than I can count. That’s why this One Bowl Chocolate Cake recipe is my kitchen superhero. It’s the answer to every chocolate emergency and the star of countless happy memories at my table. Let me show you how it works!
A Slice of Cake History
The idea of a simple, “wacky” or “depression” cake has been around for generations. These cakes often used vinegar and baking soda for lift and skipped expensive eggs and butter. My version is a bit more luxurious but keeps the same genius, hassle-free spirit. It proves that a from-scratch, moist chocolate cake doesn’t need a mountain of dishes or a pastry degree. It’s a modern take on a classic idea: delicious shouldn’t be difficult.
Why You’ll Fall in Love With This Recipe
This isn’t just another cake recipe. It’s your new best friend. First, you literally make it in one bowl. Less washing up means more time for fun! Second, that cup of hot water works magic, creating a batter so thin you’ll question it, but baking up into the most tender, velvety crumb. It’s deeply chocolatey, incredibly soft, and ridiculously reliable. Whether you’re a seasoned baker or a nervous newbie, this recipe will make you look like a star.
When to Whip Up This Easy Chocolate Cake
This cake is your go-to for almost any occasion! It’s perfect for Tuesday night treats, weekend birthday parties (just add sprinkles!), and potluck dinners where you need a guaranteed crowd-pleaser. I love serving it after a casual family meal, with a dusting of powdered sugar, or dressing it up with rich frosting for holidays. It’s the versatile foundation for endless creativity.
Gathering Your Ingredients
Here’s what you’ll need for this simple baking triumph. I bet most are already in your pantry!
- 1% cups all-purpose flour
- % cup unsweetened cocoa powder (the better the cocoa, the richer the flavor!)
- 1% teaspoons baking powder
- 1% teaspoons baking soda
- % teaspoon salt
- 2 cups granulated sugar
- 2 large eggs
- 1 cup whole milk
- % cup vegetable oil
- 2 teaspoons vanilla extract
- 1 cup hot water
Easy Ingredient Swaps
No whole milk? No problem! This cake is wonderfully flexible.
- Milk: Any milk works—2%, skim, or even a non-dairy alternative like almond or oat milk.
- Oil: Melted coconut oil or a light olive oil can replace vegetable oil. I don’t recommend butter here; oil keeps the cake super moist.
- Flour: For a slightly denser texture, you can use a 1-to-1 gluten-free flour blend.
- Sugar: You can reduce the sugar to 1% cups for a less sweet cake, but the texture may be slightly different.
Step-by-Step: Baking Your One Bowl Wonder
Step 1: Prep and Preheat
Start by turning your oven to 350°F (175°C). This gives it plenty of time to reach the perfect temperature. While it heats, grab your 9×13 inch pan or two 8-inch round pans. Grease them generously with butter, oil, or baking spray. I like to add a parchment paper sling for the rectangular pan—it makes removing the cake so easy! A well-prepped pan is the first secret to a cake that comes out beautifully.
Step 2: Whisk the Dry Goodness
Take your largest mixing bowl (yes, the only one you’ll need!). Add the flour, cocoa powder, baking powder, baking soda, salt, and sugar. Grab a whisk and stir these dry ingredients together for a good minute. You’re not just mixing; you’re aerating the flour and making sure every powdery ingredient is evenly distributed. The mixture will turn a lovely, uniform dusty brown. This step prevents little bitter pockets of baking soda in your finished cake.
Pro tip: Sift your cocoa powder if it’s lumpy. It ensures a perfectly smooth batter.
Step 3: Bring in the Wet Team
Now for the fun part! Make a well in the center of your dry ingredients. Crack in the eggs, then pour in the milk, vegetable oil, and vanilla extract. The vanilla aroma will start to mingle with the deep chocolate scent. Using a hand mixer or a sturdy whisk, beat everything together. Start slowly to avoid a flour cloud, then increase speed. Watch as the batter transforms from shaggy to gloriously smooth and thick in just a minute or two. It will be glossy and irresistible.
Step 4: The Secret Step: Hot Water
Here’s where the magic happens. Heat up a cup of water until it’s very hot, almost boiling. Carefully pour it into the batter. Don’t worry! The batter will become incredibly thin and liquid. This is exactly what you want. The hot water “blooms” the cocoa powder, intensifying the chocolate flavor. It also creates a super-hydrated batter that steams in the oven, resulting in that famous, tender, moist cake texture. Stir it gently until just combined.
Step 5: Bake to Perfection
Pour the thin batter into your prepared pan(s). It will spread out evenly on its own. Slide it into your preheated oven. For a 9×13 pan, bake for 30-35 minutes. For round layers, start checking at 25-28 minutes. The cake is done when the top springs back lightly to the touch, the edges pull away from the pan, and a toothpick inserted in the center comes out with a few moist crumbs—not wet batter. Your kitchen will smell like a bakery dream!
Step 6: The Crucial Cool Down
Patience is key here! Let the cake cool in the pan on a wire rack for at least 30 minutes. This allows the structure to set. If you frost a warm cake, the frosting will melt into a puddle. For round layers, I let them cool for 10 minutes in the pan before turning them out onto the rack to cool completely. Once cool, you can frost it with your favorite buttercream, dust it with powdered sugar, or simply slice and enjoy its pure, chocolatey glory.
Chef’s tip: For the ultimate easy chocolate cake experience, try poking a few holes in the warm cake with a skewer and brushing it with a simple syrup (equal parts sugar and water, heated until dissolved). It adds an extra layer of moisture and sweetness!
Your Baking Timeline
This is what makes the recipe a true lifesaver.
- Prep Time: 10 minutes (seriously, it’s that fast!).
- Baking Time: 30-35 minutes.
- Cooling Time: 45-60 minutes (for proper frosting).
- Total Hands-Off Time: About 45 minutes from bowl to table if served unfrosted.
- Servings: 12 generous slices.
- Calories: Approximately 330 per slice (without frosting).
My #1 Secret for the Best Texture
Don’t skip sifting your cocoa powder! It’s the one extra step that makes a noticeable difference. Cocoa tends to clump, and those little clumps can create dry pockets in your finished cake. Running it through a fine-mesh sieve guarantees a silky-smooth batter and an even, velvety crumb in every single bite. It’s my non-negotiable trick for professional-level results at home.
A Sweet Baking Fact
That cup of hot water isn’t just a random ingredient. In baking science, hot liquid helps to dissolve the sugar and cocoa more completely. This leads to a better emulsion in the batter, which translates to a finer, more even texture in the baked cake. So when you add that water and think the batter looks wrong, just smile—you’re doing advanced kitchen chemistry!
What You’ll Need to Make It
You don’t need any fancy equipment.
- One large mixing bowl
- A whisk and/or hand mixer
- Measuring cups and spoons
- 9×13 inch baking pan or two 8-inch round cake pans
- Wire cooling rack
- Spatula for scraping the bowl
How to Keep Your Cake Fresh and Delicious
Unfrosted Cake: Once completely cool, you can store it right in the pan. Just cover it tightly with plastic wrap or aluminum foil. It will stay wonderfully moist at room temperature for up to 3 days. For longer storage, wrap the whole cake or individual slices in plastic and then foil. Freeze for up to 3 months. Thaw overnight on the counter.
Frosted Cake: If you’ve used a buttercream or cream cheese frosting, the cake should be stored in the refrigerator. Let it sit in an airtight container or cake carrier. It will keep for up to 4 days. For the best texture and flavor, let slices come to room temperature for about 30 minutes before serving. The chill can mute the flavors a bit.
Pro Tip: To prevent sticking, you can place pieces of parchment paper against the cut sides of the cake if you’ve only eaten part of it. This keeps the exposed cake from drying out in the fridge.
Tips for a Flawless Cake Every Time
- Use room temperature eggs and milk if you can. They incorporate into the batter more easily.
- Don’t overmix after adding the hot water. Just stir until it’s combined to keep the cake tender.
- Check your baking powder and soda to make sure they’re fresh. They lose their power over time.
- Always do the toothpick test in the center of the cake, not the edge.
- Like all of our favorite cake recipes, this one is a perfect base for your own spins and additions.
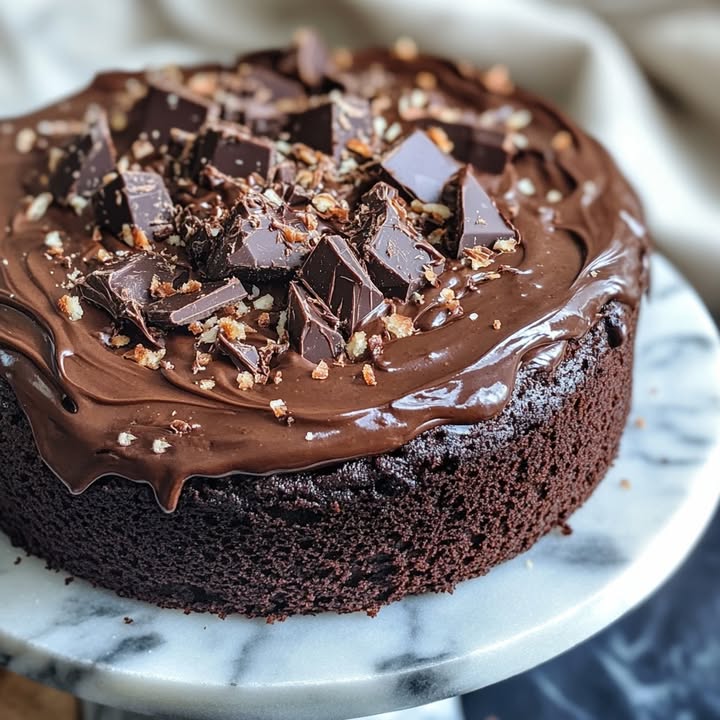
Making Your Cake Look Stunning
Even a simple cake deserves a beautiful presentation! Here are a few ideas:
- Dust with powdered sugar using a small sieve for a snowy, elegant look.
- Top with a pile of fresh berries—raspberries and strawberries are classic with chocolate.
- Drizzle with a simple chocolate ganache and let it drip down the sides casually.
- Serve with a dollop of freshly whipped cream or a scoop of vanilla ice cream on the side.
- For a party, add some colorful sprinkles or edible flowers on top of the frosting.
6 Fun & Tasty Recipe Twists
Love this base recipe? Try one of these delicious variations!
- Mexican Chocolate Cake: Add 1 tsp cinnamon and a tiny pinch of cayenne pepper to the dry ingredients for a warm, spiced kick.
- Chocolate Peanut Butter Cake: Swirl % cup of creamy peanut butter into the batter before baking, or frost with a rich peanut butter frosting.
- Mocha Cake: Replace the hot water with hot, strongly brewed coffee. The coffee makes the chocolate flavor even deeper and richer.
- Chocolate Mint Cake: Add 1 tsp peppermint extract with the vanilla. Frost with a mint-flavored buttercream for a refreshing treat.
- Chocolate Cherry Cake: Fold 1 cup of dried or frozen cherries into the batter before pouring. The tart cherries are wonderful with the sweet cake.
- Chocolate Raspberry Cake: After pouring the batter, drop spoonfuls of seedless raspberry jam on top and swirl with a knife for a marbled effect.
Looking for other easy bakes? This cake is as simple as whipping up a batch of delicious Kentucky Butter Cake Cookies, and perfect for a celebration like a festive Easter Bunny Poke Cake. For a non-chocolate treat, my family adores these bright and zesty Lemon Sweet Rolls, and on busy nights, nothing beats the speed of our Quick 20-Minute Homemade Bread.
Common Mistakes to Avoid
Mistake 1: Using Cold Ingredients
Pulling eggs and milk straight from the fridge is a common habit. Cold ingredients don’t blend as smoothly into the batter. This can lead to a denser cake and might even cause the oil to solidify a little. For the best, most evenly mixed batter, let your eggs and milk sit on the counter for 20-30 minutes before you start baking. Your cake’s texture will thank you!
Mistake 2: Over-Baking the Cake
We’ve all done it—left the cake in “just two more minutes” to be safe. This is the fast track to a dry cake. Remember, the cake continues to cook from residual heat as it cools. Bake until a toothpick comes out with a few moist crumbs attached, not completely clean. Start checking a few minutes before the recipe’s minimum time. An over-baked cake loses that wonderful moist quality.
Mistake 3: Skipping the Sifting for Cocoa
It’s tempting to just dump the cocoa powder in. But cocoa is notoriously clumpy. Those little dry clumps won’t dissolve fully, leaving bitter, powdery pockets in your finished slice. Taking 30 seconds to sift your cocoa (and even your flour!) with the other dry ingredients ensures everything is light, aerated, and perfectly combined for a flawless crumb.
Mistake 4: Frosting a Warm Cake
The excitement to dig in is real! But frosting a warm cake is a recipe for a melted, sliding mess. Buttercream will melt, and whipped cream will deflate. More importantly, the cake’s structure is still setting as it cools. Frosting it too soon can tear the soft surface. Be patient. Let the cake cool completely in the pan on a wire rack. This step is non-negotiable for a beautiful finish.
Understanding your ingredients is part of being a great home baker. For example, knowing how to read food labels can help you choose higher quality cocoa powder or understand the nutritional content of your baking staples.
Your Chocolate Cake Questions, Answered
Can I make this cake without eggs?
You can try an egg substitute! For this recipe, a good option is to use % cup of plain yogurt or buttermilk in place of the two eggs. Another common substitute is a “flax egg”: mix 1 tablespoon of ground flaxseed with 2.5 tablespoons of water for each egg, let it sit for 5 minutes to gel, then use. The texture may be slightly denser, but it will still be moist and delicious. I’ve had great success with the yogurt method when baking for friends with allergies.
Why is the batter so runny? Did I do something wrong?
You did everything perfectly! The thin, runny batter is exactly what you want. The hot water hydrates the dry ingredients thoroughly and creates a lot of steam during baking. This steam is what gives the cake its incredibly light and tender, moist texture. If your batter was thick, the cake would be heavy and dense. So embrace the liquid—it’s the secret to the best chocolate cake.
What’s the best type of cocoa powder to use?
For this recipe, I recommend using natural unsweetened cocoa powder (like Hershey’s). It reacts perfectly with the baking soda to give the cake a good rise and a classic chocolate flavor. Do not use Dutch-processed cocoa unless you adjust the leavening, as it is processed differently and can result in a flat cake. Stick with the standard “unsweetened cocoa powder” for guaranteed results.
Can I use this recipe to make cupcakes?
Absolutely! This batter makes fantastic cupcakes. Simply line a muffin tin with paper liners and fill each one about % full. Bake at the same temperature (350°F) for 18-22 minutes, or until a toothpick comes out clean. You should get about 24 standard cupcakes. They are perfect for lunchboxes, parties, or a portable chocolate treat.
How can I tell if my cake is truly done baking?
Use a few clues together for the best judgment. First, the edges of the cake will pull away slightly from the sides of the pan. Second, the top will feel springy when gently pressed in the center. Finally, and most reliably, insert a toothpick or a dry paring knife into the very center of the cake. It should come out with a few moist crumbs clinging to it, but not with wet, gooey batter. If it’s clean, it might be overdone.
My cake sunk in the middle. What happened?
A sunken center usually means the cake wasn’t fully baked in the middle, or there was too much leavening (baking powder/soda). Make sure your oven is properly preheated and you’re using the correct pan size. Don’t open the oven door too early—wait until at least the 25-minute mark. Also, double-check your measurements for baking powder and soda; using a heaping teaspoon by mistake can cause the cake to rise too quickly and then collapse.
Can I make this cake ahead of time and freeze it?
Yes, this cake freezes beautifully! Let it cool completely after baking. Wrap the unfrosted cake tightly in plastic wrap, then again in aluminum foil or a freezer bag. It will keep for up to 3 months. To thaw, leave it wrapped on the counter overnight. Frost it the next day. Freezing can actually make the cake even more moist as the ice crystals create little pockets of moisture when they melt.
What is the best frosting to use with this cake?
This versatile cake pairs well with almost any frosting! A classic chocolate buttercream is always a winner. For something lighter, a chocolate ganache poured over the top is rich and elegant. A simple vanilla buttercream or cream cheese frosting provides a lovely contrast to the deep chocolate flavor. If you’re in a hurry, a dusting of powdered sugar or a dollop of whipped cream is perfect.
Is it necessary to use hot water, or can I use cold?
The hot water is highly recommended, not just for dissolving sugar. It “blooms” the cocoa powder, which means it opens up the cocoa particles and releases more of their deep, complex flavor. Using cold water won’t ruin the cake, but you might find the chocolate flavor is slightly less intense. For the richest taste, take the extra minute to heat the water in your kettle or microwave.
I only have a bundt pan. Can I use that?
You can, but you need to adjust. This recipe makes a thin batter that might seep through some detailed bundt pans. Grease and flour your bundt pan extremely well. The baking time will be longer, likely 45-55 minutes, due to the thicker center of the pan. Start checking at the 40-minute mark with a long toothpick or skewer. Let it cool in the pan for 15 minutes before inverting onto a rack.
The Last Slice
And that’s it, my friend! Your new go-to recipe for a perfect, fuss-free chocolate cake. It’s the cake I make when I need something dependable and delicious, the one that always gets empty plates and happy smiles. I hope it becomes a cherished recipe in your home, too. So grab that one bowl, and let’s get baking. Your chocolate-loving heart (and everyone around your table) will be so glad you did.
Equipment
- Grand bol
- Fouet
- Spatule
- Plaque à pâtisserie
- Papier sulfurisé
Ingredients
- 2 tasses farine tout usage
- ¾ tasse cacao en poudre non sucré
- 1.5 cuil. à café poudre à lever
- 1.5 cuil. à café bicarbonate de soude
- ½ cuil. à café sel
- 2 tasses sucre cristallisé
- 2 oeufs
- 1 tasse lait entier
- ½ tasse huile végétale
- 2 cuil. à café extrait de vanille
- 1 tasse eau chaude
Instructions
- Préchauffez votre four à 175°C et préparez votre plaque à pâtisserie de 9x13 pouces ou deux moules ronds de 8 pouces en les graissant.
- Dans un grand bol, fouettez ensemble la farine, le cacao, la poudre à lever, le bicarbonate, le sel et le sucre pendant environ une minute jusqu'à ce qu'ils soient bien mélangés.
- Faites un puits au centre des ingrédients secs et ajoutez les oeufs, le lait, l'huile et l'extrait de vanille ; mélangez jusqu'à obtenir une pâte lisse.
- Versez délicatement l'eau chaude dans la pâte et remuez doucement jusqu'à ce que tout juste combiné.
- Versez la pâte liquide dans le moule préparé et faites cuire ; pour un moule de 9x13 pouces, faites cuire pendant 30-35 minutes, et pour des couches rondes, commencez à vérifier à 25-28 minutes.
- Une fois cuit, laissez le gâteau refroidir dans le moule pendant au moins 30 minutes avant de le transférer sur une grille pour qu'il refroidisse complètement.
Notes
Nutrition

Hi, I’m Olivia Parker, the founder of BakingSecret.com and a lifelong lover of all things sweet and homemade. I grew up in a small town in Oregon, where the smell of fresh cookies in my family’s kitchen sparked my passion for baking. Over the years, I turned that passion into a mission: to help home bakers feel confident, inspired, and creative.
After studying food science and working in several artisan bakeries across the U.S., I decided to create a space where everyone from beginners to seasoned bakers can find reliable recipes, expert tips, and a warm, welcoming community. BakingSecret.com is my way of sharing the magic of baking with the world. When I’m not testing new recipes, you’ll find me exploring farmers’ markets, collecting vintage cookbooks, or perfecting my sourdough technique.