
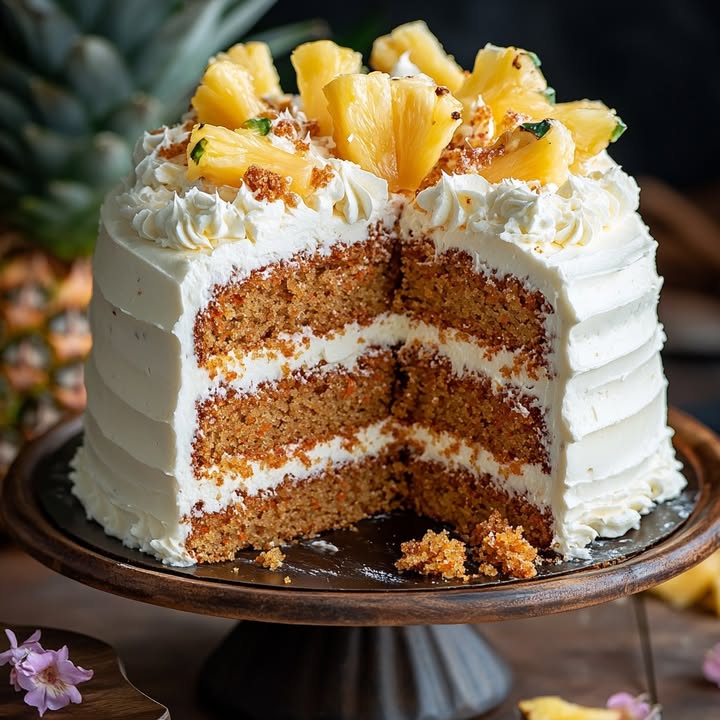
Hawaiian Carrot Pineapple Cake: A Tropical Twist on a Classic Dessert
Let me tell you about the day this cake became a legend in my house. I was hosting a potluck that felt more like a grey, wintery slog than a party. I needed sunshine on a plate. Enter this Hawaiian Carrot Pineapple Cake. The moment I pulled it from the oven, the scent of cinnamon and warm pineapple filled the kitchen like a tropical vacation. My friends didn’t just eat it; they hovered over the pan, forks at the ready, asking for the recipe before they’d even finished their slice. It’s that magical blend of comfort food and pure, fruity joy.
The Story Behind This Sunny Dessert
While carrot cake has roots in resourcefulness, using sweet vegetables for desserts, the “Hawaiian” twist is a more modern celebration. It takes the cozy, spiced comfort of classic carrot cake and throws a luau in the batter. The addition of crushed pineapple and sweetened coconut isn’t just about flavor—it’s about texture and moisture. This version celebrates the idea of fusion baking, where the best of a beloved treat meets the bright, cheerful flavors of the islands. It’s a perfect example of how a traditional recipe can get a fun, delicious upgrade.
Why You’ll Fall in Love With This Hawaiian Dessert
This isn’t your average carrot cake. First, it’s unbelievably moist. The pineapple and oil ensure every bite is tender. Second, it’s a flavor fiesta. The earthy carrots, sweet pineapple, toasty coconut, and warm cinnamon dance together under a blanket of creamy frosting. Finally, it’s deceptively easy. You just mix wet and dry ingredients, fold in the goodies, and bake. The result looks and tastes like you spent all day in the kitchen, but your secret is safe with me!
The Perfect Occasions for This Tropical Cake
This cake is your secret weapon for bringing a little sunshine. It’s a smash hit at summer barbecues and pool parties. It makes a gorgeous, unexpected centerpiece for Easter or spring celebrations. Need a potluck dish that will have everyone talking? This is it. I also love baking it just to brighten a regular weeknight. Slicing into it feels like a mini-holiday, no flight required.
Gathering Your Ingredients for Hawaiian Carrot Cake
Let’s get everything ready. Using fresh, simple ingredients makes all the difference here.
For the Cake:
- 2 cups all-purpose flour
- 2 teaspoons baking soda
- 1/2 teaspoon salt
- 2 teaspoons ground cinnamon
- 1 1/2 cups granulated sugar
- 1 cup vegetable oil
- 4 large eggs
- 2 teaspoons vanilla extract
- 2 cups finely grated carrots
- 1 cup crushed pineapple, well drained
- 1 cup sweetened shredded coconut
- 1 cup chopped pecans (optional but wonderful)
For the Cream Cheese Frosting:
- 8 ounces cream cheese, softened
- 1/2 cup unsalted butter, softened
- 3 cups powdered sugar
- 1 teaspoon vanilla extract
Easy Ingredient Substitutions
No worries if you’re missing something! Here are some easy swaps:
- Oil: You can use an equal amount of melted coconut oil for a stronger tropical note.
- Nuts: Walnuts are a great substitute for pecans, or simply leave them out for a nut-free cake.
- Coconut: Unsweetened shredded coconut works fine; the cake will be a bit less sweet.
- Pineapple: Use canned pineapple in 100% juice for the best flavor and texture.
How to Make Your Hawaiian Carrot Pineapple Cake
Follow these simple steps for a perfect, moist cake every single time.
Step 1: Prep and Preheat
Start by preheating your oven to 350°F (175°C). This ensures it’s perfectly hot when your batter is ready. Grease and flour a 9×13 inch baking pan. I like to use a bit of butter and a spoonful of flour, tapping it around until the whole pan is coated. This little step is your insurance policy for a cake that slides out beautifully after baking. Get your carrots grated and your pineapple drained while the oven heats up. Pro tip: Press the drained pineapple in a fine-mesh strainer with the back of a spoon to squeeze out every last drop of extra juice. Too much liquid can make the cake soggy.
Step 2: Mix the Dry Ingredients
In a medium bowl, whisk together your flour, baking soda, salt, and cinnamon. Whisking is better than stirring here—it aerates the flour and makes sure those leavening agents are perfectly distributed. You’ll see little clouds of cinnamon dancing through the white flour. This uniform mixture is key to a cake that rises evenly, without any bitter pockets of baking soda. Set this colorful, fragrant flour blend aside for a moment.
Step 3: Combine the Wet Ingredients
In a large mixing bowl, combine the sugar, vegetable oil, eggs, and vanilla extract. Use a hand mixer or a sturdy whisk to beat it all together for about a minute. You’re looking for a smooth, pale yellow, and slightly thickened mixture. The sugar will start to dissolve into the oil and eggs. This emulsion creates the foundation for your cake’s tender crumb. The vanilla scent will start to bloom, promising wonderful things to come.
Step 4: Fold in the Carrots, Pineapple, and Coconut
Now for the fun part! Stir in the finely grated carrots, the well-drained crushed pineapple, the shredded coconut, and the pecans if you’re using them. A sturdy silicone spatula is perfect for this. The mixture will become thick, chunky, and incredibly vibrant. You’ll see flecks of orange, white, and brown all swirled together. The batter will smell like a tropical spice market. Don’t overmix here; just fold until everything is evenly incorporated.
Step 5: Bring It All Together and Bake
Gradually add your bowl of dry ingredients to the wet, tropical mixture. Mix on low speed or by hand just until the flour disappears. A few streaks are okay—overmixing is the enemy of a tender cake! Pour this luscious batter into your prepared pan and smooth the top. Slide it into your preheated oven. The bake time is 40-45 minutes. Your kitchen will smell absolutely divine. The cake is done when a toothpick inserted into the center comes out clean or with just a few moist crumbs attached.
Step 6: Make the Frosting and Frost the Cake
While the cake cools completely (this is non-negotiable for frosting!), make your frosting. Beat the softened cream cheese and butter together until completely smooth and fluffy. This takes about 2 minutes. Gradually add the powdered sugar and vanilla, beating until the frosting is silky and spreadable. Once the cake is truly cool, spread the frosting over the top in swoops and swirls. For a final touch, sprinkle a little extra coconut or chopped nuts on top. Chef’s tip: For super smooth frosting, let the cream cheese and butter sit out until they are so soft your finger leaves a deep indent. Cold ingredients will give you lumpy frosting.
Timing Your Baking Success
- Prep Time: 20 minutes
- Cook Time: 45 minutes
- Cooling Time: At least 1 hour
- Total Time: About 2 hours 5 minutes (including cooling)
- Kcal: Approximately 480 per slice
- Servings: 12 generous pieces
A Little Chef’s Secret
For an extra layer of flavor, toast your shredded coconut before adding it to the batter. Just spread it on a baking sheet and bake at 350°F for 5-7 minutes, watching carefully until it’s golden. Let it cool before using. This deepens the coconut flavor and adds a wonderful toasted note that complements the pineapple perfectly.
A Pinch of Extra Info
Did you know the carrot’s natural sweetness made it a popular sugar substitute in the Middle Ages? This humble root vegetable has been sweetening cakes for centuries! Pairing it with pineapple, a symbol of hospitality, makes this cake the ultimate welcoming dessert. It’s a delicious piece of history and culture in every bite.
What You’ll Need to Make It
- 9×13 inch baking pan
- Mixing bowls (one large, one medium)
- Whisk
- Hand mixer or stand mixer
- Spatula
- Box grater or food processor for carrots
- Fine-mesh strainer
- Measuring cups and spoons
Storing Your Tropical Masterpiece
Because this cake is so moist, it stores beautifully. Cover the pan tightly with plastic wrap or aluminum foil, or transfer slices to an airtight container. It will stay fresh and delicious at room temperature for about 2 days.
For longer storage, the refrigerator is your friend. The cream cheese frosting requires it if you’re keeping it for more than two days. Cover it well and it will be perfect for up to 5 days. Let slices come to room temperature for about 20 minutes before serving for the best texture and flavor.
You can also freeze this cake! Wrap the unfrosted, cooled cake tightly in plastic wrap and then foil. Freeze for up to 3 months. Thaw overnight in the refrigerator, then frost and serve. You can also freeze individual frosted slices on a tray before wrapping them, for a quick sweet treat anytime.
My Best Tips and Advice
- Grate Fine: Use the small holes on your box grater for the carrots. This helps them blend seamlessly into the cake and distribute moisture evenly.
- Drain Thoroughly: I can’t stress this enough—squeeze that pineapple pulp! Excess liquid is the main cause of a dense, gummy cake.
- Room Temp is Key: For the fluffiest frosting, make sure your cream cheese and butter are genuinely softened at room temperature.
- Cool Completely: Frosting a warm cake is a recipe for a melty, sliding disaster. Patience makes perfect here.
Presentation Ideas to Wow Your Guests
- Top with a ring of toasted coconut flakes and a few pecan halves for a rustic look.
- Serve with a small dollop of whipped cream and a thin wedge of fresh pineapple on the side.
- For a party, cut into small squares and garnish each with a tiny edible flower.
- Drizzle a little extra caramel sauce over the frosting for a decadent touch.
Exploring Healthier Recipe Variations
This versatile cake can be tweaked to fit different dietary needs or flavor whims. Here are six delicious ideas:
- Gluten-Free Hawaiian Carrot Cake: Swap the all-purpose flour for a 1:1 gluten-free baking blend. Ensure your baking soda and other ingredients are certified gluten-free.
- Whole Wheat Carrot Cake: Replace half of the all-purpose flour with whole wheat pastry flour for added fiber and a nuttier flavor.
- Reduced-Sugar Version: Cut the granulated sugar in the cake to 1 cup and use a sugar substitute blend in the frosting. The fruit adds plenty of natural sweetness.
- Vegan Tropical Carrot Cake: Use flax eggs (1 tbsp ground flax + 3 tbsp water per egg), a neutral oil, and vegan cream cheese and butter for the frosting.
- Carrot Cake Muffins: Divide the batter into a muffin tin lined with cups. Bake at 375°F for 20-25 minutes. Skip the frosting for a portable breakfast treat.
- Spiced Rum Raisin Twist: Soak 1/2 cup raisins in 1/4 cup spiced rum while you prep. Drain and fold them in with the carrots for a warm, boozy note.
If you’re looking for other crowd-pleasing baked dishes that are full of flavor, you must try these Baked Garlic Parmesan Chicken Meatloaves. They’re packed with savory flavor and are a family-friendly hit, much like this cake. For another fruity dessert idea, these Cheesecake Fruit Roll-Ups are a fun, no-bake option. And when apple season hits, these Caramel Apple Puff Pastries are incredibly easy and delicious. Don’t forget the cookies! My Soft Batch Pumpkin Sugar Cookies are another spiced, moist treat that’s perfect with a cup of coffee.
Common Mistakes to Avoid
Mistake 1: Not Draining the Pineapple Enough
This is the #1 reason cakes turn out soggy or dense. Canned crushed pineapple holds a lot of juice. If you just dump it in, you’re adding extra liquid that throws off the balance of wet to dry ingredients. The batter becomes too thin, and the cake can’t set properly. To avoid this, drain the pineapple in a fine-mesh strainer and then press it firmly with the back of a spoon or a spatula. You want it moist, but not dripping wet.
Mistake 2: Overmixing the Batter
Once you add the flour to the wet ingredients, a clock starts ticking. Overmixing develops the gluten in the flour, which leads to a tough, chewy cake instead of a tender, soft crumb. Mix the dry ingredients in just until you no longer see streaks of flour. A few small lumps are perfectly fine. It’s better to have a slightly uneven mix than an overworked one. Use a folding motion with a spatula for the final stirs.
Mistake 3: Frosting a Warm Cake
I know it’s tempting to slather on that creamy frosting as soon as the pan is cool enough to touch, but resist! A warm cake will melt the cream cheese frosting on contact. You’ll end up with a runny, gloppy mess that soaks into the cake instead of sitting prettily on top. Let the cake cool in the pan on a wire rack until the pan is completely cool to the touch. For absolute certainty, let it cool for a full hour. Patience results in perfect, picture-worthy frosting.
Mistake 4: Using Cold Cream Cheese and Butter
Lumpy frosting is almost always caused by ingredients that are too cold. Cold cream cheese and butter will never beat together smoothly with powdered sugar. You’ll get tiny bits of cream cheese throughout. To fix this, take the cream cheese and butter out of the fridge at least an hour before you plan to make the frosting. They should be so soft that your finger easily leaves a deep indentation. This ensures a silky, lump-free frosting.
Choosing high-quality ingredients is a part of being a mindful cook. For information on selecting fresh produce and understanding food labeling, resources like the USDA offer great guidance on food responsibility from farm to table.
Frequently Asked Questions
Can I make this Hawaiian Carrot Cake in layers?
Absolutely! This recipe works beautifully for a layer cake. Simply divide the batter between two or three greased and floured 9-inch round cake pans. Reduce the baking time to about 25-35 minutes. Keep a close eye on them and test with a toothpick for doneness. Let the layers cool completely before frosting and stacking. You might want to make 1.5 times the frosting recipe to have enough for the layers and the outside of the cake.
Can I use fresh pineapple instead of canned?
Yes, you can, but it requires an extra step. You need about 1 cup of finely chopped fresh pineapple. First, you must cook it down slightly to soften it and release its juices. Simply simmer the chopped pineapple in a small saucepan over medium heat for 5-7 minutes until tender. Then, drain and press it just like you would with canned pineapple to remove all excess liquid. Using raw, fresh pineapple can result in a fibrous texture and too much active enzyme, which might affect the cake’s structure.
Why did my cake sink in the middle?
A sunken cake usually points to one of a few issues. First, check your baking soda. If it’s old, it won’t provide enough lift. Second, the oven door was likely opened too early or too often during baking, causing a sudden temperature drop. Third, the cake might have been underbaked. The top may look set, but the center is still wet. Always use the toothpick test in the very center of the cake. Finally, overmixing the batter can also weaken its structure, causing it to collapse.
Can I make this cake ahead of time?
This cake is actually better the next day! The flavors meld and the texture becomes even more moist. You can bake the cake up to two days in advance. Let it cool completely, then wrap the unfrosted cake tightly in plastic wrap and store it at room temperature. Make the frosting on the day you plan to serve it. Frost the cake a few hours before your event. This gives the frosting a chance to set slightly, making it easier to slice neatly.
How do I store leftover frosted cake?
Because of the cream cheese frosting, any leftover cake must be stored in the refrigerator. Cover the pan tightly with plastic wrap or aluminum foil, or transfer slices to an airtight container. It will keep well for up to 5 days. The cold will firm up the cake and frosting. For the best taste and texture, let individual slices sit at room temperature for about 20-30 minutes before serving. This takes the chill off and restores the cake’s softness.
Can I leave out the coconut or the nuts?
Of course! Baking should fit your tastes. If you don’t like coconut, simply omit it. The cake will still be wonderfully moist from the carrots and pineapple. If you have a nut allergy or simply don’t want nuts, leave out the pecans. The cake will still be delicious. You don’t need to replace these ingredients with anything else, just proceed with the recipe as written without them.
What’s the best way to grate carrots for carrot cake?
The small holes on a standard box grater are your best friend here. They create a fine grate that blends seamlessly into the cake batter. You can also use the grating attachment on a food processor for speed and uniformity. Avoid using large shreds, as they can be too prominent and create a stringy texture in the finished cake. You want the carrots to melt into the background, providing moisture and sweetness without a coarse feel.
Can I use pre-shredded carrots from the store?
I don’t recommend it. Pre-shredded carrots are often too dry and too thick. They are shredded for salads, not for baking. They won’t release as much moisture or sweetness into the batter, and their texture can be woody. Taking the few extra minutes to grate fresh carrots makes a significant difference in the cake’s moisture and overall texture. It’s a step worth doing for the best possible result.
My frosting is too runny. How can I fix it?
A runny frosting is usually caused by ingredients that are too warm or by not using enough powdered sugar. First, pop the whole bowl of frosting into the refrigerator for 20-30 minutes to firm up the fats. Then, beat it again. If it’s still too soft, you can gradually add a little more powdered sugar, about 1/4 cup at a time, until it reaches a spreadable consistency. Be sure your cake is completely cool before you try to frost it with the fixed frosting.
Can I freeze this carrot pineapple cake?
Yes, you can freeze it very successfully, but it’s best to freeze it unfrosted. Wrap the completely cooled cake tightly in plastic wrap, then in a layer of aluminum foil. Freeze for up to 3 months. Thaw overnight in the refrigerator, then bring to room temperature before frosting and serving. You can also freeze individual slices of frosted cake. Place them on a baking sheet until solid, then wrap each slice individually. Thaw in the fridge.
For more wonderful baking inspiration and a whole collection of delightful treats, be sure to explore our full library of cake and cupcake recipes. You’ll find everything from classic chocolate to other fun fruity creations.
The Final Slice
This Hawaiian Carrot Pineapple Cake is more than just a dessert. It’s a burst of sunshine, a taste of the tropics, and a guaranteed smile-maker. It combines the cozy, familiar comfort of carrot cake with a bright, fruity twist that feels like a celebration. Whether you’re serving it for a special occasion or just because, it’s a recipe that will earn you rave reviews. So preheat that oven, grate those carrots, and get ready to bake a little bit of happiness. Happy baking!
Equipment
- Grand bol
- Fouet
- Spatule
- Plaque à pâtisserie
- Papier sulfurisé
Ingredients
- 4 œufs
- 300 g sucre
- 500 g farine tout usage
- 10 g poudre à lever
- 1 g sel
- 1 cuil. à café cannelle moulue
- 240 ml huile végétale
- 500 g carottes râpées
- 250 ml ananas écrasé bien égoutté
- 100 g noix de coco râpée
- 100 g noix de pécan hachées facultatif
Instructions
- Préchauffez votre four à 175°C et graissez un moule de 9x13 pouces.
- Mélangez la farine, la poudre à lever, le sel et la cannelle dans un bol moyen.
- Dans un grand bol, combinez le sucre, l'huile, les œufs et l'extrait de vanille et battez jusqu'à obtenir un mélange homogène.
- Incorporez les carottes râpées, l'ananas égoutté, la noix de coco râpée et les noix de pécan.
- Ajoutez progressivement les ingrédients secs aux ingrédients humides et mélangez jusqu'à ce que le mélange soit homogène.
- Versez la pâte dans le moule préparé et lissez le dessus ; faites cuire pendant 40 à 45 minutes ou jusqu'à ce qu'un couteau en ressorte propre.
- Laissez refroidir complètement. Pendant ce temps, préparez le glaçage en battant le fromage à la crème et le beurre jusqu'à consistance lisse, puis ajoutez le sucre en poudre et la vanille jusqu'à obtenir une texture crémeuse.
- Une fois le gâteau refroidi, étalez le glaçage sur le dessus et servez.
Notes
Nutrition

Hi, I’m Olivia Parker, the founder of BakingSecret.com and a lifelong lover of all things sweet and homemade. I grew up in a small town in Oregon, where the smell of fresh cookies in my family’s kitchen sparked my passion for baking. Over the years, I turned that passion into a mission: to help home bakers feel confident, inspired, and creative.
After studying food science and working in several artisan bakeries across the U.S., I decided to create a space where everyone from beginners to seasoned bakers can find reliable recipes, expert tips, and a warm, welcoming community. BakingSecret.com is my way of sharing the magic of baking with the world. When I’m not testing new recipes, you’ll find me exploring farmers’ markets, collecting vintage cookbooks, or perfecting my sourdough technique.