
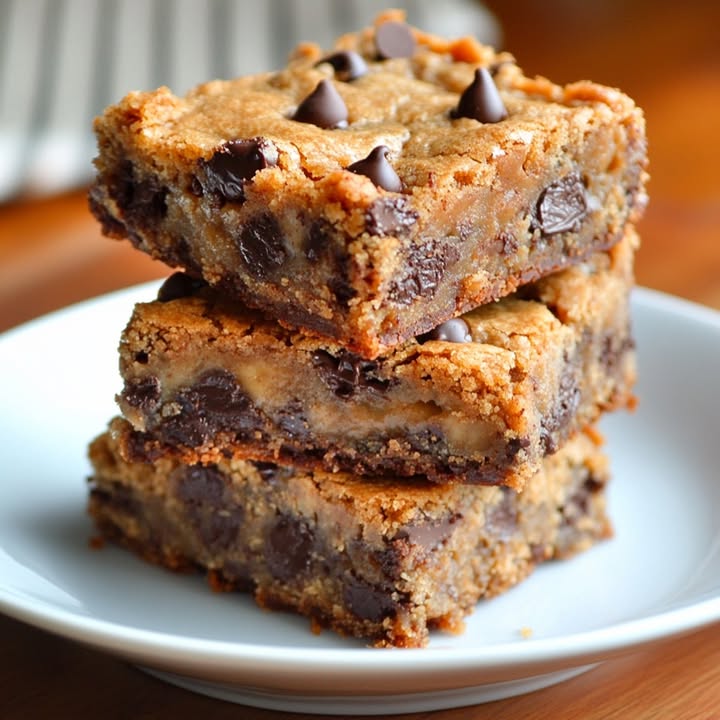
The Ultimate Sweet Treat: Peanut Butter Caramel Toffee Chocolate Chip Cookie Bars
You know that magical moment when your sweet tooth screams for *everything* at once? Chocolate, peanut butter, caramel, and a little crunchy toffee? Me too. So I did what any sane baker would do: I threw them all into one pan and created what my family now calls “The Unfair Bar.” These Peanut Butter Toffee Bars are the love child of a chocolate chip cookie and a candy shop, and they are outrageously good.
From Classic Cookie to Epic Bar
Let’s talk cookie evolution. The classic chocolate chip cookie is perfect. But sometimes, life calls for more. I wanted a dessert that was shareable, gooey, and packed with layers of flavor. I started with my favorite peanut butter cookie base—it’s soft and rich. Then came the “what ifs.” What if we layered it like a dessert lasagna? What if we added a river of caramel? And wouldn’t some toffee bits add a buttery crunch? After a few (delicious) tests, this recipe was born. It’s a modern twist that turns a simple cookie into a show-stopping dessert bar. Perfect for when one flavor just isn’t enough.
Why You’ll Fall in Love with These Peanut Butter Toffee Bars
First, they’re incredibly easy. No rolling dough or scooping individual cookies. You mix, layer, and bake. Second, the texture is a dream team: a soft, chewy peanut butter base, a molten caramel center, and melty chocolate chips. Every bite is a delightful adventure. Third, they feed a crowd! One pan makes 12 generous bars that disappear faster than you can say “save one for me.” Honestly, the hardest part is waiting for them to cool before you slice.
The Perfect Occasion for These Cookie Bars
These bars are your secret weapon for any gathering. Bringing them to a potluck? You’ll be a legend. Need a treat for a bake sale? They’ll sell out first. Hosting game night? These bars are the MVP. They’re also a fantastic “just because” bake. A rainy afternoon feels much cozier with the smell of peanut butter and caramel filling your kitchen. Trust me, any day becomes a special occasion with these on the counter.
What You’ll Need: The Ingredient List
These Peanut Butter Caramel Bars use simple, pantry-friendly ingredients. Here’s your shopping list:
- 1/2 cup unsalted butter, melted
- 1/2 cup creamy peanut butter
- 1 cup light brown sugar, packed
- 1 large egg
- 1 teaspoon vanilla extract
- 1 cup all-purpose flour
- 1/2 teaspoon baking soda
- 1/4 teaspoon salt
- 1/2 cup semi-sweet chocolate chips
- 1/2 cup toffee bits
- 1/2 cup caramel sauce, plus extra for drizzling
Easy Swaps & Substitutions
No worries if you’re missing something! Baking should be flexible.
- Peanut Butter: Use crunchy peanut butter for extra texture, or a natural one (just stir it well first). For a nut-free version, sunflower seed butter works surprisingly well.
- Toffee Bits: No toffee? Chopped pecans or walnuts are a great swap for crunch.
- Caramel Sauce: Store-bought is perfect for ease, but homemade salted caramel takes it over the top. In a pinch, you can use dulce de leche.
- Chocolate Chips: Milk, dark, or even peanut butter chips are delicious. Use what you love!
Let’s Bake! Your Step-by-Step Guide
Follow these simple steps for perfect, gooey bars every time.
Step 1: Prep Your Pan and Oven
Start by preheating your oven to 350°F (175°C). This ensures it’s perfectly hot when your batter is ready. Take an 8×8-inch baking pan and line it with parchment paper, leaving a slight overhang on two sides. This creates little “handles” that make lifting the entire slab of baked goodness out of the pan a total breeze. No more awkward flipping or broken bars!
Step 2: Mix the Wet Ingredients
In a large mixing bowl, combine the melted butter and creamy peanut butter. Stir them together until they become one smooth, glossy mixture. The aroma is already amazing! Now, add the packed light brown sugar. Stir vigorously until the sugar is fully dissolved and the mixture looks like a thick, luxurious caramel sauce. This step creates the base of your chewy texture.
Step 3: Incorporate Egg and Vanilla
Crack in the large egg and add that teaspoon of vanilla extract. The vanilla adds a warm, floral note that balances the richness. Mix everything until the egg is completely incorporated and the batter looks creamy and uniform. You’ll see it lighten in color just a bit. Pro Tip: Let your egg sit out for 10-15 minutes before baking. A room-temperature egg blends into the batter much more smoothly than a cold one.
Step 4: Gently Add the Dry Ingredients
In a separate bowl, whisk together the all-purpose flour, baking soda, and salt. This distributes the leavening agent evenly. Now, add this dry mixture to your wet batter. Use a spatula and fold gently. Stop mixing as soon as you no longer see streaks of flour. Overmixing here can lead to tough bars, and we want them soft and tender.
Step 5: Fold in the Goodies
This is the fun part! Sprinkle the semi-sweet chocolate chips and the toffee bits over your dough. Using your spatula, fold them in gently until they are just evenly distributed. Don’t overdo it—those pockets of chocolate and toffee are what make every bite exciting. The dough will be thick and studded with deliciousness.
Step 6: Layer and Add the Caramel
Now for the magic trick. Take just over half of your dough and spread it evenly into the bottom of your prepared pan. Press it down lightly with your fingers or the back of a spoon. Grab your caramel sauce and drizzle it right over this first layer. Try to keep it in the center, leaving a small border around the edges. Then, dollop the remaining dough on top and spread it as best you can—it’s okay if some caramel peeks through!
Step 7: Bake to Golden Perfection
Place your pan in the preheated oven. Bake for 25-28 minutes. You’ll know they’re done when the top is a beautiful golden brown and the center looks set, not wet. A toothpick inserted near the center might come out with a few moist crumbs, but not raw batter. The smell in your kitchen will be absolutely divine. Chef’s Tip: For super clean cuts, let the bars cool completely in the pan on a wire rack. I know it’s hard to wait, but it’s worth it!
Step 8: Cool, Drizzle, and Slice
Once the pan is completely cool—yes, completely!—use the parchment paper “handles” to lift the entire block of cookie bar out. Place it on a cutting board. Warm a little extra caramel sauce and drizzle it artistically over the top. Then, using a sharp knife, slice into 12 squares (or 9 for bigger portions!). Wiping the knife between cuts helps get those clean, beautiful layers.
Your Baking Timeline
This recipe is wonderfully quick from craving to eating.
- Prep Time: 15 minutes
- Cook Time: 28 minutes
- Cooling Time: 1 hour (crucial for clean slices!)
- Total Time: About 1 hour 45 minutes
- Servings: 12 generous bars
- Calories: Approximately 390 per bar
A Secret from My Kitchen
My absolute best trick for these Peanut Butter Toffee Bars is to slightly underbake them. If the recipe says 25-28 minutes, I pull them out at 25. The center might seem a little soft, but it will set up perfectly as it cools. This guarantees an ultra-chewy, almost fudgy texture that makes these bars impossible to resist. It’s the difference between good and “oh-my-goodness-I-need-the-recipe” good.
A Little Food for Thought
Did you know toffee is essentially caramelized sugar and butter? That means when you bite into a toffee bit in these bars, you’re getting a tiny burst of buttery, crunchy caramel. It’s a genius ingredient that adds both flavor and texture without any extra work. It’s my not-so-secret weapon for making desserts feel extra special.
Gear You’ll Need
You don’t need fancy equipment for this recipe!
- 8×8-inch baking pan
- Parchment paper
- Large mixing bowl
- Medium bowl for dry ingredients
- Whisk and spatula
- Measuring cups and spoons
- Wire cooling rack
Keeping Your Bars Fresh & Delicious
To store any leftovers (if you have any!), place the cooled bars in an airtight container. You can separate layers with parchment paper if you stack them. They will stay soft and delicious at room temperature for up to 5 days.
For longer storage, these bars freeze beautifully. Wrap individual bars tightly in plastic wrap, then place them in a freezer-safe bag or container. They’ll keep for up to 3 months. Thaw at room temperature for an hour or so, or pop one in the microwave for 15 seconds for a warm, gooey treat.
If your kitchen is very warm, you might prefer to store them in the fridge. This firms up the caramel layer and gives a different, but still delicious, chewy texture. Just let them come to room temp for 10 minutes before serving.
My Top Tips for Success
- Measure Flour Correctly: Spoon your flour into the measuring cup and level it off with a knife. Don’t scoop directly from the bag with the cup—this packs in too much flour and leads to dry bars.
- Use Room Temp Egg: As mentioned, this is a small step with a big impact on how smoothly your batter comes together.
- Don’t Overbake: Set a timer! The bars will continue to cook a bit from residual heat as they cool in the pan.
- Cool Completely: This is non-negotiable for clean slices that show off those beautiful layers.
How to Make Them Look Pretty
Presentation is part of the fun!
- Drizzle the final caramel in a zig-zag pattern, then do a second pass with melted chocolate for a professional bakery look.
- Sprinkle a few flaky sea salt crystals on top after drizzling. Salt makes the sweet flavors pop.
- Serve them on a nice platter with a small bowl of extra caramel sauce for dipping.
- For a party, cut them into tiny “two-bite” squares for easy sampling.
Love These Bars? Try These Variations!
Once you master this recipe, the flavor world is your oyster. Here are 6 fun twists to try:
- Salted Dark Chocolate: Swap semi-sweet chips for dark chocolate chunks and use a salted caramel sauce. The grown-up, sophisticated version.
- S’mores Style: Add 1/2 cup of mini marshmallows and 1/2 cup of crushed graham crackers with the chocolate chips. Taste the campfire!
- White Chocolate Macadamia: Use white chocolate chips and chopped macadamia nuts instead of toffee bits. It’s tropical and luxurious.
- Cookie Dough Layer: Mix 1/2 cup of the dough with an extra tbsp of flour and press it into a thin layer on top before baking for a cookie-dough topped bar.
- Espresso Kick: Add 1 tablespoon of instant espresso powder to the dry ingredients. It deepens the chocolate flavor beautifully.
- Festive Funfetti: Omit the toffee bits and add 1/2 cup of rainbow sprinkles for a birthday party hit.
If you enjoy these easy bar recipes, you’ll absolutely love our festive and simple Easter Cake Mix Cookie Bars for springtime baking. And for another fruity twist on a classic, our soft and bursting Blueberry Cookies are a must-try. When you’re in the mood for something with a bright, zesty flavor, these Lemon Sweet Rolls are pure sunshine. And don’t forget our classic Maple Cookies With Maple Icing for a cozy, autumnal treat.
Common Mistakes to Avoid
Avoid these simple pitfalls for perfect bars every single time.
Mistake 1: Not Letting the Bars Cool Completely
This is the number one reason bars fall apart. The caramel layer is molten hot right out of the oven. If you cut into them too soon, the caramel will ooze out everywhere and you’ll have a messy, squished bar instead of neat layers. Patience is key! Let the pan cool on a rack until it’s completely at room temperature. This can take a full hour, but it gives the structure time to set. For the cleanest cuts, you can even chill them in the fridge for 20 minutes after they’ve cooled.
Mistake 2: Overmixing the Dough
Once you add the flour, you should mix just until it disappears. Overmixing develops the gluten in the flour, which can make your bars tough and dense instead of soft and tender. Use a gentle folding motion with a spatula. It’s okay if there’s a tiny speck of flour left—it will incorporate as you fold in the chips and toffee bits. Treat the dough with a light hand for the best texture.
Mistake 3: Using the Wrong Pan Size
An 8×8-inch pan is specified for a reason. If you use a 9×13, the dough will spread too thin and bake much faster, resulting in crispy, overdone bars. If you only have a 9×13, you’ll need to double the recipe to get the proper thick, layered bars. Always use the size the recipe calls for, or adjust the quantities accordingly. The right pan ensures the perfect bake time and chew.
Mistake 4: Packing the Brown Sugar
When a recipe says “packed” brown sugar, it means you should press the sugar firmly into the measuring cup so it holds its shape when turned out. But don’t go overboard! Packing it too hard can actually add more sugar than intended, making the bars overly sweet and affecting their structure. Simply spoon the sugar in and press down lightly with the back of the spoon until the cup is full.
Mistake 5: Spreading the Top Layer Perfectly
Don’t stress about getting the top layer of dough to cover every single millimeter of caramel. It’s a thick dough, and that’s okay. Just dollop it evenly over the caramel and gently press and spread it with your fingers or a spatula. The dough will spread a little as it bakes. Having little “windows” where the caramel bubbles through makes the bars look homemade and delicious.
Frequently Asked Questions
Can I use natural peanut butter in this recipe?
You can, but there’s a catch. Natural peanut butter (the kind that separates) often has a different oil content and texture. Make sure to stir it extremely well until it’s completely homogenous before measuring. Even then, the bars might spread a bit differently and be slightly more crumbly. For the most consistent results, I recommend a standard creamy peanut butter like Jif or Skippy. They are formulated for baking and provide reliable texture every time.
My caramel sauce is very thick. How do I drizzle it?
A thick caramel sauce can be tricky to drizzle! The good news is, it’s an easy fix. Simply scoop the caramel you need into a small microwave-safe bowl. Heat it in the microwave for 10-15 seconds at a time, stirring in between, until it is just warm and has a more pourable, syrup-like consistency. Be careful not to overheat it, or it can become too runny and soak into the dough. Let it cool for a minute before you attempt to lift and drizzle it over your bars for that final pretty touch.
Can I make these bars nut-free?
Absolutely! To make a nut-free version, simply replace the peanut butter with a seed butter. Sunflower seed butter is the most common and effective swap, as it has a similar consistency and a mild, nutty flavor. Be aware that some seed butters can cause baked goods to turn a slight greenish color (a harmless chemical reaction), but they will still taste wonderful. Also, double-check that your toffee bits are nut-free, as some brands may be processed in facilities with nuts.
Why did my bars turn out cakey instead of chewy?
A cakey texture usually points to two possible issues. First, you might have added too much flour. Always measure flour using the spoon-and-level method described in the tips. Second, you might have overmixed the batter after adding the flour, which developed too much gluten. Finally, the bake time could have been a tad too long. Next time, try pulling them out of the oven a minute or two earlier and ensure you’re measuring carefully for that perfect, dense chew.
Can I freeze the unbaked dough?
You sure can! This is a great make-ahead trick. Prepare the dough as directed and press it into a parchment-lined pan. Instead of baking, wrap the entire pan tightly in a double layer of plastic wrap. Freeze for up to 3 months. When you’re ready to bake, you don’t even need to thaw it. Simply remove the plastic wrap, drizzle the caramel over the frozen dough layer, add the top layer (you may need to crumble it on if it’s too hard to spread), and bake. Add 5-10 extra minutes to the baking time since you’re starting from frozen.
What can I use instead of toffee bits?
If you can’t find toffee bits or just want a different crunch, you have great options. Chopped pretzels add a delightful salty-sweet contrast. Butterscotch chips are a close flavor cousin and will stay soft. Chopped toasted pecans or walnuts provide a classic, nutty crunch. Even roughly chopped peanut butter cups would be a delicious, if decadent, substitute. The goal is to add a textural component that contrasts with the soft cookie and gooey caramel.
How do I know exactly when the bars are done baking?
Visual cues are your best friend here. The edges should be a deep golden brown and will likely be pulling slightly away from the sides of the pan. The top should look set and be golden all over. The center should no longer look wet or shiny; it will look matte and firm to a gentle touch. A toothpick inserted about an inch from the edge should come out with a few moist crumbs, not wet batter. Remember, they continue to cook as they cool, so it’s better to err on the side of slightly underdone.
Are these bars very sweet?
Yes, they are a decadent dessert bar, so they are quite sweet. The peanut butter provides a savory, salty balance, and using semi-sweet chocolate chips (as opposed to milk chocolate) also helps cut the sweetness. If you’re sensitive to very sweet treats, you can reduce the brown sugar by 2-3 tablespoons, use a dark caramel sauce, and opt for dark chocolate chips. This will create a more sophisticated, less cloyingly sweet flavor profile while maintaining all the fantastic textures.
Can I double this recipe?
Doubling the recipe is a fantastic idea for a crowd! Simply double every ingredient. You’ll need to bake it in a 9×13-inch pan. The bake time may need to be increased by 5-10 minutes, so start checking at the 30-minute mark. Keep an eye on the edges and the set of the center. All other instructions remain the same. This is a perfect treat for parties, potlucks, or just keeping a larger stash in the freezer.
Is there a way to make these a bit healthier?
You can make a few mindful swaps for a slightly better-for-you version, though they will still be a treat. Use whole wheat white flour or a 50/50 blend with all-purpose. Swap the butter for melted coconut oil. Choose a natural peanut butter with no added sugar or oils. Reduce the brown sugar by 1/4 cup. Use a dark chocolate (70% cacao or higher) and skip the extra caramel drizzle on top. For more guidance on balancing treats within a healthy diet, you can refer to the dietary guidelines which offer great advice on enjoying sweets in moderation.
I hope you feel inspired to bake up a batch of these incredible bars. They truly are a crowd-pleaser and proof that the best desserts often come from combining your favorite flavors into one pan. For more delicious ideas just like this, explore our entire collection of dessert bar and brownie recipes where you’ll find endless sweet inspiration.
Ready, Set, Bake!
So there you have it—my ultimate recipe for Peanut Butter Caramel Toffee Chocolate Chip Cookie Bars. They’re chewy, gooey, packed with flavor, and honestly, they’re a little bit dangerous because you won’t want to stop at just one. Gather your ingredients, clear your afternoon, and get ready for some seriously happy taste buds. Don’t forget to tag me or share your creations—I love seeing your baking wins! Now, go preheat that oven and make your kitchen the happiest place in the house.
Equipment
- Grand bol
- Fouet
- Spatule
- Plaque à pâtisserie
- Papier sulfurisé
Ingredients
- 113 g beurre non salé, fondu
- 128 g beurre de cacahuète crémeux
- 220 g sucre brun clair, tassé
- 1 œuf
- 1 cuil. extrait de vanille
- 125 g farine tout usage
- 2 g bicarbonate de soude
- 1 g sel
- 90 g pépites de chocolat noir
- 90 g morceaux de caramel
- 120 ml sauce caramel, plus extra pour le décor
Instructions
- Préchauffez votre four à 175°C et tapissez une plaque à pâtisserie de 20x20 cm de papier sulfurisé.
- Dans un grand bol, mélangez le beurre fondu et le beurre de cacahuète jusqu'à consistance lisse.
- Ajoutez le sucre brun jusqu'à ce qu'il soit complètement dissous et épais.
- Incorporez l'œuf et l'extrait de vanille, puis mélangez jusqu'à obtenir un mélange homogène.
- Dans un autre bol, mélangez la farine, le bicarbonate de soude et le sel, puis incorporez délicatement dans le mélange humide jusqu'à ce que tout soit juste combiné.
- Ajoutez les pépites de chocolat et les morceaux de caramel jusqu'à bien les répartir.
- Étalez un peu plus de la moitié de la pâte uniformément dans le moule préparé, en arrosant de sauce au caramel dessus.
- Étalez le reste de la pâte sur le dessus, laissant quelques éclats de caramel visible.
- Faites cuire au four pendant 25 à 28 minutes, jusqu'à ce qu'elles soient dorées, puis laissez refroidir complètement dans le moule.
- Retirez avec le papier sulfurisé, arrosez avec du caramel supplémentaire et coupez en carrés.
Notes
Nutrition

Hi, I’m Olivia Parker, the founder of BakingSecret.com and a lifelong lover of all things sweet and homemade. I grew up in a small town in Oregon, where the smell of fresh cookies in my family’s kitchen sparked my passion for baking. Over the years, I turned that passion into a mission: to help home bakers feel confident, inspired, and creative.
After studying food science and working in several artisan bakeries across the U.S., I decided to create a space where everyone from beginners to seasoned bakers can find reliable recipes, expert tips, and a warm, welcoming community. BakingSecret.com is my way of sharing the magic of baking with the world. When I’m not testing new recipes, you’ll find me exploring farmers’ markets, collecting vintage cookbooks, or perfecting my sourdough technique.