
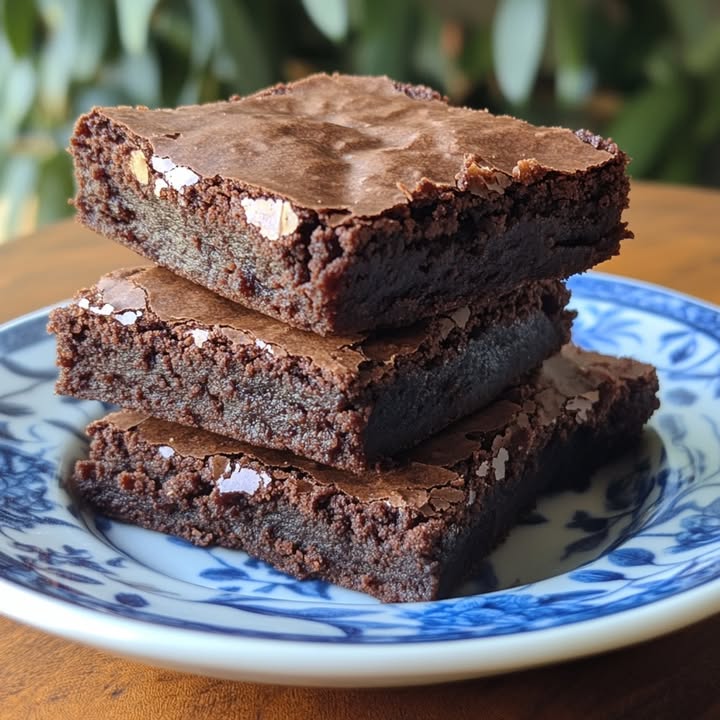
Lunchroom Ladies Brownies: A 50-Year-Old Recipe for Pure Joy
You know that smell. The one that hits you the second you walk into a bake sale or a school cafeteria on a really good day. It’s rich, chocolaty, and promises a fudgy, melt-in-your-mouth squares of joy. For years, I chased that perfect taste, trying fancy recipes with fancy chocolate. Then I found it: the Lunchroom Ladies Brownies. This isn’t just a recipe; it’s a time machine in a 9×13 pan. The secret? A frosting you spread on while the brownies are still warm, creating a soft, cloud-like layer that soaks in just a little. I made these for my book club, and the room went silent—except for the happy murmurs. Let me share this 50-year-old treasure with you.
The Story Behind These Classic Lunchroom Brownies
This recipe is a piece of history. It’s said to come straight from the notebooks of the real “lunchroom ladies” from 1970s school cafeterias. These women weren’t fancy pastry chefs. They were pros who needed to feed a crowd with simple ingredients, on a budget, and make every kid feel like they got a special treat. Their mission? Maximum chocolate happiness with minimum fuss. The modern twist often comes from our fear of underbaking, but these old-school bakers knew the truth: a perfect brownie should be *fudgy*, not cakey. The warm frosting is their genius signature move—it creates a creamy layer that blends with the brownie beneath it. It’s the reason this recipe has been passed around on handwritten cards for generations.
Why You’ll Love This Vintage Brownie Recipe
You’ll fall for these brownies for three big reasons. First, the texture is unbeatable. They’re dense, fudgy, and deeply chocolaty without being overly sweet. Second, they are incredibly simple. One bowl, basic pantry staples, and no fancy techniques. My teenager can make them! Finally, that old-school frosting is a game-changer. It’s not a stiff buttercream; it’s a soft, cocoa-infused blanket that makes each bite heavenly. It’s the ultimate comfort food dessert that feels both nostalgic and absolutely perfect right now.
Perfect Occasions for These Nostalgic Desserts
These brownies are your new go-to for almost any gathering! They are a star at potlucks and bake sales because they travel like a dream and please everyone. Need a quick treat for a sports team or a school event? This recipe doubles easily. They’re the perfect cozy dessert for a family movie night, and they make a heartfelt gift when wrapped in a simple box. Basically, any time you need a guaranteed smile, these Classic Lunchroom Brownies are your answer.
Gathering Your Ingredients for Homemade Brownies
Let’s keep it simple, just like the original ladies did. Here’s what you need:
For the Brownies:
- 1 cup unsalted butter, melted
- 1 cup unsweetened cocoa powder
- 2 cups granulated sugar
- 4 large eggs
- 1 tablespoon vanilla extract
- 1 ½ cups all-purpose flour
- ½ teaspoon salt
For the Frosting:
- ½ cup unsalted butter, softened
- ¼ cup milk
- ¼ cup unsweetened cocoa powder
- 2 cups powdered sugar
- 1 teaspoon vanilla extract
Simple Substitutions for Your Pantry
Out of something? No worries! Here are easy swaps:
- Butter: Salted butter works fine; just omit the extra salt in the brownie batter.
- Cocoa Powder: Use natural unsweetened cocoa for that classic taste. Dutch-process will work but will give a slightly milder flavor.
- Milk in Frosting: Any milk you have—whole, 2%, or even a non-dairy milk like almond—will do the job.
- Nut-Free: These are naturally nut-free, perfect for school events.
How to Make The Best Fudgy Brownies: Step-by-Step
Step 1: Prep and Mix the Base
First, preheat your oven to 350°F (175°C). Grease your trusty 9×13-inch pan well. Now, take a big bowl and pour in that glorious melted butter. Stir in the cup of cocoa powder. You’ll see it transform into a smooth, dark, glossy paste that smells intensely of chocolate. This is your flavor foundation. Next, beat in the sugar. Then, add the eggs one at a time, mixing well after each. The batter will become thicker and shinier. Finally, stir in that tablespoon of vanilla—it adds a wonderful warmth.
Step 2: Bring It All Together
Here’s the key to perfect texture: gently fold in the flour and salt. Use a spatula and mix just until you no longer see streaks of white flour. A few small lumps are totally fine! Overmixing is the enemy of fudgy brownies because it develops the gluten in the flour, making them tough and cakey. You want a thick, luxurious batter that plops into the pan. Pro tip: Sift your flour and cocoa if they seem lumpy for an extra-smooth batter.
Step 3: Bake to Perfection
Pour that beautiful dark batter into your prepared pan and smooth the top. Slide it into the preheated oven. Now, set your timer for 25 minutes, but don’t wander off! Ovens vary. You want to bake until a toothpick poked into the center comes out with a few moist crumbs clinging to it, not completely clean. A clean toothpick means overbaked, dry brownies. Those moist crumbs promise a fudgy center. This usually takes 25-30 minutes. When done, place the pan on a wire rack. Let the brownies cool slightly while you make the magic frosting.
Step 4: Whip Up the Legendary Frosting
While the brownies are still warm, make the frosting. In a medium bowl, beat the softened butter until smooth. Add the milk, cocoa powder, powdered sugar, and vanilla. Beat it all together on medium speed until it becomes a creamy, dreamy, chocolate frosting. It should be spreadable but not runny. If it’s too thick, add a teaspoon of milk. Too thin? Add a bit more powdered sugar. This frosting is forgiving and comes together in minutes.
Step 5: The Final, Crucial Touch
Here is the lunchroom lady’s secret: frost the brownies while they are still warm, not hot. The gentle heat helps the frosting soften and melt just a tiny bit, creating that iconic soft, almost melt-in layer. Spread the frosting evenly over the surface with a spatula. Watch as it glides on, looking shiny and inviting. Chef’s tip: For pretty squares, let the frosted brownies cool completely in the pan before cutting. Use a sharp knife wiped clean between cuts.
Your Baking Timeline for Classic Brownies
| Activity | Time |
|---|---|
| Prep Time | 15 minutes |
| Cooking Time | 30 minutes |
| Cooling & Frosting Time | 30 minutes |
| Total Time | About 1 hour 15 minutes |
Servings: 16 generous squares | Kcal per serving: Approximately 320
Chef’s Secret for the Ultimate Texture
The single best trick is to underbake them just a little. Take them out when the edges are set and pulling away from the pan slightly, but the center still looks a tiny bit soft. They will continue to set as they cool. This is what gives you that dense, fudgy, almost gooey center that makes these brownies legendary. Trust the process!
A Fun Slice of Brownie History
Did you know the brownie is a distinctly American invention? It first appeared in cookbooks around the late 1800s, likely created by a creative home cook who forgot to add baking powder to a chocolate cake! Our lunchroom version, with its simple cocoa-based batter and frosting, is a direct descendant of those early, humble “cake-like” brownies designed to be easy and satisfying. Using butter and cocoa like this provides a good source of healthy fats that help create that rich, satisfying mouthfeel we all love.
Equipment You’ll Need
- 9×13-inch baking pan
- Large mixing bowl
- Whisk and spatula
- Medium bowl for frosting
- Hand mixer or stand mixer (for frosting, but a strong arm works too!)
- Measuring cups and spoons
How to Store Your Brownie Masterpiece
To keep these brownies tasting fresh, store them covered at room temperature for up to 3 days. A cake carrier or a pan tightly covered with foil works perfectly. The frosting may soften a bit more over time, which is part of its charm.
If you need to store them longer, you can refrigerate them for up to a week. Let them come to room temperature before serving for the best texture and flavor. The cold fridge can make the brownie base a bit denser.
For long-term storage, these brownies freeze beautifully. Freeze them unfrosted or frosted, in a single layer on a baking sheet first, then transfer to a freezer bag. They’ll keep for 2-3 months. Thaw at room temperature whenever a chocolate craving strikes!
Tips and Advice for Brownie Success
- Room Temperature Eggs: Using eggs straight from the fridge can cause your melted butter to seize up. Let them sit out for 15-20 minutes first.
- Measuring Flour: For accuracy, spoon flour into your measuring cup and level it off. Don’t scoop directly from the bag!
- Cool Before Cutting: I know it’s hard to wait, but letting the brownies cool completely gives the structure time to set. You’ll get clean, sharp squares instead of gooey mounds.
Presentation Ideas for Your Old-School Treats
- Cut into small squares and stack them on a vintage cake stand for a bake sale.
- Place a single large square on a plate with a scoop of vanilla ice cream and a drizzle of caramel.
- For a party, cut into bite-sized pieces and stick with decorative toothpicks.
- Dust the top with a little extra powdered sugar or cocoa powder for a pretty finish.
Healthier & Fun Brownie Variations
Want to mix things up? Here are six delicious twists on the classic:
- Gluten-Free Brownies: Swap the all-purpose flour for a 1-to-1 gluten-free baking blend. The result is just as fudgy!
- Whole Wheat Brownies: Replace half the all-purpose flour with whole wheat pastry flour for a nuttier flavor and extra fiber.
- Mint Chocolate Brownies: Add ½ teaspoon of peppermint extract to the frosting for a refreshing twist.
- Mocha Brownies: Dissolve 1 tablespoon of instant espresso powder in the melted butter before adding the cocoa for a coffee kick.
- Rocky Road Brownies: After frosting, immediately sprinkle with mini marshmallows, chopped walnuts, and a handful of chocolate chips.
- Peanut Butter Swirl Brownies: Before baking, drop spoonfuls of peanut butter on the batter and swirl with a knife for a marbled effect.
Common Mistakes to Avoid
Mistake 1: Overmixing the Batter
This is the top reason brownies turn out tough or cakey instead of fudgy. When you vigorously mix the flour, you develop the gluten strands in the wheat. Think of it like over-kneading bread dough. The goal is just to combine. Once you add the flour, switch to a spatula and fold gently. Mix only until you no longer see dry, white streaks of flour. A few small lumps are perfectly fine and will bake out.
Mistake 2: Overbaking the Brownies
We are so trained to bake cakes until a toothpick comes out clean. With fudgy brownies, that rule will lead you astray. A clean toothpick means you’ve baked out all the moisture, resulting in a dry, crumbly texture. The sweet spot is when the toothpick has a few moist crumbs attached. The brownies will continue to cook from residual heat as they cool. Set your timer for the minimum time and check early!
Mistake 3: Frosting Brownies That Are Too Hot
Timing is everything with the iconic frosting. If you spread it on piping hot brownies, the butter and milk in the frosting will melt completely, turning into a runny glaze that soaks in and disappears. If you wait until they’re cold, the frosting will sit on top as a firm layer. You want that perfect in-between: warm enough to soften and meld slightly, but not hot. Let the pan cool on a rack for 20-30 minutes before frosting.
Mistake 4: Using Cold Ingredients
Cold eggs meeting warm, melted butter can cause the butter to firm up into little lumps, making your batter grainy. It can also make it harder to get a smooth, emulsified mixture. To avoid this, simply take your eggs out of the fridge about 30 minutes before you start baking. For the frosting, truly softened butter (where your finger leaves a clear indent) is key for a creamy, spreadable texture.
Frequently Asked Questions About Lunchroom Brownies
Can I make these brownies without the frosting?
Absolutely! The brownie base is fantastic on its own. You’ll have a rich, fudgy, unfrosted brownie that’s still delicious. They might be a tad less sweet, which some people prefer. If you skip the frosting, you could sprinkle the top with a handful of chocolate chips or walnuts before baking for a little extra texture and flavor. They bake up just the same, and the baking time should be nearly identical.
Why is my frosting runny or too thick?
Frosting consistency depends on a few factors. If it’s runny, your butter may have been too soft or the brownies underneath might have been too hot, warming the bowl. Thicken it by adding a bit more powdered sugar, a tablespoon at a time. If it’s too thick and hard to spread, the butter may have been too cold, or you might need a touch more liquid. Add milk, just one teaspoon at a time, until it reaches a creamy, spreadable consistency. The weather (humidity) can also play a role!
Can I use Dutch-process cocoa instead of natural cocoa?
Yes, you can, but there’s a slight difference. Natural unsweetened cocoa (like Hershey’s) is acidic and gives that classic “brownie” flavor. Dutch-process cocoa is alkalized, making it milder and less acidic. In this recipe, which doesn’t rely on baking soda for leavening, you can swap them 1-for-1. The flavor will be a little deeper and less sharp, and the color will be a very dark brown. Both will make delicious brownies!
How do I get clean, sharp cuts on my brownies?
The secret is a cool brownie and a clean knife. Let the frosted brownies cool completely in the pan, even refrigerate them for an hour if you can wait. Use a sharp chef’s knife. For each cut, wipe the blade clean with a damp paper towel. This removes any sticky frosting and crumbs, ensuring your next cut is just as clean. Don’t use a sawing motion; press down firmly and evenly.
Can I double this recipe?
You bet! This recipe doubles beautifully for a crowd. Simply double all the ingredients. You’ll need a very large mixing bowl or you can mix the batter in two batches. Bake it in a standard half-sheet pan (approximately 18×13 inches). The baking time may be slightly longer, so start checking around the 30-minute mark. A double batch is perfect for large family gatherings, parties, or if you just want a big stash in the freezer for later.
Are these the same as “Texas Sheet Cake” brownies?
They are very close cousins! Both feature a simple, cocoa-based cake or brownie that is frosted while warm. Texas Sheet Cake is often a bit more cake-like in texture and the frosting usually includes a bit of pecans. Our Lunchroom Ladies version is decidedly more fudgy and dense, with a simpler, nut-free frosting. Think of this as the school cafeteria’s no-fuss, universally-loved version of that Southern classic.
What’s the best way to melt the butter?
The safest and easiest way is in the microwave. Cut the butter into tablespoons and place in a microwave-safe bowl. Heat in 30-second bursts, stirring in between, until just melted. Don’t let it bubble and boil. You can also melt it in a small saucepan over low heat on the stovetop. Just keep an eye on it. You want it liquid, but not so hot that it cooks the eggs when you mix them in.
My brownies sunk in the middle, what happened?
A sunken center usually means the batter was undermixed or the brownies were underbaked by quite a bit. If the structure isn’t set enough, it will collapse as it cools. Next time, ensure you’ve mixed the flour in thoroughly (no dry pockets) and bake until the edges are fully set and the center passes the “moist crumbs” toothpick test. Opening the oven door too early during baking can also cause a collapse.
Can I add mix-ins like chocolate chips or nuts?
Please do! The lunchroom ladies would approve of customization. After folding in the flour, gently stir in up to 1 ½ cups of your favorite add-ins. Classic semi-sweet chocolate chips, chopped walnuts or pecans, or even white chocolate chunks are all wonderful. I love the contrast of crunchy nuts against the fudgy base. Just be careful not to overmix once they’re in.
How long do these brownies stay fresh?
Stored properly in an airtight container at room temperature, they are at their peak for 2-3 days. The frosting stays soft and the brownie stays fudgy. After that, they’ll start to dry out a little but are still good to eat. For longer freshness, refrigerate them. If you want to keep them for more than a week, freezing is your best bet. They thaw quickly and taste almost as good as fresh-baked.
If you’re a fan of bar cookies and easy desserts, you’ll find plenty more inspiration in our full collection of dessert bars and brownie recipes. From gooey Peanut Butter Caramel Toffee Bars to classic Chocolate Chip Cookies and even unique Cheesecake Cookies, there’s a sweet treat for every craving. For a bright, citrusy change, my Lemon Sweet Rolls are a morning favorite.
The Final Scoop on These Classic Treats
So there you have it. The legendary Lunchroom Ladies Brownies, a 50-year-old recipe that’s stood the test of time for one simple reason: it works. It delivers pure, uncomplicated chocolate joy. It’s the taste of a simpler time, made with love and a wooden spoon. Whether you’re baking for a crowd, your family, or just for yourself, this recipe is a little piece of edible happiness. Now, go preheat that oven and get ready for the best, fudgiest, most nostalgic brownies of your life. Happy baking!
Equipment
- Grand bol
- Fouet
- Spatule
- Plaque à pâtisserie
- Papier sulfurisé
Ingredients
- 1 tasse beurre non salé, fondu
- 1 tasse cacao en poudre non sucré
- 2 tasses sucre granulé
- 4 grands œufs
- 1 cuillère à soupe extrait de vanille
- 1.5 tasses farine tout usage
- 0.5 cuillère à café sel
- 0.5 tasse beurre non salé, ramolli (pour le glaçage)
- 0.25 tasse lait (pour le glaçage)
- 0.25 tasse cacao en poudre (pour le glaçage)
- 2 tasses sucre glace (pour le glaçage)
- 1 cuillère à café extrait de vanille (pour le glaçage)
Instructions
- Préchauffez votre four à 175°C et graissez un moule de 9x13 pouces.
- Dans un grand bol, mélangez le beurre fondu et le cacao en poudre jusqu'à obtenir une consistance lisse.
- Ajoutez le sucre granulé et mélangez bien.
- Ajoutez les œufs un par un, en mélangeant bien après chaque ajout.
- Incorporez l'extrait de vanille.
- Ajoutez la farine et le sel délicatement jusqu'à ce qu'ils soient juste combinés.
- Versez la pâte dans le moule préparé et étalez uniformément.
- Faites cuire au four pendant 25-30 minutes, jusqu'à ce qu'un cure-dent en ressorte avec quelques miettes humides.
- Laissez refroidir légèrement pendant que vous préparez le glaçage.
- Dans un bol moyen, battez le beurre ramolli jusqu'à ce qu'il soit lisse.
- Ajoutez le lait, le cacao en poudre, le sucre glace et la vanille; mélangez jusqu'à obtenir une consistance crémeuse.
- Glaçant les brownies tièdes, étalez uniformément.
- Laissez refroidir complètement dans le moule avant de couper en morceaux.
Notes
Nutrition

Hi, I’m Olivia Parker, the founder of BakingSecret.com and a lifelong lover of all things sweet and homemade. I grew up in a small town in Oregon, where the smell of fresh cookies in my family’s kitchen sparked my passion for baking. Over the years, I turned that passion into a mission: to help home bakers feel confident, inspired, and creative.
After studying food science and working in several artisan bakeries across the U.S., I decided to create a space where everyone from beginners to seasoned bakers can find reliable recipes, expert tips, and a warm, welcoming community. BakingSecret.com is my way of sharing the magic of baking with the world. When I’m not testing new recipes, you’ll find me exploring farmers’ markets, collecting vintage cookbooks, or perfecting my sourdough technique.