
The Quest for Ultimate Sunshine: My Perfect Lemon Bars
You know those days when the sun is shining but you’re stuck indoors? That’s when my baking itch starts. I need something that captures that bright, cheerful feeling. For me, that’s always a perfect lemon dessert bar. The first bite of a good lemon bar is like a little burst of sunshine. It’s sweet, it’s tart, and it makes everyone smile. After many trials (and a few too-tart disasters!), I finally crafted this recipe. It’s the one my family now begs for. Let me share my secret to the best lemon bars.
A Slice of Citrus History
Lemon bars feel like a classic American treat. Their origins are a bit fuzzy, but they likely evolved from lemon curd and shortbread traditions. Modern versions really took off in the mid-20th century. They became a staple in community cookbooks and bake sales. My grandma had a similar recipe, but hers was a bit too dense. I wanted that perfect balance: a buttery, crisp crust with a filling that’s set yet creamy. This version hits that nostalgic note with a foolproof method. It’s a traditional dessert with a perfectly modern, reliable twist.
Why You’ll Absolutely Love These Lemon Dessert Bars
Why is this recipe special? First, the flavor is just magical. The fresh lemon juice and zest give a real, vibrant citrus punch. It’s not fake or too sweet. Second, it’s surprisingly simple. No fancy techniques are needed. It’s just mixing, pressing, and whisking. Finally, these bars are incredibly versatile. They fit a casual picnic just as well as a fancy party plate. They’re the kind of dessert that looks homemade in the best way. People know you put love into it.
Perfect Occasions for These Zesty Bars
These lemon dessert bars are your new go-to for so many events. Think spring luncheons, baby showers, or Mother’s Day brunch. They bring a fresh, light note. They’re also perfect for summer picnics and potlucks. I always bring them to neighborhood gatherings. For holiday dinners, they offer a bright finish after a rich meal. Even a simple Tuesday deserves a treat. Slice them up, dust them with powdered sugar, and watch them disappear.
Ingredients for the Best Lemon Bars
Gathering your ingredients is the first step to success. Using fresh, good-quality items makes a difference. Here’s what you’ll need:
For the Shortbread Crust:
- 1 cup unsalted butter, softened
- 1/2 cup granulated sugar
- 2 cups all-purpose flour
- 1/4 teaspoon salt
For the Luscious Lemon Filling:
- 4 large eggs
- 1 1/2 cups granulated sugar
- 1/4 cup all-purpose flour
- 2/3 cup fresh lemon juice (about 3-4 lemons)
- 1 tablespoon lemon zest
- Powdered sugar, for dusting
Smart Ingredient Substitutions
Don’t stress if you’re missing something. Baking is flexible!
- Butter: Salted butter works. Just omit the extra salt in the crust.
- Lemons: Bottled lemon juice can be used in a pinch, but fresh gives the best flavor. Meyer lemons make a sweeter, milder bar.
- Flour: For a slightly nutty crust, you can substitute 1 cup of the all-purpose flour with whole wheat flour.
- Sugar: The sugar in the filling is key for structure. I don’t recommend reducing it much.
How to Make Lemon Dessert Bars: A Step-by-Step Journey
Follow these steps and you’ll have perfect bars. I’ve included all my little tricks along the way.
Step 1: Preparing Your Pan and Oven
Start by preheating your oven to 350°F (175°C). This ensures a consistent bake. Line a 9×13-inch baking pan with parchment paper. Let the paper overhang the sides. This creates “slings” that will make lifting the whole baked slab out incredibly easy. No struggling with sticky corners! Greasing the pan underneath the paper helps it stick. This simple prep step saves so much hassle later.
Step 2: Making the Buttery Shortbread Crust
In a mixing bowl, cream the softened butter and sugar together. You want it light and fluffy. This creates a tender base. Add the flour and salt. Mix until a soft, cohesive dough forms. It will feel like a thick, playdough-like texture. Don’t overmix. Now, press this dough evenly into the bottom of your prepared pan. Use your fingers or the bottom of a glass. Aim for a uniform layer. A solid, flat crust is the foundation for your lemon filling. Pro tip: If the dough sticks to your fingers, lightly flour them.
Step 3: Baking the Crust to Golden Perfection
Place the crust in the preheated oven. Bake it for 18-20 minutes. You’re looking for a light golden color around the edges. It should look set and slightly puffy. This partial baking, called “blind baking,” is crucial. It prevents the crust from becoming soggy when the wet filling is added. The hot crust also helps the filling start cooking immediately. Watch it closely near the end. Every oven is different.
Step 4: Whisking Up the Sunny Lemon Filling
While the crust bakes, make the filling. In a medium bowl, whisk the eggs until well blended. Add the sugar and flour. Whisk vigorously until smooth and no lumps remain. Now, add the star ingredients: fresh lemon juice and zest. The zest adds that powerful aromatic oil. The mixture will be thin, pale yellow, and vibrant. It should smell absolutely heavenly. Chef’s tip: Roll your lemons on the counter before juicing. This breaks the inner membranes and gets you more juice.
Step 5: Combining and Final Bake
When the crust is done, take it out of the oven. Immediately pour your lemon filling over the hot crust. Do this carefully but swiftly. The filling will shimmer as it hits the warm base. Return the pan to the oven. Bake for 20-25 minutes. The center should be set; it will jiggle slightly but not look liquid. The edges might be slightly more set. A light golden hue on top is perfect. Overbaking leads to a rubbery texture. Trust the timing.
Step 6: Cooling, Chilling, and the Finishing Touch
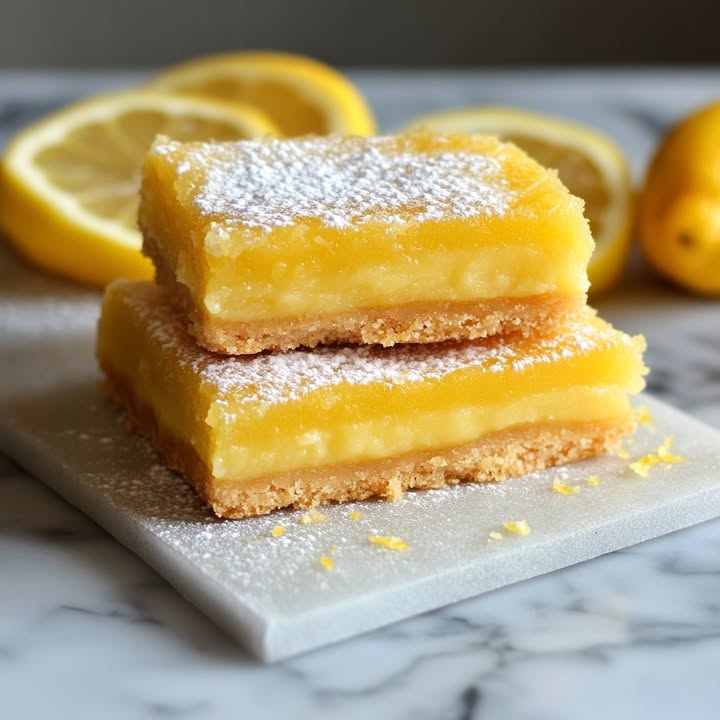
This is the most important waiting period! Let the pan cool completely on a rack. Then, transfer it to the refrigerator. Chill for at least 2 hours, or even overnight. This step firms up the filling completely for clean slicing. Only after chilling, use the parchment slings to lift the entire slab out. Place it on a cutting board. Slice into squares or bars. Just before serving, dust generously with powdered sugar. That snowy topping makes them look magical and adds a final sweet kiss.
Timing Your Lemon Bar Creation
Good baking is about planning your time. Here’s the breakdown:
- Prep Time: 15 minutes (measuring, mixing)
- Cooking Time: 45 minutes (crust + filling bake)
- Cooling/Chilling Time: At least 2 hours (crucial for setting)
- Total Time: About 3 hours (from start to ready-to-eat)
My Chef’s Secret for the Best Lemon Bars
My secret is all in the zest. Don’t just juice your lemons. That bright yellow zest holds the most intense citrus oil. I use a fine microplane zester. I zest the lemons before I juice them. It’s easier. Adding a full tablespoon of zest to the filling makes the flavor pop. It gives that “wow” factor people remember. It transforms a simple lemon bar into an extraordinary lemon dessert bar.
A Little Extra Citrus Info
Lemons are fascinating. Their sourness comes from citric acid. In baking, that acid interacts with sugar and eggs to create a unique set. It’s a delicate balance. Interestingly, the USDA FoodData Central shows lemons are low in natural sugars, which is why we add sugar to balance the tartness in recipes like these bars. This contrast is what makes the flavor so addictive.
Necessary Equipment
You don’t need fancy tools. Here’s the simple list:
- 9×13-inch baking pan
- Parchment paper
- Mixing bowls (medium and large)
- Whisk and mixer (or spoon for crust)
- Measuring cups and spoons
- Microplane or fine zester
- Juicer (or your strong hands!)
- Wire cooling rack
Storing Your Lemon Bars
These bars store beautifully. First, keep them chilled. After slicing, place them in an airtight container. Store them in the refrigerator. They will stay fresh and firm for up to 4-5 days. The powdered sugar might dissolve a bit. You can re-dust them before serving.
For longer storage, you can freeze them. Place the whole slab or individual bars on a parchment-lined tray. Freeze until solid, then wrap tightly or store in a freezer container. They can freeze for up to 2 months. Thaw in the refrigerator overnight.
Always note that the crust may soften slightly over time in the fridge. That’s normal. It’s still delicious. For the best texture and experience, enjoy them within the first 2-3 days.
Tips and Advice for Success
- Use Room Temperature Eggs: They blend more smoothly into the filling.
- Don’t Skip the Chill: Rushing this leads to messy, runny slices.
- Slice with a Clean Knife: Use a sharp knife wiped clean between cuts for perfect edges.
- Adjust Tartness: If you love tart bars, reduce the filling sugar by 1/4 cup. For sweeter bars, add it.
Presentation Tips to Make Them Shine
Making them look pretty is easy!
- Dust powdered sugar through a fine sieve for an even, snow-like coat.
- Add a tiny twist of lemon zest on top of each bar for color.
- Serve on a light-colored plate or a rustic wooden board.
- Pair with fresh berries like raspberries or blueberries on the side.
- For a party, stack them in a elegant pyramid on a cake stand.
Healthier & Fun Variations
Love this recipe but want to tweak it? Here are six ideas:
- Gluten-Free Lemon Bars: Use a certified gluten-free all-purpose flour blend for both the crust and filling. The method stays the same.
- Vegan Lemon Bars: For the crust, use a plant-based butter. For the filling, a silken tofu and agar-agar blend can work, but it requires a different recipe approach.
- Lemon Lavender Bars: Infuse the granulated sugar for the filling with 1 teaspoon of dried culinary lavender overnight. Strain it out before using. Adds a floral, sophisticated note.
- Key Lime Bars: Substitute the lemon juice and zest with fresh Key lime juice and zest. The flavor becomes more tropical and unique.
- Lemon Berry Swirl Bars: Before baking the filling, dot the surface with a few tablespoons of raspberry or strawberry jam. It creates a beautiful swirl effect after baking.
- Lemon Coconut Bars: Add 1/2 cup of toasted coconut flakes to the crust dough. For the filling, use coconut milk instead of part of the lemon juice for a creamy twist.
If you’re looking for other bar recipes, explore our entire collection of dessert bars and brownies for more inspiration. And if you love citrus but want a different format, my Vanilla Bean Crème Brûlée Cheesecake Cupcakes have a lovely creamy texture that pairs well with lemon curd. For a classic cookie, try my Classic Chocolate Chip Cookies with Walnuts. For a savory bake, my Jalapeño Cornbread is a winner. And for a cozy fall side, this Sweet Potato Cornbread with Cinnamon Honey Butter is unforgettable.
Common Mistakes to Avoid
A few small errors can change your bars. Let’s avoid them!
Mistake 1: Using Cold Butter for the Crust
If your butter is too cold, it won’t cream properly with the sugar. You’ll end up with a crumbly, dry dough that’s hard to press. It might bake into a tough, dense crust. Always soften your butter to room temperature. It should be slightly cool to the touch but easily indented. Tip: If you forgot, cut it into small pieces and let it sit for 20-30 minutes.
Mistake 2: Not Blind Baking the Crust Enough
Baking the crust only until it looks “done” but not lightly golden is a risk. A pale crust isn’t strong enough. The wet lemon filling will seep in and make it soggy. Ensure you bake for the full 18-20 minutes until you see a definite light golden color at the edges. This creates a barrier.
Mistake 3: Overbaking the Lemon Filling
The filling should be set but not firm like a cake. Overbaking causes the eggs to tighten too much. Your bars will have a rubbery, dry texture and might crack on top. Check at 20 minutes. The center should jiggle slightly like a thick pudding when you nudged the pan. It will firm up during chilling.
Mistake 4: Skipping the Chilling Step
This is the biggest mistake! Trying to slice warm or cool bars is messy. The filling is still soft and will run. It will stick to your knife and make ugly slices. Patience is key. Chill for at least 2 hours, preferably longer. This ensures clean, perfect squares.
Mistake 5: Using Bottled Lemon Juice Without Zest
Bottled juice lacks the fresh, bright flavor of real lemons. If you must use it, the flavor will be flat. But if you combine bottled juice with no zest, it’s even worse. The zest carries the aromatic oils. Always use fresh lemons and always zest them. It’s non-negotiable for the best flavor.
Frequently Asked Questions About Lemon Bars
Can I make lemon bars with bottled lemon juice?
You can, but the flavor won’t be as bright and vibrant. Fresh lemons provide a complex citrus taste that bottled juice, which is often pasteurized, can’t match. If you’re in a real pinch and must use bottled juice, try to at least add some fresh lemon zest to the filling. The zest contains the essential oils that give that true lemon aroma. For the best lemon dessert bars, fresh is always the way to go. It’s worth the extra effort of squeezing a few lemons.
Why did my lemon filling crack on top?
Cracking usually means the filling was overbaked. The eggs in the filling set too firmly and then contract as they cool, causing cracks. To avoid this, bake just until the center is set but still has a slight jiggle. It should not look completely firm like a cake. Also, avoid drastically sudden temperature changes. Let the bars cool gradually on a rack before chilling. A smooth, crack-free top is a sign of perfect baking timing.
How do I get my crust to be firm and not soggy?
A soggy crust happens if it’s under-baked before the filling is added. The “blind bake” step is crucial. Bake the crust alone until it’s lightly golden all over, not just pale. This creates a sealed, sturdy base. Also, make sure your crust dough is pressed very evenly. Thin spots can become weak points. Finally, pour the filling onto the hot crust right after it comes out of the oven. This helps start the setting process immediately.
Can I freeze lemon bars?
Yes, lemon bars freeze quite well! To freeze them, first chill and slice them as usual. Place the bars on a parchment-lined baking sheet and flash-freeze for about an hour. This prevents them from sticking together. Then, transfer the frozen bars to an airtight freezer container or bag. They can be stored for up to 2 months. To thaw, place them in the refrigerator overnight. Dust with fresh powdered sugar after thawing. The texture may be slightly softer but still delicious.
What’s the best way to slice lemon bars cleanly?
Clean slicing requires three things: a fully chilled bar, a sharp knife, and a wiping technique. Chill the bars for at least 2 hours, until very firm. Use a sharp, non-serrated knife. Cut straight down without sawing. After each cut, wipe the knife blade clean with a damp paper towel. This removes sticky filling and powdered sugar, ensuring every slice looks neat and perfect. It’s a simple trick that makes a big difference in presentation.
Can I reduce the sugar in this recipe?
You can reduce the sugar slightly, but be careful. Sugar in the filling isn’t just for sweetness; it also contributes to the structure and texture. Reducing it by more than 1/4 cup might result in a filling that’s too tart and doesn’t set as firmly. If you prefer a tart bar, try reducing the sugar in the filling by 1/4 cup. I wouldn’t recommend reducing the sugar in the crust, as it affects the texture and flavor of the shortbread.
Why do I need to add flour to the lemon filling?
The small amount of flour in the filling acts as a stabilizer. It helps thicken the mixture and prevents it from being too runny or separating. It ensures a smooth, creamy set rather than a curdled texture. Don’t skip it! Whisk it thoroughly with the sugar and eggs to avoid any lumps. This little bit of flour is the secret to a velvety, perfect lemon layer that holds its shape.
How long do lemon bars last in the fridge?
Properly stored in an airtight container, lemon bars will last 4 to 5 days in the refrigerator. The powdered sugar topping may melt into the bars over time, but you can re-dust them before serving if desired. The crust may soften a bit after a few days, but the flavor will still be great. For the best taste and texture, I recommend enjoying them within the first 3 days.
Can I use a different pan size?
You can, but it will change the baking time and bar thickness. A 9×13 inch pan gives classic, moderately thick bars. Using a 8×11 or 10×10 pan will make thicker bars, which might need a slightly longer baking time for the filling to set. Using a larger pan like a 9×15 will make thinner bars, which will bake faster. Adjust your watchfulness. Always ensure the filling is set in the center, regardless of pan size.
What can I serve with lemon bars?
Lemon bars are wonderful on their own, but they pair beautifully with many things. A dollop of whipped cream or a scoop of vanilla ice cream adds a creamy contrast. Fresh berries like raspberries or strawberries complement the citrus. For a brunch, serve them with a cup of coffee or tea. They also go well with other dessert bars on a varied platter. Their bright flavor cuts through richness, making them a perfect standalone treat or part of a larger spread.
Your Bright Baking Adventure
Making these lemon bars is more than following a recipe. It’s about creating a little bit of sunshine in your kitchen. The process is simple and satisfying. The result is a treat that never fails to bring joy. I hope this recipe becomes your go-to for that perfect sweet-tart bite. Share them with friends, bring them to gatherings, or simply enjoy one with a quiet cup of tea. Happy baking, and enjoy your burst of citrus sunshine!
Equipment
- Grand bol
- Fouet
- Spatule
- Plaque à pâtisserie
- Papier sulfurisé
Ingredients
- 4 œufs
- 300 g sucre
- 30 g farine tout usage
- 160 ml jus de citron frais environ 3-4 citrons
- 1 cuil à soupe zeste de citron
- q.s. sucre glace pour saupoudrer
Instructions
- Préchauffez votre four à 175°C et préparez un moule à pâtisserie de 9x13 pouces avec du papier sulfurisé.
- Dans un grand bol, crémez le beurre ramolli et le sucre jusqu'à obtenir une consistance légère et aérée.
- Incorporez la farine et le sel jusqu'à obtenir une pâte homogène. Appuyez uniformément la pâte au fond du moule préparé.
- Faites cuire la croûte pendant 18-20 minutes jusqu'à ce qu'elle soit légèrement dorée et bien cuite.
- Pendant la cuisson de la croûte, dans un autre bol, fouettez les œufs, le sucre et la farine jusqu'à obtenir un mélange homogène.
- Ajoutez le jus de citron frais et le zeste, fouettez jusqu'à ce que le tout soit bien mélangé.
- Versez la garniture au citron sur la croûte chaude immédiatement après sa sortie du four.
- Remettez le moule au four et faites cuire pendant 20-25 minutes jusqu'à ce que le centre soit pris mais tremble légèrement.
- Laissez refroidir complètement sur une grille, puis réfrigérez pendant au moins 2 heures.
- Soulevez les barres à l'aide du papier sulfurisé et tranchez-les en carrés ou barres; saupoudrez de sucre glace avant de servir.
Notes
Nutrition

Hi, I’m Olivia Parker, the founder of BakingSecret.com and a lifelong lover of all things sweet and homemade. I grew up in a small town in Oregon, where the smell of fresh cookies in my family’s kitchen sparked my passion for baking. Over the years, I turned that passion into a mission: to help home bakers feel confident, inspired, and creative.
After studying food science and working in several artisan bakeries across the U.S., I decided to create a space where everyone from beginners to seasoned bakers can find reliable recipes, expert tips, and a warm, welcoming community. BakingSecret.com is my way of sharing the magic of baking with the world. When I’m not testing new recipes, you’ll find me exploring farmers’ markets, collecting vintage cookbooks, or perfecting my sourdough technique.