
There’s something magical about the smell of apples and cinnamon frying in hot oil. It takes me right back to my grandma’s kitchen on a crisp fall morning. She wasn’t Amish, but she had a friend who was, and this recipe for Amish Apple Fritters was a treasured gift. I’ve made it my own over the years, and trust me, the moment you bite into a warm, crispy fritter drizzled with sweet glaze, you’ll understand why it’s a keeper. It’s pure, simple joy in every bite.
The Humble History of Amish Apple Fritters
Amish cooking is all about community, simplicity, and making the most of what you have. These Amish Apple Fritters are a perfect example. They likely came from the need to use up a bounty of fall apples in a way that could feed a crowd. There’s no fancy equipment needed—just a bowl, a spoon, and a trusty skillet. The recipe has been passed down through generations, not in fancy cookbooks, but on well-loved index cards and by word of mouth. It’s a piece of edible history that celebrates humble ingredients turned into something extraordinary.
Why You’ll Fall in Love With This Recipe
You will adore this recipe because it’s forgiving, fun, and fantastically delicious. The batter comes together in minutes. The sizzle of the batter hitting the hot oil is so satisfying. Best of all, you get a treat that’s crispy on the outside, tender and apple-packed on the inside. They are the ultimate homemade treat. They beat any donut shop version because they’re made with love (and real chunks of apple!). They fill your home with the most incredible aroma, which is half the fun.
Perfect Occasions for Apple Fritter Magic
These fritters are your secret weapon for making any moment special. They are perfect for:
- Weekend Breakfasts: Turn an ordinary Saturday into a celebration.
- Fall Gatherings: Serve them at Halloween or Thanksgiving brunch.
- Potlucks and Church Socials: They travel well and disappear fast!
- After-School Snacks: A warm, welcoming treat for hungry kids.
- Coffee with a Friend: The ultimate pairing for a good chat.
Gathering Your Ingredients for Amish Apple Fritters
Here’s what you’ll need to create these golden crispy delights. I promise, it’s all simple stuff!
- For the fritters: 2 cups all-purpose flour, ⅓ cup granulated sugar, 2 teaspoons baking powder, ½ teaspoon salt, 1 teaspoon ground cinnamon, ¼ teaspoon nutmeg, 2 large eggs, ¾ cup whole milk, 1 teaspoon vanilla extract, 2 tablespoons unsalted butter (melted), 1 ½ cups peeled and diced apples (I love Granny Smith or Honeycrisp), and vegetable oil for frying.
- For the glaze: 1 cup powdered sugar, 2 tablespoons milk, and ½ teaspoon vanilla extract.
Smart Substitution Options
Don’t have everything? No problem! Here are some easy swaps:
- Flour: You can use a 1:1 gluten-free baking blend.
- Milk: Any milk you have works—almond, oat, or soy milk are fine.
- Apples: Any good baking apple will do. Try Fuji, Braeburn, or Pink Lady.
- Oil for Frying: Canola, peanut, or even lard are traditional alternatives to vegetable oil.
- No Glaze? Simply roll the warm fritters in cinnamon sugar for a different kind of sweet crunch.
Let’s Make Amish Apple Fritters: Step-by-Step
Step 1: Mixing the Dry Ingredients
Grab a large mixing bowl. Whisk together the flour, sugar, baking powder, salt, cinnamon, and nutmeg. Watch as the spices create little ribbons of brown and orange through the white flour. This is where the warm, spiced flavor starts. Whisking now prevents lumps later and makes sure every bite is perfectly seasoned. Pro tip: Give your spices a quick sniff before adding. Fresh, fragrant spices make all the difference.
Step 2: Combining the Wet Ingredients
In a separate bowl, crack in the eggs. Pour in the milk, vanilla, and the melted butter that’s just cool enough to touch. Whisk it all together until it’s a smooth, sunny yellow liquid. You’ll see little flecks of vanilla bean if you use the good stuff. This wet mixture is what will bind our dry ingredients into a glorious batter. Making sure it’s well-combined here means less mixing later, which keeps the fritters tender.
Step 3: Bringing the Batter Together
Now, pour your wet ingredients into the bowl with the dry ingredients. Use a sturdy spoon or spatula to gently stir. Stir just until the flour disappears and you have a thick, shaggy batter. A few small lumps are perfectly fine! Over-mixing is the enemy of fluffy fritters. The batter should be thick enough to coat the back of your spoon. It will smell amazing already, like a spiced cake.
Step 4: Folding in the Apples
Here comes the star! Dump in your pile of freshly diced apples. Gently fold them into the batter with a folding motion. You want every piece of crisp apple to be coated in that spiced batter. The batter will become even thicker. You should see more apple than batter in some spots, and that’s exactly what you want. These juicy pockets are what make every bite so special.
Step 5: Heating the Oil to Perfection
Pour vegetable oil into a deep, heavy-bottomed skillet or Dutch oven until it’s about 2 inches deep. Heat it over medium heat until it reaches 350°F (175°C). Use a candy or deep-fry thermometer. This is crucial! If the oil is too cool, the fritters will soak up oil and be greasy. If it’s too hot, they’ll burn on the outside before cooking inside. The oil should shimmer and bubble gently when you add a tiny drop of batter.
Step 6: Frying to Golden Brown
Carefully drop heaping spoonfuls of batter into the hot oil. Don’t crowd the pan—fry in batches. They will puff up and float. Let them fry for 2-3 minutes until the underside is a deep, golden brown. Then, carefully flip them with a slotted spoon or tongs. Fry for another 2-3 minutes on the other side. The sizzle is music to a cook’s ears! You’ll know they’re done when they are evenly browned and feel firm to the touch.
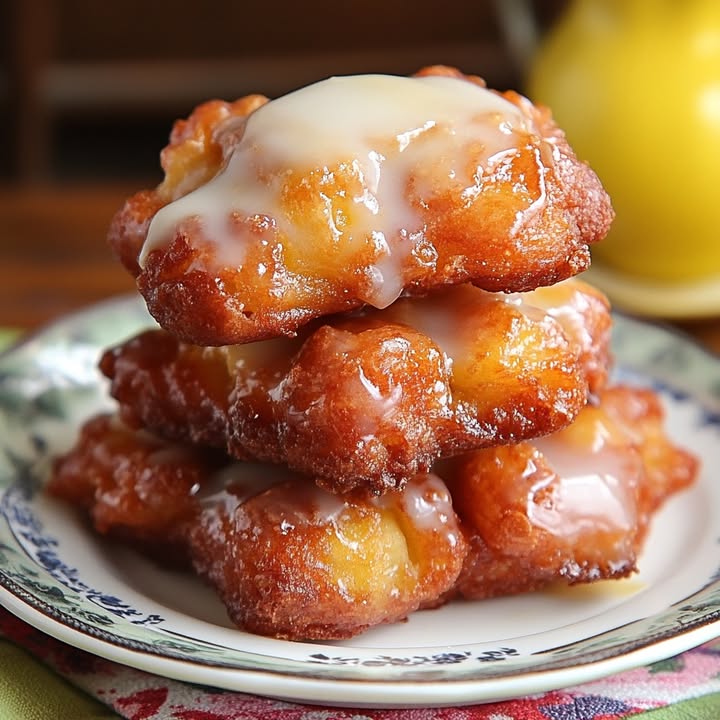
Step 7: Draining and Glazing
Use your slotted spoon to lift the fritters from the oil. Let the excess oil drip back into the pan. Then, place them directly onto a plate lined with paper towels. This step absorbs any extra grease. While they drain, whisk the powdered sugar, milk, and vanilla for the glaze until it’s perfectly smooth. You can drizzle it over the fritters with a spoon or dip the tops right into the bowl. Do this while they’re still warm so the glaze sets into a lovely, thin shell.
Chef’s Tip
For the absolute best texture, let your batter rest for about 10 minutes after mixing and before frying. This allows the flour to fully hydrate and the baking powder to start working. The result? Fritters that are incredibly light and airy on the inside, with an even crispier exterior. It’s a simple wait that pays off big time.
Your Amish Apple Fritter Timeline
Here’s a quick breakdown of your time investment for this easy baking project:
- Prep Time: 15 minutes (including apple dicing!)
- Cook Time: 15-20 minutes (for all batches)
- Rest Time: 10 minutes (for the batter, if using the chef’s tip)
- Total Time: About 40-45 minutes from start to first delicious bite.
A Chef’s Secret for the Best Fritters
My secret is in the apple dice. Don’t chop them too small! Aim for pieces about the size of a pea or a little larger. Tiny pieces will almost melt away. Larger chunks give you those wonderful, juicy bursts of apple flavor and texture in every single bite. It makes the fritter substantial and truly apple-forward.
A Little Extra Apple Info
Did you know apples continue to ripen after they’re picked? They emit a gas called ethylene. That’s why storing them in a cool, dark place is best. For this recipe, I actually prefer apples that are slightly tart and very firm. They hold their shape during frying and provide a lovely contrast to the sweet glaze. A Granny Smith is my perfect pick.
Necessary Kitchen Equipment
You don’t need anything fancy! Just gather:
- Two mixing bowls (one large, one medium)
- Whisk and wooden spoon/spatula
- Measuring cups and spoons
- Peeler and knife for the apples
- Deep skillet or Dutch oven
- Slotted spoon or spider strainer
- Candy/deep-fry thermometer
- Paper towels for draining
Storing Your Homemade Apple Fritters
The best way to enjoy Amish Apple Fritters is absolutely fresh and warm, right out of the fryer. The glaze will be soft and the interior fluffy. If you have leftovers, let them cool completely on a wire rack first. This prevents the bottom from getting soggy.
Once cool, place them in a single layer in an airtight container. You can separate layers with parchment paper. They will keep at room temperature for 1 day. The glaze will soak in and they will soften, but they are still tasty. For longer storage, freeze them.
To freeze, place the unglazed, cooled fritters on a baking sheet and flash-freeze for 1 hour. Then, transfer to a freezer bag. They’ll keep for up to 2 months. Reheat frozen fritters in a 350°F oven for about 10 minutes, then glaze. This revives their crispness beautifully.
My Best Tips and Advice
- Keep an eye on your oil temperature between batches. Let it come back to 350°F before adding new batter.
- If your oil starts smoking, it’s way too hot. Remove it from the heat for a minute to cool down.
- Use a small cookie scoop (about 1.5 tablespoons) to drop your batter. It makes evenly sized fritters that cook at the same rate.
- Don’t skip the thermometer. It’s the single best tool for perfect fried desserts.
Presentation Ideas to Impress
Make your fritters look as good as they taste!
- Stack them on a rustic wooden board or a pretty cake stand.
- Dust with a little extra powdered sugar or cinnamon for a snowy effect.
- Serve with a side of warm caramel sauce or apple butter for dipping.
- For a brunch, place them in a basket lined with a checkered napkin.
- Add a few thin apple slices and a cinnamon stick to the plate for decoration.
Healthier & Fun Recipe Variations
Love the idea but want to mix it up? Try these six twists on the classic Amish Apple Fritter:
- Baked Apple Fritters: For a lighter version, drop spoonfuls of batter onto a parchment-lined baking sheet. Bake at 375°F for 15-18 minutes until puffed and golden. You miss the deep-fry crisp but gain a guilt-free treat.
- Whole Wheat Apple Fritters: Swap half the all-purpose flour for whole wheat pastry flour. It adds a nutty flavor and extra fiber. The texture is still wonderfully tender.
- Apple Cider Fritters: Reduce the milk to ½ cup and add ¼ cup of reduced apple cider to the wet ingredients. It doubles down on that fantastic fall apple flavor.
- Dairy-Free Apple Fritters: Use your favorite plant-based milk and replace the melted butter with an equal amount of melted coconut oil. The result is just as delicious and inclusive for all diets.
- Apple Berry Fritters: Replace half the diced apples with fresh or frozen blueberries or raspberries. You get a beautiful pop of color and a tart berry surprise in every bite.
- Spiced Pumpkin Apple Fritters: Add ¼ cup of pumpkin puree to the wet ingredients and increase the spices. It’s like autumn in fritter form, combining two classic flavors perfectly.
If you’re looking for more inspiration, our collection of international pastries is full of wonderful recipes from around the world, each with its own simple story.
Common Mistakes to Avoid
Mistake 1: Using the Wrong Oil Temperature
This is the biggest fritter flop. Oil that’s not hot enough makes greasy, heavy fritters that soak up oil like a sponge. Oil that’s too hot burns the outside before the inside cooks. The fix is simple: use a thermometer. Heat your oil slowly to 350°F and check it between batches. If you don’t have a thermometer, test with a small piece of bread or a drop of batter. It should sizzle vigorously and turn golden in about 60 seconds.
Mistake 2: Over-Mixing the Batter
Stirring the batter too much develops the gluten in the flour. This makes your fritters tough and chewy, not light and cakey. You want to mix just until you no longer see dry streaks of flour. A few lumps are not just okay, they’re good! Treat the batter gently, especially when folding in the apples. A shaggy, lumpy batter promises a tender crumb.
Mistake 3: Crowding the Frying Pan
It’s tempting to fry them all at once, but don’t! Adding too many fritters at once causes the oil temperature to plummet. This leads to uneven cooking and oily results. Fry in small batches, giving each fritter plenty of room to float and puff up. This keeps the oil hot and ensures every fritter gets that perfect, all-over golden brown crispness.
Mistake 4: Glazing While Too Hot or Too Cold
Timing is everything with the glaze. If you glaze the fritters the second they come out of the oil, the heat will melt the glaze completely and it will just run off. If you wait until they’re stone cold, the glaze won’t stick well. The sweet spot is when they are still very warm to the touch but have drained for a minute or two. The glaze will set into a beautiful, crackly shell.
Frequently Asked Questions
Can I make Amish Apple Fritter batter ahead of time?
I don’t recommend making the batter too far in advance. The baking powder starts working as soon as it gets wet. If you let the batter sit for hours, it will lose its leavening power. Your fritters won’t be as light and airy. The best plan is to prep your dry ingredients and dice your apples ahead of time. Then, mix the wet and dry together just before you’re ready to fry. You can let the mixed batter rest for 10 minutes, but try to fry it within 30 minutes for the best results.
What is the best apple for apple fritters?
You want an apple that holds its shape and has a balance of sweet and tart. My top picks are Granny Smith for a bright, tangy punch, or Honeycrisp for a sweeter, juicier bite. Other great options are Fuji, Braeburn, or Pink Lady. Avoid very soft apples like Red Delicious. They turn to mush when cooked. A firm, crisp apple gives you those wonderful distinct pieces in the finished fritter, which is key for texture and flavor.
How do I keep my fritters from being greasy?
Greasy fritters almost always come from oil that is not hot enough. The number one fix is to use a thermometer and maintain 350°F. Also, make sure you’re not crowding the pan, as that lowers the temperature. After frying, drain them well on a rack set over a sheet pan instead of just paper towels. This allows air to circulate all around, preventing steam from making the bottom soggy. Proper draining is a simple step for a perfect, non-greasy treat.
Can I bake these instead of frying them?
Yes, you can bake them for a lighter version! Drop spoonfuls of batter onto a parchment-lined baking sheet. Bake in a preheated 375°F oven for 15-18 minutes. They will puff up and turn a lovely golden brown. Flip them halfway through for even color. They won’t have the same all-over crisp crust as fried fritters, but they will be deliciously cakey and much lower in fat. It’s a great alternative when you want the flavor without the fryer.
Why did my fritters turn out dense and heavy?
Dense fritters are usually caused by two things: over-mixing the batter or old baking powder. As mentioned, over-mixing develops gluten. Also, check your baking powder’s expiration date. If it’s old, it won’t create the bubbles needed to make the fritters light. Make sure your oil is hot enough, too. If it’s not, the fritters won’t puff up quickly. They’ll just sit in the oil and become heavy. Fresh ingredients and a gentle hand are your best tools for light fritters.
How can I make a dairy-free glaze?
It’s very easy! Simply replace the milk in the glaze recipe with any plant-based milk you like. Almond, oat, and soy milk all work perfectly. You can also use orange juice or even apple cider for a different flavor twist. The key is to add the liquid one tablespoon at a time. You want a thick but pourable consistency. A dairy-free glaze sets just like the regular version and tastes just as sweet and wonderful.
What’s the best way to reheat leftover apple fritters?
To bring back some crispness, the oven or air fryer is best. Preheat your oven to 350°F. Place the fritters on a baking sheet for 5-8 minutes until warmed through. In an air fryer, 350°F for 3-4 minutes works great. Avoid the microwave. It will make them very soft and chewy. Reheating will never make them as perfect as fresh, but it’s a great way to enjoy leftovers without waste.
Can I freeze glazed apple fritters?
You can, but the glaze may become sticky and messy when thawed. For best freezing results, freeze the fritters before glazing. Flash-freeze the plain, cooled fritters on a tray, then bag them. When ready to eat, reheat from frozen in the oven, then make a fresh batch of glaze to drizzle on top. This gives you the closest experience to a fresh-made fritter. The glaze is so quick to make, it’s worth the tiny extra step.
Is there a way to make these fritters a bit healthier?
Absolutely! You can bake them instead of fry, as mentioned. You can also use whole wheat pastry flour for part of the all-purpose flour. Reduce the sugar in the batter by a tablespoon or two—the apples and glaze provide plenty of sweetness. For more ideas on balancing indulgence with nutrition, the USDA offers great resources on healthy cooking methods that can inspire your kitchen habits. Remember, a homemade treat where you control the ingredients is always a better choice than a processed one!
My glaze is too thick/too thin. How do I fix it?
Glaze consistency is easy to adjust. If it’s too thick and won’t drizzle, add more milk just half a teaspoon at a time until it flows nicely. If it’s too thin and runs right off the fritter, add more powdered sugar a tablespoon at a time until it thickens. The perfect glaze should coat the back of a spoon and slowly drip off. It’s very forgiving, so don’t worry. You can always tweak it until it’s just right for you.
Your New Favorite Comfort Food
And there you have it! My tried-and-true recipe for the most delicious Amish Apple Fritters. They are more than just a recipe. They are a warm hug, a taste of tradition, and a surefire way to make someone smile. The process is part of the fun—the mixing, the frying, the glazing. I hope this recipe finds a special place in your kitchen, just like it has in mine. Now, go put on that apron, get those apples diced, and create some sweet indulgence of your own. Your family and friends will thank you. Happy frying!
Equipment
- Grand bol
- Fouet
- Spatule
- Poêle profonde ou faitout
- Papier absorbant
Ingredients
- 2 tasses farine tout usage
- ⅓ tasse sucre granulé
- 2 cuillères à café poudre à lever
- ½ cuillère à café sel
- 1 cuillère à café cannelle moulue
- ¼ cuillère à café muscade
- 2 oeufs
- ¾ tasse lait entier
- 1 cuillère à café extrait de vanille
- 2 cuillères à soupe beurre non salé (fondu)
- 1½ tasses pommes pelées et coupées en dés
- q.s. huile végétale pour la friture
- 1 tasse sucre glace
- 2 cuillères à soupe lait pour le glaçage
- ½ cuillère à café extrait de vanille pour le glaçage
Instructions
- Dans un grand bol, fouettez ensemble la farine, le sucre, la poudre à lever, le sel, la cannelle et la muscade.
- Dans un bol séparé, cassez les œufs et ajoutez le lait, la vanille et le beurre fondu. Fouettez jusqu'à consistance lisse.
- Versez les ingrédients humides dans les ingrédients secs et remuez jusqu'à ce qu'ils soient juste combinés, avec une pâte épaisse et en désordre.
- Incorporez délicatement les pommes coupées en dés jusqu'à ce qu'elles soient bien réparties.
- Chauffez l'huile végétale dans une poêle profonde ou un faitout à 175°C (350°F).
- Déposez des cuillerées de pâte dans l'huile chaude et faites frire par lots pendant 2-3 minutes de chaque côté jusqu'à ce qu'elles soient dorées.
- Égouttez les beignets frits sur une assiette tapissée de papier absorbant et préparez le glaçage.
- Fouettez ensemble le sucre glace, le lait et la vanille jusqu'à consistance lisse, puis nappez les beignets chauds de glaçage.
Notes
Nutrition

Hi, I’m Olivia Parker, the founder of BakingSecret.com and a lifelong lover of all things sweet and homemade. I grew up in a small town in Oregon, where the smell of fresh cookies in my family’s kitchen sparked my passion for baking. Over the years, I turned that passion into a mission: to help home bakers feel confident, inspired, and creative.
After studying food science and working in several artisan bakeries across the U.S., I decided to create a space where everyone from beginners to seasoned bakers can find reliable recipes, expert tips, and a warm, welcoming community. BakingSecret.com is my way of sharing the magic of baking with the world. When I’m not testing new recipes, you’ll find me exploring farmers’ markets, collecting vintage cookbooks, or perfecting my sourdough technique.