
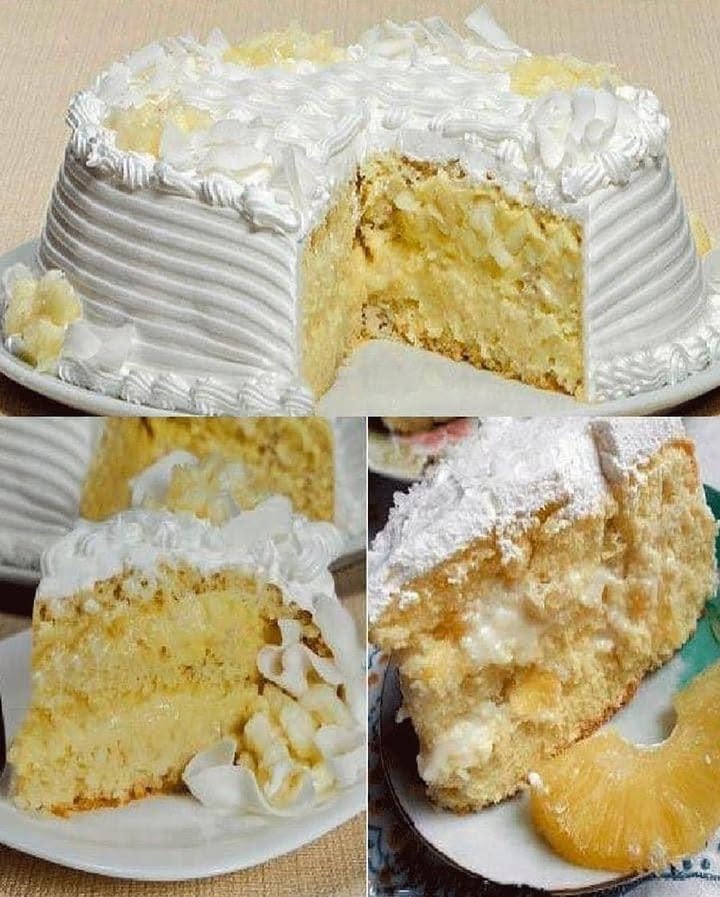
You know that feeling when you take a bite of something so good, you just have to close your eyes? That’s my Pineapple and White Chocolate Meringue Cake. I first made it for my daughter’s birthday, and let me tell you, it disappeared faster than cookies at a bake sale. The fluffy vanilla cake layers, that dreamy cold pineapple-chocolate filling, and the soft, sweet meringue on top… it’s a symphony in a slice.
A Slice of Sunshine: The Story of This Cake
This recipe is my happy kitchen experiment. I wanted a special cake that felt tropical and elegant, but not too fussy. I took the classic idea of a chilled dessert pie and turned it into a grand cake. The sweet-tart pineapple, cooked down until jammy, pairs magically with rich white chocolate. The meringue frosting is the cloud-like crown. It’s a modern twist that feels right at home at any gathering, bringing a bit of island sunshine straight to your table.
Why This Pineapple and White Chocolate Cake Will Steal Your Heart
You’ll love this because it’s a showstopper that’s surprisingly straightforward. The flavors balance perfectly—not too sweet, with a wonderful contrast of textures. The make-ahead filling is a lifesaver for busy hosts. It’s the kind of dessert that makes people ask for the recipe before they’ve even finished their piece.
The Best Moments for This Showstopper Cake
This cake is perfect for celebrations where you want to impress. Think birthday parties, summer barbecues, Mother’s Day brunch, or even as the grand finale for a holiday meal. It brings a refreshing, tropical vibe that’s always welcome. I love serving it on a warm afternoon with a cup of coffee—it just feels special.
Gathering Your Ingredients for Success
Let’s get everything on the counter. Using good-quality ingredients makes all the difference here, especially with the chocolate.
For the Cake Dough:
- 2 large eggs
- 1 tablespoon margarine (or unsalted butter for richer flavor)
- 1 cup of granulated sugar
- 1/2 cup warm milk
- 1 and 1/4 cups all-purpose wheat flour
- 1 tablespoon baking powder
For the Pineapple and White Chocolate Filling:
- 1 small fresh pineapple
- 1/2 to 1 cup sugar (for cooking the pineapple)
- 500 grams good quality white chocolate (chopped, not chips with hydrogenated oil)
- 1 can (approx. 300ml) of milk cream (table cream or half-and-half)
- 1 teaspoon pineapple or vanilla essence
For the Meringue Coverage:
- 1 cup egg whites (about 7-8 large eggs)
- 1 cup of granulated sugar
- A few drops of vanilla extract
Handy Substitutions for Your Kitchen
Don’t have every item? No problem! Here are some easy swaps:
- Margarine: Use an equal amount of unsalted butter.
- Fresh Pineapple: A 20-oz can of crushed pineapple in juice (drained very well) works in a pinch.
- White Chocolate: Look for baking bars. In a real bind, you could use a high-quality white chocolate mousse mix, but the flavor won’t be as deep.
- Milk Cream: Half-and-half or even full-fat coconut milk for a tropical twist.
- Pineapple Essence: Pure vanilla extract is a perfect substitute.
Let’s Bake! Your Step-by-Step Guide
Follow these steps, take your time, and enjoy the process. The smells alone are worth it!
Step 1: Making the Perfect Cake Base
Start by preheating your oven to 350°F (175°C). Grease and flour a 20cm round cake pan. In a mixing bowl, beat the eggs, margarine, and sugar together until the mixture is pale, fluffy, and almost creamy. This takes about 3-4 minutes with an electric mixer. Pour in the warm milk and beat for another minute just to combine. The warm milk helps everything blend smoothly. Turn off the mixer. Sift your flour and baking powder together right over the wet ingredients. Gently fold everything together with a spatula until no dry streaks remain. The batter will be thick and smooth. Pour it into your prepared pan and bake for 25-30 minutes, or until a toothpick poked in the center comes out clean. Pro tip: Avoid opening the oven door early, as it can make the cake fall. Let it cool completely in the pan before removing.
Step 2: Creating the Dreamy Pineapple Filling
While the cake bakes, tackle the pineapple. Peel your pineapple and chop the flesh into very small pieces—the smaller they are, the better they’ll mix into the filling. Toss the pieces into a saucepan with the sugar. Use 1/2 cup if your pineapple is very sweet, or the full cup if it’s a bit tart. Turn the heat to medium-low. The magic here is to cook it without any added water. The pineapple’s own juices will release and mix with the sugar, creating a gorgeous, sticky glaze. Stir it often for about 10 minutes until the pineapple is soft and the liquid has thickened. Let it cool completely, then strain it, pressing gently to remove most of the syrup. We want the juicy pieces, not extra liquid that will make the filling runny. Reserve these golden gems.
Step 3: The White Chocolate Magic
Now, for the luxurious part. Chop your white chocolate bar into small, even pieces. Place them in a heatproof bowl with the can of milk cream. You can melt this over a double boiler or carefully in the microwave in 30-second bursts, stirring well between each. We want it silky smooth. Once melted and combined, stir in the pineapple or vanilla essence. Let this mixture cool for about 10 minutes, then fold in your reserved cooked pineapple pieces. The contrast of the bright pineapple and the creamy chocolate is beautiful. Pour this filling into a container and pop it in the freezer. We’re not freezing it solid, just until it’s firm enough to spread, about 1.5 to 2 hours. Chef’s tip: A cold filling is much easier to handle and keeps the cake layers from getting soggy.
Step 4: Whipping Up the Fluffy Meringue
This is a Swiss meringue, which is stable and not too sweet. It’s easier than it sounds! Combine the egg whites and sugar in a heatproof bowl (the bowl of your stand mixer works if it’s metal). Place the bowl over a pot of simmering water, making sure the bottom doesn’t touch the water. Whisk constantly and gently for about 3-5 minutes. You’re heating the mixture until the sugar dissolves completely—test by rubbing a bit between your fingers; it should feel smooth, not grainy. Please don’t let it cook into scrambled eggs! Once hot and smooth, move the bowl to your stand mixer. Add the vanilla and beat on high speed for 5-7 minutes until you have stiff, glossy peaks that hold their shape. It will be cool to the touch and ready to pipe or spread.
Step 5: The Grand Assembly
The fun part! Once your cake is completely cool, carefully slice it horizontally into two even layers. A serrated bread knife works wonders here. To keep it moist, I like to brush each cut side with a simple syrup. My go-to is just a tablespoon of sugar dissolved in two tablespoons of warm milk. Place the bottom cake layer back into the clean (or re-greased) cake pan you baked it in. This acts as a mold for the filling. Take your semi-frozen filling and spread it all over this bottom layer. It should be thick and hold its place. Gently place the top cake layer over it, pressing down lightly. Cover the pan with plastic wrap and refrigerate for at least 4 hours, or better yet, overnight. This sets everything perfectly. When ready to serve, run a knife around the edge, unmold the cake onto your serving plate, and cover it entirely with the fluffy meringue. Get creative with your decorating!
Your Cake Timeline
Planning is key for a stress-free baking day.
- Prep Time: 1 hour
- Cooking Time: 30 minutes (cake) + 10 minutes (pineapple)
- Freezing Time (Filling): 2 hours
- Chilling/Setting Time: 4 hours (minimum)
- Total Time (hands-off chilling included): About 7.5 hours
My Secret for the Best Filling
My biggest trick is in the pineapple. After cooking and straining it, spread the pieces on a paper towel for a few minutes to soak up any last bit of excess moisture. This one extra step guarantees your white chocolate filling will be creamy and firm, not watery.
A Fun Fact About Pineapple
Did you know pineapple contains an enzyme called bromelain that tenderizes meat? It’s also why your mouth might tinge a little. Cooking it, like we do for this filling, deactivates that enzyme, leaving just the sweet, tangy flavor we love.
Kitchen Tools You’ll Need
- 20cm round cake pan
- Electric mixer (hand or stand)
- Mixing bowls
- Saucepan and heatproof bowl (for double boiler)
- Spatulas
- Serrated knife (for slicing cake)
- Pastry brush (for syrup)
How to Keep Your Cake Delicious
Because of the meringue and dairy-based filling, this cake needs to stay cold. Once assembled and frosted, keep it covered in the refrigerator.
It will stay fresh and tasty for up to 3 days. The meringue may start to weep a tiny bit after the first day, but it will still taste wonderful.
I do not recommend freezing the fully assembled cake with meringue, as the texture can suffer. You can, however, freeze the unfilled cake layers wrapped tightly for up to a month.
Helpful Tips for Baking Bliss
- Ensure your eggs are at room temperature for better volume in both the cake and meringue.
- When melting chocolate, go slow. Burnt chocolate is bitter and cannot be saved.
- If your meringue feels grainy, the sugar didn’t dissolve fully in the heating stage. Whisk a little longer over the heat next time.
- For a gorgeous finish, you can brown the meringue with a kitchen torch for a toasted marshmallow effect.
Presenting Your Masterpiece
- Place the cake on a cake stand and decorate the top with thin slices of dried pineapple or a few fresh mint leaves.
- Use a piping bag with a star tip to create beautiful meringue swirls and peaks all over the cake for a professional look.
- Serve each slice on a plate with a small drizzle of leftover pineapple syrup or a sprinkle of toasted coconut.
Six Tasty Twists on the Classic
Feel like mixing it up? Here are some delightful variations:
- Tropical Dream: Add 1/2 cup of toasted shredded coconut to the filling along with the pineapple.
- Berry Burst: Replace the pineapple with 1.5 cups of cooked, strained raspberries or strawberries.
- Citrus Zing: Use lemon curd instead of the pineapple filling and add lemon zest to the cake batter.
- Nutty Delight: Fold 1/2 cup of finely chopped macadamia nuts or pecans into the cake batter for added crunch.
- Choco-Lovers: Swap the white chocolate for dark or milk chocolate in the filling for a richer taste.
- Coconut Cream: Use coconut milk instead of milk cream in the filling and add a teaspoon of coconut extract.
If you love layered treats, you might also enjoy my classic Vanilla Bean Layer Cake with Raspberry Jam. For another chilled dessert idea, this No-Bake Lemon Icebox Pie is a summer lifesaver. When pineapple is in season, I also make these Pineapple Upside-Down Cupcakes for a portable treat. And if meringue has won you over, my Chocolate Pavlova with Whipped Cream is an absolute must-try.
Common Mistakes to Avoid
Avoiding these simple pitfalls will ensure your cake turns out perfect every single time.
Mistake 1: Using the Wrong White Chocolate
This is the biggest one! Using white chocolate chips or a low-quality bar that contains hydrogenated oils or too little cocoa butter will cause your filling to split or remain greasy and not set properly. Always choose a good-quality baking bar labeled as “white chocolate.” Check the ingredients—cocoa butter should be near the top. Pro tip: If your chocolate seizes or looks grainy when melting, add a tiny splash more of warm cream and stir vigorously to bring it back.
Mistake 2: Not Straining the Pineapple Well Enough
Adding wet, soupy pineapple to the chocolate filling is a recipe for a runny disaster. The extra liquid prevents the filling from firming up and can make the cake soggy. After cooking the pineapple, let it cool completely in the strainer. Press down gently with a spoon to release more juice. For extra safety, pat the pieces dry with a paper towel. We want the flavor, not the water.
Mistake 3: Rushing the Chilling Steps
Patience is your friend here. Spreading a warm, liquid filling will soak into your cake layers. Freezing the filling until it’s spreadable is non-negotiable. Similarly, not chilling the assembled cake long enough means it might slump when you unmold or frost it. The 4-hour minimum chill in the fridge sets the structure, making it easy to handle and slice cleanly.
Mistake 4: Under-beating or Over-beating the Meringue
The meringue needs to form stiff peaks to hold its shape as a frosting. If you under-beat it, it will be runny and slide right off the cake. If you over-beat it, it can become dry, grainy, and start to separate. Stop your mixer when the meringue is glossy, holds a sharp peak when you lift the whisk, and doesn’t feel gritty between your fingers.
Mistake 5: Cutting the Cake Before It’s Fully Set
It’s so tempting to dive in, but cutting into a cake that hasn’t had time to set is messy. The layers can shift, and the filling might ooze out. Wait for the full chilling time. For the neatest slices, dip your sharp knife in hot water and wipe it clean between each cut.
When choosing ingredients, it’s always a good idea to practice general food awareness by reading labels and understanding what you’re putting into your recipes for the best flavor and quality.
Answers to Your Cake Questions
Can I make this cake a day ahead?
Absolutely! In fact, I highly recommend it. You can bake the cake layers, cook the pineapple, and make the filling up to two days ahead. Store the layers wrapped at room temp, and keep the filling in the fridge. Assemble and frost the cake the day before your event. The flavors meld together beautifully overnight. Just keep it refrigerated until you’re ready to serve.
What can I use instead of fresh pineapple?
Canned crushed pineapple in its own juice is a great time-saver. Make sure to drain it extremely well—I even press it in a fine-mesh strainer and pat it dry with paper towels. You’ll need about 1.5 to 2 cups of drained fruit. Skip the cooking-with-sugar step, as canned pineapple is already sweetened, and just make sure it’s very dry before mixing it into the chocolate.
My filling is too runny. What did I do wrong?
This usually happens for one of two reasons. First, the pineapple had too much liquid. Next time, strain and dry it more thoroughly. Second, the chocolate or cream might have been too warm when combined, or the chocolate quality wasn’t high enough. For a rescue, you can try re-freezing the whole assembled cake for an extra hour or two to firm it up before adding the meringue.
How do I keep my meringue from weeping?
Weeping (those tiny beads of syrup) happens when sugar isn’t fully dissolved or there’s a big temperature change. Ensure you heat the egg white and sugar mixture enough so it’s smooth to the touch. Also, try to apply the meringue to a cool, dry cake surface. If you’re in a very humid climate, Swiss meringue is your best bet, but a little weeping can still happen and is totally normal.
Can I use a different pan size?
Yes, but adjust your baking time. For a 9-inch (23cm) pan, the cake layers will be slightly thinner, so check for doneness around 20-22 minutes. For taller layers in two 6-inch pans, you might need to adjust the filling amount slightly. The key is to have two even layers to sandwich the filling.
Is there a way to make this without an electric mixer?
You can whisk the cake batter by hand, but it will take some elbow grease to get it light and fluffy. For the meringue, a hand mixer is almost essential to achieve the right volume and texture. A stand mixer makes it effortless, but a good hand mixer will work perfectly.
How should I store leftovers?
Cover the leftover cake tightly with plastic wrap or place it in a cake keeper. Keep it in the refrigerator. The meringue will soften a bit over time, but the cake will still be delicious for up to 3 days. I don’t recommend leaving it out at room temperature for more than an hour due to the dairy filling.
Can I toast the meringue?
Yes, and it adds a wonderful flavor! Use a kitchen torch to gently brown the peaks and swirls of the meringue right before serving. It gives a lovely toasted marshmallow taste. If you don’t have a torch, you can briefly place the cake under a preheated broiler for just 30-60 seconds—watch it like a hawk to prevent burning!
Why did my cake sink in the middle?
A sinking cake is often caused by opening the oven door too early in the baking process, undermixing the batter (so the baking powder isn’t evenly distributed), or using old baking powder. Make sure your baking powder is fresh, mix the batter just until combined after adding the flour, and resist peeking for the first 20 minutes of bake time.
What’s the best syrup to moisten the cake layers?
I love the simple milk and sugar syrup because it’s mild and doesn’t compete with the other flavors. You can also use a syrup made from the juices strained from the cooked pineapple mixed with a little water and heated. For a more adult twist, a tablespoon of rum, coconut liqueur, or pineapple juice mixed with sugar makes a fantastic brush-on syrup.
Remember, for more fabulous ideas like this, the whole world of cake and cupcake recipes on my site is waiting for you to explore.
Ready for Your Standing Ovation?
So there you have it! My beloved Pineapple and White Chocolate Meringue Cake. It looks fancy but comes together with a bit of planning and love. Don’t be intimidated by the steps—each one is simple. The joy on your friends’ and family’s faces when they taste it is worth every minute. Put on some music, tie on your apron, and get ready to bake a memory. I promise, this cake will become one of your most requested recipes. Now, go on and create something wonderful!
Equipment
- Grand bol
- Fouet
- Spatule
- Plaque à pâtisserie
- Papier sulfurisé
Ingredients
- 2 œufs
- 1 c. sucre granulé
- 0.5 c. lait chaud
- 1.25 c. farine tout usage
- 1 c. poudre à lever
- 0.5 c. beurre
- 500 g chocolat blanc
- 300 ml crème
- 0.5 tsp essence de vanille
Instructions
- Préchauffez votre four à 175°C. Graissez un moule à gâteau rond de 20 cm.
- Dans un bol, battez les œufs, le beurre et le sucre jusqu'à obtenir un mélange mousseux.
- Ajoutez le lait chaud et mélangez bien.
- Tamisez la farine et la poudre à lever sur les ingrédients humides et incorporez délicatement jusqu'à obtenir une pâte lisse.
- Versez la pâte dans le moule préparé et enfournez pendant 25 à 30 minutes.
- Pendant la cuisson, préparez la garniture en cuisant des morceaux d'ananas avec du sucre à feu moyen pendant environ 10 minutes.
- Égouttez l'ananas cuit et laissez-le refroidir.
- Faites fondre le chocolat blanc avec la crème au bain-marie et incorporez l'essence.
- Incorporez les morceaux d'ananas dans le chocolat blanc et mettez la garniture au congélateur jusqu'à ce qu'elle soit ferme.
- Pour la meringue, battez les blancs d'œufs et le sucre au bain-marie puis continuez à battre jusqu'à obtenir des pics fermes.
- Coupez le gâteau refroidi en deux, garnissez la partie inférieure avec la garniture, puis recouvrez avec la partie supérieure.
- Réfrigérez le gâteau au moins 4 heures avant de le décorer avec la meringue.
- Servez frais et dégustez !
Notes
Nutrition

Hi, I’m Olivia Parker, the founder of BakingSecret.com and a lifelong lover of all things sweet and homemade. I grew up in a small town in Oregon, where the smell of fresh cookies in my family’s kitchen sparked my passion for baking. Over the years, I turned that passion into a mission: to help home bakers feel confident, inspired, and creative.
After studying food science and working in several artisan bakeries across the U.S., I decided to create a space where everyone from beginners to seasoned bakers can find reliable recipes, expert tips, and a warm, welcoming community. BakingSecret.com is my way of sharing the magic of baking with the world. When I’m not testing new recipes, you’ll find me exploring farmers’ markets, collecting vintage cookbooks, or perfecting my sourdough technique.