
This Wonder Cake Truly Lives Up to Its Name!
I still remember the first time I saw a Wonder Cake at a friend’s party. It was towering, cloud-like, and decorated with such joy. I thought, “There’s no way I can make that.” Well, guess what? You totally can! This Wonder Cake recipe is my go-to for wowing a crowd without losing my mind in the kitchen. It’s a fluffy vanilla cake layered with a dreamy, creamy filling that’s just pure happiness on a plate. Let me show you how to create your own little wonder.
A Slice of Sweet History
The Wonder Cake feels like a cherished family secret passed between friends. While its exact origins are a bit fuzzy, it reminds me of classic American layer cakes and European tortes coming together for a party. The “wonder” likely comes from that magical moment when you slice into it and reveal the beautiful layers of cake and cream. My version uses “mini dreams,” those little meringue kisses, for decoration, which adds a wonderful modern crunch. It’s a treat that feels both timeless and perfectly suited for today’s celebrations.
Why You’ll Love This Wonder Cake Recipe
You will love this recipe because it balances simplicity with spectacular results. The cake itself is light as air, thanks to whipping those egg whites. The filling is rich and custardy but not overly heavy. It’s a forgiving recipe, too. Even if your layers aren’t perfectly even (mine rarely are!), the generous filling and snowy sprinkle of powdered sugar make everything look intentional and gorgeous. Most importantly, the taste is pure comfort—sweet, vanilla-kissed, and utterly delightful.
Perfect Occasions for Your Homemade Wonder Cake
This cake is a celebration in itself! It’s perfect for birthdays, baby showers, or anniversaries. I love bringing it to potlucks because it always disappears fast. It’s also just the thing for a Sunday family dinner when you want to make an ordinary day feel special. Basically, any time you want to spread a little joy and hear people say, “You made this?!” is the right time for a Wonder Cake.
Wonder Cake Ingredients
Let’s gather everything. Having your ingredients ready makes the process so smooth!
- For the Cake:
- 4 large eggs (whites and yolks separated)
- 2 cups of granulated sugar
- 1 tablespoon margarine (or unsalted butter, softened)
- 1 teaspoon vanilla extract or essence
- 1 cup of warm milk
- 2 cups of all-purpose wheat flour
- 1 tablespoon of baking powder
- Extra margarine for greasing the pan
- Confectioners’ (powdered) sugar for sprinkling
- Mini meringues (“mini dreams”) for decoration
- For the Filling & Topping:
- 2 cans (14 oz each) of sweetened condensed milk
- 2 cups of milk
- 2 egg yolks, lightly beaten
- 2 tablespoons of cornstarch
- 1 box (200g) of heavy cream or crema fresca
Handy Substitution Options
No worries if you’re missing an ingredient! Here are some easy swaps:
- Margarine: Use an equal amount of unsalted butter for a richer flavor.
- All-purpose flour: A 1:1 gluten-free baking blend works well for a gluten-free Wonder Cake.
- Heavy Cream (in filling): Full-fat coconut cream can be used for a dairy-free version, though the flavor will change slightly.
- Mini Meringues: Fresh berries, toasted coconut flakes, or chocolate shavings make lovely decorations.
How to Make Wonder Cake: A Step-by-Step Guide
Step 1: Prep the Egg Whites
Start by separating your eggs. Make sure no yolk gets into the whites, as even a little fat can prevent them from whipping up. Place the whites in a very clean, dry bowl. Using a mixer, beat them on high speed until they form stiff, glossy peaks that hold their shape. Set this beautiful, fluffy cloud aside for later. This step is the secret to our cake’s incredible lightness.
Step 2: Create the Yolk Base
In another bowl, combine the egg yolks, sugar, margarine, and vanilla. Beat them with the mixer on medium-high speed for a good 3-5 minutes. You want the mixture to become pale yellow, thick, and fluffy. It should ribbon off the beaters. This creaming process incorporates air, giving the cake structure and a tender crumb. The smell at this stage is already heavenly!
Step 3: Combine Wet and Dry
With the mixer on low speed, it’s time to add the milk and flour. Don’t just dump it all in! Alternate: add about a third of the warm milk, then a third of the flour, mixing just until combined each time. Repeat until everything is incorporated. The batter will be smooth and quite thick. Pro tip: Warming the milk slightly helps it blend seamlessly with the other ingredients without curdling the yolks.
Step 4: Gently Fold It All Together
Now for the gentle part! Use a large spoon or silicone spatula to fold in the whipped egg whites and the baking powder. “Folding” means you cut through the center of the batter, scoop along the bottom, and fold it over the top. Rotate the bowl as you go. Be patient and gentle to keep as much air in the batter as possible. The final mixture should be airy and uniform in color.
Step 5: Bake to Golden Perfection
Preheat your oven to 350°F (175°C). Grease a deep, 9-inch (24cm) round pan and line the bottom with parchment paper for easy removal. Pour the batter into the prepared pan and smooth the top. Bake for 35-40 minutes. The cake is done when it’s golden brown on top, has pulled away from the pan’s sides slightly, and a toothpick inserted in the center comes out clean. Let it cool completely in the pan before moving on.
Step 6: Craft the Luscious Filling
While the cake cools, make the filling. In a medium saucepan, whisk together the condensed milk, regular milk, egg yolks, and cornstarch. Make sure the cornstarch is fully dissolved to avoid lumps. Place the pan over medium heat. Cook, stirring constantly with a whisk, until the mixture thickens and comes to a gentle boil. This will take about 8-10 minutes. Remove from heat and stir in the box of cream until smooth. Let this cool completely—it will thicken more as it sits.
Step 7: Assemble Your Masterpiece
Once the cake and filling are cool, run a knife around the edge of the pan and unmold the cake. Carefully slice it horizontally into three even layers using a serrated knife. Place the bottom layer on your serving plate. Fit a pastry bag with a large star tip and fill it with the creamy filling. Pipe a generous amount of filling onto the first layer. Repeat with the second cake layer and more filling. Top with the final cake layer.
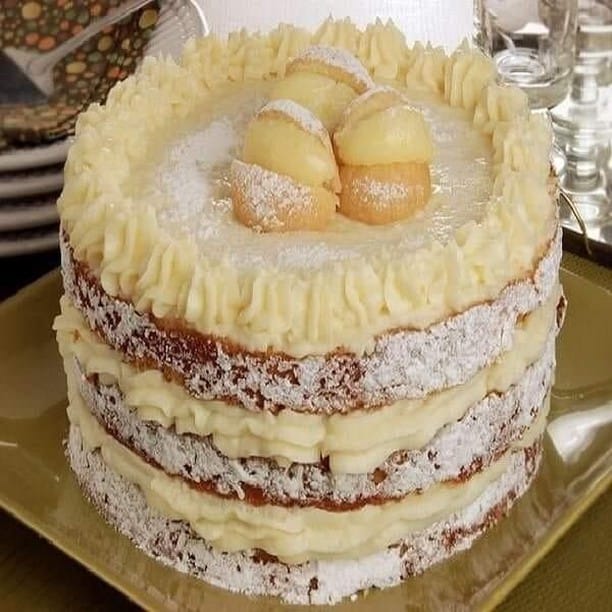
Step 8: The Grand Finale Decoration
Use the remaining filling to decorate the top of your Wonder Cake. You can pipe pretty swirls or just spread it evenly. Now, for the magic dust: generously sift confectioners’ sugar all over the top and sides. It creates a beautiful snowy effect. Finally, crown your creation with the mini meringues. Chef’s tip: For an extra wow, lightly toast the meringues in a low oven for a few minutes first—it intensifies their flavor!
Wonder Cake Timing Breakdown
Good baking is all about timing. Here’s what to expect:
- Prep Time: 30 minutes
- Cooking Time: 40 minutes (for the cake) + 10 minutes (for the filling)
- Cooling & Assembly Time: 1 hour 30 minutes
- Total Time: Approximately 2 hours 50 minutes
The cooling time is crucial. Assembling with warm components can make the filling runny and the layers slide.
Chef’s Secret for the Best Wonder Cake
My secret is in the egg whites. Let your separated egg whites sit at room temperature for 20-30 minutes before whipping. Room-temperature whites whip up much higher and faster than cold ones, giving you maximum volume for that signature airy texture. It’s a small step with a huge payoff!
A Fun Fact About the “Wonder”
The name “Wonder Cake” perfectly captures the reaction it gets. It’s not just one wonder, but several: the wonder of the fluffy cake, the wonder of the creamy filling, and the wonder that you made it yourself! Dishes named for delight, like this one, have a long history in home baking, often becoming the most requested recipe in a family’s collection.
Necessary Equipment
You don’t need fancy tools! Here’s your checklist:
- Stand mixer or hand mixer
- Two large mixing bowls
- 9-inch round cake pan (deep is best)
- Parchment paper
- Saucepan and whisk
- Spatula
- Serrated knife (for splitting layers)
- Pastry bag and large star tip (optional but fun!)
- Cooling rack
How to Store Your Wonder Cake
Because of the dairy-based filling, this cake must be stored in the refrigerator. Place it in a cake keeper or loosely cover it with plastic wrap or a dome. The powdered sugar will slowly melt into the frosting, but it will still taste amazing.
For the best texture, let the cake sit at room temperature for about 20-30 minutes before serving straight from the fridge. This takes the chill off the filling and softens the cake layers perfectly.
The Wonder Cake is best enjoyed within 2-3 days. The meringue decorations will start to soften in the fridge’s humidity, but they remain delicious. I do not recommend freezing the assembled cake, as the filling can separate.
Pro Tips and Advice
- Measure flour correctly: Spoon the flour into your measuring cup and level it off. Don’t scoop directly from the bag, as this packs in too much flour and can make the cake dense.
- Cool completely: I can’t stress this enough. Warm cake layers will melt the filling and make a mess.
- Slice with care: Use a gentle sawing motion with a long serrated knife to split the cake layers. Mark the sides with toothpicks first as a guide for an even cut.
Inspired Presentation Ideas
Make your Wonder Cake the star of the table!
- Serve each slice with a drizzle of raspberry or strawberry coulis.
- Instead of meringues, decorate with fresh edible flowers for a spring look.
- For a birthday, add colorful sprinkles to the top along with the powdered sugar.
- Present it on a beautiful cake stand for instant elegance.
6 Delicious Wonder Cake Variations
Love the base recipe? Try these twists!
- Chocolate Wonder Cake: Replace 1/2 cup of the flour in the cake with unsweetened cocoa powder. Add a cup of chocolate chips to the batter for extra gooey pockets.
- Lemon Berry Wonder: Add the zest of two lemons to the cake batter. Fold a cup of fresh raspberries into the filling before assembling for a tart and fruity version.
- Coconut Dream Cake: Use coconut milk in place of the regular milk in both the cake and filling. Top with toasted coconut flakes instead of meringues.
- Mocha Wonder Cake: Dissolve 2 tablespoons of instant espresso powder in the warm milk for the cake. It pairs beautifully with the creamy, sweet filling.
- Nutty Caramel Wonder: Swirl 1/2 cup of salted caramel sauce into the filling. Decorate the assembled cake with chopped toasted pecans or walnuts.
- Funfetti Wonder Cake: Stir 1/2 cup of rainbow sprinkles into the cake batter right before folding in the egg whites. It’s a guaranteed hit with kids!
If you enjoy exploring different cake styles, you might also love the rich simplicity of a classic pound cake, the fruity freshness of a perfect lemon drizzle cake, the cozy spice of a homemade carrot cake, or the festive cheer of a yule log for the holidays.
Common Mistakes to Avoid
Mistake 1: Not Whipping the Egg Whites Enough
This is the biggest mistake! Unde-whipped whites won’t give the cake its necessary lift, leading to a dense, flat result. Your egg whites should form stiff, glossy peaks that don’t droop when you lift the beaters. A pro tip: ensure your bowl and beaters are completely clean and free of any grease, as fat is the enemy of meringue.
Mistake 2: Overmixing the Batter After Adding Flour
Once you add flour, gluten development begins. Overmixing at this stage makes the gluten strands tough, resulting in a chewy, heavy cake instead of a tender, soft one. Mix just until you no longer see streaks of flour. It’s okay if the batter looks a little lumpy—it’s better than overmixed!
Mistake 3: Assembling the Cake While It’s Still Warm
Warm cake + cool custard filling = a slippery, sliding, messy disaster. The heat will melt the filling, causing it to soak into the cake or ooze out the sides. Always let your cake layers cool completely on a wire rack. Patience here is the key to clean, beautiful layers.
Mistake 4: Cooking the Filling on Too High Heat
If you crank up the heat to thicken the filling faster, you risk scrambling the egg yolks or burning the bottom, creating lumps. Cook it over a steady medium heat, stirring constantly with a whisk. It will thicken reliably and smoothly. Slow and steady wins the race for perfect pastry cream.
Mistake 5: Using the Wrong Pan Size
Using a pan that’s too small or shallow can cause the batter to overflow in the oven. Using one that’s too big will give you a thin, dry cake. A deep 9-inch pan is ideal. If you’re unsure, you can fill your pan only 2/3 full with batter and bake any extra in a few cupcakes on the side.
For those looking to understand the nutritional building blocks of their baking, it’s interesting to note that eggs, a key ingredient here, are an excellent source of high-quality protein. You can learn more about food composition and protein balance from trusted sources.
This Wonder Cake is a fantastic addition to any home baker’s repertoire. For more inspiring ideas and classic treats, be sure to browse our full collection of delicious cake and cupcake recipes.
Frequently Asked Questions
Can I make Wonder Cake a day ahead?
Absolutely! In fact, I often do. Baking the cake and making the filling a day ahead makes assembly a breeze. Store the cooled, unsliced cake wrapped in plastic at room temperature. Keep the filling in a sealed container in the fridge. The next day, slice the cake, assemble, decorate, and refrigerate the finished masterpiece for a few hours before serving. This allows the flavors to meld beautifully.
What can I use instead of a pastry bag for the filling?
No pastry bag? No problem! You have a couple of easy options. You can use a large zip-top bag: just spoon the filling into one corner, snip off the tip, and squeeze. Or, you can simply spread the filling between the layers with an offset spatula or spoon. For the top, you can create pretty swirls with the back of a spoon. The taste is what matters most.
Why did my cake sink in the middle?
A sunken cake can be disheartening. The most common causes are underbaking, opening the oven door too early (before the structure has set), or an issue with the leavening. Make sure your baking powder is fresh. Test for doneness with a toothpick—it should come out clean. And try to resist peeking in the oven for at least the first 25 minutes of baking!
Can I use all butter instead of margarine?
Yes, you can! Unsalted butter is a great substitute and will give the cake a richer, more classic flavor. Use the same amount: one tablespoon softened butter in the batter, and butter for greasing the pan. Just know that butter has a lower water content than some margarines, so the crumb might be slightly more dense but wonderfully flavorful.
How do I know when the filling is thick enough?
The filling should coat the back of a spoon thickly. When you run your finger through it, the line should hold its shape without the filling running back together. It will also visibly thicken and begin to form large, slow bubbles as it approaches a boil. Remember, it will continue to thicken significantly as it cools in the refrigerator.
Is there a way to make this cake less sweet?
The Wonder Cake is meant to be a decadent dessert, but you can tweak it. For the cake, you can reduce the sugar by 1/4 cup. For the filling, using one can of condensed milk and increasing the regular milk by 1/2 cup will lessen the sweetness. The result will be a milder, still-delicious cream. The powdered sugar on top is optional and can be lightly dusted.
My layers broke when I tried to slice the cake. Help!
It happens to the best of us! First, make sure the cake is completely cool—a warm cake is fragile. Use a long, serrated knife and a gentle sawing motion. Don’t press down. You can also use dental floss: hold a long piece taut and pull it through the cake horizontally. The most important thing? Even if they break, you can still assemble it. The filling acts as delicious glue!
Can I freeze the unfilled cake layers?
Yes, this is a fantastic time-saver. Once the baked cake layers are completely cool, wrap each one tightly in plastic wrap, then in aluminum foil. Freeze for up to 2 months. Thaw overnight in the refrigerator or at room temperature for a few hours before assembling. This helps lock in moisture.
What are “mini dreams” and where do I find them?
“Mini dreams” are simply small, store-bought meringue kisses. They are light, airy, and very sweet. You can find them in the bakery section, the international foods aisle, or sometimes with the cookies in most large grocery stores. Brands like “Meringues” or “Meringue Kisses” are common. If you can’t find them, see the substitution list above for other decorating ideas.
The filling is lumpy. Can I fix it?
Lumps in the filling are usually from undissolved cornstarch or slightly curdled eggs. You can often save it! As soon as you notice small lumps, immediately remove the pan from the heat and pour the filling through a fine-mesh sieve into a clean bowl, pressing it through with a spatula. This will catch any lumps and give you a perfectly smooth cream. Stir in the cold cream after straining.
Go Ahead, Create Your Own Wonder!
There you have it—everything you need to make a stunning, delicious Wonder Cake that will have everyone asking for the recipe. Don’t let the steps intimidate you. Each part is simple, and the final result is so worth it. Baking this cake is an act of love, and sharing it is pure joy. So preheat that oven, gather your ingredients, and get ready to bake something wonderful. I can’t wait for you to experience the magic!
Equipment
- Grand bol
- Fouet
- Spatule
- Moule rond de 9 pouces
- Papier sulfurisé
Ingredients
- 4 œufs
- 400 g sucre
- 15 g margarine ou beurre non salé, ramolli
- 5 ml extrait de vanille
- 240 ml lait tiède
- 250 g farine tout usage
- 15 g poudre à lever
- q.s. margarine supplémentaire pour graisser le moule
- q.s. sucre glace pour saupoudrer
- q.s. mini meringues pour la décoration
Instructions
- Séparez les œufs et battez les blancs d'œufs jusqu'à ce qu'ils forment des pics fermes.
- Dans un autre saladier, mélangez les jaunes d'œufs, le sucre, la margarine et l'extrait de vanille, puis battez jusqu'à obtenir un mélange léger et mousseux.
- Ajoutez progressivement le lait tiède et la farine, en mélangeant à vitesse basse jusqu'à obtention d'un mélange homogène.
- Incorporez délicatement les blancs d'œufs battus et la poudre à lever.
- Préchauffez le four à 175°C, graissez un moule rond de 9 pouces, puis versez la pâte.
- Faire cuire pendant 35-40 minutes ou jusqu'à ce qu'il soit doré et qu'un cure-dent en ressorte propre.
- Pendant que le gâteau refroidit, préparez la garniture en fouettant ensemble le lait concentré sucré, le lait régulier, les jaunes d'œufs et la fécule de maïs, puis faites cuire jusqu'à épaississement.
- Défaites le gâteau refroidi et coupez-le en trois couches.
- Assemblez en ajoutant de la garniture entre les couches et en décorant le dessus avec le reste de la garniture.
- Terminez par une saupoudrée de sucre glace et des mini meringues sur le dessus.
Notes
Nutrition

Hi, I’m Olivia Parker, the founder of BakingSecret.com and a lifelong lover of all things sweet and homemade. I grew up in a small town in Oregon, where the smell of fresh cookies in my family’s kitchen sparked my passion for baking. Over the years, I turned that passion into a mission: to help home bakers feel confident, inspired, and creative.
After studying food science and working in several artisan bakeries across the U.S., I decided to create a space where everyone from beginners to seasoned bakers can find reliable recipes, expert tips, and a warm, welcoming community. BakingSecret.com is my way of sharing the magic of baking with the world. When I’m not testing new recipes, you’ll find me exploring farmers’ markets, collecting vintage cookbooks, or perfecting my sourdough technique.