
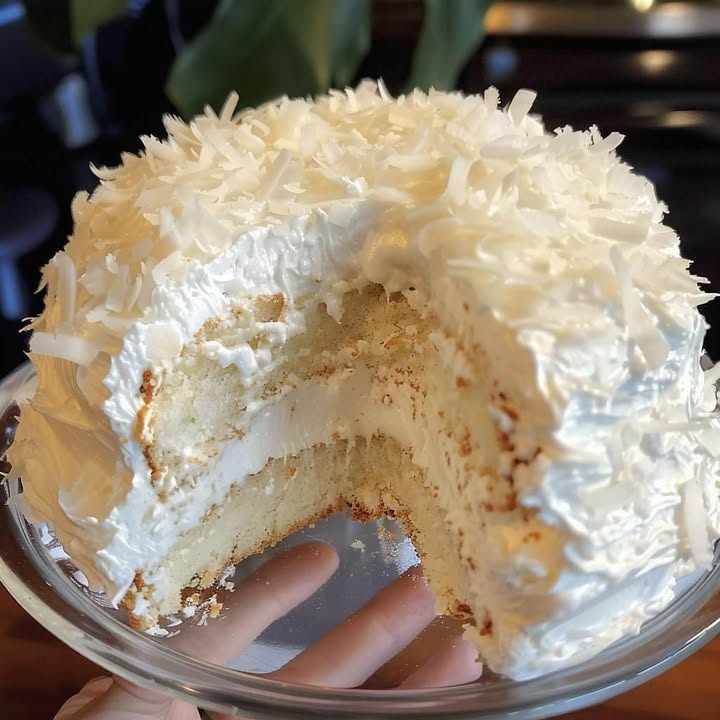
Why Coconut Cream Delight Should Be Your Next Dessert Obsession
Picture this: a slice of soft, pillowy cake topped with creamy, dreamy goodness that makes you close your eyes and savor every bite. That’s what happens when you make Coconut Cream Delight, my all-time favorite dessert. I tested this recipe for the first time during a family game night. My kids were skeptical about coconut, but one bite and they were asking for seconds! This cake is not just a treat; it’s an experience that brings people together.
The Story Behind Coconut Cream Delight
This Coconut Cream Delight recipe has roots in tropical regions where coconuts are celebrated for their rich flavor. Historically, coconut cakes were simple creations made by busy home bakers who wanted to use up pantry staples. Over time, pudding mixes and extracts transformed it into the lush, indulgent dessert we know today. My version combines classic charm with modern ease—perfect for a busy mom like me!
Why You’ll Fall in Love with This Recipe
What sets this dish apart? It’s easy as pie (well, cake), packed with tropical flavor, and oh-so-versatile. Whether you’re making it for yourself or sharing with friends, its moist texture and heavenly aroma will win hearts. Bonus: It requires ingredients you likely already have in your kitchen!
Perfect Occasions to Whip Up This Beauty
A Coconut Cream Cake shines at birthday parties, picnics, and holiday gatherings. It’s also fantastic for weekend tea times or even surprise drop-ins from neighbors. Trust me, serving this cake instantly earns you hostess-of-the-year status.
What You’ll Need to Make This Magic Happen
Let’s gather our tools:
- 1 box (15 ounces) yellow cake mix
- 4 eggs
- 1/2 cup vegetable oil
- 3/4 cup sour cream
- 1 teaspoon coconut extract
- 1 box (3.4 ounces) instant coconut cream pudding mix
- 2/3 cup water
(Don’t worry—I’ll share topping details later.)
Substitutions That Work
No sour cream? Use Greek yogurt instead. Swap vegetable oil for melted butter if you prefer a richer taste. And yes, vanilla extract can stand in for coconut extract—though fresh coconut flavor takes things to the next level.
Step 1: Preheat and Prep
Start by heating your oven to 350°F. Grease your cake pans thoroughly—trust me, no one likes stuck-on cake! As you prep, imagine how those golden layers will look once finished. Pro tip: Line the bottoms with parchment paper for extra insurance.
Step 2: Mix It Up
In a large bowl, combine the yellow cake mix, eggs, oil, sour cream, coconut extract, pudding mix, and water. Blend until smooth and fluffy. The batter should smell divine, thanks to the coconut extract. Don’t overmix—it’s okay if it’s slightly lumpy.
Step 3: Bake Like a Pro
Pour the batter evenly into prepared pans. Pop them in the oven and bake for about 25 minutes. You’ll know they’re done when a toothpick comes out clean. The aroma alone might tempt you to sneak a nibble!
Step 4: Cool Before Decorating
Once baked, let the cakes cool completely on wire racks. If you try frosting warm cake, disaster awaits. Patience pays off here—the cooling phase ensures everything holds together perfectly.
Chef’s Tip
For an extra burst of flavor, sprinkle shredded coconut onto the frosted cake. Toasted coconut adds texture and visual appeal, too. A quick toast in a dry skillet works wonders!
Timing Breakdown
Here’s the scoop: prep takes around 15 minutes, baking requires about 25-30 minutes, and cooling adds another hour. Total time? Roughly 1 hr 45 min—but trust me, it’s worth it.
Chef’s Secret
To boost moisture retention, wrap cooled cake layers in plastic wrap before assembling. This step keeps them soft and irresistible.
An Extra Bite of Fun
Did you know coconuts are called “the tree of life” in many cultures? They provide food, drink, fuel, and more. No wonder ingredient preparation focuses so much on their versatility!
Essential Tools for Success
You’ll need mixing bowls, a hand mixer, measuring cups/spoons, spatulas, round cake pans, a cooling rack, and offset spatulas for spreading frosting. Basic stuff, but invaluable!
How to Store Coconut Cream Delight
Keep leftover cake covered tightly with plastic wrap or stored in an airtight container. Room temperature storage works for up to two days, while refrigeration extends freshness to five days. For longer storage, freeze individual slices wrapped in foil—they thaw beautifully!
If freezing, label each package with the date to avoid confusion. Thaw overnight in the fridge before enjoying again.
Last tip: Avoid stacking other items on top, as this may squish the tender layers. Cakes deserve respect!
Tips and Advice for Perfection
- Use room-temperature eggs for better blending.
- Toast coconut flakes lightly for a nuttier taste.
- Fold whipped cream into your frosting for added fluffiness.
- Double the pudding mix if you want an ultra-rich filling.
Presentation Ideas
Garnish with fresh berries or edible flowers for elegance. A dusting of powdered sugar adds whimsy, while layers of fruit compote create show-stopping drama. Check out these ideas inspired by recipes like Chocolate Cookie Roll or Tray-Baked Mole Cake.
Healthier Alternatives
Swap out some traditional components:
- Gluten-Free Flour: Works well with most cake mixes.
- Low-Fat Sour Cream: Reduces fat without losing flavor.
- Coconut Milk Frosting: Adds richness minus heavy dairy.
- Stevia Sweetener: Great alternative to sugar.
- Egg Replacer: Ideal for those avoiding eggs.
- Vegan Butter: Keeps the vegan-friendly vibe strong.
Common Mistakes to Avoid
Mistake 1: Skipping the Cooling Phase
Hasty decorators often frost warm cakes, leading to melty messes. Always cool both cake and frosting before assembly. Patience really is a virtue here!
Mistake 2: Overmixing Batter
Overmixing leads to dense, rubbery results. Stop once the ingredients are blended. Airy textures depend on gentle handling.
Mistake 3: Not Leveling Layers
If your cake layers are uneven, your stack won’t stay steady. Trim tops carefully for professional-looking results.
Explore More Baking Delights
Craving something different? Why not check out these fan favorites: Heavenly Vanilla Layer Cake or M&M Chocolate Cake? Find all under our desserts category.
FAQ About Coconut Cream Delight
Can I use a bundt pan?
Yes! Adjust baking time accordingly since thicker shapes take longer to cook fully. Test doneness with a toothpick inserted near the center.
What kind of frosting pairs best?
Cream cheese frosting complements coconut wonderfully. Add coconut flakes to the mix for enhanced texture and flavor.
Is it possible to make it gluten-free?
Absolutely! Many brands offer gluten-free yellow cake mix options compatible with this recipe.
Can I prepare ahead?
Definitely. Make unfrosted layers in advance, then freeze until ready to assemble.
Should I chill the frosting first?
Only if your recipe calls for it. Some frostings firm up better chilled, so read instructions carefully.
Why did my cake sink?
Sinking usually happens if the leavening agents weren’t activated properly or the cake wasn’t cooled enough before removing from the pan.
Final Thoughts
I hope you feel inspired to whip up your own Coconut Cream Delight. With its lush layers and delightful tropical twist, it’s sure to become a staple in your home. Give it a shot—you won’t regret it!
Equipment
- Mixing bowls
- Hand mixer
- Measuring cups/spoons
- Round cake pans
- Cooling rack
- Offset spatulas
Ingredients
- 1 box (15 ounces) yellow cake mix
- 1/2 cup vegetable oil
- 3/4 cup sour cream
- 1 tsp coconut extract
- 1 box (3.4 ounces) instant coconut cream pudding mix
- 2/3 cup water
Instructions
- Preheat your oven to 350°F and grease your cake pans thoroughly.
- In a large bowl, combine the yellow cake mix, eggs, oil, sour cream, coconut extract, pudding mix, and water. Blend until smooth and fluffy.
- Pour the batter evenly into prepared pans and bake for about 25 minutes, or until a toothpick comes out clean.
- Let the cakes cool completely on wire racks before decorating.
Notes
Nutrition

Hi, I’m Olivia Parker, the founder of BakingSecret.com and a lifelong lover of all things sweet and homemade. I grew up in a small town in Oregon, where the smell of fresh cookies in my family’s kitchen sparked my passion for baking. Over the years, I turned that passion into a mission: to help home bakers feel confident, inspired, and creative.
After studying food science and working in several artisan bakeries across the U.S., I decided to create a space where everyone from beginners to seasoned bakers can find reliable recipes, expert tips, and a warm, welcoming community. BakingSecret.com is my way of sharing the magic of baking with the world. When I’m not testing new recipes, you’ll find me exploring farmers’ markets, collecting vintage cookbooks, or perfecting my sourdough technique.