
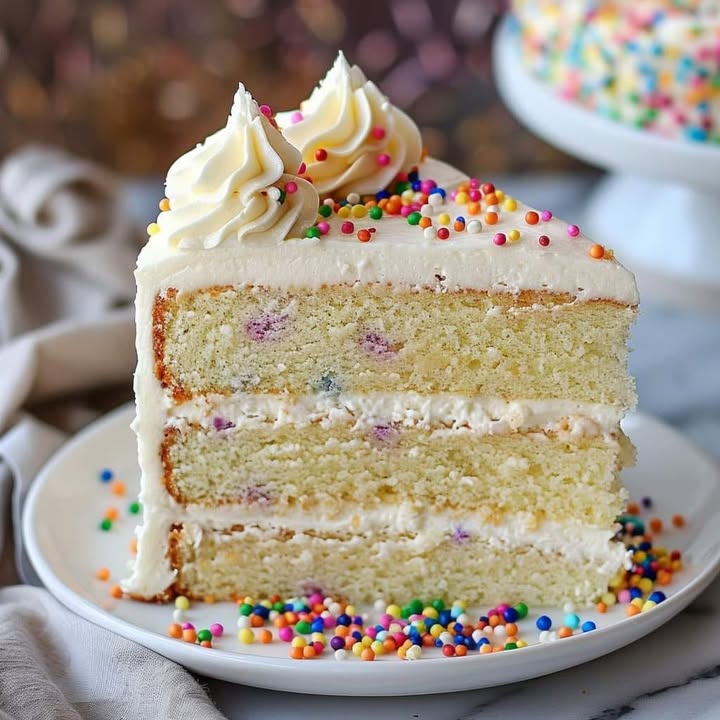
Why Vanilla Dream Delight is a Must-Try
There’s something magical about the aroma of vanilla wafting through your kitchen. It’s like a warm hug on a cold day, isn’t it? I remember the first time I made this Vanilla Dream Delight—it was for my daughter’s birthday. She wasn’t a fan of overly sweet cakes, so I wanted something soft, light, and irresistibly fragrant. The result? A hit! Everyone at the party raved about how moist and flavorful it was. And guess what? This recipe is just as perfect for casual family dinners as it is for special occasions.
A Little Sweet History
Did you know vanilla is one of the most beloved flavors in the world? Its origins trace back to Mexico, where ancient civilizations used it to flavor their chocolate drinks. Fast forward to today, and vanilla continues to hold its charm in everything from ice cream to cakes. This Vanilla Dream Cake is a modern take on classic vanilla cakes, blending simplicity with elegance. Whether you’re baking for tradition or just because, this recipe bridges cultures and generations with every slice.
Why You’ll Fall in Love With This Recipe
What sets this cake apart is its perfect balance of flavors. The buttery layers are infused with rich vanilla extract, making each bite melt-in-your-mouth delicious. Plus, it’s simple enough for beginner bakers but impressive enough to wow seasoned pros. Trust me—this is the kind of dessert that will make people ask, “Where did you buy this?” only to be even more impressed when you say, “I made it myself.”
Perfect Occasions for Your Vanilla Dream Delight
This Vanilla Dream Delight shines in so many settings. Serve it at birthday parties, baby showers, or holiday gatherings. It’s also a fantastic option for potlucks or tea parties with friends. Honestly, though, I’ve been known to bake it “just because” and enjoy a slice (or two) with my favorite cup of coffee during lazy weekend mornings. There’s no wrong time to indulge!
Ingredients
- 2 cups all-purpose flour
- 2 teaspoons baking powder
- 1/2 teaspoon salt
- 1/2 cup unsalted butter, softened
- 1 1/2 cups granulated sugar
- 4 large eggs
- 2 teaspoons vanilla extract
- 1 cup whole milk
- 2 cups buttercream frosting
Substitution Options
- If you don’t have whole milk, you can substitute with almond milk or oat milk for a lighter touch.
- Unsalted butter can be swapped with coconut oil if you’re looking for dairy-free alternatives.
- Granulated sugar can be replaced with honey or maple syrup, though you may need to adjust other liquid ingredients slightly.
Step 1: Preheating and Mixing Dry Ingredients
Start by preheating your oven to 350°F (175°C). While the oven heats up, sift together the flour, baking powder, and salt in a medium bowl. Sifting ensures there are no lumps, which makes for a smoother batter. Pro tip: Sifting also aerates the flour, giving your Vanilla Dream Delight an airy texture. Set these dry ingredients aside while you move on to the next step.
Step 2: Creaming Butter and Sugar
In a large mixing bowl, cream the softened butter and granulated sugar until the mixture turns light yellow and fluffy. This usually takes about 3-4 minutes with a hand mixer. Picture golden clouds forming in your bowl—that’s what you’re aiming for! The creamy base serves as the foundation for the cake’s tender crumb. Don’t rush this part; patience pays off here.
Step 3: Adding Eggs and Vanilla Extract
Crack the eggs into the butter-sugar mix one at a time, beating well after each addition. Next, stir in the vanilla extract—a key player in creating that dreamy flavor we all love. If possible, use pure vanilla extract rather than imitation. Trust me; the taste difference is worth it. After mixing, your batter should look glossy and smooth, almost like sunshine in a bowl.
Step 4: Alternating Flour and Milk
Now comes the fun part. Gradually add your dry ingredients alternately with the milk to the wet mixture, starting and ending with the flour. This method prevents the batter from curdling and ensures even distribution. As you fold them in, imagine the blend coming together like a gentle hug, marrying all those lovely flavors. Chef’s tip: Scrape down the sides of the bowl occasionally to keep everything consistent.
Step 5: Baking and Cooling
Pour the batter evenly into two greased and floured 9-inch round cake pans. Bake for 25 minutes, or until a toothpick inserted in the center comes out clean. Once done, let the cakes cool in the pans for 10 minutes before transferring them to wire racks. Why? Cooling helps the layers firm up without falling apart. Imagine lifting a perfectly golden circle without cracks—that’s the goal!
Step 6: Frosting and Decorating
Once the cakes are completely cool, frost generously with buttercream. Spread it with a spatula, letting it cascade over the edges like a sugary waterfall. Get creative with decorations—sprinkles, fresh berries, or edible flowers work beautifully. Presentation matters, but remember: the real star here is the cake itself.
Timing Details
- Preparation time: 20 minutes
- Cooking time: 25 minutes
- Total time: 45 minutes (plus cooling)
Chef’s Secret
Here’s a little trick I learned the hard way: always bring your eggs and milk to room temperature before using them. Cold ingredients can cause the batter to seize up, leading to a denser cake. Room temperature equals fluffy perfection!
Extra Info
Did you know that vanilla beans were once considered more valuable than gold in Europe? No wonder this spice adds such luxury to desserts. For another twist inspired by global flavors, try pairing this cake with hints of cinnamon or cardamom. Speaking of variations, check out this Coconut Cream Delight; it’s a tropical cousin you might adore too.
Necessary Equipment
- Two 9-inch round cake pans
- Hand mixer or stand mixer
- Spatula
- Wire cooling rack
- Parchment paper
Storage Tips
To keep your cake fresh, store it in an airtight container at room temperature for up to three days. If you live in a warmer climate, pop it in the fridge instead. For longer storage, wrap individual slices tightly in plastic wrap and freeze for up to a month. When ready to serve, thaw at room temp for a couple of hours.
The great thing about freezing is that it locks in moisture. Just be sure not to frost the entire cake beforehand if planning to freeze it. Instead, apply the frosting post-thaw for best results.
And here’s a bonus nugget—if you want to retain that bakery-fresh smell while storing, toss a slice of bread inside the container. It absorbs excess moisture and keeps the cake soft. Clever, right?
Tips and Advice
Double-check measurements to avoid a flat or dry cake. Overmixing after adding flour can lead to toughness, so mix just until combined. For extra flavor, consider brushing the cooled layers with a simple syrup infused with lemon zest or almond extract.
Presentation Ideas
- Dust powdered sugar on top for an elegant finish.
- Layer slices of fresh strawberries between tiers.
- Pipe decorative designs around the edges with colorful frosting.
Healthier Alternatives
If you’re watching your calorie intake, here are six ways to lighten up this Vanilla Dream Delight:
Variant 1: Swap regular butter for Greek yogurt to reduce saturated fat. Find similar inspiration in this Chocolate Cookie Roll, which uses smart swaps effectively.
Variant 2: Use almond flour instead of all-purpose for gluten-free options.
Variant 3: Opt for coconut sugar instead of white sugar for lower glycemic index benefits.
Variant 4: Incorporate mashed bananas into the batter to naturally sweeten the cake.
Variant 5: Replace buttercream with whipped cream cheese frosting for less sugar.
Variant 6: Try experimenting with vegan butter substitutes paired with plant-based milk.
Mistake 1: Skipping the Sift
Not sifting the flour and dry ingredients is a rookie error. Sifting breaks up clumps and introduces air, which improves texture. To avoid dense cakes, dedicate those two extra minutes to sieving. Pro tip: Do it directly into your measuring cups for precision.
Mistake 2: Rushing the Cooling Process
I get it—you’re excited to dig in. But cutting into a warm cake causes it to fall apart. Patience truly is a virtue here. Let the layers cool completely before frosting, ensuring they stay intact.
Mistake 3: Overbeating the Batter
Overbeating leads to tough gluten development, ruining the cake’s delicate structure. Mix gently after adding flour, stopping once ingredients are incorporated. Remember: Less is more when it comes to folding.
For tips on improving your overall cooking efficiency, Healthline offers excellent advice tailored for home cooks.
Looking for more cake ideas? Dive deeper into our category page dedicated to cakes and desserts. Whether you prefer this Tray-Baked Mole Cake or go classic with a Heavenly Vanilla Layer Cake, we’ve got you covered!
FAQ
Can I use self-rising flour instead of all-purpose flour?
No, self-rising flour already contains leavening agents, which could throw off the balance of the recipe. Stick with all-purpose flour combined with baking powder for optimal results.
My cake stuck to the pan—what happened?
Likely, the pans weren’t properly greased or floured. To prevent sticking, line the bottom with parchment paper, then grease and flour thoroughly before pouring in the batter.
How do I know when the cake is fully baked?
Insert a toothpick into the center; if it comes out clean or with a few crumbs clinging to it, the cake is done. Avoid underbaking, as this affects both texture and flavor.
Can I halve the recipe?
Absolutely! Simply divide all ingredient quantities by half and use one cake pan instead of two. Adjust baking times accordingly and monitor closely.
Is vanilla extract necessary, or can I omit it?
The vanilla extract is essential for authentic flavor. Omitting it would dull the cake’s aromatic charm. Consider substituting with vanilla bean paste if needed.
Why does my cake sink in the middle?
This often happens if opened too soon during baking or if there’s too much liquid in the batter. Follow measurements precisely and avoid opening the oven door during initial baking stages.
Can I make this ahead of time?
Yes! The cake tastes even better the next day as flavors meld overnight. Store unfrosted layers wrapped in plastic at room temperature and assemble shortly before serving.
What if I don’t own a hand mixer?
You can whisk by hand, though expect some arm workout action! Aim for thorough creaming regardless of the tool used, since improper mixing impacts final quality.
Does altitude affect this recipe?
Yes, high-altitude bakers might notice issues with rising or setting. Compensate by increasing oven temp slightly and reducing sugar content for stability at higher elevations.
Can kids help with this recipe?
Definitely! Kids love cracking eggs and stirring batters. Assign age-appropriate tasks like measuring dry ingredients or helping decorate the frosted cake later.
Curious about other delicious treats? Check out this guide on making a decadent Tray-Baked Mole Cake, or explore the art behind crafting a Heavenly Vanilla Layer Cake.
The Final Slice
Baking the Vanilla Dream Delight is more than just whipping up a dessert—it’s creating memories, sharing love, and filling your home with irresistible scents. Whether you stick to the original recipe or experiment with healthier tweaks, there’s no limit to how delightful this cake can be. So grab your apron, turn on some music, and let’s create something sweet together!
Equipment
- Hand mixer or stand mixer
- Spatula
- Wire cooling rack
- Two 9-inch round cake pans
- Parchment paper
Ingredients
- 2 cups all-purpose flour
- 2 teaspoons baking powder
- 1/2 teaspoon salt
- 1/2 cup unsalted butter, softened
- 1 1/2 cups granulated sugar
- 4 large eggs
- 2 teaspoons vanilla extract preferably pure
- 1 cup whole milk
- 2 cups buttercream frosting
Instructions
- Preheat your oven to 350°F (175°C) and sift together flour, baking powder, and salt in a medium bowl.
- In a large mixing bowl, cream the softened butter and granulated sugar until light yellow and fluffy, about 3-4 minutes.
- Crack eggs into the butter-sugar mix one at a time, beating well after each addition, then stir in the vanilla extract.
- Gradually add dry ingredients alternately with milk to the wet mixture, starting and ending with flour, and gently fold until combined.
- Pour the batter evenly into two greased and floured 9-inch round cake pans and bake for 25 minutes or until a toothpick comes out clean.
- Let the cakes cool in the pans for 10 minutes before transferring them to wire racks to cool completely.
- Once cooled, frost the cakes generously with buttercream and decorate as desired.
Notes
Nutrition

Hi, I’m Olivia Parker, the founder of BakingSecret.com and a lifelong lover of all things sweet and homemade. I grew up in a small town in Oregon, where the smell of fresh cookies in my family’s kitchen sparked my passion for baking. Over the years, I turned that passion into a mission: to help home bakers feel confident, inspired, and creative.
After studying food science and working in several artisan bakeries across the U.S., I decided to create a space where everyone from beginners to seasoned bakers can find reliable recipes, expert tips, and a warm, welcoming community. BakingSecret.com is my way of sharing the magic of baking with the world. When I’m not testing new recipes, you’ll find me exploring farmers’ markets, collecting vintage cookbooks, or perfecting my sourdough technique.