
Get Ready for a Burst of Flavor with This Cheesecake Fruit Salad
Imagine a delightful blend of creamy cheesecake and a refreshing fruit salad, all in one delectable dessert. This Cheesecake fruit salad is not just a delicious treat but also a conversation starter at any gathering. It’s a perfect fusion of sweet, tangy, and creamy flavors that will leave your taste buds dancing for more.
A Little History and Background
This recipe has its roots in the creative minds of home cooks who wanted to combine the best of both worlds—cheesecake and fruit salad. While traditional cheesecake is a rich and indulgent delight, adding a variety of fruits brings a fresh and vibrant twist. It’s a modern take on a classic, perfect for those who love to experiment in the kitchen.
Why You’ll Love This Cheesecake Fruit Salad Recipe
The Fruit Salad Cheesecake is a crowd-pleaser for several reasons. The combination of creamy cheesecake and juicy fruits creates a harmonious balance of flavors. Plus, it’s surprisingly easy to make, even for those new to baking. The textures and colors make it a feast for the eyes as well as the palate.
Perfect Occasions to Prepare This Recipe
This fruit salad cheesecake is perfect for summer barbecues, potlucks, or any casual get-together. It’s a refreshing and light dessert that everyone will enjoy. Whether you’re hosting a family gathering or a picnic, this dish is sure to be a hit.
Ingredients
- For the crust:
- 1 1/2 cups vanilla wafer crumbs
- 2 tablespoons of melted butter
- For the filling:
- 1 20 oz. can crushed pineapple, drained
- 3/4 cup granulated sugar
- 1/2 cup cold water
- 2 unflavored gelatin envelopes
- 1 8 oz. package cream cheese, cubed
- 1 1/2 cups seedless grapes
- 1 11 oz. can mandarin oranges, drained and cut in half
- 1 10 oz. jar maraschino cherries, drained and roughly chopped
- 1/2 cup finely chopped pecans
- 2 cups whipped topping (such as Cool Whip)
Substitution Options
- Vanilla wafer crumbs: Use graham cracker crumbs instead.
- Cream cheese: Substitute with Neufchâtel cheese for a lighter option.
- Pineapple: Use fresh pineapple if you prefer a more natural flavor.
- Whipped topping: Make your own whipped cream by beating heavy cream and a little sugar until stiff peaks form.
Preparation Section
Step 1: Prepare the Crust
In a small bowl, mix the vanilla wafer crumbs with melted butter until the mixture resembles wet sand. Press this mixture firmly into the bottom of a 9-inch springform pan coated with nonstick cooking spray. Set it aside while you prepare the filling.
Step 2: Cook the Filling Mixture
In a small saucepan, cook the drained crushed pineapple with sugar over medium heat for about 5 minutes, or until the sugar is dissolved and the mixture is heated through. In a separate small bowl, sprinkle the gelatin over cold water; let it sit for 1 minute to soften. Stir the gelatin mixture into the hot pineapple mixture until it is completely dissolved.
Step 3: Add Cream Cheese and Cool
Reduce the heat to low and add the cubed cream cheese to the saucepan. Stir continuously until the cream cheese is completely melted and the mixture is smooth. Remove from heat and allow the mixture to cool completely. Pro tip: Be patient and let it cool to room temperature to ensure the right texture.
Step 4: Combine Fruits and Cream Cheese Mixture
Once cooled, stir in the grapes, mandarin oranges, cherries, and pecans. Gently fold in the whipped topping until everything is well combined. The mixture should be a beautiful array of colors and textures, making it a visually appealing dessert.
Step 5: Assemble the Cheesecake
Pour the fruit and cream cheese mixture into the prepared crust. Smooth the top with a spatula to ensure an even layer. Chef’s tip: Use a gentle, circular motion to avoid creating air bubbles.
Step 6: Chill and Set
Cover the cheesecake with plastic wrap and refrigerate overnight, or at least for 6 hours, to allow it to set. This step is crucial for the cheesecake to firm up and achieve the perfect texture.
Timing
Prep time: 20 minutes
Cooking time: 5 minutes
Resting time: 6 hours (or overnight)
Total time: 6 hours 25 minutes
Chef’s Secret
To enhance the flavor of your fruit salad cheesecake, try adding a teaspoon of vanilla extract to the cream cheese mixture before cooling. This simple addition will give your dessert a subtle, yet delightful, vanilla aroma.
Extra Info
One interesting fact about this recipe is that using a combination of canned and fresh fruits can create a unique and balanced flavor profile. The sweetness of canned fruits complements the natural freshness of the grapes and oranges.
Necessary Equipment
- 9-inch springform pan
- Small mixing bowl
- Saucepan
- Spatula
- Measuring cups and spoons
- Plastic wrap
Storage
To store your fruit salad cheesecake, cover it tightly with plastic wrap and keep it in the refrigerator. It will stay fresh for up to 5 days. If you want to freeze it, wrap it in plastic wrap and aluminum foil, and it will last for up to 3 months. Just make sure to let it thaw in the refrigerator overnight before serving.
For the best results, always store the cheesecake in airtight containers. This will prevent any odors from the fridge from affecting the flavor. Also, keep it in the coldest part of the fridge to maintain its texture and freshness.
If you have leftovers, consider slicing them into individual portions and storing them in separate containers. This way, you can grab a quick and delicious snack without having to cut the entire cheesecake.
Tips and Advice
- Make sure to drain the canned fruits thoroughly to avoid a soggy crust.
- Use room-temperature cream cheese for easier melting and a smoother texture.
- Feel free to mix and match different fruits to suit your taste preferences.
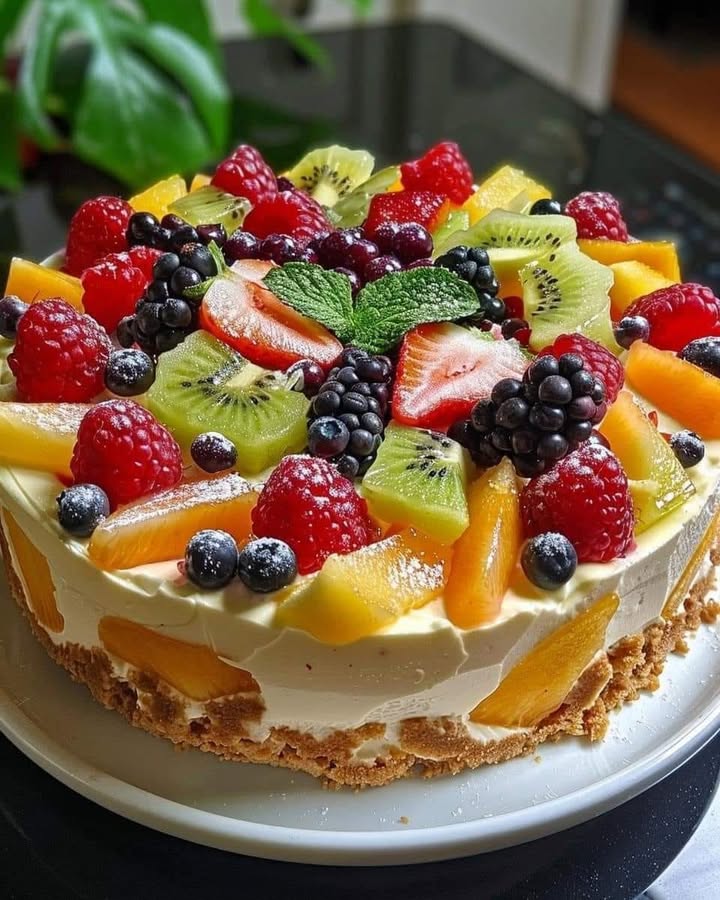
Presentation Tips
When it comes to presenting your fruit salad cheesecake, garnish it with additional fresh fruit like sliced strawberries or kiwi. A dusting of crushed vanilla wafers on top adds a nice touch. You can also serve it on a platter with some decorative elements, like a lace doily or a colorful tablecloth, to make it look even more inviting.
Healthier Alternative Recipes
Here are six possible variations to make this fruit salad cheesecake healthier:
- Low-Fat Version: Substitute the cream cheese with a low-fat alternative and use a sugar substitute for a lighter version.
- Vegan Version: Use vegan cream cheese and whipped topping, and replace the gelatin with agar-agar powder.
- Gluten-Free Version: Use gluten-free vanilla wafer crumbs for the crust and ensure all other ingredients are gluten-free certified.
- Reduced Sugar Version: Reduce the amount of sugar and use naturally sweet fruits like ripe bananas and peaches.
- High-Protein Version: Add a scoop of protein powder to the cream cheese mixture for a protein boost.
- No-Sugar Version: Use a sugar substitute like stevia or erythritol, and choose unsweetened canned fruits.
If you’re looking for more creative cheesecake recipes, check out our Pineapple Mousse Cheesecake, No-Bake Mango Cheesecake, Lime Mousse Cheesecake, and Best Chocolate Cake Recipe.
Common Mistakes to Avoid
Mistake 1: Not Draining the Canned Fruits Enough
One common mistake is not draining the canned fruits thoroughly. Excess liquid can make the crust soggy and affect the overall texture of the cheesecake. To avoid this, make sure to drain the fruits well and pat them dry with a paper towel if necessary.
Mistake 2: Overmixing the Whipped Topping
Another mistake is overmixing the whipped topping. This can cause the mixture to become too runny and lose its light, fluffy texture. Fold the whipped topping gently into the fruit and cream cheese mixture to maintain its airiness.
Mistake 3: Not Allowing the Cheesecake to Set Properly
Not allowing the cheesecake to set long enough can result in a soft, messy dessert. Make sure to chill the cheesecake for at least 6 hours or overnight to ensure it sets properly. Patience is key here!
Mistake 4: Using Cold Cream Cheese
Using cold cream cheese can make it difficult to melt and blend smoothly. Take the cream cheese out of the refrigerator about 30 minutes before you start, so it reaches room temperature. This will help it melt more easily and create a smoother mixture.
Mistake 5: Overcooking the Pineapple Mixture
Overcooking the pineapple mixture can make it too thick and lose its fresh, fruity flavor. Cook the pineapple and sugar mixture for about 5 minutes, just until the sugar is dissolved and the mixture is heated through. Keep an eye on it to avoid burning.
Remember, a good fruit salad cheesecake is all about balancing flavors and textures. By avoiding these common mistakes, you’ll be well on your way to creating a delectable dessert that everyone will love. For more tips on creating healthy meals, visit MyPlate.
Now that you know the ins and outs of making this delicious fruit salad cheesecake, it’s time to get creative and share your creation with friends and family. Happy baking!
FAQ
Can I use fresh pineapple instead of canned?
Yes, you can use fresh pineapple. Just make sure to chop it into small pieces and drain off any excess juice to prevent the cheesecake from becoming too watery.
How long does the cheesecake need to chill?
The cheesecake needs to chill for at least 6 hours, or overnight, to set properly. This ensures a firm and delicious texture.
Can I use a different type of crust?
Absolutely! You can use graham cracker crumbs, Oreo cookie crumbs, or any other cookie crumbs you like. Just make sure to adjust the amount of butter to get the right consistency.
Can I make this recipe without gelatin?
While gelatin helps set the cheesecake, you can use agar-agar as a vegetarian alternative. Follow the instructions on the agar-agar package for the correct ratio and method.
Can I add other types of fruit?
Of course! Feel free to add your favorite fruits. Just make sure to chop them into small, bite-sized pieces and drain off any excess liquid.
Is this recipe suitable for people with dietary restrictions?
You can make this recipe suitable for various dietary restrictions by using gluten-free cookie crumbs, vegan cream cheese, and a sugar substitute. Just check the labels of your ingredients to ensure they meet your specific needs.
Can I make this cheesecake ahead of time?
Yes, you can make this cheesecake ahead of time. It can be stored in the refrigerator for up to 5 days. Just make sure to cover it tightly with plastic wrap.
Can I freeze the cheesecake?
Yes, you can freeze the cheesecake. Wrap it tightly in plastic wrap and aluminum foil, and it will last for up to 3 months. Thaw it in the refrigerator overnight before serving.
What if the cheesecake doesn’t set?
If the cheesecake doesn’t set, it might be because the mixture was too warm or the gelatin wasn’t fully dissolved. Make sure to let the mixture cool to room temperature before adding the whipped topping and refrigerating it.
Can I use a different size pan?
Yes, you can use a different size pan, but the baking time and thickness of the cheesecake might vary. Adjust the baking time accordingly and make sure to use a pan with a removable bottom for easy removal.
How do I know when the cheesecake is done?
Since this is a no-bake cheesecake, there’s no baking involved. The key is to let it chill long enough to set. It should be firm and hold its shape when you slice it.
Conclusion
This fruit salad cheesecake is a delightful and versatile dessert that combines the best of both worlds. It’s easy to make, delicious, and perfect for any occasion. With a few simple tips and a bit of creativity, you can create a show-stopping dessert that everyone will adore. So, gather your ingredients, roll up your sleeves, and get ready to impress your guests with this scrumptious treat. Happy baking, and enjoy!
Equipment
- 9-inch springform pan
- Small mixing bowl
- Saucepan
- Spatula
- Measuring cups and spoons
- Plastic wrap
Ingredients
- 1 1/2 cups vanilla wafer crumbs
- 2 tbsp melted butter
- 1 20 oz. can crushed pineapple, drained
- 3/4 cup granulated sugar
- 1/2 cup cold water
- 2 envelopes unflavored gelatin
- 1 8 oz. package cream cheese, cubed
- 1 1/2 cups seedless grapes
- 1 11 oz. can mandarin oranges, drained and cut in half
- 1 10 oz. jar maraschino cherries, drained and roughly chopped
- 1/2 cup finely chopped pecans
- 2 cups whipped topping (such as Cool Whip)
Instructions
- In a small bowl, mix vanilla wafer crumbs with melted butter until resembling wet sand. Press into a 9-inch springform pan and set aside.
- In a saucepan, cook drained crushed pineapple with sugar over medium heat for about 5 minutes, until sugar is dissolved.
- Sprinkle gelatin over cold water in a bowl; let sit for 1 minute. Stir into hot pineapple mixture until dissolved.
- Reduce heat and add cubed cream cheese, stirring until melted and smooth. Allow to cool completely.
- Stir in grapes, mandarin oranges, cherries, and pecans. Gently fold in whipped topping until combined.
- Pour the mixture into the crust, smoothing the top with a spatula.
- Cover with plastic wrap and refrigerate for at least 6 hours, or overnight, to set.
Notes
Nutrition

Hi, I’m Olivia Parker, the founder of BakingSecret.com and a lifelong lover of all things sweet and homemade. I grew up in a small town in Oregon, where the smell of fresh cookies in my family’s kitchen sparked my passion for baking. Over the years, I turned that passion into a mission: to help home bakers feel confident, inspired, and creative.
After studying food science and working in several artisan bakeries across the U.S., I decided to create a space where everyone from beginners to seasoned bakers can find reliable recipes, expert tips, and a warm, welcoming community. BakingSecret.com is my way of sharing the magic of baking with the world. When I’m not testing new recipes, you’ll find me exploring farmers’ markets, collecting vintage cookbooks, or perfecting my sourdough technique.