
Welcome to the Ultimate Oreo Birthday Cake Adventure!
Imagine a birthday cake that’s not just a treat, but a celebration in itself. The Oreo Birthday Cake is exactly that—a rich, creamy, and oh-so-delicious dessert that will make your special day even more memorable. This recipe has been a hit with my family and friends, and I’m excited to share it with you. Let’s dive into the world of Oreo-filled goodness!
A Brief History of the Oreo Birthday Cake
The Oreo cookie, born in 1912, has been a beloved treat for generations. It’s no wonder that combining this iconic cookie with a classic cake creates something truly special. The Oreo Birthday Cake is a modern twist on a traditional favorite, blending the nostalgia of childhood treats with the elegance of a homemade cake. It’s the perfect way to celebrate any occasion, especially a birthday.
Why You’ll Love This Oreo Birthday Cake
This cake is all about indulgence. The combination of rich chocolate and creamy vanilla, with the crunch of Oreo cookies, creates a symphony of flavors and textures. What’s more, this cake is surprisingly simple to make, making it a go-to recipe for both beginners and experienced bakers. Plus, it’s always a crowd-pleaser, so get ready for lots of compliments!
Perfect Occasions to Prepare This Recipe
Beyond birthdays, this Oreo cake is perfect for any festive gathering. Whether it’s a holiday, a family reunion, or a just-because party, this cake will be the star of the show. It’s also a great way to impress your guests at a dinner party or to surprise a friend with a thoughtful gift.
Ingredients for the Oreo Birthday Cake
- For the Dough
- 400 g wheat flour (Type 405)
- 60 g cornstarch
- 1 tbsp baking powder
- 2 tsp salt
- 1 tsp baking soda
- 24 Oreo cookies (approx. 260 g)
- 450 g sugar
- 250 g soft butter
- 30 ml neutral cooking oil (e.g., sunflower oil)
- 4 eggs (size M)
- 2 egg yolks (size M)
- 415 ml buttermilk
- 2 tbsp vanilla extract
- For the Buttercream
- 36 Oreo cookies (approx. 400 g)
- 600 g soft butter
- 500 g sweetened condensed milk
- 1 tbsp vanilla extract
- 1 tsp salt
- For the Drip
- 100 g dark chocolate (70% cocoa content)
- 125 g cream
- For Decoration
- 10 Oreo cookies (approx. 110 g)
- Some softened butter for the molds
Substitution Options
If you need to make some substitutions, here are a few options:
– Butter: Use margarine or coconut oil.
– Buttermilk: Mix 1 cup of milk with 1 tbsp of lemon juice and let it sit for 5 minutes.
– Vanilla Extract: Use almond or coconut extract.
– Dark Chocolate: Use semisweet chocolate or white chocolate.
– Cream: Use half-and-half or heavy cream.
Preparation of the Oreo Birthday Cake
Step 1: Preheat the Oven and Prepare the Pans
Preheat your oven to 180 degrees (top/bottom heat) or 160 degrees if using a fan oven. Line the bottoms of three springform pans (20 cm each) with baking paper and grease them with some softened butter. This will ensure that your cakes come out clean and easy to remove. Pro tip: Make sure the pans are well-greased to prevent sticking.
Step 2: Mix the Dry Ingredients
In a large bowl, mix the flour, cornstarch, baking powder, salt, and baking soda. Roughly chop 24 Oreo cookies and set them aside. The dry ingredients will give your cake a light and fluffy texture. Pro tip: Sift the dry ingredients to avoid lumps and ensure a smooth batter.
Step 3: Beat the Sugar, Butter, and Oil
In a separate bowl, beat the sugar, soft butter, and oil on high speed using a flat beater or hand mixer for about 5 minutes until the mixture is light and creamy. This step is crucial as it incorporates air into the batter, making the cake light and fluffy. Pro tip: Make sure the butter is at room temperature for the best results.
Step 4: Add the Eggs and Egg Yolks
Add the eggs and egg yolks one at a time, mixing well after each addition. This will help the eggs emulsify and blend smoothly into the batter. The mixture should be smooth and creamy. Pro tip: Crack the eggs into a small bowl first to avoid shell fragments in your batter.
Step 5: Combine the Wet and Dry Ingredients
Mix the buttermilk and vanilla extract in a small bowl. Gradually add the wet mixture to the dry ingredients, alternating with the chopped Oreos. Stir gently until everything is well combined. The batter should be thick and smooth. Pro tip: Don’t overmix, as this can lead to a tough cake.
Step 6: Bake the Cakes
Pour the batter evenly into the prepared pans and bake for about 25-30 minutes, or until a toothpick inserted into the center comes out clean. The cakes should be golden brown and spring back when lightly pressed. Pro tip: Rotate the pans halfway through baking for even cooking.
Step 7: Cool the Cakes
Remove the cakes from the oven and let them cool in the pans for 10 minutes. Then, carefully transfer them to a wire rack to cool completely. This cooling process is essential to prevent the cake from crumbling when you layer and frost it. Pro tip: Use a thin spatula to gently loosen the edges of the cake before removing it from the pan.
Step 8: Prepare the Buttercream
While the cakes are cooling, prepare the buttercream. In a large bowl, beat the soft butter until creamy. Add the sweetened condensed milk, vanilla extract, and salt, and mix until smooth. Roughly chop 36 Oreo cookies and fold them into the buttercream. The consistency should be smooth and spreadable. Pro tip: Use an electric mixer for a smoother, silkier buttercream.
Step 9: Assemble the Cake
Place one cake layer on a serving plate and spread a generous amount of buttercream on top. Repeat with the second and third layers, finishing with a layer of buttercream on top and around the sides of the cake. Smooth the buttercream with a spatula. Pro tip: Use a turntable to make frosting easier.
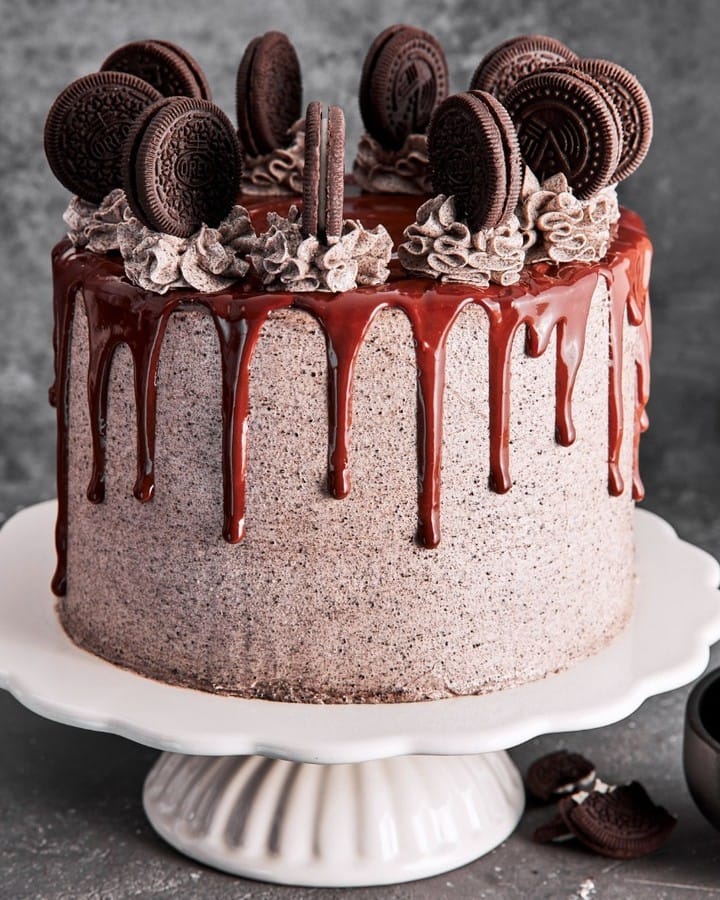
Step 10: Add the Drip
Heat the dark chocolate and cream in a microwave-safe bowl, stirring every 30 seconds until smooth. Drizzle the chocolate over the top of the cake, letting it drip down the sides. Pro tip: For a more controlled drizzle, use a piping bag with a small round tip.
Step 11: Decorate and Serve
Decorate the cake with the remaining 10 Oreo cookies. You can place them on the top, around the base, or create a border. Serve the cake at room temperature for the best flavor and texture. Pro tip: Chill the cake for 10-15 minutes to set the drip before adding the final decorations.
Timing for the Oreo Birthday Cake
Here’s a breakdown of the timing for this recipe:
– Prep Time: 1 hour
– Baking Time: 25-30 minutes
– Cooling Time: 1 hour
– Total Time: 2.5 hours
Chef’s Secret
To take this cake to the next level, try adding a layer of whipped cream between the cake layers. This adds an extra touch of lightness and richness. Another secret is to use a high-quality vanilla extract; it makes a big difference in the flavor.
Extra Info
Did you know that Oreo cookies were originally called “Biscuit A” and “Biscuit B”? It wasn’t until a contest that the name “Oreo” was chosen. The exact origin of the name is still a mystery, but it has become one of the most recognizable cookie brands in the world.
Necessary Equipment
- Three 20 cm springform pans
- Baking paper
- Electric mixer or stand mixer
- Wire rack
- Spatula
- Piping bag (optional)
- Turning table (optional)
Storage
Storing your Oreo Birthday Cake is important to keep it fresh and delicious. Here are some tips:
– Room Temperature: If you plan to serve the cake within a few hours, store it at room temperature. Make sure it’s in a cool, dry place, away from direct sunlight.
– Refrigerator: For longer storage, wrap the cake tightly in plastic wrap and store it in the refrigerator. The cake will stay fresh for up to 5 days.
– Freezer: If you want to freeze the cake, wrap it in a double layer of plastic wrap and then in aluminum foil. It will keep for up to 1 month. Thaw the cake in the refrigerator overnight before serving.
Tips and Advice
- Make sure all your ingredients are at room temperature before starting. This ensures a smooth and well-combined batter.
- Don’t overmix the batter. Overmixing can lead to a dense and tough cake.
- Use a kitchen scale for accurate measurements. This will ensure your cake turns out perfectly every time.
- Let the cakes cool completely before frosting. This prevents the buttercream from melting and sliding off the cake.
- Chill the cake for 15-20 minutes after frosting. This helps the frosting set and makes it easier to handle.
Presentation Tips
Here are some inspired ideas to make your Oreo Birthday Cake look stunning:
– Crumbled Cookie Border: Sprinkle crushed Oreo cookies around the base of the cake for a rustic, homemade look.
– Chocolate Shavings: Use a vegetable peeler to create chocolate shavings and sprinkle them on top of the cake.
– Fresh Berries: Add a pop of color and freshness with a handful of fresh strawberries, blueberries, or raspberries on top.
– Edible Gold Dust: For a touch of elegance, brush the top of the cake with a little edible gold dust.
– Candle Centerpiece: Place a tall candle in the center of the cake for a dramatic effect. Perfect for a birthday celebration!
Healthier Alternative Recipes
If you’re looking for a healthier version of this cake, here are six variations you might enjoy:
- Oatmeal Oreo Cake: Replace the wheat flour with oat flour and use unsaturated fats like olive oil instead of butter. This version is higher in fiber and lower in saturated fats, making it a bit lighter.
- Zucchini Oreo Cake: Add grated zucchini to the batter for added moisture and nutrients. This cake is surprisingly moist and flavorful, and the zucchini is barely noticeable.
- Carrot Oreo Cake: Mix grated carrots into the batter for a boost of vitamins and fiber. This cake has a slightly sweeter and earthier flavor, perfect for those who love carrot cake.
- Avocado Oreo Cake: Use ripe avocados in place of some of the butter. Avocados add a creamy texture and are rich in healthy fats. This cake is a unique twist on the classic recipe.
- Apple Oreo Cake: Add diced apples to the batter for a natural sweetness and a hint of cinnamon. This cake is perfect for fall and has a comforting, homey flavor.
- Blueberry Oreo Cake: Fold in fresh or frozen blueberries for a burst of antioxidants and a vibrant color. This cake is a delightful and refreshing option.
If you’re in the mood for other delicious recipes, check out our Prune Topped Bolu, Coconut Chocolate Delight, Apple Lemon Sponge, and Ultimate Vegan Vanilla. These are all fantastic choices for your next baking adventure!
Common Mistakes to Avoid
Mistake 1: Overmixing the Batter
Overmixing the batter can lead to a tough and dense cake. To avoid this, mix the ingredients just until they are combined. You should still see some streaks of flour in the batter. Overmixing activates the gluten in the flour, which can make the cake chewy and dense. Pro tip: Use a timer to keep track of mixing times and follow the recipe closely.
Mistake 2: Not Using Room Temperature Ingredients
Using cold ingredients, especially butter and eggs, can result in a lumpy and uneven batter. Make sure all your ingredients are at room temperature before you start. This allows for better emulsification and a smoother, more uniform batter. Pro tip: Take the butter and eggs out of the refrigerator about an hour before you start baking.
Mistake 3: Adding Too Much Buttercream Between Layers
Adding too much buttercream between the cake layers can cause the cake to slide and become unstable. Use a moderate amount of buttercream, enough to create a thin, even layer. This will help keep the cake stable and prevent it from collapsing. Pro tip: Use a small offset spatula to spread the buttercream evenly and keep it thin.
Mistake 4: Not Chilling the Cake Before Serving
Not chilling the cake before serving can result in a messy and unattractive presentation. After frosting, chill the cake in the refrigerator for 15-20 minutes. This helps the frosting set and makes it easier to cut neat slices. Pro tip: Cover the cake loosely with plastic wrap while it chills to prevent it from drying out.
Mistake 5: Overbaking the Cake
Overbaking can dry out the cake, making it tough and crumbly. Keep an eye on the cake as it bakes and test it with a toothpick. When the toothpick comes out clean or with a few moist crumbs, the cake is done. Pro tip: Every oven is different, so start checking the cake a few minutes before the recommended baking time.
For more baking inspiration and tips, visit our cake recipes page. Happy baking!
FAQ
Can I use different types of Oreos?
Yes, you can use different flavors of Oreos, such as Golden, Double Stuf, or even seasonal flavors. Just make sure to adjust the sweetness of the recipe if the Oreo flavor is very sweet.
Can I make this cake without buttermilk?
Absolutely! You can make a buttermilk substitute by mixing 1 cup of milk with 1 tablespoon of lemon juice or white vinegar. Let it sit for 5 minutes before using it in the recipe.
How do I make the cake layers even?
To make the cake layers even, use a kitchen scale to measure the batter. Divide the total weight of the batter by the number of pans you are using. This ensures that each layer is the same size and bakes evenly.
What if I don’t have a stand mixer?
You can use a hand mixer or even whisk the ingredients by hand. It may take a bit more effort, but it’s definitely doable. Just make sure to mix the ingredients thoroughly for a smooth batter.
Can I use a different type of flour?
While the recipe calls for Type 405 wheat flour, you can use all-purpose flour as a substitute. Just keep in mind that the texture and flavor may vary slightly. For a healthier option, you can use whole wheat flour, but the cake will be denser and nuttier.
How long does the cake last?
If stored properly, the Oreo Birthday Cake can last for up to 5 days at room temperature or in the refrigerator. For longer storage, wrap the cake tightly and store it in the freezer for up to 1 month.
Can I make this cake ahead of time?
Yes, you can make the cake layers ahead of time and store them in the freezer. When you’re ready to assemble the cake, thaw the layers at room temperature. Prepare the buttercream and drip just before assembling for the best results.
How do I prevent the cake from sticking to the pan?
To prevent the cake from sticking to the pan, line the bottom with baking paper and grease the sides with softened butter. You can also dust the pan with a little flour after greasing for added insurance. This will help the cake release easily.
What if I don’t have a springform pan?
If you don’t have a springform pan, you can use regular round cake pans. Just make sure to line the bottoms with baking paper and grease the sides. This will help the cakes release cleanly from the pans.
Can I use unsalted butter?
Yes, you can use unsalted butter. Just add a pinch of salt to the recipe to balance the flavors. Using unsalted butter allows you to control the amount of salt in the recipe, which is especially useful if you’re watching your sodium intake.
Enjoy creating this delectable Oreo Birthday Cake and making memories with your loved ones. Happy baking, and happy birthday!
Equipment
- Electric mixer or stand mixer
- Baking paper
- Wire rack
- Three 20 cm springform pans
- Spatula
Ingredients
- 400 g wheat flour (Type 405)
- 60 g cornstarch
- 1 tbsp baking powder
- 2 tsp salt
- 1 tsp baking soda
- 24 pieces Oreo cookies approx. 260 g
- 450 g sugar
- 250 g soft butter
- 30 ml neutral cooking oil e.g., sunflower oil
- 4 pieces eggs size M
- 2 pieces egg yolks size M
- 415 ml buttermilk
- 2 tbsp vanilla extract
- 36 pieces Oreo cookies approx. 400 g
- 600 g soft butter
- 500 g sweetened condensed milk
- 1 tbsp vanilla extract
- 1 tsp salt
- 100 g dark chocolate 70% cocoa content
- 125 g cream
- 10 pieces Oreo cookies approx. 110 g
- q.s. softened butter for the molds
Instructions
- Preheat your oven to 180 degrees (top/bottom heat) or 160 degrees if using a fan oven. Line the bottoms of three springform pans (20 cm each) with baking paper and grease them with some softened butter.
- In a large bowl, mix the flour, cornstarch, baking powder, salt, and baking soda. Roughly chop 24 Oreo cookies and set them aside.
- In a separate bowl, beat the sugar, soft butter, and oil on high speed for about 5 minutes until light and creamy.
- Add the eggs and egg yolks one at a time, mixing well after each addition.
- Mix the buttermilk and vanilla extract in a small bowl. Gradually add the wet mixture to the dry ingredients, alternating with the chopped Oreos. Stir gently until everything is well combined.
- Pour the batter evenly into the prepared pans and bake for about 25-30 minutes, or until a toothpick inserted into the center comes out clean.
- Remove the cakes from the oven and let them cool in the pans for 10 minutes. Then, carefully transfer them to a wire rack to cool completely.
- While the cakes are cooling, prepare the buttercream. In a large bowl, beat the soft butter until creamy. Add the sweetened condensed milk, vanilla extract, and salt, and mix until smooth. Fold in the chopped 36 Oreo cookies.
- Place one cake layer on a serving plate and spread a generous amount of buttercream on top. Repeat with the second and third layers, finishing with a layer of buttercream on top and around the sides of the cake.
- Heat the dark chocolate and cream in a microwave-safe bowl, stirring every 30 seconds until smooth. Drizzle the chocolate over the top of the cake, letting it drip down the sides.
- Decorate the cake with the remaining 10 Oreo cookies. Serve the cake at room temperature for the best flavor and texture.
Notes
Nutrition

Hi, I’m Olivia Parker, the founder of BakingSecret.com and a lifelong lover of all things sweet and homemade. I grew up in a small town in Oregon, where the smell of fresh cookies in my family’s kitchen sparked my passion for baking. Over the years, I turned that passion into a mission: to help home bakers feel confident, inspired, and creative.
After studying food science and working in several artisan bakeries across the U.S., I decided to create a space where everyone from beginners to seasoned bakers can find reliable recipes, expert tips, and a warm, welcoming community. BakingSecret.com is my way of sharing the magic of baking with the world. When I’m not testing new recipes, you’ll find me exploring farmers’ markets, collecting vintage cookbooks, or perfecting my sourdough technique.