
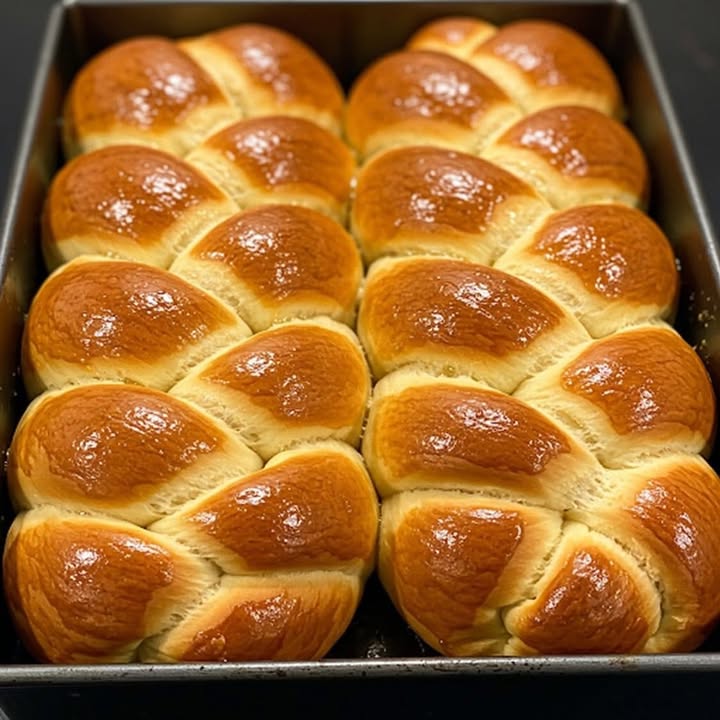
Discover the Delight of Homemade Sweet Bread: Soft, Spongy, and Irresistible!
Oh, the joy of a warm, freshly baked loaf of soft braided bread! It’s like a big, fluffy hug from the kitchen. This recipe is a family favorite, and I’m excited to share it with you. It’s the perfect companion for a cozy cup of coffee or hot chocolate, and it’s super easy to make. Let’s dive in!
The Story Behind This Sweet Bread Recipe
My grandma used to make this sweet bread every Sunday, and the whole house would fill with its irresistible aroma. It’s a tradition that dates back generations in my family. The secret lies in the soft, spongy texture and the simple, yet delicious flavors. Whether it’s a special occasion or just a weekend treat, this bread never fails to bring a smile to everyone’s face.
Why You’ll Love This Sweet Braided Bread
What makes this soft braided bread so special? For starters, the flavor is simply divine. The combination of sugar, butter, and a hint of salt creates a perfect balance of sweet and savory. Plus, the process is straightforward, making it a great recipe for both beginners and seasoned bakers. The result is a bread that’s light, airy, and oh-so-irresistible.
Perfect Occasions to Prepare This Sweet Bread
This soft braided bread is a versatile treat that can brighten up any occasion. Whether it’s a Sunday brunch, a family gathering, or a lazy afternoon at home, this bread is always a hit. It’s also a wonderful gift to share with friends and neighbors, especially during the holiday season.
Ingredients for Your Sweet Braided Bread
- 650 g of wheat flour 0000 (plus extra for dusting)
- 250 g of sugar
- 200 ml of milk
- 100 ml of water
- 100 g of butter
- 2 eggs (1 for the dough, 1 to paint)
- 1 tablespoon instant yeast
- A pinch of salt
Substitution Options
- If you don’t have 0000 flour, you can use all-purpose flour instead.
- For a dairy-free option, substitute the milk and butter with almond milk and vegan butter.
- If you prefer a different flavor, try adding a teaspoon of vanilla extract or a dash of cinnamon.
Preparation of Your Sweet Braided Bread
Step 1: Prepare the Dough
In a large bowl, mix the milk, sugar, 1 egg, and butter until well combined. Gradually add the flour, stirring as you go. Add the water little by little until you get a manageable dough. Knead for about 1 minute, then add the instant yeast. The dough should be smooth and slightly sticky.
Step 2: Let the Dough Rest
Cover the dough with a clean kitchen towel and let it rest for 20 minutes. Knead again and let it rest for another 20 minutes. Repeat this process three times. This method helps develop the gluten, resulting in a soft and spongy texture. The dough will become more elastic and easier to handle after each resting period.
Step 3: Form the Braid
Divide the dough into three equal parts. Shape each part into an elongated strip, pressing from the center to the ends. Arrange the strips side by side and braid them, making sure not to press too much. The braid should be loose and not too tight. Cover the braid and let it rest for 10-15 minutes. This allows the dough to rise a bit and become even more airy.
Step 4: Paint and Bake
Place the braid on a baking tray. Beat the remaining egg with a few drops of water and gently brush it over the braid. Preheat your oven to 230°C (about 450°F). Bake the braid for 30-35 minutes, but lower the temperature to 180-200°C (about 350-390°F) after the first 15 minutes. This helps achieve a golden crust without overcooking the inside.
Chef’s Tip: Perfect Crust
To get that perfect golden crust, place a small dish of water in the oven while baking. This creates steam, which helps the bread stay moist and gives it a shiny, crispy crust.
Timing
- Prep time: 30 minutes
- Cooking time: 30-35 minutes
- Resting time: 1 hour
- Total time: 1 hour 30 minutes
Chef’s Secret
One of my favorite tricks is to use room-temperature ingredients. This helps the dough come together more easily and results in a better texture. Also, make sure your butter is soft and not too cold. This makes it easier to mix into the dough and ensures a uniform texture.
Extra Info
Did you know that the braiding technique is also used in many other cultures? For example, in Jewish traditions, challah bread is often braided. The braiding not only looks beautiful but also helps the bread cook more evenly, creating a consistent texture throughout.
Necessary Equipment
- A large mixing bowl
- A clean kitchen towel
- A baking tray
- A pastry brush
Storage
Once your soft braided bread is cooled, store it in an airtight container at room temperature. It will keep fresh for up to 3 days. If you want to keep it longer, you can wrap it in plastic wrap and refrigerate it. It will last for up to 1 week in the fridge. For longer storage, you can freeze the bread. Wrap it in plastic wrap and place it in a freezer bag. It will keep for up to 3 months.
When you’re ready to serve, simply thaw the bread at room temperature. You can also reheat it in the oven at 350°F (180°C) for 5-10 minutes to restore its freshness.
Pro tip: If the bread starts to dry out, you can refresh it by lightly brushing it with a little milk or water before reheating. This helps to add moisture and revive the texture.
Tips and Advice
- Make sure your ingredients are at room temperature before starting. This helps the dough come together more smoothly.
- If the dough is too sticky, add a little more flour. If it’s too dry, add a bit more water.
- Don’t skip the resting periods. They are crucial for developing the texture and flavor of the bread.
- Use a silicone mat or parchment paper to prevent the bread from sticking to the baking tray.
Presentation Tips
- Slice the bread and serve it on a wooden board with a small dish of butter or jam.
- Garnish with a sprinkle of powdered sugar for a touch of elegance.
- Add a few fresh berries or sliced fruit around the bread for a pop of color.
Healthier Alternative Recipes
- Whole Wheat Version: Substitute half of the white flour with whole wheat flour for a healthier twist. This adds fiber and nutrients, making it a great option for those looking for a cleaner eating choice. For more tips on clean eating, check out this article.
- Reduced Sugar: Reduce the amount of sugar by half and add a bit of honey or maple syrup for natural sweetness. This version is perfect for those who prefer a less sweet bread.
- Vegan Version: Use almond milk and vegan butter as substitutes. This makes the bread suitable for those with dairy allergies or following a vegan lifestyle.
- Zesty Orange: Add the zest of one orange to the dough for a citrusy kick. This adds a fresh and zesty flavor that complements the sweetness beautifully.
- Chocolate Chip: Fold in a handful of dark chocolate chips for a decadent touch. The chocolate chips create delightful pockets of melted goodness in every bite.
- Nutty Delight: Add chopped nuts, such as almonds or walnuts, to the dough for added crunch and nutrition. This version is perfect for nut lovers and adds a nice textural element.
Common Mistakes to Avoid
Mistake 1: Overmixing the Dough
Overmixing can lead to a tough and dense bread. It’s important to mix the dough just until it comes together. Overworking the dough develops too much gluten, resulting in a chewy texture. To avoid this, mix the dough until it’s smooth and slightly sticky, and stop there.
Mistake 2: Not Letting the Dough Rest Enough
Skipping or shortening the resting periods can affect the texture of the bread. The resting periods allow the gluten to relax, making the dough more pliable and easier to handle. Make sure to follow the resting times as specified in the recipe. Patience is key here!
Mistake 3: Using Cold Ingredients
Using cold ingredients can make it difficult for the dough to come together. Room-temperature ingredients mix more easily and result in a smoother, more consistent dough. Take the butter and eggs out of the refrigerator at least 30 minutes before you start preparing the dough.
Mistake 4: Overbaking the Bread
Overbaking can dry out the bread and make it tough. Keep an eye on the bread during the last 10 minutes of baking. If it’s getting too dark, cover it loosely with aluminum foil. This will help prevent the top from burning while allowing the inside to finish cooking.
Mistake 5: Not Adjusting the Oven Temperature
Not adjusting the oven temperature can result in uneven baking. Start at a high temperature to get a good rise, then lower it to finish baking. This method helps the bread to rise properly and then bake through without over-browning. Follow the temperature adjustments as specified in the recipe for the best results.
Frequently Asked Questions
Can I use all-purpose flour instead of 0000 flour?
Yes, you can use all-purpose flour instead of 0000 flour. While 0000 flour is finer and creates a lighter texture, all-purpose flour will still work well. The texture might be slightly denser, but it will still be delicious. Just make sure to adjust the amount of liquid if needed, as all-purpose flour may absorb more water.
How do I know when the bread is done?
You can tell when the bread is done by tapping the bottom. If it sounds hollow, it’s ready. You can also check the internal temperature with a thermometer; it should read around 190°F (87°C). The top should be a deep golden brown, and the bread should feel firm to the touch.
Can I freeze the bread?
Yes, you can freeze the bread. Allow it to cool completely, then wrap it tightly in plastic wrap and place it in a freezer bag. It will keep for up to 3 months. When you’re ready to serve, thaw it at room temperature or reheat it in the oven at 350°F (180°C) for 5-10 minutes.
What if I don’t have instant yeast?
If you don’t have instant yeast, you can use active dry yeast instead. However, you’ll need to activate it first. Dissolve the yeast in warm water (around 110°F/43°C) with a pinch of sugar and let it sit for about 5-10 minutes until it becomes frothy. Then, add it to the dough as directed.
Can I add other flavors to the bread?
Absolutely! Feel free to experiment with different flavors. You can add a teaspoon of vanilla extract, a dash of cinnamon, or even some grated lemon or orange zest to the dough. These additions can give your bread a unique and delicious twist. Just make sure to start with small amounts and taste as you go.
Is this recipe suitable for beginners?
Yes, this recipe is suitable for beginners. The steps are straightforward, and the dough is forgiving. Just follow the instructions carefully, and don’t be afraid to ask for help if you need it. With a little practice, you’ll be making perfect soft braided bread in no time.
Can I use a stand mixer to knead the dough?
Yes, you can use a stand mixer with a dough hook to knead the dough. This can save you time and effort. Just be careful not to overmix the dough, as this can lead to a tough texture. Knead for about 5-7 minutes on low speed, or until the dough is smooth and elastic.
How can I make the bread more festive?
To make the bread more festive, you can add a sprinkle of colored sugar or a festive glaze. You can also shape the bread into different designs, such as a wreath or a star. Adding a few decorative elements, like a sprinkle of cinnamon or a drizzle of honey, can also make the bread look and taste extra special.
Can I make this bread ahead of time?
Yes, you can make the bread ahead of time. Prepare the dough and let it go through the first rise. Then, shape the braid and let it rest for 10-15 minutes. Cover it with plastic wrap and refrigerate overnight. The next day, let it come to room temperature, brush it with the egg wash, and bake as directed. This way, you can enjoy fresh bread without having to start from scratch.
Is this bread suitable for people with gluten intolerance?
No, this recipe is not suitable for people with gluten intolerance, as it contains wheat flour. If you need a gluten-free option, you can try using a gluten-free flour blend. However, the texture and taste might be different. For a tried-and-true gluten-free recipe, you might want to check out some of the gluten-free bread options available online.
Now that you have all the tools and knowledge, it’s time to get baking! Don’t forget to explore our other delightful recipes, like the Garlic Buttermilk Buns and Sweet Potato Cornbread. Happy baking, and enjoy your soft braided bread! 🍞
Equipment
- Large mixing bowl
- Clean kitchen towel
- Baking tray
- Pastry brush
- Oven
Ingredients
- 650 g wheat flour 0000 plus extra for dusting
- 250 g sugar
- 200 ml milk
- 100 ml water
- 100 g butter
- 2 pieces eggs (1 for the dough, 1 to paint)
- 1 tbsp instant yeast
- a pinch salt
Instructions
- In a large bowl, mix the milk, sugar, 1 egg, and butter until well combined.
- Gradually add the flour, stirring as you go.
- Add the water little by little until you get a manageable dough.
- Knead for about 1 minute and then add the instant yeast.
- Cover the dough with a clean kitchen towel and let it rest for 20 minutes.
- Knead again and let it rest for another 20 minutes. Repeat this process three times.
- Divide the dough into three equal parts and shape each part into an elongated strip.
- Arrange the strips side by side and braid them loosely.
- Cover the braid and let it rest for 10-15 minutes.
- Place the braid on a baking tray and beat the remaining egg with a few drops of water, then brush it over the braid.
- Preheat your oven to 230°C (about 450°F).
- Bake the braid for 30-35 minutes, lowering the temperature to 180-200°C (about 350-390°F) after the first 15 minutes.
Notes
Nutrition

Hi, I’m Olivia Parker, the founder of BakingSecret.com and a lifelong lover of all things sweet and homemade. I grew up in a small town in Oregon, where the smell of fresh cookies in my family’s kitchen sparked my passion for baking. Over the years, I turned that passion into a mission: to help home bakers feel confident, inspired, and creative.
After studying food science and working in several artisan bakeries across the U.S., I decided to create a space where everyone from beginners to seasoned bakers can find reliable recipes, expert tips, and a warm, welcoming community. BakingSecret.com is my way of sharing the magic of baking with the world. When I’m not testing new recipes, you’ll find me exploring farmers’ markets, collecting vintage cookbooks, or perfecting my sourdough technique.