
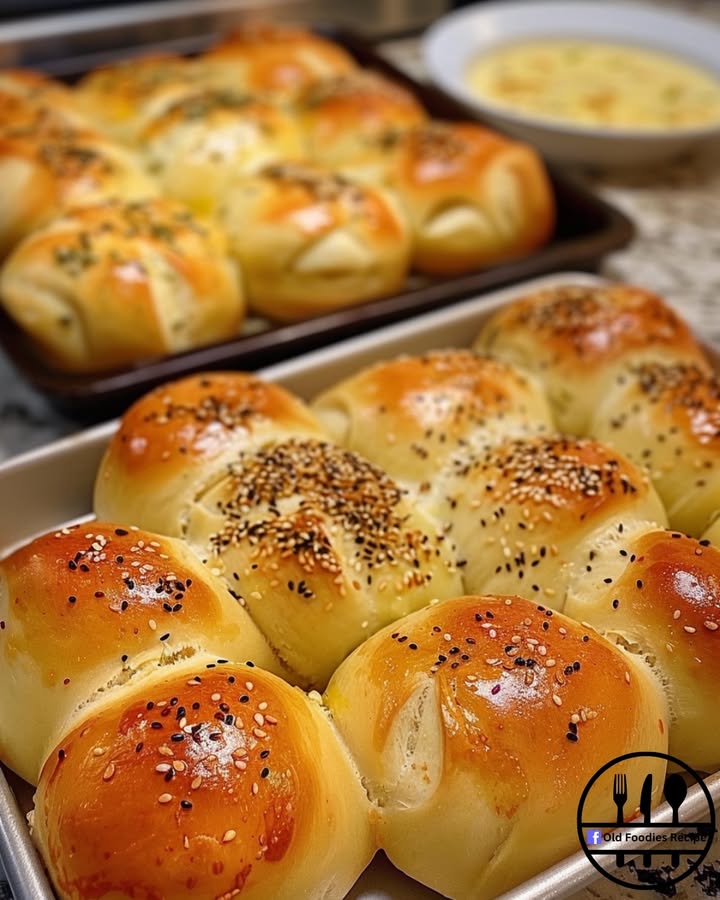
Homemade Garlic Buns: A Flavorful Delight for Every Meal
Every time I make garlic butter buns, the aroma fills my kitchen, and I’m transported back to my grandma’s cozy kitchen. She had a way of making everything taste magical, and her garlic buns were no exception. Today, I’m sharing this recipe with you, so you can bring a touch of that magic to your own table.
A Pinch of History: The Story of Garlic Buns
Garlic buns might not have a long, storied history, but they sure have a place in many hearts. Originating as a simple bread recipe, they’ve evolved into a beloved side dish or snack. In some cultures, garlic bread is a staple, often served with pasta or as an appetizer. My version is a fusion of traditional and modern, combining the best of both worlds.
Why You’ll Adore This Recipe
These garlic butter buns are not just about the garlic; it’s the perfect blend of flavors and textures. They’re soft, fluffy, and packed with a robust garlic and herb aroma. Plus, they’re incredibly easy to make, even for beginners. The simplicity and deliciousness make them a winner in any home cook’s book.
Perfect Occasions to Prepare These Buns
These buns are versatile and can be the star at any event. Whether it’s a family dinner, a casual get-together with friends, or a potluck, these garlic butter buns will be the talk of the table. They pair wonderfully with a hearty soup, a rich pasta dish, or even on their own as a delightful snack.
Ingredients for Garlic Butter Buns
- 400 g (3 1/4 cups) all-purpose flour
- 50 g (1/4 cup) sugar
- 5 g (1 tsp) salt
- 7 g dry yeast
- 250 ml (1 cup) lukewarm milk
- 1 large egg
- 55 g (1/4 cup) butter, softened
- 8 g (1 tbsp) minced garlic
- 1 g (2 tsp) dried parsley
- 55 g (1/3 cup) salted butter, melted
Substitution Options
- All-purpose flour: You can use whole wheat flour for a healthier twist.
- Sugar: Swap with honey or maple syrup for a natural sweetness.
- Lukewarm milk: Use almond or soy milk for a dairy-free option.
- Dried parsley: Fresh parsley or chives can be used for a fresher taste.
Preparing Your Garlic Butter Buns
Step 1: Mix the Dry Ingredients
In a large bowl, combine the flour, sugar, salt, and instant yeast. This mixture should look like a fine, powdery blend, ready for the liquid ingredients.
Step 2: Add the Liquid Ingredients
Pour the lukewarm milk and add the egg to the dry mixture. The warmth of the milk will help activate the yeast, and the egg will give the dough a nice, smooth texture.
Step 3: Knead the Dough
Knead the dough with a mixer for about 5 minutes. The dough should start to come together and become elastic. Cover the bowl with a towel and let it rest for 20 minutes. Pro tip: Letting the dough rest allows it to relax and makes it easier to shape later.
Step 4: Add the Butter and Garlic
Add the softened butter and minced garlic to the dough. Continue kneading until the dough is smooth and elastic. The garlic will infuse the dough with its aromatic flavor, making it irresistible.
Step 5: First Rise
Transfer the dough to a greased bowl and cover it. Let it rise in a warm place for about 1 hour or until it doubles in size. Pro tip: A warm, draft-free spot in your kitchen is ideal for rising.
Step 6: Shape the Buns
Transfer the dough to a work surface and shape it into a square. Divide it into 25 equal pieces and roll each piece into a ball. Cover the balls and let them rest for 15 minutes. Pro tip: Resting the dough again helps in achieving a light, airy texture.
Step 7: Second Rise
Gently degas the dough by tucking in the edges and placing the balls in a greased mold. Cover and let them rise for another 30 minutes. This second rise is crucial for a light, fluffy texture.
Step 8: Prepare the Garlic Butter
In a small bowl, mix the minced garlic, dried parsley, and melted butter. Brush the tops of the risen rolls with the garlic butter. Preheat your oven to 180°C (350°F).
Step 9: Bake and Enjoy
Bake the rolls in the preheated oven for 15-17 minutes, or until they are golden brown. When the rolls are still warm, brush them with a bit more garlic butter for extra flavor. Serve and enjoy!
Timing Breakdown
- Prep Time: 45 minutes
- Cooking Time: 15-17 minutes
- Resting Time: 1 hour and 50 minutes
- Total Time: 2 hours and 52 minutes
Chef’s Secret
To enhance the flavor, try adding a pinch of rosemary or thyme to the garlic butter. It adds a subtle, earthy note that complements the garlic perfectly.
Extra Info
Did you know that garlic has been used for centuries for its antibacterial properties? It’s not just delicious; it’s also good for you! Incorporating garlic into your recipes can be a simple way to boost your health.
Necessary Equipment
- Mixing bowls
- Measuring cups and spoons
- Kitchen scale (optional)
- Stand mixer or hand mixer
- Towel
- Greased bowl
- Work surface
- Baking pan or mold
- Pastry brush
- Oven
Storage Tips
Store the buns in an airtight container at room temperature for up to 3 days. If you want them to last longer, keep them in the refrigerator for up to 5 days. For optimal freshness, reheat them in the oven for a few minutes before serving. Freezing is also an option. Place the buns in a freezer bag and store them for up to 3 months. Thaw them overnight in the refrigerator before reheating.
Tips and Advice
- Use fresh, high-quality garlic for the best flavor.
- Check the dough during the first rise to ensure it’s not over-proofed. Over-proofing can lead to a collapse in the oven.
- Don’t skimp on the butter. It adds richness and helps the buns stay soft and moist.
Presentation Tips
- Arrange the buns on a platter and garnish with a sprinkle of fresh parsley.
- For a rustic look, wrap the buns in a clean, linen cloth and tie it with a ribbon.
- Place the buns in a basket and serve them with a side of butter or a dip of your choice.
Healthier Alternative Recipes
- Zucchini Cinnamon Muffins: If you’re looking for a sweet, healthy alternative, try our zucchini cinnamon muffins. They’re perfect for a quick breakfast or a mid-day snack.
- Soft Hot Buns: For a lighter, fluffier version, check out our soft hot buns. They’re easy to make and always a hit with the family.
- Cheesy Garlic Bombs: If you love garlic and cheese, our cheesy garlic bombs are a must-try. They’re ooey-gooey and full of flavor.
- Fluffy Hot Cross Buns: For a classic Easter treat, try our fluffy hot cross buns. They’re traditionally made with raisins and spices, perfect for the holiday season.
- Whole Wheat Garlic Buns: Substitute all-purpose flour with whole wheat flour for a healthier, nuttier version of the classic garlic buns.
- Herb-Infused Garlic Buns: Add a variety of herbs like rosemary, thyme, and oregano to the dough for a burst of fresh, herbal flavors.
Common Mistakes to Avoid
Mistake 1: Using Cold Ingredients
Using cold ingredients can slow down the rising process and affect the texture of your buns. Make sure your milk is lukewarm and your butter is softened. This will help the yeast activate properly and give your buns a light, airy texture.
Mistake 2: Over-kneading the Dough
Over-kneading can make the dough tough and dense. Knead the dough until it’s smooth and elastic, but don’t go overboard. The dough should feel soft and slightly sticky. Pro tip: Use a timer to keep track of your kneading time.
Mistake 3: Not Letting the Dough Rise Enough
Not letting the dough rise enough can result in dense, heavy buns. The first rise should take about 1 hour, and the second rise should be around 30 minutes. Patience is key here. Pro tip: Place the dough in a warm, draft-free spot to speed up the rising process.
Mistake 4: Applying Too Much Garlic Butter
While garlic butter is delicious, too much of it can make the buns soggy. Brush the buns with a thin, even layer of garlic butter. Pro tip: Save some garlic butter to brush on the buns after baking for additional flavor.
Mistake 5: Overbaking the Buns
Overbaking can make the buns dry and hard. Bake them for 15-17 minutes, or until they’re golden brown. Keep an eye on them towards the end of the baking time to prevent overbaking. Pro tip: Tap the buns lightly; if they sound hollow, they’re done.
For more tips on mindful food preparation, check out these helpful resources. Mindful eating can transform your cooking experience and make every meal more enjoyable.
Now that you have the recipe and all the tips, you’re ready to whip up a batch of these delectable garlic butter buns. Don’t forget to browse through our other bread recipes for more inspiration.
FAQ
What is the best way to store garlic buns?
Store the buns in an airtight container at room temperature for up to 3 days. For longer storage, keep them in the refrigerator for up to 5 days. Alternatively, you can freeze them for up to 3 months. Thaw them overnight in the refrigerator before reheating.
Can I use whole wheat flour instead of all-purpose flour?
Yes, you can substitute all-purpose flour with whole wheat flour for a healthier version. Just keep in mind that the texture might be a bit denser, but the buns will still be delicious.
How do I know if the dough has risen enough?
The dough should double in size during the first rise, which usually takes about 1 hour. For the second rise, the buns should look puffy and fill up the baking pan. Patience is key, as the exact time can vary based on the room temperature.
Can I use a different type of fat instead of butter?
Yes, you can use other fats like margarine or coconut oil. However, the flavor and texture may differ slightly. Butter provides the best flavor and texture, but substitutes can work well too.
What can I do if my buns are too dry?
If your buns turn out too dry, you might have overbaked them or used too little liquid. Next time, try reducing the baking time slightly or adding a bit more milk to the dough. Also, brushing the buns with melted butter after baking can help add moisture.
Can I add other herbs to the garlic butter?
Absolutely! Adding herbs like rosemary, thyme, or oregano to the garlic butter can add a wonderful, aromatic flavor. Experiment with different herbs to find your favorite combination.
How can I make sure my buns are evenly baked?
To ensure even baking, rotate the pan halfway through the baking time. This helps distribute the heat evenly and prevents the buns from overbrowning on one side. Also, make sure the buns are spaced evenly in the pan.
What can I do if my dough is too sticky?
If your dough is too sticky, you can add a little more flour, but be careful not to add too much. Start with a tablespoon at a time until the dough is manageable. Over-flouring can make the buns tough, so it’s better to err on the side of caution.
Can I make the buns ahead of time?
Yes, you can make the buns ahead of time. After shaping the buns, you can refrigerate them overnight. The next day, let them come to room temperature and then proceed with the second rise and baking.
What can I do if my buns are not rising?
If your buns are not rising, the yeast might not be active. Check the expiration date of the yeast and make sure the milk is lukewarm, not too hot or too cold. Also, ensure the dough is in a warm, draft-free spot to help with the rising process.
Final Thoughts
These garlic butter buns are a true delight, and I hope they bring as much joy to your table as they do to mine. With their rich, aromatic flavor and soft, fluffy texture, they’re sure to become a family favorite. Happy baking!
Equipment
- Mixing bowls
- Measuring cups and spoons
- Stand mixer or hand mixer
- Towel
- Baking pan or mold
Ingredients
- 400 g all-purpose flour
- 50 g sugar
- 5 g salt
- 7 g dry yeast
- 250 ml lukewarm milk
- 1 large egg
- 55 g butter, softened
- 8 g minced garlic
- 1 g dried parsley
- 55 g salted butter, melted
Instructions
- In a large bowl, combine the flour, sugar, salt, and instant yeast.
- Pour the lukewarm milk and add the egg to the dry mixture.
- Knead the dough with a mixer for about 5 minutes until it becomes elastic, then cover and let it rest for 20 minutes.
- Add the softened butter and minced garlic to the dough and knead until smooth and elastic.
- Transfer the dough to a greased bowl, cover it, and let it rise in a warm place for about 1 hour or until it doubles in size.
- Shape the dough into a square, divide it into 25 equal pieces, and roll each piece into a ball. Let them rest for 15 minutes.
- Degas the dough and place the balls in a greased mold, cover, and let them rise for another 30 minutes.
- Mix minced garlic, dried parsley, and melted butter in a small bowl and brush the tops of the risen rolls with it. Preheat the oven to 180°C (350°F).
- Bake the rolls in the preheated oven for 15-17 minutes until golden brown, brushing with more garlic butter while warm before serving.
Notes
Nutrition

Hi, I’m Olivia Parker, the founder of BakingSecret.com and a lifelong lover of all things sweet and homemade. I grew up in a small town in Oregon, where the smell of fresh cookies in my family’s kitchen sparked my passion for baking. Over the years, I turned that passion into a mission: to help home bakers feel confident, inspired, and creative.
After studying food science and working in several artisan bakeries across the U.S., I decided to create a space where everyone from beginners to seasoned bakers can find reliable recipes, expert tips, and a warm, welcoming community. BakingSecret.com is my way of sharing the magic of baking with the world. When I’m not testing new recipes, you’ll find me exploring farmers’ markets, collecting vintage cookbooks, or perfecting my sourdough technique.