
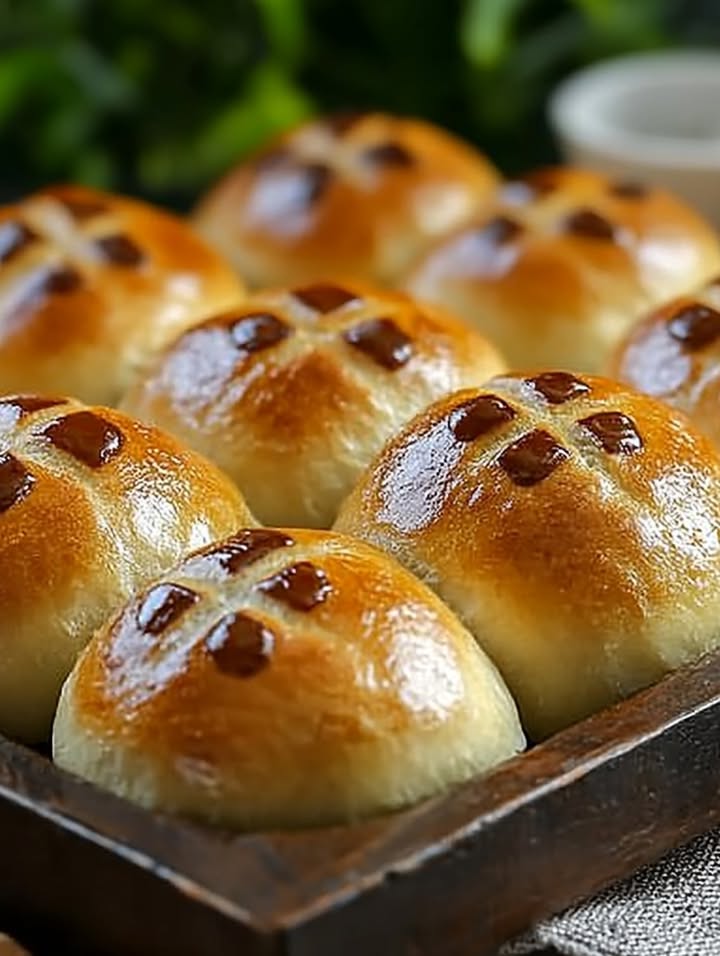
Discover the Joy of Making Soft Hot Cross Buns at Home
There’s something magical about the aroma of freshly baked bread, and when it comes to Easter, nothing beats the sweet, spiced scent of Soft Hot Cross Buns. I remember the first time I made these buns for my family; the kitchen was filled with warmth and the anticipation of a delicious treat. It’s a tradition that has stuck, and I love sharing this recipe because it brings such joy to everyone who tastes it.
A Brief History of These Traditional Treats
Hot cross buns have a rich history dating back to the 18th century in England. They were originally associated with the Christian celebration of Good Friday, but over the years, they’ve become a beloved Easter treat around the world. The traditional spices and fruit in these buns make them a perfect blend of sweet and aromatic, perfect for any springtime celebration. Today, you can find both classic and modern versions of this recipe, each with its own unique twist.
Why You’ll Love This Recipe
The best part about this Hot Cross Buns recipe is its simplicity and the burst of flavors it delivers. The combination of cinnamon, allspice, and raisins creates a warm, comforting taste that’s hard to resist. Plus, the soft, pillowy texture of the buns makes them a crowd-pleaser. Whether you’re baking for your family or planning an Easter brunch, these buns are sure to be a hit.
Perfect Occasions to Prepare This Recipe
These Soft Hot Cross Buns are not just for Easter. They make a wonderful addition to any springtime gathering, from a casual weekend breakfast to a more formal holiday brunch. I love to serve them with a pat of butter or a dollop of whipped cream. They also make a great snack or a thoughtful gift for friends and neighbors.
Ingredients
- All-purpose flour: 325g (2 1/2 cups)
- Whole milk: 150 ml (1/2 cup + 2 tbsp)
- Granulated sugar: 50g (1/4 cup)
- Active dry yeast: 2 tsp
- Cinnamon powder: 1/2 tsp
- Ground allspice: 1/2 tsp
- Salt: 3/4 tsp
- Egg: 1
- Raisins: 100g (2/3 cup)
- Unsalted butter: 40g (3 tbsp), softened
Cross Paste:
- All-purpose flour: 30g (1/4 cup)
- Water: 2-3 tbsp
Glaze:
- Granulated sugar: 2 tbsp
- Water: 2 tbsp
Substitution Options
If you’re out of some ingredients, don’t worry! You can use whole wheat flour instead of all-purpose flour for a healthier option. Swap raisins for other dried fruits like cranberries or chopped apricots. If you prefer a dairy-free version, use almond milk instead of whole milk. And if you’re short on unsalted butter, you can use coconut oil as a substitute.
Preparation
Step 1: Activate the Yeast
In a bowl, combine warm milk, sugar, and yeast. Let it stand for 5-10 minutes until it becomes foamy. This step is crucial for a good rise, so make sure the milk is warm, not hot, to avoid killing the yeast.
Step 2: Mix in the Flavorings
Add the egg, cinnamon, allspice, and salt to the yeast mixture. Whisk everything together until it’s well combined. The aromas of the spices will start to fill your kitchen, getting you excited for the next steps.
Step 3: Form the Dough
Gradually add the flour to the mixture, mixing until a shaggy dough forms. This is where the fun begins! The dough might be a bit sticky at first, but resist the urge to add more flour. You want to keep the dough nice and soft.
Step 4: Knead the Dough
Add the softened butter and knead the dough for 8-10 minutes until it becomes smooth and elastic. The butter will make the dough soft and rich. If you have a stand mixer, this step is much easier. Otherwise, get ready for a good arm workout!
Step 5: Add the Raisins
Gently fold in the raisins. This step adds a delightful sweetness and texture to your buns. Make sure the raisins are evenly distributed throughout the dough for the best results.
Step 6: Let the Dough Rise
Place the dough in a greased bowl, cover it, and let it rise for 1-1.5 hours, or until it doubles in size. This is the magic moment when the yeast does its work, making the dough light and airy. Find a cozy spot in your kitchen to let it rest.
Step 7: Shape the Buns
Punch down the dough and divide it into 12 equal portions. Shape each piece into a ball and place them on a baking sheet lined with parchment paper. Cover and let them rise for another 30-45 minutes. This second rise gives the buns their final shape and texture.
Step 8: Make the Cross Paste
Mix the flour and water until a thick paste forms. Transfer the paste to a piping bag. This step is what gives the buns their iconic look. The paste will bake beautifully, creating a distinct cross on top of each bun.
Step 9: Pipe the Crosses
Pipe crosses on top of each bun. This can be a bit tricky, but don’t worry if they’re not perfectly straight. The rustic look is part of their charm. Once you’ve piped the crosses, you’re ready to bake!
Step 10: Bake the Buns
Bake the buns at 375°F (190°C) for 15-20 minutes, or until they’re golden brown. The smell of baking bread will fill your kitchen, and you’ll know they’re done when they’re golden and puffy.
Step 11: Make the Glaze
While the buns are baking, combine the sugar and water in a saucepan. Heat over medium heat, stirring until the sugar dissolves. The glaze should be a syrupy consistency. This simple glaze adds a beautiful shine and a touch of sweetness to the buns.
Step 12: Glaze the Buns
Brush the warm buns with the glaze immediately after baking. The glaze will soak into the buns, giving them a lovely, glossy finish. Let them cool slightly before serving. The glaze not only looks beautiful but also locks in the moisture, keeping the buns soft and delicious.
Chef’s Tip: Perfect Texture
To achieve the perfect texture, make sure your dough is soft and pliable. If it feels too stiff, add a little more milk. Conversely, if it’s too sticky, add a small amount of flour. The key is to find the right balance, so your buns are light and fluffy.
Timing
Prep Time: 20 minutes
Cooking Time: 15-20 minutes
Resting Time: 2-2.5 hours
Total Time: Approximately 3-3.5 hours
Chef’s Secret
One of my favorite secrets for these buns is to use a mix of spices. While the traditional cinnamon and allspice are great, you can also add a pinch of nutmeg or ground cloves for an extra depth of flavor. It’s a small change that makes a big difference!
Extra Info
Did you know that the cross on top of the buns is not just decorative? In Christian tradition, it symbolizes the crucifixion. But even if you’re not religious, the cross adds a festive and classic touch to these buns, making them feel special.
Necessary Equipment
- Large mixing bowl
- Measuring cups and spoons
- Stand mixer or a large clean surface for kneading
- Parchment-lined baking sheet
- Piping bag or a small Ziploc bag
- Saucepan for the glaze
Storage
Store the Soft Hot Cross Buns in an airtight container at room temperature for up to 3 days. If you want to keep them longer, you can refrigerate them for up to a week. For the best freshness, wrap them in plastic wrap or aluminum foil. To reheat, simply pop them in the microwave for a few seconds or warm them in the oven. They’ll still be soft and delicious, perfect for a quick snack or a late-night treat.
Tips and Advice
- Make sure your milk is warm, not hot, to activate the yeast properly.
- If you’re using a stand mixer, use the dough hook attachment for easier kneading.
- Don’t overwork the dough when adding the raisins. A gentle fold is all you need.
Presentation Tips
- Arrange the buns on a pretty platter and garnish with a sprinkle of powdered sugar.
- Place a small pat of butter and a drizzle of honey on each bun for a decadent touch.
- For a festive Easter brunch, serve the buns with a side of colored hard-boiled eggs and a fresh fruit salad.
Healthier Alternative Recipes
Here are some variations to try:
- Whole Wheat Hot Cross Buns: Substitute half of the all-purpose flour with whole wheat flour for added fiber and a nuttier flavor.
- Vegan Hot Cross Buns: Use almond milk instead of whole milk and replace the egg with a flax egg. Top with a vegan glaze for a plant-based treat.
- Gluten-Free Hot Cross Buns: Use a gluten-free flour blend and follow the same steps. Perfect for those with gluten sensitivities.
- Keto Hot Cross Buns: Replace the all-purpose flour with almond flour and use a sugar substitute for a low-carb, high-fat option. Check out our Zero Carb Bread for more keto-friendly recipes.
- Honey-Glazed Hot Cross Buns: Use honey instead of sugar for the glaze. This adds a natural sweetness and a rich, golden color.
- Sourdough Hot Cross Buns: Incorporate a sourdough starter into the dough for a unique, tangy flavor. This version takes a bit longer but is worth the effort.
Common Mistakes to Avoid
Mistake 1: Overworking the Dough
Kneading the dough is important, but overworking it can make the buns tough and dense. Aim for 8-10 minutes of kneading, or until the dough is smooth and elastic. Pro tip: Use a stand mixer with a dough hook if you’re not comfortable kneading by hand.
Mistake 2: Using Cold Ingredients
Make sure all your ingredients, especially the milk and butter, are at room temperature. Cold ingredients can hinder the yeast’s activity, resulting in a poor rise. Pro tip: Take the milk and butter out of the refrigerator at least 30 minutes before you start baking.
Mistake 3: Not Letting the Dough Rise Enough
Patience is key when it comes to letting the dough rise. If you rush this step, the buns won’t be as light and fluffy. Make sure to let the dough double in size during the first rise and allow it to rise again after shaping the buns. Pro tip: Place the dough in a warm, draft-free spot to help it rise faster.
Mistake 4: Overbaking the Buns
Overbaking can make the buns dry and hard. Keep an eye on them and remove them from the oven when they’re golden brown. Pro tip: Tap the bottom of the buns; they should sound hollow when done.
Mistake 5: Skipping the Second Rise
The second rise is crucial for the perfect texture. If you skip this step, the buns might end up dense and heavy. Pro tip: Cover the buns loosely with a clean kitchen towel and let them rise in a warm, draft-free area.
When you’re ready to dive into more baking adventures, check out our bread and roll recipes for more delicious treats.
FAQ
What are the origins of Hot Cross Buns?
Hot cross buns have a long and interesting history, dating back to the 18th century in England. They were traditionally eaten on Good Friday, and the cross on top represents the crucifixion of Jesus Christ. Over time, they became a popular Easter treat in many countries, and today, they are enjoyed for their delicious flavor and symbolic meaning.
Can I use whole wheat flour instead of all-purpose flour?
Yes, you can use whole wheat flour instead of all-purpose flour. This will give your buns a nuttier flavor and a denser texture. Just keep in mind that whole wheat flour absorbs more liquid, so you may need to adjust the amount of milk or water in the recipe. Start with a 50-50 mix of whole wheat and all-purpose flour to get the best of both worlds.
How do I make a vegan version of Hot Cross Buns?
To make a vegan version, you can use almond milk instead of whole milk and replace the egg with a flax egg. Mix 1 tablespoon of ground flaxseed with 3 tablespoons of water and let it sit for a few minutes to thicken. Use this in place of the egg in the recipe. Also, make sure to use a vegan butter or margarine. For the glaze, you can use a sugar substitute or a simple syrup made with agave nectar or maple syrup.
Can I freeze Hot Cross Buns?
Yes, you can freeze Hot Cross Buns. Allow them to cool completely, then wrap each bun in plastic wrap or aluminum foil and place them in a freezer-safe bag. They will keep for up to 3 months. When you’re ready to eat them, thaw them at room temperature or reheat them in the oven at 350°F (175°C) for 10-15 minutes.
What can I do if my dough is too sticky?
If your dough is too sticky, you can add a small amount of flour, one tablespoon at a time, until it becomes manageable. Be careful not to add too much flour, as this can make the buns dense. Another option is to let the dough rest for a few minutes; sometimes, the flour just needs a bit more time to absorb the liquid.
What is the best way to store leftover Hot Cross Buns?
Store leftover Hot Cross Buns in an airtight container at room temperature for up to 3 days. If you want to keep them longer, you can refrigerate them for up to a week. For the best freshness, wrap them individually in plastic wrap or aluminum foil. To reheat, you can microwave them for a few seconds or warm them in the oven at 350°F (175°C) for 5-10 minutes.
Can I make the cross paste with a different type of flour?
Yes, you can use a different type of flour for the cross paste. All-purpose flour works well, but you can also use cake flour or even a gluten-free flour blend if you’re making a gluten-free version. The key is to get a thick, pipeable consistency. Adjust the amount of water as needed to achieve the right texture.
What can I do if my buns are too dry?
If your buns come out too dry, there are a few things you can do. First, make sure you’re not overbaking them. Check them a few minutes early and tap the bottom; they should sound hollow. You can also brush the buns with a little melted butter while they’re still warm to add moisture. Storing them in an airtight container can also help keep them soft.
How can I make the buns less sweet?
If you prefer a less sweet version, you can reduce the amount of sugar in the recipe. Start by cutting the sugar by 1/4 cup and see how you like it. You can also use less sugar in the glaze or omit it entirely. The buns will still be delicious with just the natural sweetness of the raisins and the spices.
What is the best way to reheat Hot Cross Buns?
The best way to reheat Hot Cross Buns is to preheat your oven to 350°F (175°C) and place the buns on a baking sheet. Warm them in the oven for 5-10 minutes, or until they are heated through and slightly crispy on the outside. You can also microwave them for a few seconds, but this method won’t give you the same crispiness. For an extra touch, brush them with a little melted butter before reheating.
Conclusion
There’s nothing quite like the comfort and joy of homemade Soft Hot Cross Buns. Whether you’re baking for a special occasion or just treating yourself, these buns are sure to be a hit. With their rich history, delightful flavors, and easy-to-follow recipe, you’ll find yourself making them year after year. So, gather your ingredients, turn on your favorite music, and get ready to fill your home with the wonderful aroma of freshly baked buns. Happy baking!
Equipment
- Large mixing bowl
- Measuring cups and spoons
- Stand mixer or clean surface for kneading
- Parchment-lined baking sheet
- Piping bag or small Ziploc bag
Ingredients
- 325 g All-purpose flour
- 150 ml Whole milk
- 50 g Granulated sugar
- 2 tsp Active dry yeast
- 0.5 tsp Cinnamon powder
- 0.5 tsp Ground allspice
- 0.75 tsp Salt
- 1 whole Egg
- 100 g Raisins
- 40 g Unsalted butter, softened
Instructions
- In a bowl, combine warm milk, sugar, and yeast. Let it stand for 5-10 minutes until foamy.
- Add the egg, cinnamon, allspice, and salt to the yeast mixture and whisk together until combined.
- Gradually add the flour, mixing until a shaggy dough forms.
- Knead the dough for 8-10 minutes until smooth and elastic, adding softened butter midway.
- Gently fold in the raisins until evenly distributed.
- Place the dough in a greased bowl, cover, and let it rise for 1-1.5 hours or until doubled in size.
- Punch down the dough, divide into 12 portions, shape into balls, and place on a parchment-lined baking sheet. Let rise for another 30-45 minutes.
- Mix the flour and water for the cross paste until thick. Transfer to a piping bag.
- Pipe crosses on top of each bun.
- Bake at 375°F (190°C) for 15-20 minutes until golden brown.
- While baking, combine sugar and water in a saucepan to make the glaze.
- Brush the warm buns with the glaze immediately after baking.
Notes
Nutrition

Hi, I’m Olivia Parker, the founder of BakingSecret.com and a lifelong lover of all things sweet and homemade. I grew up in a small town in Oregon, where the smell of fresh cookies in my family’s kitchen sparked my passion for baking. Over the years, I turned that passion into a mission: to help home bakers feel confident, inspired, and creative.
After studying food science and working in several artisan bakeries across the U.S., I decided to create a space where everyone from beginners to seasoned bakers can find reliable recipes, expert tips, and a warm, welcoming community. BakingSecret.com is my way of sharing the magic of baking with the world. When I’m not testing new recipes, you’ll find me exploring farmers’ markets, collecting vintage cookbooks, or perfecting my sourdough technique.