
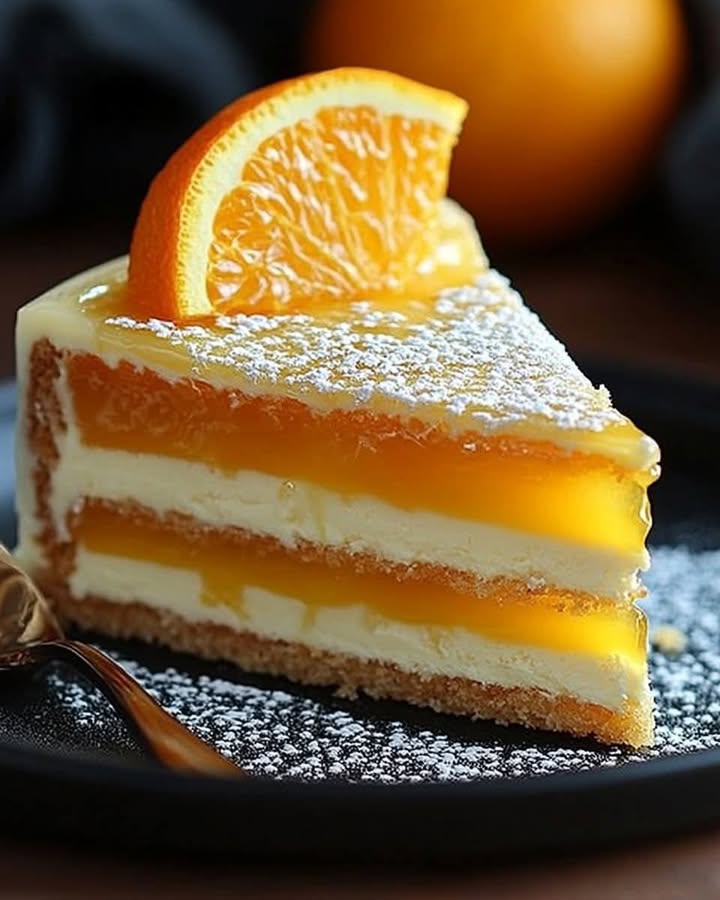
A Slice of Sunshine: My Ultimate Zesty Lemon Mousse Cake
You know that feeling when you need a dessert that’s both a showstopper and a breath of fresh air? I was searching for exactly that last summer for my niece’s baby shower. The humidity was high, and heavy chocolate cakes just wouldn’t do. That’s when I perfected this cloud-like Zesty Lemon Mousse Cake. The first forkful was pure magic—a light, airy sponge soaked with a hint of Limoncello, topped with tart-sweet lemon curd and a pillow of creamy mousse. It was gone in minutes, with everyone begging for the recipe. I knew right then I had to share this ray of edible sunshine with you.
The Humble History of a Citrus Star
Lemon desserts have been brightening tables for centuries! Think of the classic lemon curd from England or the rustic French tarte au citron. This Lemon Mousse Cake is my modern, elegant take on those traditions. It combines the old-world comfort of a baked sponge with the fluffiness of a contemporary mousse. The optional splash of Limoncello is a cheeky nod to Italy’s Amalfi Coast, where those gorgeous lemons grow. It’s a delicious blend of history and today’s love for light, flavorful treats.
Why You’ll Fall in Love With This Lemon Mousse Cake
Let me count the ways! First, the contrast in textures is just incredible. The soft sponge, the silky curd, and the cloud-like mousse create a party in your mouth. Second, it’s surprisingly light, so you can enjoy a generous slice without feeling weighed down. It’s also the perfect make-ahead dessert. Letting it set overnight makes your party day completely stress-free. Honestly, the biggest challenge is not eating all the lemon curd with a spoon before it even touches the cake!
The Perfect Occasion for a Zesty Dessert
This cake is your secret weapon for so many events! It’s a natural fit for spring luncheons, Mother’s Day brunches, or summer patio parties. I’ve served it at bridal showers where its elegant look got all the compliments. It’s also fantastic for a fancy family dinner when you want to feel a little extra. And after a heavy holiday meal? This is the refreshing, palate-cleansing dessert everyone craves. It turns any day into a celebration.
Gathering Your Ingredients for Success
Using fresh, simple ingredients is key to that vibrant flavor. Here’s what you’ll need:
- For the Sponge Cake: 6 large eggs (room temperature), 1 cup white sugar, 1 tbsp vanilla extract, 1 cup all-purpose flour (sifted), 2 tbsp melted salted butter, 2 oz Limoncello Liqueur (optional)
- For the Lemon Curd: 6 egg yolks (lightly beaten), 1 cup sugar, 1/2 cup fresh lemon juice, Zest of two lemons, 1/2 cup butter (cut into small pieces)
- For the Lemon Mousse: 1/2 batch of chilled lemon curd, 2 cups whipping cream, 2 tbsp powdered sugar, 1/2 tsp vanilla extract
- For Topping & Garnish: 1 cup whipping cream, 1 tsp vanilla extract, 1 tbsp powdered sugar, 3/4 cup white sugar (for candied lemon peel), 3/4 cup water (for candied lemon peel), Peel of one lemon, 1/2 cup additional sugar for rolling
Smart Substitutions for Your Kitchen
No buttermilk? No problem! Here are my go-to swaps:
- Limoncello: Simply use 2 oz of fresh lemon juice mixed with 1 teaspoon of sugar or orange juice.
- Salted Butter: Unsalted butter works just fine. Just add a tiny pinch of salt to the batter and curd.
- Fresh Lemon Juice: In a real pinch, bottled lemon juice can work, but fresh is infinitely better for flavor.
- Whipping Cream: Look for heavy cream or heavy whipping cream; they have the same fat content needed for whipping.
- Candied Peel: For a quick garnish, use fresh lemon zest, white chocolate shavings, or even store-bought lemon cookies.
Crafting Your Zesty Lemon Mousse Cake: Step-by-Step
Step 1: Preparing the Stage
Start by preheating your oven to 325°F (160°C). This gentle heat is perfect for a soft, even sponge. Grab your 10-inch springform pan and line just the bottom with a round of parchment paper. Here’s a pro tip: don’t grease the sides. This helps the cake cling and rise properly as it bakes. Having everything ready makes the process feel like a calm dance in the kitchen.
Step 2: Creating the Foamy Sponge Base
In your mixing bowl, combine the eggs, sugar, and vanilla. Now, beat it! Let the mixer run for a full 10 minutes. You’ll watch the mixture transform from yellow and grainy to a voluminous, pale, and foamy cloud. This step incorporates air, which is the only leavening in this cake. It should drip from the beaters in thick ribbons. Patience here makes for a light-as-air texture later.
Step 3: Incorporating the Flour with Care
Reduce your mixer speed to low. Slowly sprinkle the sifted flour over the fluffy egg foam. Go slowly to avoid deflating all that beautiful air you just worked so hard for. Mix just until you can’t see any white streaks. A few small lumps are okay; overmixing is the enemy of a tender sponge.
Step 4: The Butter Folding Trick
Take about 1 to 2 cups of your batter and place it in a separate bowl. Stir the melted butter into this small portion. This tempers the butter, preventing it from sinking to the bottom. Now, gently fold this buttery mixture back into the main bowl of batter. Use a wide spatula and a light hand, folding from the bottom up until it’s just combined.
Step 5: Baking to Golden Perfection
Pour the final batter into your prepared pan. Smooth the top gently. Bake for about 45 minutes. You’ll know it’s done when the top is a light golden brown and springs back when you touch it gently. Avoid opening the oven door too early! Let the cake cool completely in the pan for at least 2 hours. It will shrink slightly, which is normal and makes it easy to remove.
Step 6: Whipping Up the Lemon Curd
While the cake cools, make the curd. In a saucepan, whisk together the egg yolks, sugar, fresh lemon juice, and zest. The bright yellow color and sharp, citrusy scent are incredible. Cook over medium-low heat, stirring constantly with a wooden spoon for about 10 minutes. It’s ready when it coats the back of the spoon and leaves a clean line when you run your finger through it. Remove from heat and stir in the butter pieces until the curd is silky smooth. Chill it in the fridge.
Step 7: Creating the Dreamy Lemon Mousse
For the mousse, whip 2 cups of cream with powdered sugar and vanilla until you get firm peaks. Take half of your chilled lemon curd and gently fold it into this whipped cream. Watch as the yellow curd swirls into the white cream, creating a beautiful, light, and zesty mousse. Be gentle to keep it airy.
Step 8: Assembling Your Masterpiece
Once the sponge is cool, place it back into the clean springform pan. If you’re using Limoncello, now’s the time to drizzle it over the cake for an extra flavor kick. Spoon all of the lemon mousse over the sponge and spread it into an even layer. This is your cake’s new fluffy top. Refrigerate the whole thing for several hours, or ideally overnight, to let it set beautifully.
Step 9: The Final Glamorous Touches
The next day, run a knife around the edge and release the springform pan. Spread the remaining lemon curd over the top of the mousse. Whip the final cup of cream with sugar and vanilla for pretty dollops or piped borders. For the candied peel, simmer lemon peel strips in sugar water for 15-20 minutes, then roll in sugar. They dry into sweet, crunchy jewels. Artfully arrange your garnishes and get ready for the oohs and ahhs!
Chef’s Secret for the Ultimate Zest
My biggest secret is in the zesting! Only zest the bright yellow outer skin of the lemon. Avoid the bitter white pith underneath. Do this before you juice the lemons—it’s so much easier. Use a microplane for the finest zest that will melt seamlessly into your curd, giving bursts of potent lemon oil in every bite.
Your Cake Timeline
Planning is key for a relaxed baking experience.
- Prep Time: 1 hour (includes making curd & batter)
- Bake Time: 45 minutes
- Cooling Time: 2 hours (for sponge)
- Chilling/Setting Time: 6 hours minimum, overnight is best
- Total Time (hands-off): About 10 hours (mostly chilling)
A Little Extra Info: The Power of Eggs
This recipe is a wonderful example of eggs doing double duty. The whole eggs provide structure and lift to the sponge cake, while the yolks in the curd act as a natural thickener, creating that luscious, creamy texture without any extra starch. It’s fascinating how one ingredient can play such different roles! For those curious about nutrition, you can check the protein content and other details of eggs on trusted resources.
Essential Equipment You’ll Need
- 10-inch Springform Pan
- Stand Mixer or Hand Mixer
- Medium Saucepan
- Mixing Bowls (Various Sizes)
- Whisk and Rubber Spatula
- Microplane Zester
- Parchment Paper
How to Store Your Lemon Mousse Cake
For Short-Term Storage: Keep the cake covered in the refrigerator for up to 4 days. The mousse and curd need to stay cold. I like to place toothpicks in the top and drape plastic wrap over them so it doesn’t stick to the beautiful topping.
Can You Freeze It? You can, but with caution. Freezing can slightly change the texture of the mousse, making it a bit grainier when thawed. If you must freeze, do so without the fresh whipped cream garnish. Wrap the whole cake or individual slices tightly in plastic wrap and then foil. Thaw overnight in the fridge.
Serving After Storage: Let the cake sit at room temperature for about 15-20 minutes before serving. This takes the chill off and allows all the lemon flavors to truly sing again.
My Best Tips & Advice
- Room Temp is Real: Using room temperature eggs is non-negotiable for maximum volume in the sponge.
- Chill Your Bowl: For the whipped cream, chill your mixing bowl and beaters in the freezer for 15 minutes first. It whips faster and higher.
- Fold, Don’t Stir: When combining the mousse, use a folding motion with a spatula. This keeps the air in the cream.
- Taste Your Curd: Love things extra tart? Add a bit more lemon zest to the curd. Prefer it sweeter? Add a touch more sugar.
Presentation Ideas to Wow Your Guests
- Serve on a simple white cake stand for the colors to pop.
- Top with fresh blueberries or raspberries for a red, white, and blue theme.
- Use an offset spatula to create pretty swoops in the top layer of curd.
- Add edible gold leaf or delicate flowers for a truly special event cake.
- Slice with a hot, clean knife for the most beautiful, clean pieces.
Common Mistakes to Avoid
Mistake 1: Deflating the Sponge Cake Batter
This happens when you add the flour too quickly or mix on high speed. It also happens if you stir, rather than fold, the melted butter mixture in. All that precious air escapes, leading to a dense, flat cake. To avoid it, always sift your flour and add it on the lowest mixer setting. When folding in the butter, use a gentle hand and stop as soon as it’s combined.
Mistake 2: Scrambling the Lemon Curd
Curd can turn into sweet lemony scrambled eggs if the heat is too high. Cooking over medium-low heat and stirring constantly is the key. Don’t walk away! If you see small lumps starting to form, immediately pull the pot off the heat and whisk vigorously. You can also strain the finished curd through a fine-mesh sieve to ensure absolute silkiness.
Mistake 3: Runny or Over-Whipped Mousse
If your whipping cream is too warm or you don’t whip it enough, the mousse will be soft and won’t hold its shape on the cake. Whip until you have firm peaks that hold their shape when you lift the beater. On the flip side, don’t whip it into butter! Stop as soon as it’s firm. Gentle folding with the curd is the final step to a perfect, airy mousse.
Mistake 4: Not Letting the Cake Set Long Enough
Impatience is the enemy here. If you try to assemble or slice the cake before the mousse layer has fully set, it will be a messy, delicious puddle. The several hours (or overnight) chill is crucial. It allows the mousse to firm up so you get clean, beautiful slices that stand tall on the plate.
More Amazing Cakes to Try
If you love this lemon dream, you must explore our other favorites. For a cozy, spiced treat, my Caramel Apple Pecan Cake is pure comfort. When berries are in season, these elegant No-Bake Blackberry Lavender Mini Cheesecakes are stunning. Chocolate lovers will adore the swirls in this Chocolate Cherry Swiss Roll. And for the ultimate indulgence, nothing beats a slice of Hazelnut Chocolate Truffle Cake. You can find all these inspirations and more in our full collection of cake recipes.
6 Delicious Healthier Tweaks & Variations
- Gluten-Free Lemon Mousse Cake: Swap the all-purpose flour for a 1-to-1 gluten-free baking blend. Ensure your blend contains xanthan gum for the best texture.
- Dairy-Free Delight: Use a plant-based butter alternative and full-fat coconut milk (chilled) for whipping the cream. The coconut adds a lovely subtle flavor that pairs well with lemon.
- Lower-Sugar Version: Reduce the sugar in the lemon curd by 1/4 cup and use a sugar substitute in the sponge designed for baking. The tartness will shine even more.
- Berry Lemon Fusion: Add a layer of fresh raspberries or blueberries between the sponge and the mousse. The berries add a burst of juice and antioxidants.
- Individual Jars: Skip the whole cake and make parfaits! Layer crumbled sponge cake, lemon curd, and mousse in glasses for perfectly portioned, portable desserts.
- Yogurt Mousse Swap: For a protein boost, fold the lemon curd into 3 cups of thick, strained Greek yogurt instead of whipped cream. It’s tangier and richer.
Frequently Asked Questions
Can I make this cake ahead of time?
Absolutely! In fact, I highly recommend it. You can bake the sponge cake up to two days ahead, wrap it well, and keep it at room temperature. The lemon curd can be made up to a week in advance and stored in the fridge. The full assembled cake needs at least 6 hours to set, so making it the day before your event is the perfect plan. This makes it the ultimate stress-free dessert for entertaining.
Why is my lemon curd not thickening?
If your curd is still runny after cooking, the heat was likely too low or you didn’t cook it long enough. It needs a gentle simmer to activate the egg yolks as thickeners. Bring it back to the heat and cook, stirring constantly, for a few more minutes. It should coat the back of a spoon thickly. Remember, it will also thicken significantly as it cools in the refrigerator.
What can I use instead of Limoncello?
No worries if you don’t have Limoncello! You can simply omit it. For a similar flavor boost, use 2 tablespoons of fresh lemon juice mixed with 2 tablespoons of simple syrup (equal parts sugar and water, dissolved). A little orange juice or even a tablespoon of Grand Marnier can also add a nice, though different, citrus note.
How do I prevent a soggy cake bottom?
Making sure your sponge cake is completely cool before adding the mousse is the number one rule. A warm cake will create condensation. Also, the drizzle of Limoncello is optional and should be light. If you’re worried, you can even brush a thin layer of the lemon curd on the cake first to create a bit of a seal before adding the mousse.
Can I use store-bought lemon curd?
You can, but homemade is vastly superior in flavor. If you’re in a pinch, choose a high-quality store-bought curd. You’ll need about 1.5 to 2 cups total. Taste it first—if it’s very sweet, you might want to add a bit of fresh lemon zest to brighten it up before folding it into the whipped cream.
My whipped cream is grainy. What happened?
Grainy whipped cream usually means you’ve over-whipped it, and it’s starting to turn into butter. Unfortunately, you can’t fix it once it’s gone grainy. Start over with new, very cold cream. Whip just until you see firm peaks that hold their shape. Stop the mixer as soon as you get there.
How do I get clean slices of mousse cake?
Use a long, thin knife. Run it under very hot water, wipe it completely dry, and then make your slice. The heat helps the knife glide through the mousse and curd cleanly. Wipe and reheat the knife between each slice for the prettiest presentation on every plate.
Is it safe to eat raw egg yolks in the curd?
The curd is cooked to a safe temperature of 170°F, which pasteurizes the egg yolks. You cook it until it thickens and coats a spoon, which means it’s reached a temperature high enough to kill any potential bacteria. As long as you cook it properly, it is perfectly safe to eat.
Can I make this into cupcakes or a layer cake?
For cupcakes, bake the sponge batter in lined cups for about 18-20 minutes. Pipe the mousse on top and dollop with curd. For a layer cake, bake the sponge in two 8-inch rounds. Split each layer, then spread curd and mousse between them. It becomes a gorgeous, impressive layer cake!
Why did my sponge cake sink in the middle?
This is usually due to underbaking, opening the oven door too early, or majorly deflating the batter. Make sure your oven is preheated and use an oven thermometer for accuracy. Don’t open the door for at least the first 30 minutes. Test for doneness only when the cake looks golden and set.
The Final Slice
This Zesty Lemon Mousse Cake is more than just a dessert. It’s a little bit of work that delivers a whole lot of joy. The bright, sunny flavor, the dreamy textures, and the stunning look make it worth every minute. I’ve made it for so many of my own life’s happy moments, and I hope it becomes a part of yours too. So go ahead, bake a slice of sunshine. Your friends and family will thank you—and probably ask for seconds.
Equipment
- Grand bol
- Fouet
- Spatule
- Plaque à pâtisserie
- Papier sulfurisé
Ingredients
- 6 œufs
- 200 g sucre
- 120 ml jus de citron frais
- 2 cuil. à soupe zeste de citron
- 65 g beurre
- 240 ml crème à fouetter
- 1 cuil. à soupe extrait de vanille
- 1 cuil. à soupe sucre glace pour la garniture
Instructions
- Préchauffez votre four à 165°C et préparez un moule à charnière de 10 pouces avec du papier sulfurisé au fond.
- Dans un grand bol, battez les œufs, le sucre et l'extrait de vanille pendant 10 minutes jusqu'à ce que le mélange soit pâle et mousseux.
- Réduisez la vitesse du mixeur à basse et ajoutez la farine tamisée jusqu'à ce qu'elle soit juste combinée.
- Versez la pâte dans le moule préparé et faites cuire pendant 45 minutes jusqu'à ce qu'elle soit dorée.
- Une fois cuit, laissez le gâteau refroidir dans le moule pendant au moins 2 heures.
- Dans une casserole, fouettez les jaunes d'œufs, le sucre, le jus de citron et le zeste, puis cuisez à feu doux en remuant constamment pendant 10 minutes jusqu'à ce que le mélange épaississe.
- Incorporez le beurre jusqu'à ce que le lemon curd soit lisse et laissez refroidir au réfrigérateur.
- Battez la crème avec le sucre glace et l'extrait de vanille jusqu'à obtenir des pics fermes, puis incorporez la moitié du lemon curd au mélange de crème.
- Placez le gâteau dans le moule à charnière, arrosez de Limoncello et étalez la mousse au citron sur le dessus.
- Réfrigérez pendant plusieurs heures ou toute la nuit pour prendre.
- Une fois l'ensemble pris, retirez le gâteau du moule à charnière et étalez le reste de lemon curd sur le dessus, garnissez de crème fouettée et de zeste de citron confit.
Notes
Nutrition

Hi, I’m Olivia Parker, the founder of BakingSecret.com and a lifelong lover of all things sweet and homemade. I grew up in a small town in Oregon, where the smell of fresh cookies in my family’s kitchen sparked my passion for baking. Over the years, I turned that passion into a mission: to help home bakers feel confident, inspired, and creative.
After studying food science and working in several artisan bakeries across the U.S., I decided to create a space where everyone from beginners to seasoned bakers can find reliable recipes, expert tips, and a warm, welcoming community. BakingSecret.com is my way of sharing the magic of baking with the world. When I’m not testing new recipes, you’ll find me exploring farmers’ markets, collecting vintage cookbooks, or perfecting my sourdough technique.