
The Ultimate Blackberry Cheesecake: A Creamy Dream Come True
There’s a certain magic that happens when tart blackberries meet a rich, velvety cheesecake. I remember the first time I tried this combination; it was at a summer potluck, and one bite had everyone asking for the recipe. The juicy, dark berries cut through the lush cream cheese filling in the most perfect way. It felt like a fancy bakery treat, but the friend who made it swore it was easy. Spoiler alert: she was right. Now, this Blackberry Cheesecake is my go-to for wowing a crowd without spending all day in the kitchen. Let’s make that magic together!
A Berry Delicious History
Cheesecake itself is ancient, dating back to Greece. But the fruity topping version is a more modern, American twist. Think of the classic New York style, simple and pure. Then came the vibrant strawberry or cherry glazes. The blackberry variation is a beautiful nod to that tradition but feels a bit wilder, a bit more rustic. It celebrates the berry in its full glory—not just as a garnish, but as a star. Whether you use freshly foraged berries or frozen ones from the store, this dessert ties a thread from classic elegance to homemade, heartwarming goodness.
Why You’ll Love This Blackberry Cream Cheese Creation
This isn’t just another dessert. It’s a textural masterpiece. You get the crunchy, buttery crust, the impossibly smooth and tangy cheesecake layer, and that bright, jammy blackberry sauce on top. The flavors balance each other so well. It’s impressive but forgiving. The recipe guides you to avoid cracks, and even if one happens, that gorgeous purple sauce covers it right up! It’s the kind of dessert that makes people think you’re a pastry chef, but really, you just followed a few simple secrets.
Perfect Occasions for This Showstopper
This cheesecake dresses up or down beautifully. It’s perfect for:
- Summer BBQs and Picnics: It’s a refreshing, cool finish to a grilled meal.
- Holiday Gatherings: The deep purple hue is stunning on a Christmas or Thanksgiving table.
- Birthdays: A fabulous alternative to traditional birthday cake.
- Just Because: Sometimes, a Tuesday deserves a slice of gorgeous cheesecake.
Ingredients for Your Blackberry Cheesecake
Let’s gather our players. Using full-fat, quality ingredients is key for the best texture and flavor.
For the Crust:
- 1 1/2 cups graham cracker crumbs
- 1/4 cup granulated sugar
- 1/2 teaspoon cinnamon (optional, but lovely)
- 1/2 cup (1 stick) unsalted butter, melted
For the Cheesecake Filling:
- 2 pounds (four 8-oz blocks) cream cheese, softened
- 1 cup granulated sugar
- 3 large eggs, at room temperature
- 1 teaspoon pure vanilla extract
- 1/4 cup sour cream
- 1/4 cup heavy cream
For the Blackberry Sauce:
- 2 cups fresh or frozen blackberries
- 1/4 cup granulated sugar
- 1 tablespoon fresh lemon juice
- 1 teaspoon cornstarch (optional, for thickening)
- 1 tablespoon water (if using cornstarch)
Handy Substitution Options
No stress if you’re missing something! Here are easy swaps:
- Graham Cracker Crumbs: Use digestive biscuits, vanilla wafers, or even ginger snaps for a spiced twist.
- Sour Cream: Plain, full-fat Greek yogurt works in a pinch.
- Fresh Blackberries: Frozen are absolutely fine and often more affordable. No need to thaw.
- Heavy Cream: You can use all sour cream instead, but the heavy cream makes it extra luscious.
Let’s Make This Blackberry Cream Cheese Dream!
Clear some counter space, put on some music, and let’s bake. Read through all steps first—it helps!
Step 1: Prepare the Crust
Preheat your oven to 325°F (163°C). In a medium bowl, mix the graham cracker crumbs, sugar, and cinnamon. The smell is already so cozy! Pour in the melted, golden butter. Stir until every crumb is coated and the mixture looks like wet sand. Dump it into a 9-inch springform pan. Using the bottom of a glass or a measuring cup, press the crumbs firmly and evenly across the bottom. A solid, compact crust is your foundation. Bake it for 10 minutes, then let it cool on a rack. This pre-baking stops it from getting soggy.
Pro tip: For easy removal, you can line the bottom of your pan with a round of parchment paper before adding the crumbs.
Step 2: Prepare the Cheesecake Filling
Now for the main event! In a large bowl, beat the softened cream cheese with a mixer until it’s completely smooth. No lumps allowed! This can take 2-3 minutes. Scrape down the bowl. Add the sugar and beat again until it’s fully incorporated and creamy. Next, add the eggs one at a time, mixing just until each yellow yolk disappears into the white batter. Over-beating eggs can incorporate too much air and cause cracks. Finally, mix in the vanilla, sour cream, and heavy cream. The batter will become gloriously silky and pourable. Pour it over your cooled crust and gently smooth the top.
Step 3: Bake and Cool with Patience
Place the pan in the preheated oven. Bake for 50-60 minutes. The cheesecake is done when the edges are set and slightly puffed, but the center (about a 3-inch circle) still has a slight jiggle, like Jell-O. Do not overbake! Turn off the oven, crack the door open with a wooden spoon, and let the cheesecake cool inside for 1 hour. This gradual cooling is the #1 secret to preventing cracks. After the hour, let it cool completely at room temperature, then refrigerate for at least 4 hours, but overnight is truly best for the perfect slice.
Step 4: Prepare the Blackberry Sauce
While the cheesecake chills, make the vibrant topping. In a saucepan, combine blackberries, sugar, and lemon juice. Cook over medium heat. The berries will start to release their deep, ruby juice and pop. Stir occasionally. Let it simmer for about 10 minutes until saucy. For a thicker glaze, make a slurry by mixing cornstarch with water, then stir it into the bubbling berries for a minute. Let the sauce cool completely—it will thicken more as it sits. The contrast between the cold cheesecake and the cool berry sauce is divine.
Step 5: Assemble and Serve
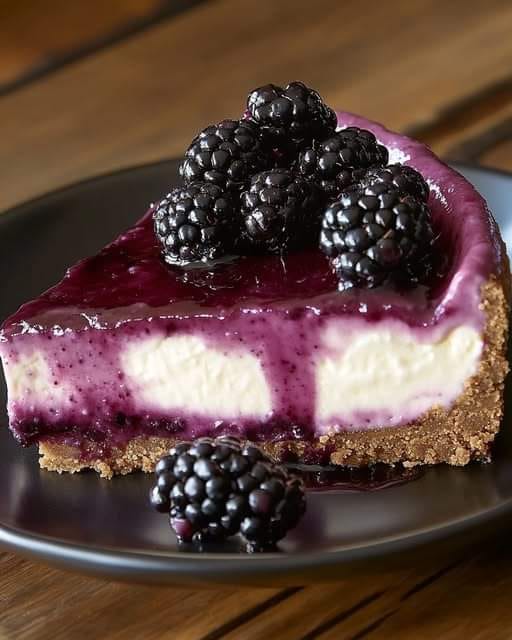
The final touch! Once your cheesecake is fully chilled and set, spread the cooled blackberry sauce evenly over the top. Get artistic with swirls if you like. For a gorgeous finish, garnish with a few fresh blackberries and maybe a mint leaf. Run a thin knife around the edge of the springform pan, then unlock and remove the ring. Slice with a clean, hot knife (dip it in hot water, wipe, slice) for perfect pieces. Get ready for the compliments!
Chef’s Tip: For an extra layer of flavor, stir a teaspoon of lemon zest into the cream cheese filling. It makes the blackberries sing!
Timing Breakdown
Good baking is about planning. Here’s your schedule:
- Prep Time: 30 minutes
- Cook Time: 60 minutes (plus crust baking)
- Cooling Time (Oven): 1 hour
- Chilling Time: 4 hours minimum (overnight ideal)
- Total Time (including chill): About 6 hours
Chef’s Secret: The Room Temperature Rule
This is non-negotiable for a smooth filling. Your cream cheese, eggs, and sour cream must be at room temperature. Take them out of the fridge 1-2 hours before you start. Cold ingredients don’t blend smoothly, leading to a lumpy batter that can bake unevenly. If you forget, you can gently warm the cream cheese blocks in the microwave at 10% power for short bursts, but room temp is always best.
A Berry Interesting Fact
Blackberries aren’t actually berries in the botanical sense! They’re “aggregate fruits,” meaning each little juicy bulb (drupelet) is its own tiny fruit with a seed. This unique structure is why they burst so beautifully into sauce. They’re also packed with antioxidants and vitamin C, so feel a tiny bit virtuous about that second slice.
Necessary Equipment
You don’t need fancy gear, just a few basics:
- 9-inch springform pan (essential!)
- Electric hand mixer or stand mixer
- Medium and large mixing bowls
- Saucepan
- Measuring cups and spoons
- Spatula
How to Store Your Blackberry Cheesecake
Cover the cheesecake tightly with plastic wrap or store it in an airtight cake carrier. It will keep beautifully in the refrigerator for up to 5 days. The flavors actually meld and get even better on day two and three.
For longer storage, you can freeze the cheesecake (without the sauce) for up to 2 months. Wrap the whole cheesecake or individual slices first in plastic wrap, then in foil. Thaw overnight in the fridge before adding your sauce and serving.
Store any extra blackberry sauce in a separate jar in the fridge for up to a week. It’s fantastic on your morning oatmeal, yogurt, or even ice cream.
Tips and Advice for Success
- Don’t Peek! Resist opening the oven door during the first 45 minutes of baking. Sudden temperature drops can cause cracks.
- Water Bath Option: For the ultimate silkiness with no risk of cracks, bake your cheesecake in a water bath. Wrap the springform pan bottom in foil, place it in a roasting pan, and pour hot water halfway up the sides.
- Seedless Sauce: If you don’t like seeds, press the cooked blackberry sauce through a fine-mesh sieve after cooking.
Presentation Tips to Impress Your Guests
- Place each slice on a drizzle of extra blackberry sauce.
- Add a dollop of freshly whipped cream and a single perfect blackberry on the side.
- For a holiday feel, garnish with edible gold flakes or a sprig of fresh rosemary.
- Serve on simple white plates to let the purple color truly pop.
Healthier & Fun Recipe Variations
Love this base recipe? Try these twists!
- Blackberry Swirl Cheesecake: Instead of topping, drop spoonfuls of sauce onto the filled crust and use a toothpick to swirl it marbly and beautiful before baking.
- Mini Cheesecakes: Use a muffin tin with liners. Press crust into the bottom, fill 3/4 full, and bake for 18-22 minutes. Top each with a spoonful of sauce for perfect individual treats.
- Lemon-Blackberry: Add 2 tablespoons of lemon zest and 1/4 cup lemon juice to the filling for a bright, tangy kick.
- Gluten-Free: Use gluten-free graham crackers or almond flour mixed with a little butter and sugar for the crust.
- No-Bake Version: Use a no-bake cheesecake filling recipe, set it in the fridge, and top with this cooked, cooled blackberry sauce.
- Mixed Berry Bliss: Use a mix of blackberries, raspberries, and blueberries for the sauce. It’s a rainbow of flavor!
Common Mistakes to Avoid
Mistake 1: Using Cold Ingredients
This is the biggest culprit for a lumpy, dense cheesecake. Cold cream cheese doesn’t blend smoothly with sugar and eggs. You end up with tiny bits of unmixed cheese that bake into unpleasant bits. The batter can also become overworked as you try to beat the lumps out, adding too much air. Always plan ahead. Let your cream cheese, eggs, and dairy sit on the counter until they are no longer chilly to the touch.
Mistake 2: Over-Baking the Cheesecake
It’s so easy to do! We’re used to cakes being fully set. But a perfect cheesecake should still wobble slightly in the center when you take it out. It will firm up as it cools. If you bake it until the center is completely firm, it will be dry, crumbly, and likely cracked. Trust the “jiggle test.” The edges will look set and slightly puffed, but a small circle in the middle should move like soft Jell-O when you gently shake the pan.
Mistake 3: Skipping the Gradual Cool-Down
Pulling a hot cheesecake out into cool kitchen air is a shock. The sudden temperature change makes it contract quickly, almost guaranteeing a giant crack right down the middle. Letting it cool down slowly in the turned-off oven with the door ajar mimics a professional baker’s slow-cooling process. It’s the most effective trick for a flawless top. Patience here saves heartache later.
Mistake 4: Not Letting it Chill Long Enough
Four hours in the fridge is the bare minimum. Slicing into a cheesecake that hasn’t fully set is a messy disaster. It will ooze and won’t hold its shape. For the cleanest, most perfect slices and the best creamy texture, let it chill overnight. The wait is hard, but it makes all the difference. Think of it as the cheesecake’s final, essential setting time.
Frequently Asked Questions
Can I use frozen blackberries for the sauce?
Absolutely! Frozen blackberries work perfectly for the sauce. There’s no need to thaw them first. Just add them frozen to the saucepan with the sugar and lemon juice. They may take a minute or two longer to break down and release their juices, but the end result is just as delicious and vibrant. Using frozen berries is a great year-round option and often more budget-friendly than fresh.
Why did my cheesecake crack on top?
Cracks usually happen for three main reasons: over-beating the batter (which adds too much air), over-baking, or cooling too quickly. To avoid them, mix just until ingredients are combined after adding the eggs. Don’t over-whip. Bake until just set with a wobbly center, and always use the slow cool-down method in the oven. And remember, if a crack does appear, your luxurious blackberry sauce will cover it completely, so no one will ever know!
How do I know when the cheesecake is done baking?
Look for a set perimeter that’s slightly puffed, about 1-2 inches in from the edge of the pan. The very center (about the size of a lemon) should still have a slight jiggle when you gently shake the pan. It should look soft but not liquid. The cheesecake will continue to cook from residual heat as it cools in the oven. A toothpick test doesn’t work well here—it will never come out completely clean on a creamy cheesecake.
Can I make this cheesecake ahead of time?
Yes, it’s actually the ideal make-ahead dessert! Cheesecake needs that long chill time anyway. You can bake and chill it completely up to two days before serving. Add the blackberry sauce topping the day you plan to serve it for the freshest look. The assembled cheesecake holds up beautifully in the fridge for a full day with the sauce on it. This makes it stress-free for entertaining.
Do I have to use a springform pan?
For a traditional tall cheesecake, a springform pan is highly recommended. The removable sides are essential for getting the cheesecake out without damaging it. In a pinch, you could use a deep 9-inch pie dish, but serving slices will be messier. For a thinner cheesecake, a 9×13 inch baking dish could work, but the baking time would need to be reduced significantly.
What’s the purpose of sour cream in the filling?
Sour cream (along with the heavy cream) adds extra richness and a delightful tang that balances the sweetness. More importantly, it adds moisture and helps create a smoother, creamier texture. The extra fat content also helps stabilize the filling, contributing to that velvety mouthfeel that makes cheesecake so irresistible. It’s a small ingredient that makes a big difference.
My sauce is too runny/thick. How can I fix it?
For a runny sauce, mix a teaspoon of cornstarch with a tablespoon of cold water to make a slurry. Stir this into the simmering berry mixture and cook for 1-2 more minutes until thickened. For a sauce that’s too thick, simply stir in a teaspoon of water or lemon juice at a time until it reaches your desired consistency. Remember, it will also thicken a bit more as it cools.
Can I freeze blackberry cheesecake?
You can! Freeze it without the sauce for best results. Wrap the cooled, chilled cheesecake tightly in plastic wrap, then in foil. It will keep for up to 2 months. Thaw it overnight in the refrigerator. Make fresh blackberry sauce when you’re ready to serve. You can freeze slices individually for a quick sweet treat anytime.
Is there a way to make a seedless blackberry sauce?
Easily. After cooking the berries down into a sauce, pour the mixture through a fine-mesh sieve set over a bowl. Use a spatula to press all the juicy pulp through, leaving the seeds behind in the sieve. You’ll have a smooth, vibrant, and elegant puree. This is a great option if you’re serving to guests who might not enjoy the seeds.
Can I use other fruits with this same cheesecake base?
This creamy cheesecake base is a fantastic blank canvas. You can top it with almost any fruit sauce or compote. Try raspberry, blueberry, strawberry, or a mix. For a decadent twist, consider a chocolate ganache instead. The basic method for preparing and baking the cheesecake remains the same, allowing you to get creative with flavors all year round.
This creamy, dreamy Blackberry Cheesecake is more than just a dessert—it’s a baking adventure with a delicious, purple-topped reward. It combines a simple technique with stunning results. For more cheesecake inspiration, from classic New York to wildly creative flavors, explore our full collection of favorite cheesecake recipes. Remember, the key is room-temperature ingredients, a watchful eye on the bake, and that all-important slow cool-down. Whether for a special occasion or a sweet weekend project, this recipe is sure to become a treasured part of your baking repertoire. Now, go preheat that oven and get ready for some serious berry bliss!
Equipment
- Grand bol
- Fouet
- Spatule
- Moule à charnière de 9 pouces
- Casserole
Ingredients
- 1 1/2 tasse chapelure de biscuits Graham
- 1/4 tasse sucre
- 1/2 cuillère à café cannelle (facultatif)
- 1/2 tasse beurre non salé, fondu
- 2 livres fromage à la crème, ramolli
- 1 tasse sucre
- 3 œufs, à température ambiante
- 1 cuillère à café extrait de vanille
- 1/4 tasse crème aigre
- 1/4 tasse crème épaisse
- 2 tasses mûres fraîches ou surgelées
- 1/4 tasse sucre
- 1 cuillère à soupe jus de citron frais
- 1 cuillère à café fécule de maïs (facultatif)
- 1 cuillère à soupe eau (si utilisation de fécule de maïs)
Instructions
- Préchauffez votre four à 163°C (325°F).
- Dans un bol moyen, mélangez les chapelures de biscuits Graham, le sucre et la cannelle, puis incorporez le beurre fondu et mélangez jusqu'à ce que le mélange soit homogène.
- Appuyez sur le mélange dans un moule à charnière de 9 pouces pour former une croûte et enfournez pendant 10 minutes.
- Dans un grand bol, battez le fromage à la crème jusqu'à ce qu'il soit lisse, puis ajoutez le sucre et mélangez jusqu'à obtenir une consistance crémeuse.
- Ajoutez les œufs un par un, en mélangeant juste assez pour les incorporer. Ajoutez ensuite la vanille, la crème aigre et la crème épaisse.
- Versez le mélange de cheesecake sur la croûte refroidie et lissez le dessus.
- Enfournez pendant 50-60 minutes jusqu'à ce que les bords soient pris mais que le centre ait encore un léger mouvement.
- Éteignez le four, entrouvrez la porte et laissez le cheesecake refroidir dans le four pendant 1 heure.
- Refroidissez complètement à température ambiante puis réfrigérez pendant au moins 4 heures (idéalement toute la nuit).
- Dans une casserole, combinez les mûres, le sucre et le jus de citron; faites cuire à feu moyen jusqu'à ce que le mélange devienne sirupeux (environ 10 minutes).
- Si vous le souhaitez, incorporez une fécule de maïs mélangée à de l'eau pour épaissir la sauce et laissez-la refroidir complètement.
- Étalez la sauce aux mûres refroidie sur le cheesecake réfrigéré et décorez avant de servir.
Notes
Nutrition

Hi, I’m Olivia Parker, the founder of BakingSecret.com and a lifelong lover of all things sweet and homemade. I grew up in a small town in Oregon, where the smell of fresh cookies in my family’s kitchen sparked my passion for baking. Over the years, I turned that passion into a mission: to help home bakers feel confident, inspired, and creative.
After studying food science and working in several artisan bakeries across the U.S., I decided to create a space where everyone from beginners to seasoned bakers can find reliable recipes, expert tips, and a warm, welcoming community. BakingSecret.com is my way of sharing the magic of baking with the world. When I’m not testing new recipes, you’ll find me exploring farmers’ markets, collecting vintage cookbooks, or perfecting my sourdough technique.