
A Sweet Taste of Nostalgia: Strawberry Custard Tarts
Remember that pink bakery box from childhood? The one filled with perfect little treats topped with a glossy red strawberry? For me, they were a highlight of any family gathering. Today, I’m bringing that classic 80s memory right to your kitchen with these homemade Strawberry Custard Tarts. They’re lovingly known as “Tim Tarts” across Canada, and making them is a joy. Imagine a buttery, crisp pastry shell filled with velvety vanilla custard and crowned with fresh, juicy strawberries. It’s pure happiness on a plate!
More Than Just a Tart: A Canadian Classic
These tarts have a special place in Canadian hearts. Inspired by the beloved store-bought version, they represent a wave of nostalgia for simpler times. The modern homemade version lets you control the quality, using real vanilla and fresh berries instead of artificial flavors. It’s a wonderful way to honor tradition while adding your personal touch. This recipe keeps the spirit of the classic intact but elevates it with a richer, creamier custard and a pastry that melts in your mouth.
Why You’ll Absolutely Love This Strawberry Custard Tart Recipe
This recipe is a winner for so many reasons. First, the flavor combination is timeless: sweet berries, rich custard, and flaky pastry. Second, while there are a few steps, each one is straightforward and rewarding. You’ll feel like a pastry chef when you pipe that creamy filling! Finally, they are incredibly versatile. They look stunning on any table, from a casual picnic to a fancy dinner party. Trust me, the smiles you get when you serve these are the best reward.
The Perfect Occasion for Strawberry Custard Tarts
These tarts are celebration food. They are perfect for patriotic holidays like Canada Day, with their red and white colors. They shine at summer barbecues, birthday parties, and Mother’s Day brunches. I love making them for a weekend treat when strawberries are at their peak. Any time you want to add a touch of sweet, nostalgic joy to your day, these Strawberry Custard Tarts are the answer.
Gathering Your Ingredients for Strawberry Custard Tarts
Let’s gather everything you need. Using good-quality ingredients makes a noticeable difference, especially in the custard.
- For the Pastry: 2 1/4 cups all-purpose flour, 1/4 tsp salt, 3/4 cup soft butter, 1/3 cup white sugar, 1 extra-large egg (lightly beaten).
- For the Vanilla Custard: 3 cups whole milk, 1/3 cup all-purpose flour, 2/3 cup sugar, a pinch of salt, 3 extra-large egg yolks (slightly beaten), 4 tbsp butter, 1-2 tbsp good-quality vanilla extract.
- For Assembly & Optional Glaze: Fresh strawberries (about 12 whole and 12 halves for decoration), 1/2 cup strawberry jelly or jam, 1-2 tbsp water.
Simple Substitutions for Your Tarts
Don’t stress if you’re missing an ingredient! Here are some easy swaps.
- Pastry Flour: You can use pastry flour for a more tender crust.
- Custard Milk: 2% milk works, though whole milk gives the richest texture.
- Vanilla: If you have a vanilla bean, use the seeds from one bean for incredible flavor.
- Strawberry Glaze: Use fresh strawberry puree mixed with a little sugar instead of jelly.
Crafting Your Strawberry Custard Tarts: A Step-by-Step Guide
Step 1: Creaming the Butter and Sugar
Start with your pastry. In a large bowl, mix the soft butter and sugar together until smooth and creamy. The mixture will turn a pale, fluffy yellow. Add the lightly beaten egg and mix for another full minute. This incorporates the egg fully and builds the structure for your dough. Pro tip: Make sure your butter is soft, not melted, for the perfect texture.
Step 2: Bringing the Dough Together
In another bowl, combine your flour and salt. Slowly add this dry mixture to your butter mixture. Mix gently until a soft, shaggy dough forms. It will come together into a beautiful, cohesive ball. Avoid over-mixing. Divide the dough into two rounds, wrap them tightly in plastic wrap, and let them rest in the fridge. This chill time relaxes the dough and makes rolling easier.
Step 3: Rolling and Baking the Tart Shells
After an hour, roll out the dough on a lightly floured surface. Cut out circles to fit your tart pans—I use 3-inch pans. Place the shaped dough into the pans and chill them again for 20 minutes in the fridge. This prevents shrinkage. Poke several holes in the bottom of each shell with a fork. Bake at 400°F (200°C) for about 15 minutes until golden and crisp. Let them cool completely on a wire rack.
Step 4: Scalding the Milk for Custard
Now for the creamy heart of the tart: the custard. Heat your whole milk just until it’s steaming and small bubbles form at the edge—this is scalding. Be careful not to let it boil. Meanwhile, in a saucepan, combine flour, sugar, and salt. This dry blend will thicken your custard beautifully.
Step 5: Thickening the Custard Base
Slowly whisk about one-third of your scalded milk into the flour mixture in the saucepan. Stir constantly over medium heat. The mixture will start to thicken into a paste. Add the next third of milk, whisking until it thickens again. Repeat with the final third. You’ll see it transform into a smooth, thick base. Keep stirring to avoid lumps.
Step 6: Tempering the Eggs for Smooth Custard
Here’s the key to a silky custard: tempering the eggs. Remove your thickened base from the heat. Slowly pour about 1/2 cup of the hot mixture into your beaten egg yolks, whisking constantly. This gently warms the eggs. Then, pour the entire egg mixture back into the saucepan. Return to medium heat and stir for 1-2 minutes until it’s pudding-thick. Chef’s tip: Constant stirring prevents curdling!
Step 7: Finishing the Vanilla Custard
Remove the custard from the heat. Stir in the butter and your glorious vanilla extract. The butter adds richness and the vanilla fills the kitchen with its warm aroma. Let the custard cool completely in the fridge. It will set into a perfect, pipeable filling.
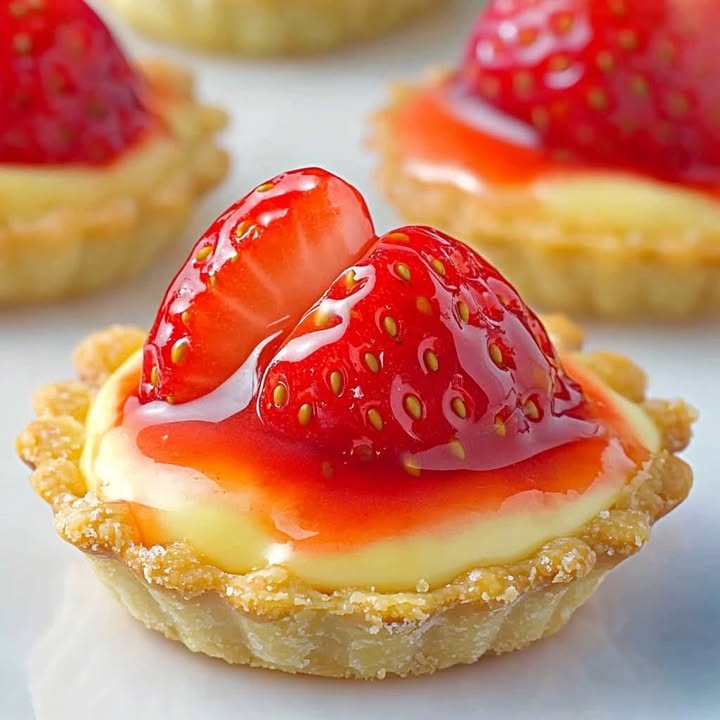
Step 8: Assembling the Strawberry Custard Tarts
This is the fun part! Place one whole, beautiful strawberry in the center of each cooled tart shell. Transfer your chilled custard to a piping bag or a Ziploc bag with the corner snipped off. Pipe the custard around the strawberry, covering it completely. It creates a lovely creamy nest. Top with strawberry halves for decoration.
Step 9: Adding the Optional Glaze
For a glossy, professional finish, make the simple glaze. Microwave the strawberry jelly with a little water for 30 seconds. Stir until smooth. Brush this lightly over the strawberry halves. It gives them a shiny, jewel-like look and adds a hint of extra sweetness.
Step 10: Serving Your Beautiful Tarts
Your Strawberry Custard Tarts are ready! Serve them chilled or at room temperature. The crisp shell, cool creamy center, and fresh berry top create a perfect bite. They are a sweet and creamy triumph, perfect for sharing with loved ones.
Time Needed for Strawberry Custard Tarts
Patience makes perfect here!
- Prep Time: 30 minutes (for pastry and custard base)
- Cooking Time: 15 minutes (shells) + 10 minutes (custard)
- Chilling/Resting Time: 1 hour (dough) + 2 hours (custard cooling)
- Assembly Time: 15 minutes
- Total Time: Approximately 4 hours (including essential cooling)
My Chef’s Secret for the Best Custard
The secret is in the vanilla. Don’t skimp! Use a good-quality pure vanilla extract or, better yet, the seeds from a real vanilla bean. That deep, aromatic flavor is what makes the custard taste truly special and nostalgic.
A Little Extra Sweet Info
Did you know using egg yolks gives custard its signature rich yellow color and luxurious texture? The fat in the yolks creates that smooth, melt-in-your-mouth feeling that defines a great custard tart.
Equipment You’ll Need
No special tools needed! Just:
- Mixing bowls
- Saucepan
- Whisk
- Rolling pin
- Tart pans (3-inch size works great)
- Piping bag or Ziploc bag
- Pastry brush (for glaze)
Storing Your Strawberry Custard Tarts
These tarts are best enjoyed fresh, but you can store them. Place assembled tarts in a single layer in an airtight container. Keep them in the refrigerator for up to 2 days. The pastry may soften slightly from the custard, but they will still taste delicious.
For longer storage, consider storing components separately. Bake and cool the pastry shells and keep them in an airtight container at room temperature for 2 days. Make the custard and keep it covered in the fridge for up to 3 days. Assemble with fresh strawberries just before serving.
Do not freeze the assembled tarts, as the custard and berries will not hold their texture well. However, you can freeze the unbaked pastry dough for up to a month, thawing it in the fridge before rolling.
My Top Tips and Advice
- For the custard, constant stirring is non-negotiable. It prevents lumps and ensures a smooth texture.
- Let the custard cool completely before piping. If it’s too warm, it will be runny and won’t hold its shape.
- Use strawberries that are ripe but still firm. Very soft berries might get mushy.
- If your pastry dough feels too soft after rolling, pop it back in the fridge for 10 minutes. It’s easier to handle when chilled.
Presentation Ideas to Make Them Sparkle
- Serve on a tiered cake stand for a party—they look so elegant!
- Dust a little powdered sugar around the plate for a snowy effect.
- Add a tiny mint leaf next to the strawberry for a fresh green contrast.
- For a Canada Day party, serve them on a red or white platter.
Delicious Variations to Try
Love this format? Try these other tasty twists!
- Mixed Berry Custard Tarts: Use a mix of blueberries, raspberries, and blackberries for a patriotic berry medley.
- Lemon Curd & Berry Tarts: Swap the vanilla custard for bright, tangy lemon curd. Top with raspberries.
- Chocolate Custard Tarts: Add 2 tablespoons of cocoa powder to the custard base for a chocolate version. Top with a strawberry or a raspberry.
- Mini Peach Custard Tarts: Use a slice of fresh peach in the center and peach jam for the glaze. A summer delight!
- No-Bake Cheesecake Tarts: Fill the baked shells with a simple no-bake cheesecake mixture and top with glazed berries.
- Savory Twist Tartlets: Use the same pastry for a savory appetizer. Fill with herbed goat cheese and top with a balsamic-glazed cherry tomato.
If you adore creamy baked desserts, you’ll also love our Peach Raspberry Cheesecake or our decadent Dreamy White Chocolate Cheesecake. For a quicker frozen treat, our Strawberry No-Bake Ice Cream is perfect. And for chocolate lovers, the Chocolate Peanut Delight bar is irresistible!
Common Mistakes to Avoid
Mistake 1: Overworking the Pastry Dough
If you mix the pastry dough too much after adding the flour, it can become tough. Overworked dough has too much developed gluten, which leads to a hard, chewy crust instead of a light, flaky one. Mix just until the dough comes together into a ball. Stop immediately when no dry flour remains. Pro tip: Use your hands to gently bring the dough together at the very end for better control.
Mistake 2: Not Tempering the Eggs Properly
Pouring hot custard base directly into the egg yolks will scramble them! You must “temper” them by slowly adding a small amount of hot mixture while whisking. This gently raises the eggs’ temperature without cooking them solid. Then you can safely combine everything. Always whisk constantly during this step for a perfectly smooth custard without little cooked egg bits.
Mistake 3: Using Warm Custard to Fill the Tarts
Filling the tart shells with custard that hasn’t cooled completely is a recipe for soggy shells and a runny mess. Warm custard is too soft to pipe neatly and will soften the crisp pastry. Let the custard chill in the fridge until it’s completely cold and firm. This gives it the perfect thick, pipeable texture and keeps your tart shells crisp.
Mistake 4: Skipping the Second Chill for the Tart Shells
After you shape the dough into the tart pans, chilling them again for 20 minutes is crucial. This final chill relaxes the dough and prevents shrinkage during baking. If you skip it, your beautiful tart shells might pull away from the sides of the pan and become misshapen. It’s a small step that makes a big difference in the final look.
Mistake 5: Overbaking the Custard
The custard cooks on the stovetop, not in the oven. Once you add the tempered eggs back to the pot and cook for 1-2 minutes, watch it carefully. It should thicken to a pudding consistency. If you cook it too long, it can become overly thick, almost rubbery, or even curdle. Remove it from the heat as soon as it coats the back of a spoon thickly.
For all your desserts, proper storage is key for taste and safety. Always follow guidelines for safe meal storage to keep your treats delicious and fresh.
Frequently Asked Questions
Can I use frozen strawberries for Strawberry Custard Tarts?
It’s best to use fresh strawberries for both the center and the decoration. Frozen berries become very soft and release a lot of water when thawed. This extra moisture can make your custard watery and your pastry soggy. Fresh strawberries give the right firm texture and bright flavor. If you must use frozen, thaw them completely and pat them dry very well with paper towels before using.
How can I make my custard thicker or thinner?
The thickness of your custard depends on the cooking time and the ratio of flour. Cooking it a bit longer will make it thicker. If you find it’s too thick after chilling, you can gently stir in a tablespoon or two of cold milk to loosen it. If it’s too thin, it likely needed more cooking time on the stove. Remember, it continues to set as it cools in the fridge.
Why did my custard get lumpy?
Lumps usually happen if you don’t stir constantly while adding the milk to the flour mixture, or if the heat is too high. Always whisk steadily and keep the heat at medium. If you get small lumps, you can try pressing the custard through a fine-mesh sieve after it’s cooked to smooth it out. But constant, gentle stirring is the best prevention.
Can I make the tart shells ahead of time?
Absolutely! This is a great time-saving tip. You can bake the tart shells up to 2 days ahead. Store them in an airtight container at room temperature. The custard can also be made 2-3 days ahead and stored covered in the refrigerator. Assemble with fresh strawberries the day you plan to serve them for the best texture and look.
What’s the best way to pipe the custard without a piping bag?
A piping bag is easiest, but a simple Ziploc bag works perfectly. Spoon the cooled custard into the bag. Seal it, then snip a medium-sized hole off one corner. Squeeze gently from the top to pipe the custard around the strawberry. You can also use a small spoon to carefully dollop and spread the custard, though piping gives a prettier, more professional finish.
My pastry shrunk in the pan during baking. What went wrong?
Pastry shrinkage is often caused by not chilling it enough or rolling it out when the dough is too warm. Make sure you chill the initial dough for the full hour. Then, after you’ve shaped the dough into the tart pans, chill them again for 20 minutes before baking. This double chill relaxes the gluten and prevents shrinkage.
Can I use a different fruit for the topping?
Yes, you can! This recipe is versatile. Raspberries, blueberries, or sliced peaches would all be beautiful. For a glaze, match the jelly to your fruit—use raspberry jam for raspberries, etc. Just make sure your chosen fruit isn’t too watery. Avoid fruits like watermelon or citrus segments that release too much juice.
Is there a way to simplify the custard-making process?
If you’re nervous about tempering eggs, you can try a simplified “pudding” method. Use an envelope of cook-type vanilla pudding mix as your base, prepared with milk according to package directions. Then, still enrich it by stirring in the 4 tbsp butter and vanilla extract after it’s cooked. It won’t be exactly the same, but it will be delicious and much simpler.
How do I prevent the bottom of my tart shells from puffing up?
Poking holes (docking) in the pastry before baking is essential! Use a fork to prick several holes in the bottom of each uncooked tart shell. This allows steam to escape during baking. Without these holes, steam gets trapped and pushes the pastry up, creating an uneven, bubbly base that’s hard to fill.
Can I use this custard recipe for other desserts?
Definitely! This vanilla custard is a wonderful base for many desserts. You can use it as a filling for a classic custard pie, as a layer in a trifle, or simply as a delicious pudding served in bowls topped with fruit. It’s a versatile, creamy recipe you’ll use again and again.
If you’re passionate about pies and tarts like I am, you’ll find so many more inspiring ideas in our collection of pie and tart recipes. From classic fruit pies to modern twists, there’s always something new to bake.
Your Own Sweet Memory
Making these Strawberry Custard Tarts is more than just following a recipe. It’s creating a moment. The smell of buttery pastry baking, the joy of piping that creamy custard, and the final beauty of the glazed strawberry topping—it’s all pure kitchen magic. These tarts connect us to sweet memories and let us share new ones. So gather your ingredients, take your time, and enjoy every step. The delicious result and the happy faces around your table will be worth it. Happy baking!
Equipment
- Grand bol
- Fouet
- Roulette à pâtisserie
- Moules à tarte (3 pouces)
- Pinceau de pâtisserie
Ingredients
- 2 1/4 tasses farine tout usage
- 1/4 c. à café sel
- 3/4 tasse beurre mou
- 1/3 tasse sucre blanc
- 1 œuf extra-large œuf légèrement battu
- 3 tasses lait entier
- 1/3 tasse farine tout usage
- 2/3 tasse sucre
- une pincée sel
- 3 jaunes d'œufs jaunes d'œufs légèrement battus
- 4 c. à soupe beurre
- 1-2 c. à soupe extrait de vanille de bonne qualité
- 12 fraises entières fraises pour décoration
- 12 moitiés moitiés de fraises pour décoration
- 1/2 tasse gelée ou confiture de fraises
- 1-2 c. à soupe eau
Instructions
- Dans un grand bol, mélangez le beurre mou et le sucre jusqu'à obtenir un mélange lisse et crémeux.
- Ajoutez l'œuf légèrement battu et mélangez pendant une minute supplémentaire.
- Dans un autre bol, combinez la farine et le sel.
- Ajoutez lentement le mélange sec au mélange de beurre en mélangeant doucement jusqu'à l'obtention d'une pâte molle et éparse.
- Divisez la pâte en deux rondelles, enveloppez dans du film plastique et laissez reposer au réfrigérateur pendant 1 heure.
- Étalez la pâte sur une surface farinée, découpez des cercles et placez-les dans des moules à tarte.
- Refroidissez la pâte formée au réfrigérateur pendant 20 minutes, piquez des trous au fond, et faites cuire à 200°C pendant environ 15 minutes jusqu'à ce qu'ils soient dorés.
- Pour la crème, chauffez le lait entier juste jusqu'à ce qu'il commence à fumer.
- Dans une casserole, combinez la farine, le sucre et le sel jusqu'à ce qu'ils soient mélangés.
- Incorporez lentement un tiers du lait chaud dans le mélange de farine en remuant constamment à feu moyen jusqu'à épaississement.
- Répétez avec le reste du lait jusqu'à obtenir un mélange lisse et épais.
- Tempérez les jaunes d'œufs en versant lentement 1/2 tasse du mélange chaud tout en fouettant, puis remettez dans la casserole et faites cuire pendant 1-2 minutes.
- Incorporez le beurre et l'extrait de vanille pour terminer la crème et laissez refroidir complètement au réfrigérateur.
- Assemblez en plaçant une fraise entière au centre de chaque croûte et remplissez de crème autour.
- Pour le glaçage, chauffez la confiture au micro-ondes avec de l'eau pendant 30 secondes, remuez jusqu'à obtention d'un mélange homogène et badigeonnez sur les fraises.
- Servez froid ou à température ambiante.
Notes
Nutrition

Hi, I’m Olivia Parker, the founder of BakingSecret.com and a lifelong lover of all things sweet and homemade. I grew up in a small town in Oregon, where the smell of fresh cookies in my family’s kitchen sparked my passion for baking. Over the years, I turned that passion into a mission: to help home bakers feel confident, inspired, and creative.
After studying food science and working in several artisan bakeries across the U.S., I decided to create a space where everyone from beginners to seasoned bakers can find reliable recipes, expert tips, and a warm, welcoming community. BakingSecret.com is my way of sharing the magic of baking with the world. When I’m not testing new recipes, you’ll find me exploring farmers’ markets, collecting vintage cookbooks, or perfecting my sourdough technique.