
The Ultimate Reese’s Peanut Butter Roll: A Dreamy Dessert
Is there anything better than the magical combination of chocolate and peanut butter? I don’t think so! My family goes absolutely wild for anything Reese’s. So, I set out to create a show-stopping dessert that captures that flavor in every single bite. The result? This incredible Reese’s Peanut Butter Roll. Picture this: a light chocolate cake rolled around a cloud of homemade peanut butter filling, drizzled with rich ganache. It’s easier than it looks, and I promise, the smile on your friends’ faces will be worth every second. Let me show you how to make this peanut butter lover’s dream come true!
A Little Story Behind This Peanut Butter Roll
I’ve always loved the classic chocolate roll cake, or Swiss roll. It felt so fancy but was really just a simple sponge cake. One day, after my son finished a whole bag of Reese’s Mini Peanut Butter Cups, I had a lightbulb moment. What if I turned that elegant roll cake into a decadent, peanut butter-packed treat? My first few tries were… interesting. Let’s just say I learned the hard way that rolling a warm cake is a delicate art! After a bit of practice (and a few crumbly messes), I perfected the method. Now, this roll is my go-to for any special gathering. It combines the comfort of a classic dessert with the irresistible, salty-sweet punch we all crave from peanut butter cups.
Why You’ll Fall in Love With This Reese’s Roll
You will love this recipe because it’s the perfect balance of impressive and easy. The chocolate cake is soft and pliable, making it a joy to roll. The filling is creamy, dreamy, and packed with real peanut butter flavor. Plus, you get little crunchy surprises from the chopped Reese’s pieces in every slice. It’s a fantastic make-ahead dessert. You can prepare it a day before your party, leaving you stress-free when guests arrive. The flavor only gets better as it chills!
Perfect Occasions for This Dreamy Roll Cake
This cake is a total crowd-pleaser for so many events! It’s perfect for birthday parties, especially for the peanut butter fanatic in your life. Bring it to a potluck or holiday gathering like Christmas or Thanksgiving, and watch it disappear first. It also makes a wonderful weekend baking project with kids. They love smoothing out the filling and sprinkling on the peanut butter cup pieces. Any time you need a dessert that screams “wow,” this is your recipe.
Gathering Your Ingredients for Peanut Butter Bliss
- 1 box chocolate cake mix or homemade chocolate sponge cake batter
- 3 large eggs
- 1/4 cup vegetable oil
- 1/2 cup water
- 1/2 cup creamy peanut butter
- 1 cup powdered sugar
- 1/2 cup unsalted butter, softened
- 1 teaspoon vanilla extract
- 2 cups heavy cream
- 1 cup powdered sugar (for whipped cream)
- 1/2 cup Reese’s Mini Peanut Butter Cups, chopped
- 1/2 cup semi-sweet chocolate chips (for optional ganache)
- 1 tablespoon vegetable oil (for optional ganache)
Easy Ingredient Swaps and Substitutions
No worries if you need to tweak things! For a nut-free version, use sunflower seed butter instead of peanut butter. You can swap the Reese’s cups for chopped peanuts or even peanut butter chips. If you’re out of heavy cream for the whipped cream layer, a tub of extra-creamy whipped topping works in a pinch. For the cake, feel free to use your favorite homemade chocolate sponge recipe if you prefer not to use a mix. The goal is deliciousness, so make it work for you!
How to Make Your Own Reese’s Peanut Butter Roll
Get ready for some fun! Follow these simple steps to create your masterpiece.
Step 1: Bake the Chocolate Cake
First, preheat your oven to 350°F (175°C). Line a 15×10-inch jelly roll pan with parchment paper and give it a light spray with cooking spray. In a large bowl, prepare your chocolate cake mix according to the package directions, using the eggs, oil, and water listed above. The batter will be smooth and fragrant with cocoa. Pour it into your prepared pan, using a spatula to spread it into a nice, even layer. Pop it in the oven and bake for 15-18 minutes. You’ll know it’s done when the top springs back lightly to the touch. The smell of baking chocolate cake will fill your kitchen beautifully.
Step 2: Roll the Cake to Set Its Shape
This step is the secret to a perfect roll! As soon as the cake comes out of the oven, carefully run a knife around the edges to loosen it. Take a clean kitchen towel and dust it lightly with cocoa powder or powdered sugar. Flip the warm cake onto the towel. Gently peel off the parchment paper. Now, starting from one of the short ends, slowly and gently roll the cake up inside the towel. Let it cool completely rolled up like a log. This “trains” the cake to hold its rolled shape and prevents cracking later. Pro tip: Let it cool on a wire rack so air can circulate all around it.
Step 3: Whip Up the Peanut Butter Filling
While the cake cools, let’s make the amazing fillings. For the peanut butter filling, grab a medium bowl. Beat together the creamy peanut butter, softened butter, 1 cup of powdered sugar, and vanilla extract. Beat it for a good 2-3 minutes until it’s super light, fluffy, and smooth. In a separate, chilled bowl, make the whipped cream. Pour in the cold heavy cream and the other cup of powdered sugar. Whip on high speed until you see stiff peaks form. This fresh whipped cream adds a lovely lightness to the roll.
Step 4: Assemble Your Peanut Butter Masterpiece
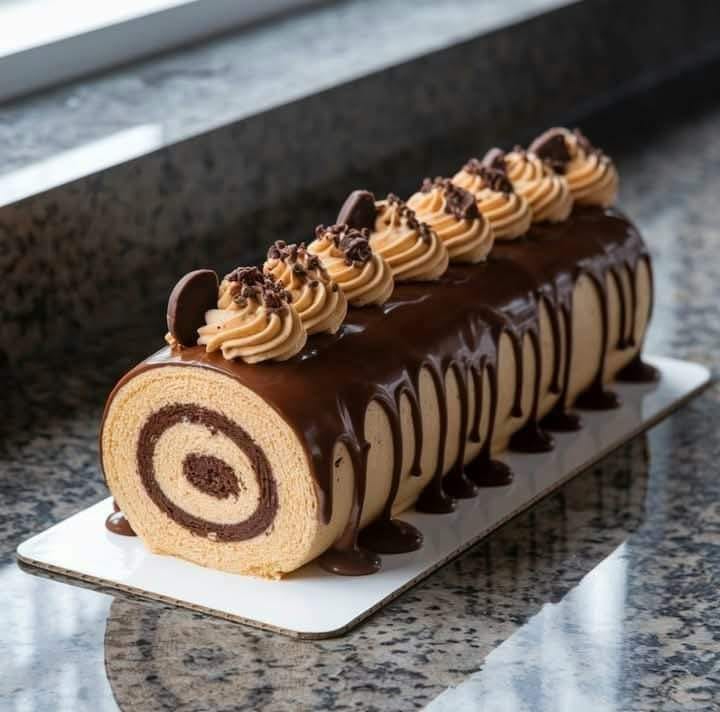
The fun part is here! Once the cake is completely cool, carefully unroll it. It will lay flat beautifully. Spread all of that delicious peanut butter filling evenly over the entire surface, leaving just a tiny border at one of the short ends. Now, sprinkle the chopped Reese’s Mini Peanut Butter Cups all over the filling. Next, gently spread the fresh whipped cream on top of the peanut butter layer. Now, take a deep breath and start rolling. Roll the cake forward, using the towel to help guide it, but don’t roll the towel inside. Keep it tight and steady. Once rolled, place it seam-side down on your serving platter.
Step 5: Add the Optional Chocolate Drizzle
For a gorgeous finishing touch, make a simple ganache. In a microwave-safe bowl, combine the chocolate chips and tablespoon of vegetable oil. Heat in 30-second bursts, stirring well after each, until smooth and glossy. Let it cool for just a minute so it’s not super runny. Drizzle the chocolate ganache artfully over the top of your roll. Don’t be shy—let it drip down the sides a little! The final touch is a few more chopped Reese’s pieces sprinkled on top of the wet ganache. Chef’s tip: For a cleaner slice, pop the whole roll in the fridge for at least an hour to firm up before serving.
Timing Your Baking Adventure
This recipe is great because the active time is short. Plan for about 20 minutes of hands-on prep work. The cake bakes in just 15-18 minutes. The most important time is the cooling period for the rolled cake, which takes about 45 minutes to an hour. So, from start to finish, you’re looking at about 1 hour and 30 minutes, including chilling time before serving.
- Prep Time: 20 minutes
- Cook Time: 18 minutes
- Cooling/Chilling Time: 1 hour
- Total Time: 1 hour 38 minutes
Chef’s Secret for the Perfect Roll
My absolute best trick is to slightly underbake the cake. Pull it out when it’s just set and the edges are pulling away from the pan, but it’s still very moist. A slightly underbaked cake is much more flexible and far less likely to crack when you roll it. It continues to cook a bit from residual heat after it’s out of the oven. This little secret has saved me from many a cracked cake!
A Fun Fact About Our Star Ingredient
Did you know Reese’s Peanut Butter Cups were invented by a former dairy farmer and shipping foreman for Milton S. Hershey? His name was H.B. Reese. He started making candy in his basement and, after some trial and error, landed on the iconic peanut butter cup in 1928. He used Hershey’s chocolate, and the rest is history! So when you bite into this roll, you’re enjoying a classic American flavor combination that’s nearly a century old.
What You’ll Need to Make It
You don’t need any fancy equipment! Just a few basics:
- 15×10-inch Jelly Roll Pan
- Parchment Paper
- Electric Mixer (hand or stand)
- Mixing Bowls (various sizes)
- Rubber Spatula
- Wire Cooling Rack
- Clean Kitchen Towel
Storing Your Leftover Peanut Butter Roll
This cake stores wonderfully. Because of the whipped cream and fresh filling, it needs to stay refrigerated.
Cover the platter loosely with plastic wrap or, for best results, place the whole roll in a large airtight container. It will keep beautifully in the fridge for 3-4 days. The flavors actually meld and get even better on the second day!
You can also freeze this roll for longer storage. Wrap the whole roll or individual slices tightly in plastic wrap, then again in foil. Freeze for up to 2 months. Thaw overnight in the refrigerator before serving.
My Best Tips and Advice for You
- Room temperature is key: Make sure your eggs and butter for the filling are truly at room temperature. This ensures a smooth batter and a fluffy filling without lumps.
- Chill your bowl: For the best whipped cream, chill your mixing bowl and beaters in the freezer for 10-15 minutes before you start.
- Don’t overfill: It’s tempting to add more filling, but too much can cause the cake to burst when you roll it. Stick to the amounts listed for a perfect roll.
- Use a serrated knife: For the cleanest slices, use a long serrated knife and wipe it clean with a damp towel between each cut.
Presentation Ideas to Wow Your Guests
Make your dessert table pop! Serve each slice on a white plate with a drizzle of extra chocolate sauce and a single whole Mini Reese’s Cup on the side. For a party, dust the whole platter with a light sprinkling of powdered sugar just before serving. You could also add a dollop of extra whipped cream and a sprinkle of sea salt on each slice to really highlight the sweet and salty flavors.
Craving More? Try These Other Delicious Recipes!
If you loved this peanut butter and chocolate combo, you simply must explore our other dessert creations. For another no-bake wonder that’s perfect for summer, you have to try this Refreshing No Bake Banana Split Cheesecake. It’s a fruity, creamy dream! If peanut butter is your true love, my Creamy Peanut Butter Pie is a must-make. It’s incredibly rich and satisfying. For a citrusy, lighter option, this sunny Orange Yogurt Cake with Apricot Glaze is a total crowd-pleaser. And if you’re a cheesecake fan, you cannot go wrong with the classic flavors in this Banana Cream Cheesecake. For more inspiration like this, check out all our wonderful cake and cupcake recipes where the baking fun never ends!
Common Mistakes to Avoid for a Perfect Roll
Mistake 1: Rolling the Cake When It’s Too Hot
This is the number one reason cakes crack. If the cake is steaming hot, it’s too fragile and the steam will make it soggy. Rolling it up immediately can cause it to stick and tear. The solution is simple: roll it while it’s warm, not hot. Follow the recipe instructions to roll it in the towel as soon as you can handle the pan. This sets the shape while it’s flexible. Letting it cool completely rolled up is the key to a memory-free cake.
Mistake 2: Using Cold Peanut Butter and Butter for the Filling
If your peanut butter is straight from the pantry and your butter is cold from the fridge, your filling will be lumpy and impossible to spread smoothly. It can even tear the delicate cake. Always plan ahead. Take the butter out to soften at room temperature for about an hour. If your peanut butter is very thick, give it a quick stir or a short 10-second microwave zap to make it creamy and spreadable before mixing.
Mistake 3: Overbeating or Underbeating the Whipped Cream
Whipped cream has stages. Underbeaten cream is runny and will make your roll soggy. Overbeaten cream becomes grainy and turns into butter! You want stiff peaks that hold their shape beautifully. The pro tip is to start on medium speed and gradually increase to high. Stop the mixer the moment the beaters leave clear marks in the cream and the peaks stand straight up when you lift the beaters.
Mistake 4: Not Letting the Roll Chill Before Slicing
I know it’s hard to wait, but slicing into this roll right away is a recipe for a messy, squished slice. The fillings need time to firm up and set together. That hour in the fridge is non-negotiable. It allows the whipped cream to stabilize and the peanut butter filling to hold its shape. The result is a neat, beautiful spiral in every single slice.
Your Reese’s Peanut Butter Roll Questions, Answered!
Can I make this roll cake a day ahead?
Absolutely, and I highly recommend it! Making this Reese’s Peanut Butter Roll a day in advance is actually a great idea. After you assemble it and add the ganache drizzle, just cover it well and refrigerate it overnight. The flavors have more time to blend together, and the cake becomes even more moist. This also means one less thing to do on the day of your party or gathering. Just take it out of the fridge about 15-20 minutes before you plan to serve it to take the slightest chill off. It slices perfectly when cold, but the flavors are a bit brighter at a cool room temperature.
What can I use instead of a jelly roll pan?
Don’t have that specific pan? No problem. You can use a standard rimmed baking sheet (a half-sheet pan is usually 13×18 inches, which is a bit bigger). If you use a larger pan, your cake layer will be thinner, so you need to reduce the baking time by a few minutes. Watch it closely. You can also use a 9×13 inch cake pan in a pinch, but your cake will be thicker and more square, making a shorter, fatter roll. The key is any pan with a rim to hold the batter, and lining it with parchment paper for easy removal is essential.
My cake cracked when I rolled it. What did I do wrong?
Don’t worry, this happens to almost everyone at least once! The most common reasons are overbaking the cake or letting it cool completely before trying to roll it the first time. An overbaked cake is dry and loses its flexibility. Also, if you didn’t roll it in the towel while warm to “train” its shape, it’s more likely to crack when you add the filling and roll it again. If you get a small crack, don’t panic. Once you roll it up with the filling, the crack will be on the inside and hidden. The powdered sugar on the towel also helps prevent sticking, which can cause tearing.
Can I use natural peanut butter for the filling?
I suggest avoiding natural peanut butter (the kind with oil that separates) for this specific recipe. It tends to be more oily and less stable, which can make your filling too soft and runny. It might not hold up well when sliced. For the best texture and consistency, use a standard creamy peanut butter like Jif or Skippy. These are homogenized and have a bit of added sugar and stabilizers that give you that perfect, spreadable, fluffy filling that holds its shape beautifully in the rolled cake.
Is the chocolate ganache on top necessary?
The chocolate ganache drizzle is listed as optional, but I think it really takes the dessert to the next level! It adds an extra layer of rich chocolate flavor, a beautiful glossy finish, and it helps seal in moisture. Without it, the exposed cake surface on the roll can dry out a tiny bit in the fridge. The ganache acts like a delicious protective barrier. It’s also very easy to make. If you’re in a real rush, you could even use a store-bought chocolate shell topping or just melt some chocolate chips alone, though adding the oil makes it drizzle more smoothly.
How many people does this recipe serve?
This Reese’s Peanut Butter Roll yields about 12 generous slices. The roll is rich and satisfying, so a standard slice is perfect for most appetites. If you’re serving it as part of a larger dessert spread with other sweets, you could potentially get 14-16 smaller, thinner slices. It’s a great dessert for a family dinner or a medium-sized party. The recipe is also easy to double if you need to feed a bigger crowd. Just be sure you have two jelly roll pans, or bake the cakes one after the other.
Can I freeze the leftover slices?
Yes, you can freeze this roll very successfully! It’s a great way to have a special treat on hand. Wrap individual slices tightly in plastic wrap, then place them in a zip-top freezer bag or an airtight container. They will keep well for up to 2 months. To serve, thaw a slice overnight in the refrigerator. You can also thaw it at room temperature for about an hour. The texture of the cake and fillings holds up remarkably well after freezing. It’s like having your own personal gourmet dessert ready whenever a craving strikes.
Why did my whipped cream turn out watery?
Watery whipped cream usually means it was under-whipped or your bowl and cream weren’t cold enough. Cream whips best when everything is chilled. Also, make sure you’re using “heavy whipping cream” or “heavy cream,” which has a higher fat content (usually 36% or more). Lower-fat creams or “whipping cream” won’t hold stiff peaks as well. Another tip is to ensure your bowl and beaters are completely clean and free of any grease, as fat from butter or oil can prevent the cream from thickening properly. Start on medium speed and be patient.
What’s the purpose of the oil in the ganache?
The small amount of vegetable oil in the ganache serves an important purpose. It thins the melted chocolate just enough to create a smooth, pourable, drizzle-able consistency. Without it, melted chocolate chips alone can be quite thick and set very hard and fast. The oil gives it a lovely glossy sheen and helps it set with a slightly softer bite. It also makes it easier to spread or drizzle without pulling on the delicate surface of the cake roll. You can use coconut oil as well for a similar effect.
How can I tell if my cake is done baking?
For a thin sheet cake like this, visual and touch cues are best. The cake is done when the top looks set and is slightly springy to the touch. The edges will just begin to pull away from the sides of the pan. You can also use the classic toothpick test: insert a toothpick into the center of the cake. If it comes out with a few moist crumbs clinging to it, it’s perfect. If it comes out completely clean, it might be a touch overbaked. Remember, it will continue to cook a little from residual heat after it’s out of the oven, so err on the side of slightly underdone for the most flexible cake.
Final Thoughts on This Dreamy Dessert
There you have it! My ultimate tribute to the perfect flavor pair: chocolate and peanut butter. This Reese’s Peanut Butter Roll is more than just a cake. It’s a fun baking project, a stunning centerpiece for your table, and a guaranteed smile-maker. Whether it’s for a birthday, a holiday, or just a Tuesday night treat, this recipe delivers big on flavor without being overly complicated. Remember, it’s all about that warm roll, the creamy fillings, and the joyful sprinkle of Reese’s pieces. It’s a reminder that good food, especially dessert, is meant to be shared and enjoyed with lots of laughs. Now go preheat that oven and get rolling! Your new favorite dessert is waiting for you.
Equipment
- Broyeur Électrique
- Fouet
- Spatule
- Plaque à pâtisserie
- Papier sulfurisé
Ingredients
- 1 boîte mélange de gâteau au chocolat
- 3 unité œufs
- 1/4 tasse huile végétale
- 1/2 tasse eau
- 1/2 tasse beurre de cacahuète crémeux
- 1 tasse sucre glace
- 1/2 tasse beurre non salé, ramolli
- 1 cuil. extrait de vanille
- 2 tasses crème épaisse
- 1 tasse sucre glace (pour la crème fouettée)
- 1/2 tasse Reese's Mini Peanut Butter Cups, hachés
- 1/2 tasse pépites de chocolat semi-sucrées (pour la ganache optionnelle)
- 1 cuil. huile végétale (pour la ganache optionnelle)
Instructions
- Préchauffez le four à 175°C et tapissez une plaque à pâtisserie de 15x10 pouces de papier sulfurisé.
- Préparez le mélange de gâteau au chocolat selon les instructions de l'emballage avec les œufs, l'huile et l'eau.
- Étalez la pâte uniformément dans la plaque préparée et faites cuire pendant 15-18 minutes jusqu'à ce que le dessus rebondisse légèrement.
- Passez un couteau autour des bords de la pâte et retournez-la sur un torchon saupoudré de cacao en poudre ou de sucre glace, en retirant le papier sulfurisé.
- Roulez le gâteau dans le torchon par un des bords courts et laissez-le refroidir complètement roulé.
- Dans un bol moyen, battez ensemble le beurre de cacahuète, le beurre ramolli, 1 tasse de sucre glace et l'extrait de vanille jusqu'à obtenir un mélange léger et aéré.
- Dans un autre bol refroidi, fouettez la crème épaisse avec l'autre tasse de sucre glace jusqu'à obtenir des pics fermes.
- Déroulez le gâteau refroidi et étalez uniformément la garniture au beurre de cacahuète sur la surface, en laissant une petite bordure.
- Parsemez les morceaux de Reese's Mini Peanut Butter Cups sur la garniture, puis ajoutez la crème fouettée par-dessus.
- Roulez le gâteau à nouveau soigneusement en utilisant le torchon, côté couture vers le bas sur un plat.
- Pour la ganache optionnelle, faites fondre les pépites de chocolat et 1 cuillère d'huile végétale dans un bol allant au micro-ondes jusqu'à obtenir un mélange lisse, puis arroser le rouleau.
- Réfrigérez le rouleau pendant au moins 1 heure avant de servir pour obtenir des tranches plus nettes.
Notes
Nutrition

Hi, I’m Olivia Parker, the founder of BakingSecret.com and a lifelong lover of all things sweet and homemade. I grew up in a small town in Oregon, where the smell of fresh cookies in my family’s kitchen sparked my passion for baking. Over the years, I turned that passion into a mission: to help home bakers feel confident, inspired, and creative.
After studying food science and working in several artisan bakeries across the U.S., I decided to create a space where everyone from beginners to seasoned bakers can find reliable recipes, expert tips, and a warm, welcoming community. BakingSecret.com is my way of sharing the magic of baking with the world. When I’m not testing new recipes, you’ll find me exploring farmers’ markets, collecting vintage cookbooks, or perfecting my sourdough technique.