
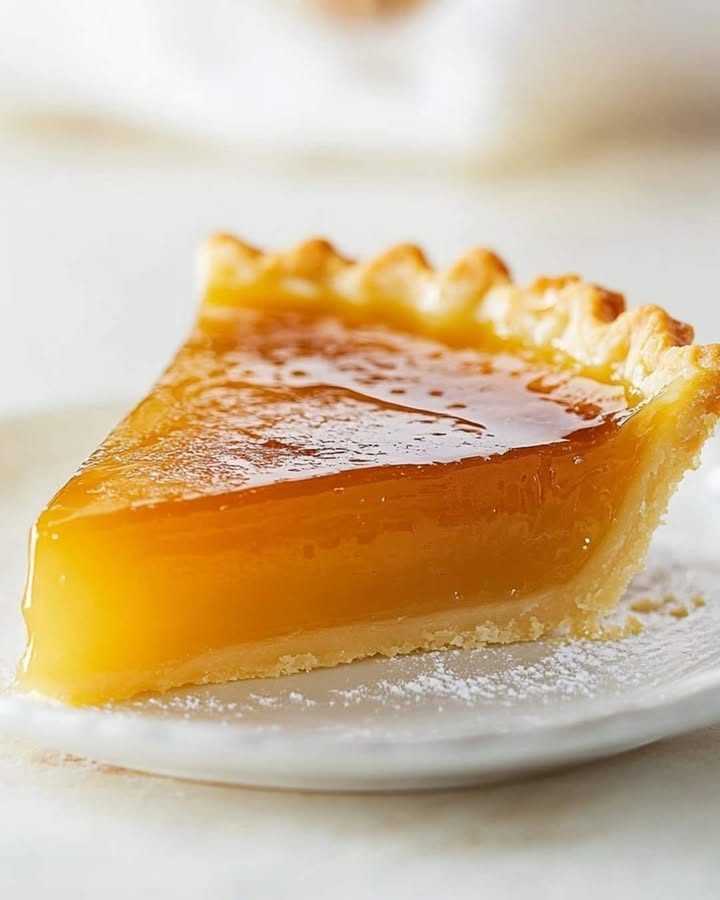
Salted Honey Pie: A Sweet and Salty Love Story
I fell in love with Salted Honey Pie the moment I tasted it at a little farm-to-table restaurant. It whispered of golden afternoons and sticky fingers, a perfect old-school dessert made new with that magic sprinkle of salt. I knew I had to recreate that cozy, caramelized bliss in my own kitchen for my family. After a few happy experiments (and a couple of less-than-perfect, but still tasty, attempts!), I’ve landed on this foolproof recipe for the dreamiest Salted Honey Delight you’ll ever bake.
The Humble Beginnings of a Modern Classic
While this pie feels like a timeless grandma’s recipe, its story is surprisingly modern. Many trace its popularity back to the creative chefs at the iconic Four & Twenty Blackbirds pie shop in Brooklyn. They took the simple, comforting concept of a sugar pie or a chess pie—those old-fashioned “desperation pies” made with pantry staples—and elevated it with the genius of flaky sea salt. That single addition transformed a very sweet pie into a complex, sophisticated dessert where every bite is a dance between deep, caramelized honey and a bright, salty finish. It’s a beautiful example of how respecting tradition while adding a fresh twist can create something truly special.
Why You’ll Adore This Salted Honey Delight
This pie isn’t just delicious; it’s a baker’s best friend for so many reasons. First, the flavor is unreal—rich, toasty, and buttery without being cloying. Second, it’s deceptively simple. The filling comes together in one saucepan! There’s no tricky water bath or delicate meringue to fuss with. Best of all, it actually gets better if you make it ahead. The flavors meld and the texture becomes perfect. It’s the ultimate make-ahead dessert for when you want to impress without the day-of stress.
Perfect Occasions for This Heavenly Pie
This pie shines at any gathering where you want to offer pure, unpretentious comfort. It’s a star at Thanksgiving, offering a gorgeous alternative to pumpkin. Bring it to a summer potluck—its chilly, creamy texture is so refreshing. It’s also the perfect “welcome to the neighborhood” gift or a just-because treat to brighten a friend’s week. Any moment that calls for a hug in dessert form is a moment for Salted Honey Pie.
Gathering Your Ingredients
Quality matters here, especially for the star players. Using a good, flavorful honey makes all the difference.
- 1 pie crust, store-bought or homemade
- 4 large egg yolks, lightly beaten
- 2 1/2 cups heavy whipping cream
- 2/3 cup packed light brown sugar
- 1/3 cup cornstarch, sifted
- 1/2 tsp salt
- 1/2 cup honey
- 2 tsp vanilla extract
- Flaky sea salt (like Maldon), for garnish
Handy Substitution Options
Don’t panic if you’re missing something! Here are some easy swaps:
- Heavy Cream: For a slightly lighter version, you can use half-and-half, but the filling won’t be quite as luxuriously thick.
- Brown Sugar: Dark brown sugar will give an even deeper, molasses-like flavor. Granulated white sugar can work in a pinch, but you’ll lose that lovely caramel note.
- Cornstarch: Arrowroot powder can be used as a 1:1 substitute.
- Honey: The flavor of your honey defines the pie. Try a wildflower honey for floral notes, or buckwheat for a more robust, almost earthy taste.
Crafting Your Salted Honey Masterpiece
Let’s get baking! This process is wonderfully meditative. Just follow these steps for a perfect pie every time.
Step 1: Prep Your Canvas
First, place your pie crust into a deep 9-inch pie dish. Tuck it in gently and crimp the edges however you like—a simple fork-press is just fine. Pop the crust into the fridge to keep it firm. Now, preheat your oven to 375°F (190°C). A hot oven is key for getting that beautiful, bubbly, golden top on your filling.
Step 2: Create the Luscious Base
In a medium saucepan, combine the heavy cream, brown sugar, sifted cornstarch, and salt. Whisk it well to break up any cornstarch lumps. Turn the heat to medium and cook, stirring constantly with a whisk or a flat-edged wooden spoon. You’ll feel the mixture start to thicken and see lazy bubbles breaking the surface. Keep cooking and stirring for about a full minute after it thickens. This cooks the cornstarch and ensures your filling sets perfectly later. Pro tip: A flat-edged spoon helps you scrape the bottom and corners of the pan, preventing any scorching.
Step 3: Temper Those Yolks
Here’s the only “chef-y” step, and it’s easy! Your goal is to warm the egg yolks slowly so they don’t scramble. Take a small ladleful of the hot cream mixture and slowly drizzle it into the bowl with the beaten yolks while whisking vigorously. Add a second ladleful, still whisking. Now, you can safely pour the yolk mixture back into the saucepan with the remaining cream. Whisk it all together until it’s completely smooth and uniform. You’ve just made a custard!
Step 4: The Golden Moment
Turn off the heat. Stir in the honey and vanilla extract. The aroma at this point is heavenly—warm, sweet, and deeply comforting. The filling will be a gorgeous, creamy beige color, thick like pudding. Give it a final whisk to make sure everything is beautifully incorporated.
Step 5: Pour and Dream
Pull your chilled pie crust from the fridge. Give your filling one last stir and pour it into the crust. It should come up high, almost to the rim. Gently jiggle the pan to let the filling settle evenly. Admire that smooth, inviting surface. You’re almost there!
Step 6: Bake to Golden Perfection
Carefully place the pie on the center rack of your preheated oven. Bake for 40-45 minutes. You’re looking for the filling to be puffed around the edges with deep golden-brown spots, and the center should still have a slight jiggle (like set Jell-O). Don’t wait for it to be rock-solid—it will continue to set as it cools. That gentle jiggle is your secret to a creamy, not rubbery, texture.
Step 7: The Patient Wait
This is the hardest part! Remove the pie from the oven and let it cool completely on a wire rack. Once it’s at room temperature, transfer it to the refrigerator. Let it chill for at least 4 hours, but overnight is truly best. This cooling and chilling time is non-negotiable. It allows the custard to firm up perfectly so you get clean slices.
Step 8: The Grand Finale
Right before serving, take your box of flaky sea salt. Hold it high over the pie and give it a gentle sprinkle—a true snowfall of salt. This isn’t just for looks. That salt makes the honey flavor sing. Slice, serve, and get ready for the compliments! Chef’s tip: For an extra pretty finish, lightly toast a few extra pie crust scraps with a sprinkle of sugar, crush them, and sprinkle over the salted pie alongside some edible flowers.
Your Baking Timeline
| Activity | Time |
|---|---|
| Prep Time | 20 minutes |
| Cook Time | 45 minutes |
| Cooling Time | 2 hours |
| Chilling Time | 4+ hours (overnight best) |
| Total Time | About 7 hours |
Chef’s Secret: The Magic of Blooming
My absolute secret for the deepest flavor? I gently warm the honey before adding it. Just microwave it for 15-20 seconds until it’s runny. “Blooming” the honey like this intensifies its aromatic compounds and helps it blend seamlessly into the custard, creating a more unified and complex taste.
A Sweet Fact About Bees
Honey has been used in baking for thousands of years, long before refined sugar was common. The type of flower the bees visit changes the honey’s flavor, color, and even aroma. Using local honey not only supports your nearby beekeepers but can also give your pie a unique taste of your own region’s flora. For more on the nutritional benefits and fascinating properties of honey, there’s always more to learn.
Tools You’ll Need
- 9-inch deep-dish pie plate
- Medium saucepan
- Whisk and wooden spoon
- Mixing bowls
- Measuring cups and spoons
- Wire cooling rack
Storing Your Salted Honey Delight
This pie is a dream for make-ahead bakers. Once fully set, cover it loosely with plastic wrap or foil, or place it under a pie dome. It will keep beautifully in the refrigerator for 3-4 days. The flavor truly deepens and improves on the second day.
I do not recommend freezing the fully assembled pie. The custard filling can become grainy and separate when thawed. However, you can pre-bake and freeze your pie crust ahead of time for convenience.
For serving leftovers, a quick 10-minute rest on the counter takes the icy edge off. That final sprinkle of flaky salt is best added fresh to each slice to maintain its delightful crunch.
Tips and Advice for Pie Perfection
- Blind bake for a crispier crust: If you fear a soggy bottom, blind bake your crust for 10-15 minutes before adding the filling. Just line it with parchment and pie weights or dried beans first!
- Room temperature eggs are key: Using cold egg yolks straight from the fridge can shock them when tempering. Let them sit out for 20-30 minutes first.
- Watch the boil: When cooking the cream mixture, a slow, rolling boil is what you want. A furious boil can cause the custard to break or scorch.
- Love exploring unique pie recipes? You’ll find more inspiration in our full collection of delicious pies and tarts.
Presentation Pointers
- Serve each slice with a dollop of barely-sweetened whipped cream.
- A drizzle of extra honey and a few bee pollen sprinkles look stunning.
- For a fall vibe, garnish with a small rosemary sprig.
- Cut smaller, bite-sized squares for a fancy party dessert platter.
Common Mistakes to Avoid
Avoid these simple pitfalls for a flawless pie every single time.
Mistake 1: Skipping the Tempering Step
It’s tempting to just dump the eggs into the hot cream. Resist! Adding cold yolks directly to high heat will scramble them instantly, leaving you with sweet, honey-flavored scrambled eggs in your pie. The slow, steady tempering process heats the yolks gently and evenly. It only takes an extra minute and guarantees a silky-smooth filling.
Mistake 2: Overbaking the Filling
We are used to baking until a toothpick comes out clean. This pie is different. If you bake it until the center is completely firm in the oven, it will be overcooked and rubbery once chilled. Remember, the custard continues to cook from residual heat as it cools. Pull it out when the edges are puffed and golden and the center has a distinct, confident jiggle.
Mistake 3: Not Letting It Chill Fully
Impatience is the enemy of a perfect slice. Cutting into this pie while it’s still warm will result in a delicious but soupy mess. It needs those several hours in the fridge for the cornstarch to fully set the structure. Trust the process. Bake it today for tomorrow’s dessert.
Mistake 4: Using Fine Table Salt for Garnish
That final sprinkle isn’t just for taste; it’s for texture and visual drama. Fine iodized salt will dissolve instantly and taste harshly salty. Flaky sea salt, like Maldon, stays on top, providing little crunchy bursts that contrast beautifully with the creamy filling and enhance the honey flavor without overwhelming it.
Frequently Asked Questions
Can I make this pie gluten-free?
Absolutely! This filling is naturally gluten-free. Simply use your favorite gluten-free pie crust. Make sure it’s a good-quality one meant for a filled pie, as some can be too crumbly. Blind baking the crust can also help it stay sturdy against the wet filling.
My filling seemed runny after baking. Did I do something wrong?
Don’t worry just yet! The filling will be jiggly and seem quite soft right out of the oven. This is completely normal. As it cools to room temperature and then chills in the fridge, the cornstarch will work its magic and the custard will firm up beautifully. Always give it the full chilling time before deciding if there’s an issue.
What’s the best type of honey to use?
The flavor of your honey is the star here, so choose one you love to eat on its own. A robust, darker honey like buckwheat or wildflower will give a very deep, almost molasses-like flavor. A lighter, floral honey like orange blossom or clover will yield a brighter, more delicate pie. Experiment to find your favorite! “Local and raw” is always a great choice for flavor.
Can I use a store-bought pie crust?
Yes, of course! I use a high-quality store-bought crust all the time when I’m short on time. Look for one in the refrigerated section (not frozen) for best results. No one will know your secret, and the pie will still be fantastic. Homemade is wonderful, but a good store-bought crust is a fantastic shortcut.
How far in advance can I make this?
This pie is an ideal make-ahead dessert. You can bake it up to two days before serving. In fact, I highly recommend making it the day before. The flavors have time to meld and the texture becomes perfectly set. Just keep it covered in the fridge and add the flaky salt garnish right before you serve.
Why did my pie crack on top?
A few fine cracks are normal and part of the pie’s rustic charm. Severe cracking usually means it was baked at too high a temperature or for a bit too long. Make sure your oven is calibrated correctly with an oven thermometer. Also, avoid over-whisking the filling once the cream is hot, as this can incorporate too much air that then deflates and cracks.
Can I freeze Salted Honey Pie?
I don’t recommend freezing the finished pie. Custard-based pies don’t freeze well; the filling can separate and become grainy when thawed. The best plan is to bake it no more than 2-3 days ahead and store it in the refrigerator.
What can I serve with it?
It’s sublime on its own, but a little freshly whipped cream or a scoop of vanilla bean ice cream never hurts. For a contrast, try a slightly tart berry compote on the side. A cup of strong coffee or a dessert wine like a Sauternes are perfect beverage pairings.
Is it very sweet?
The pie is rich and sweet, but the salt and the deep, almost bitter notes from the caramelized honey and brown sugar balance it out beautifully. It’s not a one-note sugar bomb. That’s the magic of the salted honey combination—it creates a complex flavor profile that isn’t overly cloying.
My family loves unique desserts! What’s similar to this?
If you love the creamy, dreamy texture of this pie, you might also enjoy making Blueberry Cheesecake Bars for a fruity twist. For pure indulgence, a Triple Chocolate Mousse Torte is hard to beat. For a bright, citrusy option, try these Elegant Refreshing Raspberry Lemonade Bars. And if you’re a fan of red velvet, our Red Velvet Cookie Dough Cheesecake is a showstopper.
More Delicious Variations to Try
Once you’ve mastered the classic, have fun playing with these ideas:
- Lavender Honey: Steep a teaspoon of culinary lavender in the warm cream before mixing for a floral note.
- Spiced Honey: Add a teaspoon of pumpkin pie spice or a cinnamon stick to the cream while it heats.
- Bourbon Honey: Swap out one tablespoon of honey for a good bourbon for a grown-up kick.
- Nutty Crunch: Sprinkle toasted pecans or walnuts over the filling before baking.
- Ginger Snap Crust: Use a crushed ginger snap cookie crust instead of a traditional pie dough.
- Chocolate Drizzle: Finish the chilled pie with a dark chocolate drizzle before the salt for a “turtles candy” effect.
Final Sweet Thoughts
This Salted Honey Pie is more than a recipe. It’s a lesson in beautiful contrasts—sweet and salty, smooth and crunchy, simple and sophisticated. It has become my go-to dessert for making people feel special, and I hope it becomes yours, too. So preheat that oven, grab your favorite honey, and get ready to bake a little bit of golden, salty-sweet magic. I promise, the first bite will make all the whisking and waiting completely worth it. Happy baking!
Equipment
- Plaque à tarte profonde de 9 pouces
- Casserole moyenne
- Fouet et cuillère en bois
- Bols à mélanger
- Râtelier de refroidissement
Ingredients
- 1 pièce croûte de tarte acheté ou fait maison
- 4 jaunes d'œufs légèrement battus
- 2.5 tasses crème épaisse
- 2/3 tasse sucre brun clair compact
- 1/3 tasse maïzena tamisée
- 1/2 cuil. sel
- 1/2 tasse miel
- 2 cuil. extrait de vanille
- q.s. sel de mer grossier pour garnir
Instructions
- Placez votre croûte de tarte dans un plat à tarte profond de 9 pouces et réfrigérez-la.
- Préchauffez votre four à 190°C (375°F).
- Dans une casserole moyenne, combinez la crème épaisse, le sucre brun, la maïzena et le sel; fouettez ensemble.
- Chauffez le mélange à feu moyen, en remuant constamment, jusqu'à ce qu'il épaississe.
- À l'aide d'une louche, versez doucement une partie du mélange chaud dans les jaunes d'œufs battus tout en fouettant, puis remettez-le dans la casserole.
- Éteignez le feu et ajoutez le miel et l'extrait de vanille jusqu'à ce que le mélange soit lisse.
- Versez la garniture dans la croûte de tarte froide, en vous assurant qu'elle est presque pleine.
- Faites cuire pendant 40 à 45 minutes jusqu'à ce que les bords soient gonflés et que le centre gigote légèrement.
- Laissez refroidir complètement sur une grille, puis réfrigérez pendant au moins 4 heures ou toute la nuit.
- Avant de servir, saupoudrez de sel de mer et servez.
Notes
Nutrition

Hi, I’m Olivia Parker, the founder of BakingSecret.com and a lifelong lover of all things sweet and homemade. I grew up in a small town in Oregon, where the smell of fresh cookies in my family’s kitchen sparked my passion for baking. Over the years, I turned that passion into a mission: to help home bakers feel confident, inspired, and creative.
After studying food science and working in several artisan bakeries across the U.S., I decided to create a space where everyone from beginners to seasoned bakers can find reliable recipes, expert tips, and a warm, welcoming community. BakingSecret.com is my way of sharing the magic of baking with the world. When I’m not testing new recipes, you’ll find me exploring farmers’ markets, collecting vintage cookbooks, or perfecting my sourdough technique.