
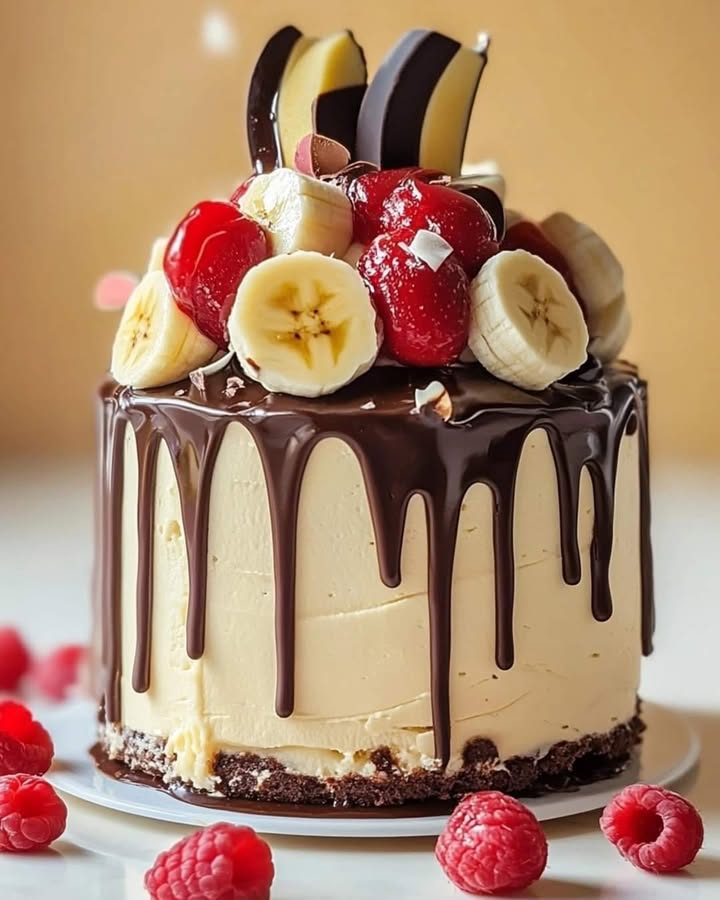
Let me tell you something about a banana split. It’s pure, sticky-fingered joy in a boat-shaped dish. But what happens when that sunny, nostalgic feeling wants to come to a birthday party or a big family dinner? You bring the whole banana split experience to a stunning, show-stopping cake! That’s exactly the magic of this Banana Split Chocolate Drip Cake. It’s every bit the luscious and fun dessert you imagine, layering rich chocolate, sweet banana cream, and all those iconic toppings.
The Story of My Ultimate Celebration Banana Split Cake
This recipe was born from a happy kitchen accident. Years ago, I made a tall chocolate cake for my nephew’s birthday. At the same time, I had a bowl of whipped cream and some overripe bananas begging to be used. On a whim, I layered them together. My family went wild! They said it tasted just like the banana splits we’d get at the old soda shop. That was my “aha!” moment. I spent the next few family gatherings perfecting it—adding the drippy ganache, piling on the cherries and nuts. Now, it’s our go-to cake for any summer celebration or when we just need a giant dose of happiness.
Why You’ll Fall in Love with This Banana Split Cake
This recipe is a winner for so many reasons! First, it looks incredible with that glossy chocolate drip and colorful toppings. But more importantly, it’s a flavor explosion. The moist chocolate cake pairs perfectly with the light, fresh banana cream. It’s surprisingly easy to make, even with the layers. The components are simple, and the assembly is just plain fun. It’s a guaranteed crowd-pleaser that turns any meal into a special event.
Perfect Times to Whip Up This Dessert Masterpiece
This cake isn’t shy—it’s made to be the center of attention! It’s perfect for birthday parties, especially summer birthdays. Bring it to a potluck or barbecue and watch it disappear first. It makes a fabulous finale for a casual Friday night dinner with friends. Honestly, any day that needs a little extra sweetness is the right day for this Banana Split Cake.
What You’ll Need: Banana Split Cake Ingredients
Gather these simple ingredients. Having everything measured and ready makes the process a breeze.
For the Chocolate Cake:
- 1 1/2 cups Granulated sugar
- 1 cup Hot water
- 1 cup Cocoa powder
- 1 teaspoon Baking soda
- 2 cups All-purpose flour
- 1/2 teaspoon Salt
- 1/2 cup Vegetable oil
- 1 1/2 teaspoons Baking powder
- 2 large Eggs
- 1 cup Buttermilk
- 1 teaspoon Vanilla extract
For the Banana Cream Filling:
- 2 Ripe bananas, mashed
- 1/2 cup Powdered sugar
- 1 cup Heavy cream
- 1 teaspoon Vanilla extract
For the Chocolate Ganache:
- 1/2 cup Heavy cream
- 1 cup Semi-sweet chocolate chips
For the Topping:
- Sliced bananas
- 1 cup Whipped cream
- Chocolate chips
- Crushed nuts (like walnuts or peanuts)
- Maraschino cherries
- Chocolate shavings
Handy Substitutions for Your Banana Split Cake
No buttermilk? Mix 1 cup milk with 1 tablespoon lemon juice or vinegar and let it sit for 5 minutes. For a nut-free version, just skip the crushed nuts or use sprinkles. You can use dark chocolate chips for a richer ganache. If you’re out of fresh bananas for the filling, a good quality banana pudding mix (prepared) can work in a pinch, though the fresh taste is better!
How to Make Your Own Banana Split Drip Cake
Follow these steps for a stunning and delicious result. Remember, baking is about joy—don’t stress!
Step 1: Bake the Chocolate Cake Layers
First, heat your oven to 350°F (175°C). Grease and line three 8-inch round cake pans with parchment paper. In a big bowl, whisk together your dry ingredients: flour, cocoa powder, sugar, baking powder, baking soda, and salt. The cocoa powder will smell rich and chocolaty. Add the buttermilk, oil, eggs, and vanilla. Beat it all until the batter is smooth and glossy. Now, carefully stir in the hot water. The batter will be thin, but that’s what makes the cake super moist! Divide it evenly among your pans and bake for 25-30 minutes. A toothpick should come out clean. Let the cakes cool completely in the pans before removing them. Pro tip: Wrap the cooled cake layers in plastic wrap and freeze them for 30 minutes. This makes them much easier to handle and frost without crumbs!
Step 2: Whip Up the Banana Cream Filling
This filling is light as a cloud and tastes like summer. Pour your heavy cream into a chilled bowl. Whip it with a mixer until you see stiff peaks form—it should hold its shape when you lift the beaters. In another bowl, mash your ripe bananas until they’re mostly smooth. Gently fold the mashed bananas, powdered sugar, and vanilla into the whipped cream. Be gentle to keep that airy texture. The filling will be a beautiful pale yellow and smell amazing.
Step 3: Create the Silky Chocolate Ganache Drip
The ganache is the elegant, shiny cloak for your cake. Place your chocolate chips in a heatproof bowl. Heat the heavy cream in a small saucepan over medium heat until you see small bubbles around the edges—it should simmer but not boil. Pour the hot cream over the chocolate chips. Let it sit, untouched, for two whole minutes. This allows the heat to soften the chocolate perfectly. Then, stir slowly from the center outward until you have a smooth, glossy, and pourable chocolate sauce. Let it cool for about 10 minutes so it thickens slightly for that perfect drip effect.
Step 4: Assemble Your Banana Split Masterpiece
Place your first cake layer on a plate or cake stand. Spread a generous, even layer of the banana cream filling on top. Repeat with the second and third layers. Now, for the fun part! Slowly pour the slightly cooled ganache onto the center of the top cake layer. Use a spoon or offset spatula to gently push it towards the edges, encouraging it to drip beautifully down the sides. Don’t worry about being perfect—the drips are part of the charm!
Step 5: Add the Classic Banana Split Toppings
This is where the cake truly comes to life! Pipe or dollop whipped cream around the top edge. Artfully arrange slices of fresh banana. Scatter over chocolate chips, crushed nuts, and chocolate shavings. Finally, crown your creation with bright red maraschino cherries. Step back and admire your work—it’s a masterpiece of fun and flavor! Chef’s tip: To prevent the banana slices from browning, toss them in a tiny bit of lemon juice or pineapple juice before arranging them on the cake.
Your Banana Split Cake Timeline
- Prep Time: 45 minutes
- Bake Time: 30 minutes
- Cooling Time: 1.5 hours
- Assembly & Decorating Time: 20 minutes
- Total Time: About 3 hours (mostly hands-off cooling)
The Secret to a Super-Moist Chocolate Cake
The hot water in the cake batter is the secret weapon! It “blooms” the cocoa powder, intensifying its chocolate flavor. It also helps the sugar dissolve more completely and activates the gluten in the flour gently, resulting in a tender, moist crumb that can hold up to the creamy filling. Don’t be scared by the thin batter—it’s the key to success.
A Sweet Slice of History
The original banana split was invented in 1904 by a pharmacy apprentice in Pennsylvania. He wanted to create a sundae so big it required a boat-shaped dish! This cake is a loving, modern tribute to that spirit of indulgence and creativity, perfect for sharing with a whole table of people.
Gather Your Baking Tools
- Three 8-inch round cake pans
- Parchment paper
- Mixing bowls (large and medium)
- Electric hand mixer or stand mixer
- Whisk and spatula
- Saucepan for ganache
- Cake stand or serving plate
- Offset spatula (helpful for spreading)
Storing Your Beautiful Banana Split Cake
Because of the fresh whipped cream and banana filling, this cake needs to be stored in the refrigerator. Cover it loosely with a cake dome or tented aluminum foil to protect the decorations. It’s best enjoyed within 2 days. The cake itself will stay moist, but the banana slices on top will start to brown after a day.
You can prepare components ahead of time! Bake and freeze the cake layers up to a month in advance. Make the ganache and reheat it gently before using. Only whip the banana cream filling and assemble the cake the day you plan to serve it for the freshest taste and texture.
This cake does not freeze well after assembly due to the fresh fruit and whipped cream. For the best experience, think of it as a make-and-share delight to be enjoyed almost immediately.
My Best Tips for Banana Split Cake Success
- Use ripe, spotty bananas for the filling. They are sweeter and have the strongest banana flavor.
- Ensure your cakes are completely cool before adding the filling, or it will melt and slide.
- Test your ganache drip on the inside of a glass before pouring it on the cake to check the thickness.
- Get creative with toppings! Try different nuts, colored sprinkles, or even a drizzle of strawberry syrup.
Creative Presentation Ideas
- Serve each slice with a side of extra hot fudge or caramel sauce for dipping.
- For a kids’ party, add colorful rainbow sprinkles to the topping mix.
- Use an ice cream scoop to place rounds of whipped cream on top instead of piping it.
- For individual portions, make a smaller version using a 6-inch cake pan set.
Explore More Decadent Dessert Inspirations
If you love stunning layered desserts, you have to try our Dreamy Boston Cream Cheesecake. For more fun with fruit and chocolate, our Decadent Strawberry Chocolate Fantasy Ice Cream Loaf is a frozen treat marvel. When you need a stunning rolled dessert, this elegant Chocolate Cherry Swiss Roll never fails to impress. And for individual treats, these zesty Mini Lemon Blackberry Cheesecakes are perfect.
Healthier Twists on the Banana Split Cake
Love the flavor but want a lighter option? Try these simple swaps.
- Whole Wheat Option: Substitute half the all-purpose flour with whole wheat pastry flour for added fiber.
- Reduced Sugar: Cut the sugar in the cake by 1/4 cup and use a sugar substitute in the banana filling.
- Greek Yogurt Cream: Use plain Greek yogurt mixed with a little honey and vanilla for a protein-rich filling alternative.
- Nut-Free & Vegan: Use a flax egg, plant-based milk and yogurt, and dairy-free chocolate chips.
- Mini Cake Version: Bake the batter in a 9×13 pan, then cut into squares and layer with filling in individual glasses for portion control.
- Fruit-Forward: Skip the ganache and top with a mixture of fresh berries and a light dusting of cocoa powder.
Common Mistakes to Avoid with Your Drip Cake
Mistake 1: Using Cold Cake Layers for Assembly
Spreading banana cream on a cake that’s even slightly warm is a recipe for a meltdown—literally. The cream will turn soupy and make your layers slide apart. Always let your cakes cool completely in the pan, then on a wire rack. For the best results, wrap them and pop them in the freezer for 20-30 minutes. A firm, cool cake is much easier to handle and frost cleanly.
Mistake 2: Making Ganache with Boiling Cream
If your cream is boiling vigorously when you pour it over the chocolate, it can cause the fat in the chocolate to separate. This gives you a grainy, oily ganache instead of a smooth, shiny one. Heat the cream just until you see small bubbles form around the edges of the saucepan—a gentle simmer is perfect. Pour it over the chips, let it sit, then stir to smooth perfection.
Mistake 3: Over-Whipping the Banana Cream Filling
Whipping the heavy cream until it’s very stiff is great, but folding in the mashed bananas can easily push it over the edge. Over-whipped cream becomes grainy and buttery. Whip the cream to just stiff peaks. Then, when you fold in the bananas and sugar, use a gentle hand and a spatula. Stop as soon as everything is combined. The filling should be light and fluffy.
Mistake 4: Adding Fresh Toppings Too Early
If you decorate the cake hours before serving, the banana slices will turn brown and the whipped cream may weep or deflate a bit. For the prettiest presentation, assemble the cake and add the ganache. Then, add the fresh whipped cream, banana slices, and other toppings within an hour of serving. This keeps everything looking bright, fresh, and inviting.
Your Banana Split Cake Questions, Answered
Can I make this cake a day ahead?
You can prepare most of it ahead! Bake and cool the cake layers the day before. Wrap them tightly in plastic wrap and store at room temperature. Make the ganache, cover it, and let it sit at room temperature. Gently reheat it for a few seconds to make it drip-ready. Only make the banana cream filling and assemble the entire cake the day you plan to serve it. This ensures the freshest taste and best texture for the whipped components and fruit.
What can I use instead of buttermilk?
No buttermilk? No problem! You have two easy options. First, you can make a quick buttermilk substitute. Add 1 tablespoon of white vinegar or fresh lemon juice to a liquid measuring cup. Then, fill it with regular milk until you reach the 1-cup line. Stir and let it sit for 5-10 minutes until it curdles slightly. Alternatively, you can use plain yogurt or sour cream thinned with a little milk to reach a pourable consistency. Each will add a similar tang and moisture to the cake.
How do I get the perfect chocolate drip?
The temperature of your ganache is key. After making it, let it cool at room temperature for about 10-15 minutes. It should be warm and fluid but not hot. Test it by dipping a spoon in and letting it run down the side of your bowl. It should flow smoothly but not be too runny. Pour the majority onto the center of the cake, spread it to the edges, then use a spoon or squeeze bottle to add controlled drips down the sides. If it’s too thick, warm it for 5 seconds; if too thin, let it cool longer.
My ganache is too thick/too thin. How can I fix it?
Don’t worry, ganache is very forgiving! If it’s too thick and won’t drip, it’s likely too cool. Place the bowl over a pot of simmering water (a double boiler) for just a few seconds, stirring constantly, to warm it up slightly. If it’s too thin and runs right off the cake, it’s too warm. Let it cool at room temperature, stirring occasionally, until it thickens. You can also pop it in the fridge for a minute at a time, stirring well after each chill.
How can I prevent my banana slices from browning?
The trick is a quick acid bath! Slice your bananas just before you’re ready to decorate the cake. Place the slices in a small bowl and toss them gently with a teaspoon or two of lemon juice, lime juice, or even pineapple juice. The acid slows down the oxidation process that causes browning. Pat them very lightly with a paper towel before placing them on the cake to avoid excess moisture.
Can I use a different size cake pan?
Yes, but baking times will change. For two 9-inch pans, the layers will be thinner, so bake for 20-25 minutes. For a 9×13 sheet pan, bake for 30-35 minutes. You can also make cupcakes! Fill liners 2/3 full and bake for 18-22 minutes. For any pan size, always use the toothpick test to check for doneness.
Is there a way to make the banana flavor stronger in the filling?
Absolutely! For a more intense banana flavor, you can add 1/4 to 1/2 teaspoon of banana extract to the whipped cream along with the vanilla. Also, make sure your bananas are very ripe—the ones with lots of brown spots are the sweetest and most flavorful. You could even reduce a mashed banana on the stove with a little sugar to make a banana paste, then fold that in.
Can I use store-bought whipped cream?
You can, but homemade is highly recommended for taste and stability. If you use a store-bought whipped topping or canned whipped cream, the texture of the filling will be different and it may not hold its structure as well between the cake layers. If you must use it, choose a sturdy whipped topping from the freezer section, thaw it, and fold in the bananas gently.
How should I store leftovers?
Store any leftover cake covered in the refrigerator. Because of the fresh fruit and whipped cream, it’s best eaten within 2 days. The cake itself will stay moist, but the banana topping will continue to brown. You cannot freeze the assembled cake successfully due to the dairy and fruit components. For more fantastic cake ideas, explore our complete collection of favorite cake and cupcake recipes for every occasion.
Is this cake very sweet?
The cake has a balanced sweetness. The chocolate cake itself is rich but not overly sweet. The banana cream filling is lightly sweetened with powdered sugar, and the dark chocolate ganache adds a slightly bittersweet note. The overall sweetness comes from the combination with the toppings. You control the final sweetness by how many chocolate chips and cherries you add! Remember, enjoying treats as part of a balanced lifestyle is key, and making them at home lets you control the quality of ingredients, which is a positive step for overall heart health.
Ready, Set, Bake Your Celebration!
This Banana Split Chocolate Drip Cake is more than just a dessert. It’s a conversation starter, a memory maker, and a giant hug on a plate. It combines the simple joy of an ice cream parlor classic with the wow factor of a beautiful homemade cake. Don’t be intimidated by the layers or the drip—each step is simple and so rewarding. Gather your ingredients, put on some happy music, and get ready to bake something truly special. Your family and friends are going to absolutely love it. Now, who’s ready for a slice?
Equipment
- Grand bol
- Fouet
- Spatule
- Plaque à pâtisserie
- Papier sulfurisé
Ingredients
- 1.5 tasses sucre granulé
- 1 tasse eau chaude
- 1 tasse cacao en poudre
- 1 cuillère à café bicarbonate de soude
- 2 tasses farine tout usage
- 0.5 cuillère à café sel
- 0.5 tasse huile végétale
- 1.5 cuillères à café poudre à lever
- 2 œufs
- 1 tasse buttermilk
- 1 cuillère à café extrait de vanille
Instructions
- Préchauffez le four à 175°C (350°F) et graissez trois moules à gâteaux ronds de 8 pouces.
- Mélangez les ingrédients secs (farine, cacao en poudre, sucre, poudre à lever, bicarbonate de soude et sel) dans un grand bol.
- Ajoutez le buttermilk, l'huile, les œufs et la vanille aux ingrédients secs, et battez jusqu'à obtenir une pâte lisse.
- Incorporez soigneusement l'eau chaude et répartissez la pâte de manière uniforme dans les moules préparés.
- Cuisinez pendant 25-30 minutes jusqu'à ce qu'un cure-dent ressorte propre, puis laissez refroidir complètement.
- Pour préparer la garniture à la crème de banane, fouettez la crème épaisse dans un bol refroidi jusqu'à formation de pics fermes.
- Dans un autre bol, écrasez les bananes mûres et incorporez-les délicatement à la chantilly avec le sucre glace et la vanille.
- Pour la ganache, chauffez la crème épaisse jusqu'à ce que de petites bulles apparaissent, puis versez sur les pépites de chocolat et laissez reposer 2 minutes avant de remuer jusqu'à obtenir un mélange lisse.
- Assemblez le gâteau en superposant le gâteau au chocolat, puis la garniture de crème à la banane, en répétant pour toutes les couches.
- Versez la ganache sur la couche supérieure, en l'encourageant à couler sur les côtés.
- Décorez avec de la chantilly, des tranches de banane, des pépites de chocolat, des noix concassées et des cerises Maraschino.
Notes
Nutrition

Hi, I’m Olivia Parker, the founder of BakingSecret.com and a lifelong lover of all things sweet and homemade. I grew up in a small town in Oregon, where the smell of fresh cookies in my family’s kitchen sparked my passion for baking. Over the years, I turned that passion into a mission: to help home bakers feel confident, inspired, and creative.
After studying food science and working in several artisan bakeries across the U.S., I decided to create a space where everyone from beginners to seasoned bakers can find reliable recipes, expert tips, and a warm, welcoming community. BakingSecret.com is my way of sharing the magic of baking with the world. When I’m not testing new recipes, you’ll find me exploring farmers’ markets, collecting vintage cookbooks, or perfecting my sourdough technique.