
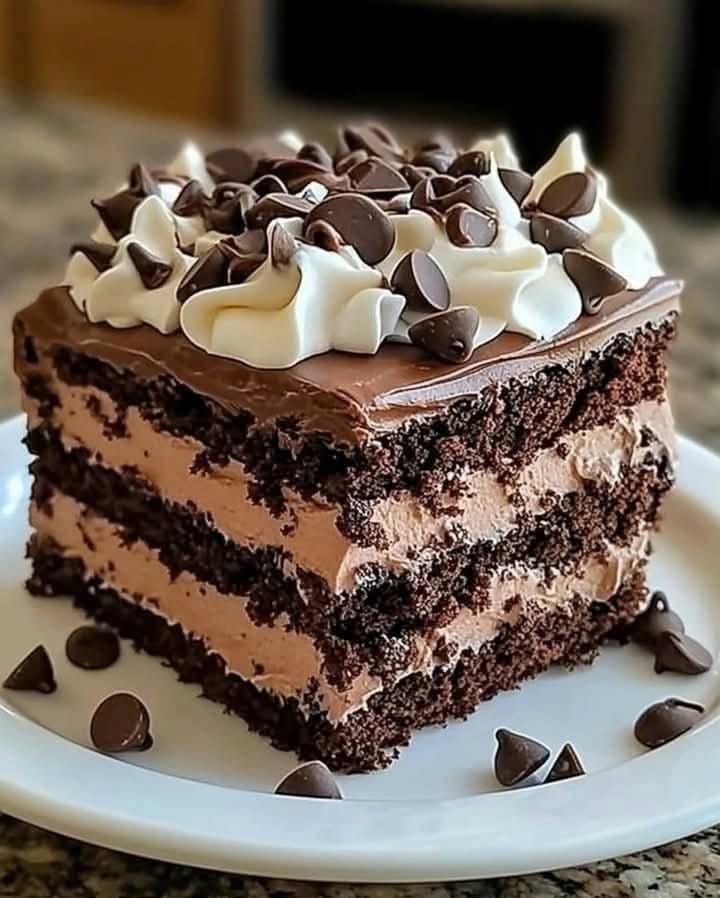
Decadent Fudgy Brownies: The Ultimate Chocolate Indulgence
Is there anything better than the smell of chocolate baking in your oven? I remember the first time I made these brownies for a last-minute potluck. The pan was empty before I even had a chance to grab one! That’s the magic of a truly great fudgy brownie. It’s not just a dessert. It’s a warm, chocolatey hug on a plate. This recipe is my go-to for birthdays, bad days, or any day that needs a little extra sweetness. Topped with a shiny, rich ganache, it’s a foolproof way to become everyone’s favorite baker.
From Humble Treat to Beloved Classic
The brownie’s story is a happy accident. Legend says a chef in Chicago forgot to add baking powder to her chocolate cake in the late 1800s. Instead of a tall, fluffy cake, she got a dense, fudgy flat treat. Her “mistake” was an instant hit! My version honors that happy accident. We skip the leavening almost entirely for that iconic dense texture. While some modern recipes add nuts or swirls of caramel, I believe a classic brownie should be pure, unadulterated chocolate. The simple ganache topping is my nod to elegance. It transforms a humble square into a celebration cake worthy of any occasion.
Why You’ll Love This Fudgy Brownie Recipe
You will love this recipe because it delivers perfect results every single time. The method is straightforward, with no fancy techniques required. You get an incredibly moist, intensely chocolate center with that beautiful, shiny cracked top. The ganache adds a layer of sophistication that makes people think you spent hours in the kitchen. Plus, the batter comes together in one saucepan, meaning less cleanup! It’s the perfect balance of simple baking and impressive outcome.
Perfect Occasions for These Ganache-Topped Brownies
This brownie cake is your secret weapon for so many events. Its rich look makes it perfect for birthdays, anniversaries, or holiday dinners. Cut into small squares, it’s a elegant addition to a dessert buffet. For a casual movie night, serve it warm with a scoop of vanilla ice cream. I’ve even packed squares in lunchboxes for a special midday treat. It’s a versatile dessert that fits every moment, from fancy to cozy.
Ingredients for Decadent Fudgy Brownies
- 1 cup (2 sticks) unsalted butter: Provides richness and that melt-in-your-mouth quality.
- 2 cups granulated sugar: Sweetens and helps create that classic crackly top.
- 4 large eggs: Binds the batter and adds structure.
- 1 teaspoon vanilla extract: Enhances all the chocolate flavors.
- 1 cup all-purpose flour: Just enough to hold everything together without making it cakey.
- 1 cup unsweetened cocoa powder: Use a good quality one for the deepest chocolate flavor.
- 1/2 teaspoon salt: A must! It balances the sweetness and makes the chocolate taste richer.
- 1 teaspoon baking powder: A tiny bit gives a slight lift at the edges.
- 1 cup semi-sweet or dark chocolate chips: For extra pockets of gooey chocolate.
For the Ganache Topping:
- 1 cup heavy cream
- 8 ounces semi-sweet chocolate, finely chopped
Easy Ingredient Substitutions
No need to run to the store! Here are some easy swaps:
- Butter: You can use salted butter. Just omit the extra 1/2 teaspoon salt from the recipe.
- Cocoa Powder: Dutch-processed cocoa will work and gives a slightly milder flavor.
- Chocolate Chips: Feel free to use milk chocolate, white chocolate, or even chopped chocolate bars.
- Heavy Cream: For a dairy-free ganache, use full-fat coconut cream.
How to Make Decadent Fudgy Brownies
Follow these simple steps for the best brownies of your life.
Step 1: Prep Your Pan and Oven
Start by preheating your oven to 350°F (175°C). This ensures it’s perfectly hot when your batter is ready. Take a 9×13-inch baking pan and grease it thoroughly with butter or non-stick spray. For absolute insurance against sticking, line the pan with parchment paper, letting the edges hang over the sides. This creates a “sling” that lets you lift the entire cooled brownie cake out for easy slicing. A little prep now saves a big headache later!
Step 2: Melt and Mix the Base
In a medium saucepan over low heat, melt the butter. You’ll see it bubble gently and smell beautifully nutty. Once it’s fully liquid, remove the pan from the heat. Immediately stir in the granulated sugar. The heat from the butter will begin to dissolve the sugar, creating a glistening, sandy mixture. This step is key for a shiny top. Let this mixture cool for about 5 minutes so you don’t cook the eggs when you add them.
Step 3: Work in the Eggs and Vanilla
Crack your eggs into a small bowl first—it’s safer than adding them directly to the hot pan! Add them one at a time to the butter-sugar mixture, stirring vigorously after each addition. Watch the texture change from grainy to smooth and glossy. After the last egg is fully incorporated, stir in the vanilla extract. The aroma will start to fill your kitchen. Pro tip: Using room temperature eggs helps them blend more smoothly and quickly.
Step 4: Fold in the Dry Ingredients
In a separate bowl, whisk together the flour, cocoa powder, salt, and baking powder. This distributes the leavening and salt evenly so every bite is consistent. Add these dry ingredients to your wet mixture. Use a spatula and fold gently. You want to mix just until the last traces of flour disappear. Overmixing develops gluten, which can make your brownies tough instead of tender and fudgy.
Step 5: Add Chocolate Chips and Bake
Now for the fun part—fold in the chocolate chips. They’ll speckle the dark batter with promise. Pour the thick, luxurious batter into your prepared pan. Use the spatula to spread it into an even layer, getting it into all the corners. Place the pan in the center of your preheated oven. Bake for 25-30 minutes. The top will be set and have a beautiful cracked paper-like look. A toothpick inserted near the center should come out with a few moist crumbs attached, not clean. This is the secret to fudginess! Let the cake cool completely in the pan on a wire rack.
Step 6: Create the Silky Ganache
While the brownie cake cools, make the ganache. Finely chop your chocolate and place it in a heatproof bowl. Heat the heavy cream in a small saucepan over medium heat until it just begins to simmer—you’ll see small bubbles form around the edges. Do not let it boil. Pour the hot cream over the chopped chocolate. Let it sit, untouched, for 3 minutes. This allows the cream to melt the chocolate gently. After 3 minutes, start whisking from the center outward until you have a smooth, glossy, and incredibly dark chocolate sauce. Chef’s secret: A pinch of salt stirred into the ganache at the end makes the chocolate flavor sing.
Step 7: Top, Set, and Slice
Once your brownie cake is completely cool, pour the warm ganache over the top. Tilt the pan to help the ganache spread evenly to every corner. Let the cake sit at room temperature for about an hour so the ganache can set into a firm, yet soft, topping. For faster setting, pop it in the fridge for 30 minutes. When ready to serve, use the parchment paper sling to lift the whole cake onto a cutting board. Use a sharp knife, wiped clean between cuts, to slice into perfect squares.
Time Investment for Perfect Brownies
Prep Time: 20 minutes
Bake Time: 25-30 minutes
Cooling & Ganache Setting Time: 1 hour
Total Time: 1 hour 50 minutes
Chef’s Secret for Ultimate Fudginess
The real trick is in the bake time. Do not wait for a clean toothpick! The moment you see a toothpick come out with a few fudgy crumbs clinging to it, take the brownies out. They will continue to cook slightly from the residual heat in the pan as they cool. This guarantees a moist, dense, and intensely chocolate center every single time.
A Little Extra Chocolate Info
Did you know the type of cocoa powder you use makes a big difference? Natural cocoa powder (like Hershey’s) is acidic and works well with baking soda. Dutch-processed cocoa is treated to neutralize the acids, resulting in a smoother, milder flavor. For this recipe, I prefer natural cocoa for its strong, tangy chocolate punch that stands up to all the sugar and butter.
Necessary Kitchen Equipment
- 9×13-inch baking pan
- Medium saucepan
- Mixing bowls (2)
- Whisk and spatula
- Measuring cups and spoons
- Wire cooling rack
- Sharp knife for slicing
How to Store Your Brownie Cake
To keep your brownies tasting fresh, store them in an airtight container at room temperature. Place a sheet of parchment paper between layers if you stack them to prevent the ganache from sticking. They will stay perfectly fudgy for up to 4 days this way.
You can also refrigerate them for up to a week. The cool temperature firms up the texture, making them even denser. Let a refrigerated brownie sit at room temperature for 10-15 minutes before eating. This allows the butter and chocolate to soften up for the best mouthfeel.
For longer storage, these brownies freeze beautifully. Wrap individual squares tightly in plastic wrap and then place them in a freezer bag. They can be frozen for up to 3 months. Thaw overnight in the refrigerator or for an hour on the counter.
Tips and Advice for Brownie Success
- For super clean cuts, chill the ganache-topped brownies for 20 minutes before slicing.
- Experiment with add-ins! Try folding in 1 cup of chopped toasted walnuts or pecans with the chocolate chips.
- If your ganache seems too thin, let it cool for 10 more minutes before pouring. If it’s too thick, add a teaspoon of warm cream and stir.
- Always use a metal or light-colored pan. Dark non-stick pans can cause the edges to overbrown.
Presentation Ideas to Impress
- Dust the ganache with a light sprinkling of flaky sea salt before it sets.
- Top each square with a fresh raspberry or strawberry just before serving.
- Drizzle with melted white chocolate for a beautiful marbled effect.
- Serve warm with a scoop of vanilla bean ice cream and a dollop of whipped cream.
Delicious Recipe Variations to Try
If you love this format, explore other fantastic layered dessert ideas. For a no-bake option, this colorful and creamy No-Bake Funfetti Oreo Icebox Cake is always a crowd-pleaser. You might also enjoy a fruity twist like this stunning Cherry-Blackberry Symphony Layer Cake. For a tangy, bright flavor, my Lemon Cake with Cranberry Filling is a refreshing choice. And for the ultimate chocolate fix, this deeply moist and indulgent Matilda-inspired Chocolate Cake is pure magic.
Common Mistakes to Avoid
Mistake 1: Overbaking the Brownies
This is the #1 reason brownies turn out dry and cakey. Many bakers wait for a completely clean toothpick, but that means the brownies are already overdone. Remember, they continue to cook as they cool in the hot pan. For perfect fudginess, take them out when the toothpick has a few moist crumbs attached. The center should still look slightly soft, but not raw.
Mistake 2: Overmixing the Batter
Once you add the flour, vigorous stirring is your enemy. Overmixing develops the gluten in the flour, leading to a tough, chewy texture instead of a tender, melt-in-your-mouth crumb. Fold the dry ingredients in gently and just until they disappear. A few small streaks are better than overworking it.
Mistake 3: Using Hot Butter to Mix Eggs
Adding eggs directly to piping hot melted butter can scramble them. Always remove the butter from heat and let it cool for a few minutes before adding the sugar and then the eggs. The mixture should be warm, not hot, to the touch. This ensures a smooth, emulsified batter and that shiny crust.
Mistake 4: Not Letting the Brownies Cool Before Slicing
Slicing into warm brownies might be tempting, but it’s messy. The structure hasn’t set yet, leading to gooey, crumbly squares that fall apart. Let them cool completely in the pan. This patience rewards you with clean, sharp cuts and the perfect fudgy texture. For information on safe meal storage practices for all your baked goods, always refer to trusted resources.
For more classic and irresistible dessert bar ideas, browse our full collection of dessert bar and brownie recipes.
Frequently Asked Questions
Can I make these brownies without a saucepan?
Absolutely. If you prefer not to use a saucepan, you can melt the butter in a microwave-safe bowl in 30-second bursts. Then, simply mix all the wet ingredients in that bowl before folding in the dry ingredients. The one-bowl method works well, though melting the butter and sugar together on the stove does help slightly with that shiny top crust.
My ganache turned out lumpy. What did I do wrong?
Lumpy ganache usually means the cream wasn’t hot enough to fully melt the chocolate, or you stirred it too soon. Ensure the cream is steaming with small bubbles around the edge. Pour it over finely chopped chocolate and let it sit for a full 3 minutes. If lumps remain, you can gently reheat the mixture over a double boiler or in the microwave for 10 seconds, then stir until smooth.
Can I use milk chocolate instead of semi-sweet?
You can, but be mindful of the sweetness. Milk chocolate is much sweeter than semi-sweet. If using it in the ganache, the topping will be very sweet. For the chips in the batter, it’s a fine substitution. For a balanced flavor, I recommend sticking with semi-sweet or dark chocolate for the ganache even if you use milk chocolate chips inside.
How do I get those perfect, crackly tops?
The crackly top comes from properly dissolving the sugar in the warm, melted butter and eggs. Whisking the eggs well into the warm butter-sugar mixture is crucial. This helps create a layer of sugar on top that cracks as the brownie bakes. Don’t skip the step of letting the butter cool slightly before adding the eggs.
Are these brownies suitable for freezing?
Yes, they freeze excellently. Cool the brownies completely and slice them. Wrap each square tightly in plastic wrap, then place them in a freezer-safe bag or container. They’ll keep for up to 3 months. Thaw at room temperature or in the fridge overnight. You can also freeze the whole cake before slicing.
What can I use instead of ganache?
If you’re short on time, a simple dusting of powdered sugar works. A classic chocolate buttercream frosting is also delicious. For a lighter option, serve each square with a dollop of freshly whipped cream or a scoop of ice cream. The brownies are fantastic all on their own, too.
Can I make this recipe gluten-free?
Yes, with one simple swap. Replace the all-purpose flour with a 1:1 gluten-free baking flour blend. Be sure the blend contains xanthan gum, which helps mimic the structure that gluten provides. I’ve had great success with this substitution, and the texture remains wonderfully fudgy.
Why did my brownies sink in the middle?
A sunken middle often indicates underbaking or opening the oven door too early. The heat shock can cause the rising structure to collapse. Ensure your oven is fully preheated and use an oven thermometer to check accuracy. Avoid opening the door until the last 5 minutes of baking to check for doneness.
My brownies are too greasy. How can I fix this?
Greasiness can happen if the butter was measured incorrectly or if the flour was under-measured. Always use the “spoon and level” method for flour: spoon it into your measuring cup and level it off with a knife. Don’t scoop directly from the bag. Also, ensure you’re using large, not extra-large, eggs.
Can I add nuts or other mix-ins?
Please do! One cup of toasted pecans, walnuts, or even macadamia nuts would be wonderful folded in with the chocolate chips. For a fun twist, try adding 1/2 cup of chopped dried cherries or a handful of mini peanut butter cups. Just be sure any add-ins are at room temperature so they don’t cool the batter down.
Your New Favorite Dessert Awaits
This brownie cake is more than a recipe. It’s a guarantee of happy faces and satisfied chocolate cravings. The process is simple, the ingredients are basic, but the result feels incredibly special. That rich, fudgy base topped with silky ganache turns an everyday treat into a celebration. I hope this recipe finds a permanent spot in your kitchen, just like it has in mine. Now, go preheat that oven. Your new favorite dessert is waiting to be made.
Equipment
- Moulin à légumes
- Fouet
- Spatule
- Plaque à pâtisserie
- Papier sulfurisé
Ingredients
- 2 tiges beurre non salé
- 400 g sucre
- 4 œufs
- 5 ml extrait de vanille
- 125 g farine tout usage
- 100 g cacao en poudre non sucré
- 2 g sel
- 5 g poudre à lever
- 170 g pépites de chocolat noir ou semi-sucré
- 240 ml crème épaisse
- 170 g chocolat semi-sucré haché
Instructions
- Préchauffez votre four à 175°C et graissez un moule à pâtisserie de 9x13 pouces, en le tapissant éventuellement de papier sulfurisé.
- Dans une casserole moyenne, faites fondre le beurre à feu doux et retirez du feu une fois complètement liquide.
- Incorporez le sucre jusqu'à ce que le mélange devienne brillant et granuleux. Laissez refroidir pendant 5 minutes.
- Ajoutez les œufs un à un au mélange de beurre et de sucre, en remuant vigoureusement après chaque ajout, puis incorporez l'extrait de vanille.
- Dans un bol séparé, tamisez la farine, le cacao en poudre, le sel et la poudre à lever, puis incorporez délicatement au mélange humide jusqu'à ce que le tout soit juste combiné.
- Incorporez les pépites de chocolat, puis versez la pâte dans le moule préparé et étalez-la uniformément.
- Faites cuire au four pendant 25-30 minutes jusqu'à ce que le dessus soit bien pris et craquelé, et qu'un cure-dent inséré en ressorte avec quelques miettes humides.
- Laissez les brownies refroidir complètement dans le moule sur une grille.
- Pour la ganache, faites chauffer la crème jusqu'à ce qu'elle frémisse, puis versez-la sur le chocolat finement haché, laissez reposer pendant 3 minutes, puis fouettez jusqu'à ce que le mélange soit lisse.
- Versez la ganache sur les brownies refroidis, laissez prendre à température ambiante pendant environ une heure, ou réfrigérez pendant 30 minutes avant de trancher.