
The Chocolate Dream That Almost Got Me in Trouble
Have you ever made a cake so good it caused a family argument? I have. The first time I baked this Nestlé Toll House Death by Chocolate Cake, my husband and kids nearly started a tug-of-war over the last slice. It’s that kind of dessert. The name isn’t a joke. This is a serious, no-holds-barred, triple-chocolate celebration that will make any chocoholic weak in the knees. It’s my go-to for birthdays, “I survived the week” parties, and any time we need a big, beautiful, chocolatey hug.
A Slice of Chocolate History
The term “death by chocolate” started popping up on restaurant menus in the 1990s. It was a funny label for desserts that piled every chocolate element imaginable into one plate. This cake is my homemade tribute to that era of joyful overindulgence. Using Nestlé Toll House chocolate chips is a nod to tradition for me. It reminds me of baking cookies with my grandma. But here, those trusty chips get a glamorous upgrade, melted into silky ganache and baked right into the layers for little molten surprises.
Why You’ll Fall in Love With This Decadent Chocolate Cake
You will love this recipe because it delivers professional-level flavor with home-baker simplicity. The hot coffee is the secret weapon. It doesn’t make the cake taste like coffee. Instead, it makes the chocolate flavor deep, rich, and complex. The texture is incredibly moist, thanks to the buttermilk. Every bite has smooth cake, creamy ganache, and the delightful crunch of mini chips. It’s a full chocolate experience.
When to Bake This Show-Stopping Cake
This cake isn’t just for birthdays! It’s perfect for:
- Potlucks: Be prepared to hand out the recipe. You’ll be asked for it.
- Valentine’s Day or Anniversary dinners at home.
- When you need to say “I’m sorry” or “Thank you” in the sweetest way possible.
- Just because it’s Tuesday! Life is too short not to eat amazing cake.
Gathering Your Chocolate Arsenal: The Ingredients
For the ultimate Decadent Chocolate Cake, you’ll need:
For the Cake:
- 2 cups all-purpose flour
- 3/4 cup unsweetened cocoa powder (use a good one!)
- 2 teaspoons baking powder
- 1/2 teaspoon baking soda
- 1/2 teaspoon salt
- 1 cup unsalted butter, softened
- 1 3/4 cups granulated sugar
- 3 large eggs
- 2 teaspoons vanilla extract
- 1 cup buttermilk
- 1/2 cup hot coffee
- 1 cup Nestlé Toll House semi-sweet chocolate chips
For the Ganache:
- 1 cup Nestlé Toll House semi-sweet chocolate chips
- 1/2 cup heavy cream
- 1 tablespoon unsalted butter
For Topping:
- 1/2 cup Nestlé Toll House mini chocolate chips
- Chocolate shavings (optional, but oh-so-pretty)
No Buttermilk? No Problem! Handy Substitutions
Don’t let a missing ingredient stop you. Here are easy swaps:
- Buttermilk: Mix 1 cup milk with 1 tablespoon lemon juice or white vinegar. Let it sit for 5 minutes until it curdles.
- Hot Coffee: Use hot water instead. The cake will still be delicious, though slightly less rich.
- All-Purpose Flour: For a gluten-free version, use a 1:1 gluten-free flour blend.
- Heavy Cream: For the ganache, full-fat coconut milk can work in a pinch.
Baking Your Masterpiece: Step-by-Step Instructions
Step 1: Prep and Preheat
Start by preheating your oven to 350°F. This ensures it’s perfectly hot when your batter is ready. Grease two 9-inch round cake pans with butter or non-stick spray. Then, dust them lightly with flour, tapping out the excess. This little step is your insurance policy for perfect, un-stickable cake layers. A little prep now saves a lot of frustration later!
Pro tip: For extra security, line the bottom of the pans with a circle of parchment paper after greasing.
Step 2: Whisk the Dry Goods
In a medium bowl, grab your whisk. Add the flour, cocoa powder, baking powder, baking soda, and salt. Whisk it all together until you see one uniform, deep brown powder. This isn’t just mixing. You’re making sure the leavening agents are evenly distributed. That means your cake will rise evenly in the oven. No dense spots allowed!
Step 3: Cream the Butter and Sugar
In a large mixing bowl, beat the softened butter and granulated sugar together. Use an electric mixer on medium speed. Beat for 3-4 minutes until the mixture is pale, fluffy, and almost creamy. You should see the texture change. This step incorporates air, which is key for a light cake. Then, add the eggs one at a time, mixing well after each. Finally, beat in the vanilla extract. Your kitchen will already smell amazing.
Step 4: Combine Wet and Dry
Now, add about one-third of your flour mixture to the butter mixture. Mix on low speed just until combined. Follow with half of the buttermilk. Repeat, alternating between flour and buttermilk, and ending with the flour. Stop mixing as soon as you see no dry streaks. A few flour specks are okay. Over-mixing at this point leads to a tough cake.
Step 5: The Secret Ingredient: Hot Coffee
Here’s the magic. Slowly pour in the half cup of hot coffee. The batter will become very thin and liquid. Don’t panic! This is exactly what you want. It will look more like a thick chocolate soup than cake batter. This liquid is what creates that famously moist, tender crumb. Finally, gently fold in the full cup of Nestlé Toll House chocolate chips with a spatula.
Step 6: Bake to Perfection
Divide the batter evenly between your two prepared pans. Smooth the tops with your spatula. Place them in the center of your preheated oven. Bake for 30-35 minutes. The cakes are done when the top springs back lightly to the touch. A toothpick inserted into the center should come out with just a few moist crumbs, not wet batter. Set a timer! Ovens vary, so start checking at 30 minutes.
Step 7: The All-Important Cool Down
When the cakes are done, take them out of the oven. Let them cool in the pans on a wire rack for exactly 10 minutes. This allows them to set slightly. Then, run a butter knife around the edges to loosen them. Invert each pan onto the rack and gently lift it off. Let the layers cool completely before you frost. I know it’s hard to wait, but warm cake will melt your ganache into a puddle.
Step 8: Create the Silky Ganache
Place the 1 cup of chocolate chips for the ganache in a heat-proof bowl. Heat the heavy cream in a small saucepan over medium heat. Watch it closely! You want it hot and steaming, with small bubbles around the edges, but not at a full, rolling boil. Pour the hot cream over the chocolate chips. Let it sit, untouched, for 2 minutes. This allows the heat to gently melt the chocolate. Then, add the tablespoon of butter and stir slowly until the mixture is gloriously smooth, shiny, and thick.
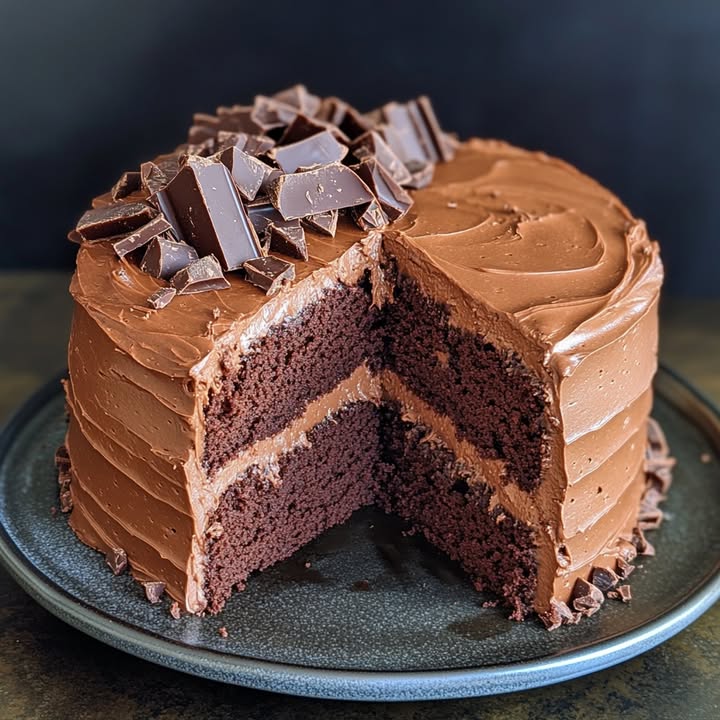
Step 9: Assemble Your Decadent Chocolate Cake
Place one completely cool cake layer on your serving plate. Spread a generous amount of the slightly cooled ganache over the top with an offset spatula. Carefully place the second layer on top. Now, pour and spread the remaining ganache over the top and down the sides. You can go for a smooth finish or a rustic, swirly look. I like rustic—it hides any mistakes beautifully!
Step 10: The Grand Finale
Immediately after frosting, sprinkle the top with the Nestlé Toll House mini chocolate chips. If you’re feeling fancy, add some chocolate shavings. The mini chips add a wonderful little crunch against the smooth cake and ganache. Now, step back and admire your work. You’ve just created a chocolate masterpiece!
Chef’s tip: For clean slices, dip your knife in hot water and wipe it dry between each cut.
Your Baking Timeline
Here’s a quick breakdown of what to expect:
- Prep Time: 25 minutes
- Cook Time: 35 minutes
- Cooling Time: 1 hour 30 minutes
- Total Time: 2 hours 30 minutes
The cooling is the longest part, but use that time to clean up and make the ganache!
A Secret From My Kitchen
My secret weapon is always room temperature ingredients. Take the eggs, butter, and buttermilk out of the fridge at least an hour before you start. Room-temperature ingredients blend together much more smoothly. This creates a better emulsion and a finer crumb in your finished cake. Cold butter just won’t cream as well, and cold ingredients can make your batter curdle.
A Fun Chocolate Fact
Did you know the cocoa bean is technically a seed from the fruit of the cacao tree? That fruit is called a pod, and it can hold up to 50 beans! The process from bean to the chocolate chips in our cake is a long journey of fermentation, drying, roasting, and grinding. It makes you appreciate that bag of chips a little more, doesn’t it?
The Tools You’ll Need
You don’t need fancy equipment, just the basics:
- Two 9-inch round cake pans
- Mixing bowls (one large, one medium)
- Electric hand mixer or stand mixer
- Whisk and rubber spatula
- Measuring cups and spoons
- Wire cooling rack
- Small saucepan for the cream
Keeping Your Cake Fresh and Fabulous
Storing at Room Temperature: If you plan to eat the cake within 24 hours, you can keep it covered with a cake dome or large bowl on the counter. The ganache will stay soft and perfect.
Refrigerating for Longer: For storage up to 5 days, place the cake in an airtight container or cover it tightly with plastic wrap and refrigerate. The cold will firm up the ganache. Let slices sit at room temperature for 20 minutes before serving to soften up beautifully.
Can You Freeze It? Absolutely! Wrap the whole cake or individual slices tightly in plastic wrap, then in foil. Freeze for up to 3 months. Thaw overnight in the fridge before serving.
My Best Tips and Advice
- Spoon your flour into the measuring cup and level it off with a knife. Don’t scoop directly from the bag. Scooping packs the flour down and can lead to a dry cake.
- Use the toothpick test, but don’t over-bake. A few moist crumbs are perfect. A completely clean toothpick might mean the cake is overdone.
- Let the ganache cool and thicken for about 10-15 minutes before frosting. It will be easier to spread and less likely to drip everywhere.
Presentation Ideas That Wow
Make your cake the star of the table:
- Place fresh raspberries or strawberries around the base of the cake.
- Dust the top lightly with powdered sugar for a snowy effect.
- Serve each slice with a dollop of lightly sweetened whipped cream or a scoop of vanilla ice cream. The contrast is heavenly.
- For a party, top with edible gold flakes or gold-dusted cacao nibs.
Love This Cake? Try These Healthier Twists!
If you’re looking to lighten things up, here are six flavorful variations on this Decadent Chocolate Cake recipe.
- Whole Wheat Chocolate Cake: Substitute half of the all-purpose flour with whole wheat pastry flour. It adds a nutty flavor and more fiber without sacrificing tenderness.
- Avocado Chocolate Cake: Replace half the butter with an equal amount of mashed ripe avocado. This swaps in heart-healthy fats for a super moist crumb. You won’t taste the avocado, I promise!
- Black Bean Brownie Cake: For a gluten-free, protein-packed version, try a recipe that uses pureed black beans as the base. The result is incredibly fudgy and rich.
- Reduced-Sugar Chocolate Cake: Cut the granulated sugar in the cake by 1/4 cup. The chocolate chips and ganache will still provide plenty of sweetness for most palates.
- Vegan Decadent Chocolate Cake: Use flax eggs (1 tbsp ground flax + 3 tbsp water per egg), vegan butter, and plant-based milk with lemon juice for the buttermilk. Opt for dairy-free chocolate chips.
- Zucchini Chocolate Cake: Grate 1 cup of zucchini, squeeze out the excess moisture, and fold it into the batter. It keeps the cake unbelievably moist and adds a veggie boost your kids will never detect.
If you’re curious about how dark chocolate can fit into a balanced lifestyle, research on the Mediterranean diet often highlights the benefits of enjoying quality, mindful indulgences as part of an overall healthy pattern of eating.
Common Mistakes to Avoid
Mistake 1: Using Cold Ingredients
This is the biggest culprit for a dense cake. Cold butter won’t cream properly with sugar. Cold eggs or buttermilk can cause the batter to curdle or separate. The result is a cake that doesn’t rise well and can be heavy. Always plan ahead. Take your butter, eggs, and buttermilk out of the fridge about an hour before you start baking. They should feel cool to the touch, not cold.
Mistake 2: Over-Mixing the Batter
Once you add the flour, gluten development begins. Mixing too much makes the gluten strands strong and tough. You want a tender cake, not chewy bread! Mix the dry and wet ingredients just until you no longer see streaks of flour. A few small lumps are perfectly fine. It’s better to finish mixing by hand with a spatula to be safe.
Mistake 3: Over-Baking the Layers
We fear raw cake, so we often bake it too long. An over-baked chocolate cake becomes dry and crumbly. Start testing at the earliest suggested time (30 minutes). The cake is done when the top springs back lightly when touched. A toothpick inserted should have a few moist crumbs attached, not wet batter. Remember, the cake continues to cook a bit as it cools in the pan.
Mistake 4: Frosting a Warm Cake
Impatience leads to ganache disaster. If the cake layers are even slightly warm, the rich ganache frosting will melt, slide right off, and create a huge mess. You must let the layers cool completely on a wire rack. This can take over an hour. Use the time to clean your kitchen and prepare the ganache. A cool cake is a stable canvas for your frosting.
Mistake 5: Boiling the Cream for Ganache
If you boil the heavy cream, it can become too hot and cause the chocolate to “seize” or become grainy and oily. You want the cream hot enough to melt the chocolate, not scorch it. Heat it over medium until it is steaming and you see small bubbles just starting to form around the edges of the saucepan. Then, immediately pour it over the chocolate chips.
Frequently Asked Questions
Can I make this cake ahead of time?
Absolutely! This cake is actually better the next day. The flavors have more time to blend and mellow. You can bake the layers up to two days in advance. Let them cool completely, then wrap each one tightly in plastic wrap and store at room temperature. Make the ganache and assemble the cake the day you plan to serve it. You can also fully assemble it, cover it well, and store it in the fridge for up to 24 hours before your event.
What can I use if I don’t have buttermilk?
No buttermilk in the fridge? No problem. The easiest substitute is to make your own “soured milk.” For this recipe, measure 1 tablespoon of fresh lemon juice or white vinegar into a measuring cup. Then, add enough regular milk (whole or 2% works best) to reach the 1-cup line. Stir it and let it sit for about 5-10 minutes. It will look curdled and thick—that’s perfect! Use it just like you would real buttermilk.
Why add hot coffee? Will my cake taste like coffee?
This is the most common question! The answer is no, your cake will not taste like coffee. The coffee is a flavor enhancer. It deepens and intensifies the chocolate flavor, making it taste richer and more complex. Think of it like adding a pinch of salt to chocolate chip cookies—it makes the sweet flavors pop. If you are really against it, you can use an equal amount of hot water, but I highly recommend trying the coffee version at least once.
My ganache is too runny. How can I fix it?
Don’t worry, this happens! It usually means the cream was too hot or the ratio was slightly off. The easiest fix is to simply let it sit at room temperature for 15-20 minutes. Stir it occasionally. It will thicken as it cools. If it’s still too thin after that, you can add a few more chocolate chips (about 2 tablespoons) to the warm ganache and stir until they melt. This will help thicken it up without altering the flavor much.
Can I make this into cupcakes?
Yes, this batter makes fantastic cupcakes! Line a muffin tin with paper liners. Fill each liner about 2/3 full with batter. Bake at 350°F for 18-22 minutes, or until a toothpick inserted comes out clean. Let them cool completely. For the frosting, you can use the ganache or a simple chocolate buttercream. This recipe should yield about 24 decadent chocolate cupcakes perfect for parties.
How do I get my cakes to bake evenly and not dome?
A slight dome is normal, but for perfectly flat layers (great for stacking!), try these tricks. First, make sure your oven temperature is accurate with an oven thermometer. Second, use cake strips! You soak fabric baking strips in water, wrap them around the outside of the cake pan, and pin them. This cools the edge of the pan so the cake bakes more evenly from edge to center. No strips? Gently wrap dampened paper towels around the pan and secure with foil.
Can I use a different type of chocolate chip?
You can, but it will change the flavor profile. Nestlé Toll House semi-sweet chips are a classic, middle-of-the-road sweetness. If you use milk chocolate chips, the whole cake will be much sweeter. If you use dark chocolate chips (60% cacao or higher), the cake will be less sweet and have a more intense, grown-up chocolate bite. I recommend sticking with semi-sweet for the perfect balance this recipe was designed for.
Is it necessary to use unsalted butter?
Yes, I strongly recommend it. Baking is a science, and salt is a key measurement. Using unsalted butter lets you control exactly how much salt goes into your cake. Salted butter can vary greatly in salt content between brands. If you only have salted butter on hand, simply reduce the added salt in the cake recipe by 1/4 teaspoon. It’s not ideal, but it will work in a pinch.
How can I tell if my baking powder or soda is still good?
Old leaveners are a main reason cakes don’t rise. To test baking powder, put 1/2 teaspoon in a cup and pour 1/4 cup of hot water over it. It should bubble vigorously immediately. To test baking soda, put 1/2 teaspoon in a cup and add a few drops of vinegar or lemon juice. It should fizz and bubble right away. If the reactions are weak or nonexistent, it’s time for a new box.
Can I make this recipe in a 9×13 inch pan?
You sure can. This is a great option if you don’t want to fuss with layers. Grease and flour a 9×13 inch baking pan. Pour all the batter into the prepared pan. Bake at 350°F. Start checking for doneness at 35 minutes. It may take 35-45 minutes total. You’ll know it’s done when a toothpick comes out clean. Let it cool in the pan. You can frost the top right in the pan with the ganache for an easy sheet cake.
For more incredible treats that will make you a baking hero, explore our entire collection of favorite cake and cupcake recipes. You’ll find everything from classic birthday cakes to fun, seasonal bakes.
Go Ahead, Indulge!
So there you have it. The secret to my most-requested, most-fought-over chocolate cake. It’s not a hard recipe, but the little details make it extraordinary. The rich coffee, the smooth ganache, the melty chips. It’s a labor of love that feels like a big, delicious celebration every single time. Bake it for someone you love, or better yet, bake it just for you. You deserve a slice of pure, unapologetic chocolate joy. Now, go preheat that oven and get ready for the best kind of chocolate “death” there is. Happy baking!
Equipment
- Deux moules à gâteau de 9 pouces
- Grand bol
- Fouet
- Mélangeur électrique ou mélangeur sur socle
- Casserole pour la crème
Ingredients
- 2 tasses farine tout usage
- 3/4 tasse cacao en poudre non sucré
- 2 cuillères à café poudre à lever
- 1/2 cuillère à café bicarbonate de soude
- 1/2 cuillère à café sel
- 1 tasse beurre non salé, ramolli
- 1 3/4 tasses sucre granulé
- 3 grands œufs
- 2 cuillères à café extrait de vanille
- 1 tasse buttermilk
- 1/2 tasse café chaud
- 1 tasse pépites de chocolat semi-sucrées Nestlé Toll House
- 1 tasse pépites de chocolat semi-sucrées Nestlé Toll House (pour ganache)
- 1/2 tasse crème épaisse (pour ganache)
- 1 cuillère à soupe beurre non salé (pour ganache)
- 1/2 tasse mini pépites de chocolat Nestlé Toll House (pour décoration)
- q.s. copeaux de chocolat (facultatif)
Instructions
- Préchauffez le four à 180°C et préparez deux moules à gâteau ronds de 9 pouces en les graissant et en les farinant légèrement.
- Dans un bol moyen, fouettez ensemble la farine, le cacao en poudre, la poudre à lever, le bicarbonate de soude et le sel.
- Dans un grand bol, battez le beurre ramolli et le sucre granulé jusqu'à ce qu'ils deviennent pâles et mousseux. Ajoutez les œufs un par un, suivis de l'extrait de vanille.
- Ajoutez alternativement le mélange de farine et le buttermilk au mélange de beurre, en commençant et en terminant par le mélange de farine.
- Versez lentement le café chaud tout en mélangeant jusqu'à ce que la pâte soit bien combinée, puis incorporez délicatement les mini pépites de chocolat.
- Divisez la pâte également entre les moules préparés et lissez le dessus.
- Faites cuire pendant 30-35 minutes, jusqu'à ce qu'un cure-dent inséré en ressorte avec quelques miettes humides.
- Laissez refroidir les gâteaux dans les moules pendant 10 minutes, puis démoulez-les sur une grille pour refroidir complètement.
- Pour la ganache, chauffez la crème épaisse jusqu'à ce qu'elle commence à fumer et versez-la sur les pépites de chocolat. Laissez reposer, puis incorporez le beurre jusqu'à ce que le mélange soit lisse.
- Assemblez en plaçant une couche de gâteau sur une assiette de service, étalez la ganache sur le dessus, superposez la seconde couche de gâteau et recouvrez-la avec le reste de ganache.
- Parsemez de mini pépites de chocolat et de copeaux de chocolat facultatifs sur le dessus avant de servir.
Notes
Nutrition

Hi, I’m Olivia Parker, the founder of BakingSecret.com and a lifelong lover of all things sweet and homemade. I grew up in a small town in Oregon, where the smell of fresh cookies in my family’s kitchen sparked my passion for baking. Over the years, I turned that passion into a mission: to help home bakers feel confident, inspired, and creative.
After studying food science and working in several artisan bakeries across the U.S., I decided to create a space where everyone from beginners to seasoned bakers can find reliable recipes, expert tips, and a warm, welcoming community. BakingSecret.com is my way of sharing the magic of baking with the world. When I’m not testing new recipes, you’ll find me exploring farmers’ markets, collecting vintage cookbooks, or perfecting my sourdough technique.