
The Creamy, Chocolatey Magic of Boston Cream Cupcakes
Do you have a family begging for dessert, but you’re short on time? I know that feeling well! Picture this: I was racing to get treats ready for a last-minute school bake sale. Then I remembered my shortcut to heaven—Boston Cream Cupcakes. They turn a box mix into something spectacular. The moment you bite into one, you are met with fluffy cake, sweet vanilla cream, and a rich chocolate finish. It’s a flavor adventure that makes everyone smile. It feels like a fancy bakery treat, but you made it in your kitchen!
A Slice of History in a Cupcake Form
The grand Boston Cream Pie is the star here. It was invented at Boston’s Parker House Hotel way back in the 1850s. Tourist lore is charming, but pie-making can be tricky. These Boston Cream Cupcakes are the modern, easy answer. They capture all the classic flavors—vanilla custard and chocolate glaze—in a single, hand-held bite. No slicing, no fuss. They are perfect for today’s busy cooks who love a taste of tradition.
Why You’ll Love This Easy Boston Cream Cupcake Recipe
You will adore this recipe for three big reasons. First, it’s incredibly simple. You start with a reliable cake mix foundation. Second, the filling is dreamy. It’s a simple pudding mix blended with cream for a lush texture. Third, the chocolate ganache topping is pure luxury. It’s silky and shiny. Together, they create a decadent dessert that looks and tastes professional. You’ll get all the praise without all the stress.
Perfect Occasions for Your Boston Cream Cupcakes
These filled cupcakes are the ultimate party heroes. They shine at birthday parties where kids (and adults!) go wild for them. They are a brilliant addition to a weekend brunch table. They are also ideal for holiday gatherings. Think Easter, Christmas, or Thanksgiving dessert spreads. A platter of these beauties always gets compliments. They are a surefire hit for potlucks and bake sales too. Everyone loves a personal, perfect little cake.
Gathering Your Ingredients for Boston Cream Cupcakes
Here is your shopping list. It’s divided into three easy parts.
- For the Cupcakes:
- 1 box yellow cake mix (plus the eggs, oil, and water listed on its box)
- 1 teaspoon vanilla extract (optional, for a flavor boost)
- For the Vanilla Cream Filling:
- 1 box (3.4 oz) instant vanilla pudding mix
- 1 cup cold milk
- 1/2 cup heavy cream
- For the Chocolate Ganache:
- 1/2 cup heavy cream
- 4 oz semi-sweet chocolate, chopped
- 1 tablespoon butter
Handy Substitution Options
Don’t worry if you’re missing something! Cooking is about being creative.
- Cake Mix: Use a white or butter cake mix if you can’t find yellow.
- Milk: Whole milk is best, but 2% works for the pudding. For a dairy-free version, try almond or oat milk.
- Chocolate: Chocolate chips can replace chopped chocolate. Milk chocolate makes a sweeter ganache. Dark chocolate offers a richer, less sweet option.
- Filling: If you want a thicker, more traditional custard, try my other elevated Boston Cream Cupcakes recipe that uses a homemade pastry cream.
Creating Your Decadent Boston Cream Cupcakes
Follow these steps for perfect results every time.
Step 1: Bake and Cool Your Cupcake Bases
Start by preparing your cake mix. Follow the box instructions exactly. Add that optional teaspoon of vanilla for a lovely aroma. Mix until the batter is smooth and pale yellow. Fill your cupcake liners about two-thirds full. Bake as directed until they are golden and spring back when touched. Let them cool completely on a wire rack. This is very important. A warm cupcake will melt your filling and make the ganache runny.
Step 2: Make the Luscious Vanilla Cream Filling
In a medium bowl, pour your cold milk and heavy cream. Add the instant pudding mix. Whisk briskly for about two minutes. Watch it transform from liquid to a thick, creamy pudding. It will coat the whisk beautifully. Place the bowl in the refrigerator for at least 10 minutes. This chilling time helps it set perfectly for filling. Pro tip: A hand mixer can make this step even quicker and give you a super smooth filling.
Step 3: Core and Fill Your Cupcakes
Now for the fun part! Take a small knife or a cupcake coring tool. Gently remove a small circle from the center of each cooled cupcake. Go about halfway down. You can eat these little cake plugs—a chef’s reward! Spoon your chilled vanilla cream into each hole. Or, use a piping bag for a neat, professional look. Fill them just to the top. You want a generous pocket of cream waiting inside.
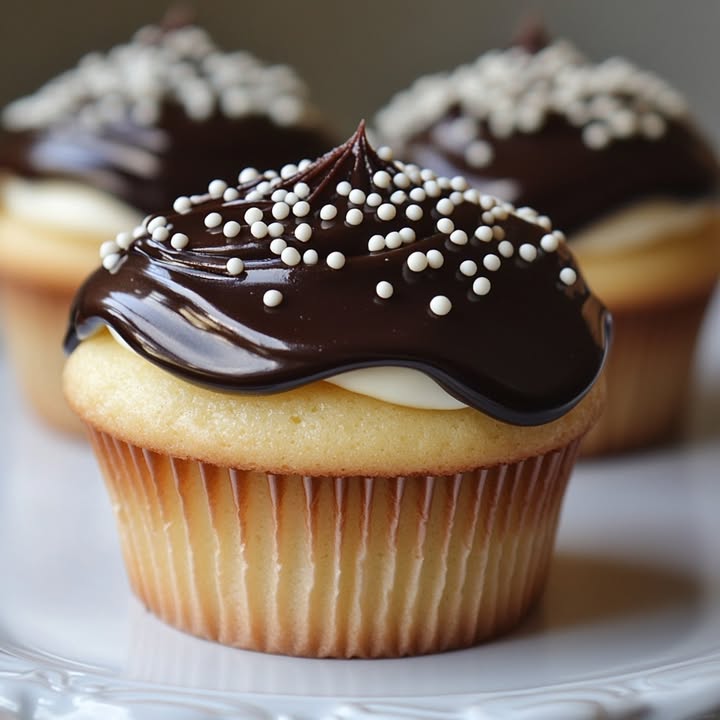
Step 4: Create the Smooth Chocolate Ganache Topping
Heat the heavy cream in a small saucepan over medium heat. Let it get hot and steamy, but do not let it boil. Once it’s steaming, take it off the heat. Immediately add your chopped chocolate and butter. Stir gently until the chocolate melts and everything combines into a glossy, dark pool. The smell is amazing! Let it cool for just a minute so it thickens slightly.
Step 5: Top, Chill, and Serve!
Dip the top of each filled cupcake into the ganache. You can also spoon it over. Give each one a gentle twist to get a smooth, even coat. The chocolate will cascade over the edges a bit—that’s the good stuff! Place them on a tray. Chill in the fridge for 15 minutes to set the chocolate. Or, serve them right away if you can’t wait. The first bite of cake, cream, and chocolate is pure joy. Chef’s tip: For a super clean dip, hold the cupcake upside down and swirl it in the ganache. This covers the top perfectly.
Timing Your Boston Cream Cupcake Adventure
The timeline for this recipe is a baker’s dream.
- Prep Time: 20 minutes (measuring, mixing, filling)
- Cook Time: 20 minutes (baking the cupcakes)
- Chill/Set Time: 25 minutes (10 for pudding, 15 for ganache)
- Total Time: About 1 hour 5 minutes
- Servings: Makes about 12 perfect cupcakes
- Calories: Approximately 330 per cupcake
My Chef’s Secret for the Best Filled Cupcakes
My secret is in the filling technique. After I pipe the cream in, I take the little cake plug I removed and press it back on top of the cream. I trim off a tiny bit so it sits flat. Then I dip it in ganache. This creates a hidden “lid.” It keeps the cream securely inside and gives the ganache a solid base to cling to. No leaking filling and a perfect chocolate top every time!
A Fun Fact About Your Ingredients
That instant pudding mix is a kitchen superstar! It was invented in the 1950s. It gave home cooks a quick way to make creamy desserts. Using it here is a nod to that clever history. It helps us create a classic taste with modern ease. It’s a wonderful example of how cooking evolves to fit our lives.
Necessary Equipment for Easy Baking
You don’t need special tools. Here’s what I use:
- Mixing bowls
- Whisk or hand mixer
- Cupcake pan and paper liners
- Measuring cups and spoons
- Small saucepan
- Small knife or apple corer for removing cupcake centers
- Piping bag with a round tip (optional, but helpful)
- Wire cooling rack
How to Store Your Boston Cream Cupcakes
These cupcakes are best enjoyed fresh. But you can store them if needed. Place them in a single layer in an airtight container. Keep them in the refrigerator. The cold helps the cream filling and ganache stay set. They will be good for up to 2-3 days. The cake may get a bit denser, but the flavors will still be great.
I do not recommend freezing them. The cream filling can separate and become watery when thawed. The texture of the cake can also suffer. It’s best to make them for near-term enjoyment.
If you need to store them for a party, you can bake the cupcakes a day ahead. Keep them unfilled at room temperature. Make the filling and ganache the day of the event. Then assemble everything fresh. This keeps the textures perfect.
Pro Tips and Advice for Success
- Always let cupcakes cool fully before filling. Warm cake ruins the structure.
- Use cold milk and cream for the pudding. It thickens much better.
- If your ganache seems too thin, let it cool a bit more. If it’s too thick, add a tiny splash of warm cream.
- For a neat look, use a piping bag to fill the cupcakes. A ziplock bag with the corner cut off works too.
- For more decorating ideas, check out my festive Boston Cream Cupcakes recipe with garnish suggestions.
Presentation Ideas to Make Them Sparkle
Make your cupcakes look extra special.
- Add a tiny dollop of leftover cream on top of the ganache before serving.
- Sprinkle with chocolate shavings or a dusting of powdered sugar.
- Place each cupcake on a colorful napkin or small doily on your serving plate.
- For a holiday touch, add a small edible gold star or a sprinkle of red sugar.
- Arrange them on a tiered stand for a real bakery display.
Exploring Healthier and Fun Variations
You can tweak this recipe in many fun ways.
- Gluten-Free Boston Cream Cupcakes: Use a certified gluten-free yellow cake mix. Ensure your pudding mix is also gluten-free. Everything else stays the same.
- Dairy-Free Version: Use a dairy-free cake mix recipe or box. For the filling, use instant pudding mixed with cold coconut milk. For ganache, heat coconut cream and mix with dairy-free chocolate.
- Lower-Sugar Option: Use a sugar-free cake mix and sugar-free pudding mix. For ganache, use a dark chocolate with high cocoa content (less sugar).
- Boston Cream “Pie” Cupcakes: Want the true pie feel? Use a round cake pan to bake a single layer. Fill and top it as a whole cake. Slice to serve. It’s a fun twist on the cupcake format.
- Chocolate Cake Base: Swap the yellow cake for a chocolate mix. You get chocolate cake, vanilla cream, and chocolate ganache—a triple chocolate dream! My chocolate lover’s Boston Cream Cupcakes recipe walks you through this version.
- Coffee-Infused Ganache: Add a teaspoon of instant espresso powder to the hot cream for the ganache. It creates a mocha flavor that’s incredible. It cuts the sweetness and adds depth.
Common Mistakes to Avoid
A few small errors can change your results. Let’s avoid them.
Mistake 1: Using Warm Cupcakes for Filling
This is the biggest mistake. If your cupcakes are still warm, the vanilla cream filling will melt and soak into the cake. The ganache will also slide right off. It makes a mess. Always let your cupcakes cool on a wire rack until they are completely room temperature. Touch the bottom of the pan; it should feel cool. Patience here makes perfect filled cupcakes.
Mistake 2: Letting the Ganache Get Too Hot or Too Cold
Ganache is sensitive. If you boil the cream, it can scorch the chocolate and make the ganache grainy. If you let the ganache cool too much before dipping, it becomes thick and clumpy. It won’t coat smoothly. Heat the cream until it’s just steaming. Then remove it from heat. Stir in the chocolate until it’s shiny. Let it cool for about 1-2 minutes until it’s slightly thickened but still pourable. That’s the perfect dipping texture.
Mistake 3: Overfilling or Underfilling the Centers
Getting the filling amount right is key. If you dig too deep or fill too much, the cupcake can split or leak. If you don’t add enough cream, you lose that wonderful surprise center. Use a small knife or corer. Remove a core about 1 inch wide and halfway deep. Fill it until the cream just reaches the top. A good rule is to use about a tablespoon of filling per cupcake. For more precision, my professional-style Boston Cream Cupcakes recipe details exact measurements.
Mistake 4: Skipping the Chill Time for the Pudding
The instant pudding needs a few minutes in the fridge. Whipping it with milk and cream makes it thick. But chilling it for 10 minutes lets it firm up properly. This gives you a stable, creamy filling that won’t weep or run. If you skip this step, your filling might be too soft. It can make the cupcake soggy. Plan for this quick chill—it’s worth it.
A Note on Ingredients and Well-being
Using good quality ingredients always makes a dessert taste better. It can also make a difference in how you feel. For example, dark chocolate with higher cocoa content has less sugar. Some research suggests certain food qualities might relate to overall health. If you’re curious about how diet choices can affect your body, you can read about the connection between inflammation and diet from trusted health sources. It’s interesting food science!
Join the Cupcake Fun!
I hope you love making these Boston Cream Cupcakes as much as I do. They are a true crowd-pleaser. For more sweet inspiration, explore all my other cake and cupcake recipes. There’s always a new baking project waiting!
Your Boston Cream Cupcakes Questions Answered
Can I make the vanilla cream filling ahead of time?
Yes, you can! The vanilla pudding filling can be made up to one day ahead. Prepare it as directed. Cover it tightly and store it in the refrigerator. It may thicken a bit more overnight. That’s fine. Just give it a quick stir before you use it to fill your cupcakes. This is a great way to split up the work if you’re preparing for a big event.
What can I use if I don’t have heavy cream for the ganache?
You can use a substitute, but the texture will change. For the ganache, you can try using full-fat coconut cream. It will give a similar rich consistency. You could also use half-and-half. The ganache will be a bit less thick and rich. Whole milk is not recommended. It makes the ganache too thin and won’t set properly. The best result comes from heavy cream or a good coconut cream.
My ganache is too runny. How can I fix it?
A runny ganache usually needs to cool more. Let it sit at room temperature for 5-10 minutes. Stir it occasionally. It will thicken as it cools. You can also add a bit more chopped chocolate. Melt a small extra amount and stir it into the warm ganache. This can help thicken it. If it’s still too thin, you can spoon it over the cupcakes instead of dipping. It will still taste wonderful.
Can I use homemade pastry cream instead of pudding mix?
Absolutely! A homemade pastry cream is more traditional. It’s richer and has a true custard texture. It uses milk, eggs, sugar, and cornstarch cooked together. It takes a bit more time and skill. But it’s delicious. If you want that authentic Boston Cream Pie filling, try a pastry cream recipe. Just let it cool completely before filling your cupcakes.
How do I stop the ganache from dripping too much down the sides?
Control the thickness and the dip technique. Let your ganache cool until it’s like a thick sauce. When you dip, hold the cupcake upside down. Lower it straight into the ganache. Twist it once gently. Lift it straight up. Don’t swirl it around too much. This gives a controlled coat. You can also use a spoon to apply a thinner layer just on the top.
Why did my filling sink into the cupcake?
This happens if the cupcake wasn’t cooled enough. Or if the filling was too liquid. Ensure your cupcakes are room temperature. Make sure your pudding filling has chilled for the full 10 minutes. It should be quite thick. Also, don’t overfill. The cake needs structure to hold the cream. If you fill it too much, the weight can push it down.
Can I freeze these cupcakes?
I don’t recommend freezing the assembled cupcakes. The cream filling can separate and become watery when thawed. The texture changes. You can freeze the unfilled, un-frosted cupcakes. Wrap them well in plastic wrap and freeze for up to a month. Thaw, then fill and top them fresh the day you want to serve them.
What’s the best way to core a cupcake without a special tool?
A small, sharp paring knife works great. Insert the tip and cut a small circle about 1 inch wide. Cut down about halfway. Twist and pull out the plug. You can also use a small apple corer. Another trick: use the large end of a piping tip. Press it into the center and twist. It removes a perfect little core.
How can I make these cupcakes look more professional for a party?
A few simple touches help. Use a piping bag to fill the cupcakes neatly. Dip the tops in ganache smoothly. Let them set fully. Then, add a tiny decoration. A small chocolate curl on top. A light dusting of edible glitter. Or place each cupcake on a fancy paper liner. Arranging them on a tiered stand instantly elevates their look.
My pudding mix didn’t thicken much. What did I do wrong?
The most common reason is not using cold liquid. The milk and cream must be cold. If they were warm or room temperature, the pudding won’t set right. Also, whisk it vigorously for the full two minutes. It needs that agitation to thicken. If you’re in a warm kitchen, chill the bowl before you start. This can help too.
The Joy of Homemade Success
There’s something truly special about handing someone a homemade Boston Cream Cupcake. You see that first look of surprise, then pure delight. The combination of soft cake, sweet cream, and rich chocolate is a timeless winner. This recipe lets you create that magic quickly and easily. It turns a simple box mix into a dessert that feels gourmet. So grab your mixing bowls, and get ready for some happy faces. Your kitchen is about to become the best little bakery around. Enjoy every bite!
Equipment
- Grand bol
- Fouet
- Plaque à pâtisserie
- Papier sulfurisé
- Râteau de cuisson
Ingredients
- 1 boîte mélange à gâteau jaune plus les œufs, l'huile et l'eau selon les instructions de la boîte
- 1 cuillère à café extrait de vanille optionnel, pour un goût supplémentaire
- 1 boîte mélange à pouding à la vanille instantané
- 1 tasse lait froid
- 1/2 tasse crème épaisse pour la garniture
- 1/2 tasse crème épaisse pour le ganache
- 4 oz chocolat semi-sucré haché
- 1 cuillère à soupe beurre
Instructions
- Préparez le mélange à gâteau selon les instructions de la boîte, en ajoutant l'extrait de vanille en option.
- Remplissez les caissettes à cupcakes aux deux tiers et faites cuire selon les indications jusqu'à ce qu'elles soient dorées et rebondissent.
- Laissez refroidir complètement sur une grille.
- Dans un bol moyen, mélangez le lait froid, la crème épaisse et le mélange à pouding instantané ; fouettez pendant environ deux minutes jusqu'à épaississement.
- Mettez la garniture au réfrigérateur pendant au moins 10 minutes.
- Creusez un petit cercle au centre de chaque cupcake refroidi pour créer de l'espace pour la garniture.
- Remplissez chaque cupcake avec la crème vanillée refroidie.
- Chauffez 1/2 tasse de crème épaisse dans une petite casserole jusqu'à ce qu'elle soit chaude mais pas bouillante.
- Retirez du feu, ajoutez le chocolat et le beurre, et mélangez jusqu'à ce que le tout soit fondu et lisse.
- Plongez ou versez le ganache sur le dessus de chaque cupcake rempli et réfrigérez pour que cela prenne.
Notes
Nutrition

Hi, I’m Olivia Parker, the founder of BakingSecret.com and a lifelong lover of all things sweet and homemade. I grew up in a small town in Oregon, where the smell of fresh cookies in my family’s kitchen sparked my passion for baking. Over the years, I turned that passion into a mission: to help home bakers feel confident, inspired, and creative.
After studying food science and working in several artisan bakeries across the U.S., I decided to create a space where everyone from beginners to seasoned bakers can find reliable recipes, expert tips, and a warm, welcoming community. BakingSecret.com is my way of sharing the magic of baking with the world. When I’m not testing new recipes, you’ll find me exploring farmers’ markets, collecting vintage cookbooks, or perfecting my sourdough technique.