
Beraouinse Cake: A Pink, Pretty, and Perfectly Simple Treat
Oh, let me tell you about the day my granddaughter declared this the “princess cake”! I was looking for a sweet, simple bake that looked as joyful as it tasted, and this Beraouinse cake (sometimes called a cortadillo) was the answer. It’s a soft, tender cake topped with a cheerful pink icing and those little crunchy dragées. The best part? It’s almost impossible to mess up. If you need a guaranteed crowd-pleaser that brings smiles, you’ve found your recipe. Let’s bake some happiness!
The Sweet Story Behind Beraouinse Cake
This cake’s name might sound fancy, but its spirit is pure home kitchen. From what I’ve gathered from friends and my own recipe hunts, this style of cake is a beloved tradition in many Latin American homes. It’s the cake you make for a birthday, a school party, or just because it’s Tuesday. The modern twist is that pink icing! It turns a simple vanilla cake into a celebration. My version keeps it classic with vanilla and a soft crumb, making it a perfect blank canvas for your own family’s traditions.
Why You’ll Absolutely Love This Beraouinse Cake Recipe
You’ll love this recipe because it’s wonderfully straightforward. You don’t need any special skills or exotic ingredients. The mixing method is simple: just combine wet and dry ingredients. The result is a moist, fluffy cake that holds up beautifully under the sweet glaze. It’s also incredibly versatile. That pink icing? You can make it blue, yellow, or leave it white! It’s a recipe that welcomes you to play and make it your own, which is my favorite kind of baking.
Perfect Occasions for Your Homemade Cortadillo
This cake is your secret weapon for so many events! It’s perfect for children’s birthday parties—just look at that pink top. It’s ideal for baby showers, bake sales, or afternoon tea with friends. I often make it as a “just because” treat to slice up with coffee. It’s not overly rich, so it’s great for when you want something sweet but not too heavy. Honestly, any day feels a bit more special with a plate of this cake on the counter.
Ingredients for Your Perfect Pink Beraouinse Cake
Gather these simple ingredients for your baking adventure. I always lay everything out on the counter first—it makes the process so much smoother!
- 3/4 cup milk
- 1 and 1/2 teaspoons baking powder
- 2 and 1/2 cups sugar
- 3/4 cup oil (a neutral oil like vegetable or canola works great)
- 7 large eggs
- 3 cups of all-purpose flour
- 1 teaspoon of pure vanilla extract
For the Pink Icing & Decoration:
- 3 cups of icing sugar (powdered sugar)
- 4 teaspoons of water
- 1 drop of pink food coloring, or more to your liking
- Dragées (those little silver or colorful candy balls) or sprinkles
Easy Ingredient Substitutions
Don’t have something? No panic! Here are some easy swaps:
- Milk: Any milk works—whole, 2%, or even a non-dairy alternative like almond or oat milk.
- Oil: You can use melted, cooled butter for a richer flavor. The texture might be slightly denser, but still delicious.
- Food Coloring: Use gel food coloring for a more vibrant pink without thinning the icing. Or, use a teaspoon of raspberry or strawberry juice for a natural tint!
- Dragées: Any sprinkle, nonpareil, or even crushed nuts would be lovely on top.
How to Make Beraouinse Cake: Step-by-Step Guide
Ready? Put on your apron, and let’s create some magic. The smell of this cake baking is pure comfort.
Step 1: Combining the Base
First, place the sugar, eggs, and oil in the bowl of your stand mixer. If you’re using a hand mixer, a large bowl works just fine. Turn the mixer to medium speed and beat everything together. You’re looking for a pale, smooth, and slightly thickened mixture. This should take about 2-3 minutes. The sugar should be fully dissolved into the eggs and oil. This step creates the foundation for a light cake texture.
Step 2: Incorporating the Dry Ingredients
In a separate bowl, whisk together your flour and baking powder. This ensures the baking powder is evenly distributed. Now, here’s my pro tip: turn the mixer OFF before adding the flour. Trust me! Add about a third of the flour mixture at a time to the wet ingredients, pulsing the mixer on low just to incorporate it. This prevents a huge cloud of flour from flying all over your kitchen and your clothes. Mix just until you no longer see dry flour streaks.
Step 3: The Final Mix and Bake
Now, pour in the vanilla and milk. Turn the mixer back on low, then gradually increase to medium. Beat everything for another minute or two until the batter is silky, smooth, and beautifully combined. It will be a lovely pale yellow. Prepare your baking tray by buttering it well and lining the bottom with parchment paper. Pour the batter in and smooth the top. Bake in a preheated oven at 180°C (350°F) for about 25-30 minutes, or until a toothpick inserted in the center comes out clean.
Step 4: The Icing on the Cake
Let the cake cool completely in the pan. Patience is key here! For the icing, place the powdered sugar in a clean bowl. Add 4 teaspoons of water and that one drop of pink coloring. Stir gently with a fork or whisk. You want a thick but pourable consistency. Add more water, a tiny drop at a time, if it’s too thick. The icing should hold its shape but still be easy to spread.
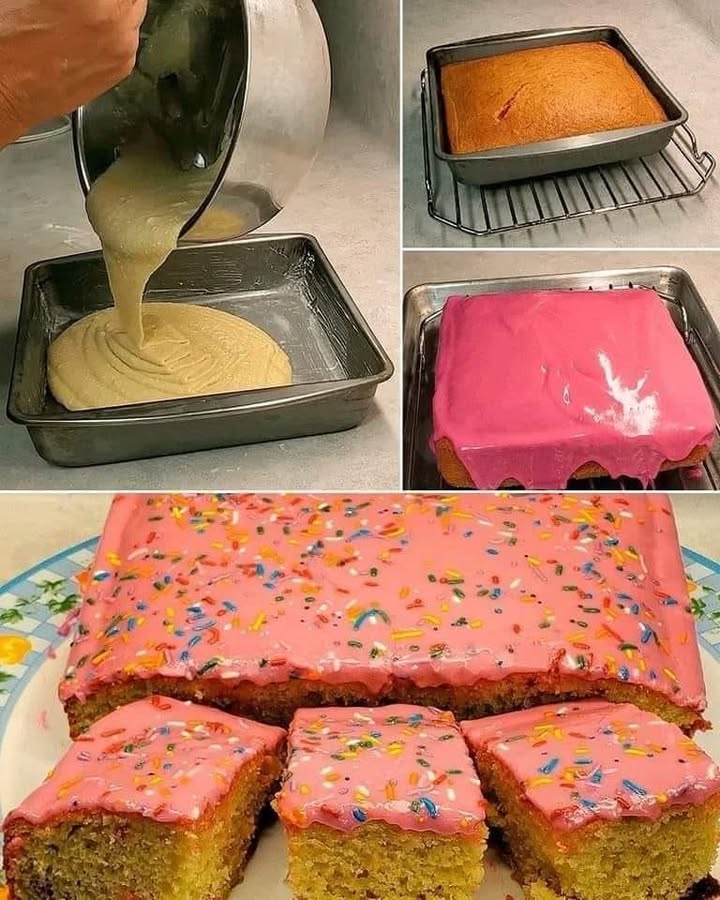
Step 5: Decorating and Serving
Pour the pink icing over the cooled cake. Use a spatula to guide it to the edges, letting it drip down the sides naturally. Immediately sprinkle your dragées or colorful sprinkles over the top so they stick. Now, the fun part: cutting! You can cut this Beraouinse cake into squares, diamonds, or small rectangles. A chef’s tip: wipe your knife clean between cuts for super neat, pretty pieces.
Your Beraouinse Cake Timeline
Here’s how your time will be spent:
- Prep Time: 15 minutes
- Cook Time: 25-30 minutes
- Cooling & Icing Time: 1 hour
- Total Time: About 1 hour 45 minutes
Chef’s Secret for the Best Cortadillo
My secret? Room temperature eggs! Take your eggs out of the fridge about 30 minutes before you start. Room-temperature eggs blend into the batter more evenly, creating a smoother, more voluminous mixture. This little trick makes a big difference in the cake’s final texture, giving you that perfect, tender crumb.
A Little Extra Cake Info
Did you know the word “cortadillo” literally means “little cut thing” in Spanish? It refers to how the cake is sliced into small pieces or shapes after baking. This makes it perfect for sharing! It’s a social cake, meant to be passed around on a platter so everyone can grab a piece.
Equipment You’ll Need
You don’t need fancy tools! Here’s the short list:
- Stand mixer or hand mixer
- Large mixing bowls (at least two)
- Whisk
- 9×13 inch baking pan or similar-sized tray
- Parchment paper
- Spatula
- Toothpick or cake tester
Storing Your Beautiful Beraouinse Cake
Once iced and cut, your cake needs a cozy home. The best way to store it is in a single layer in an airtight container. You can place parchment paper between layers if you must stack them, but try to avoid it so the icing doesn’t get smushed.
Keep the container at room temperature in a cool spot, away from direct sunlight or heat. The cake will stay fresh and moist like this for 2-3 days. The icing acts as a sweet seal, keeping the cake lovely and soft.
I don’t recommend refrigerating this cake unless your kitchen is very hot and humid. The fridge can dry out the crumb and cause the icing to become too hard. If you do refrigerate it, let it come to room temperature for about an hour before serving for the best texture and flavor.
Tips & Advice for Baking Success
- Measure Flour Correctly: Spoon flour into your measuring cup and level it off. Don’t scoop from the bag—it packs the flour down and you’ll use too much, leading to a dry cake.
- Don’t Overmix: Once you add the flour, mix just until combined. Overmixing develops gluten and can make the cake tough.
- Test for Doneness Early: Ovens vary. Start checking your cake at the 25-minute mark with a toothpick.
- Cool Completely: Icing a warm cake is a messy disaster! Let it cool fully so the icing sets nicely on top.
Presentation Ideas to Make it Shine
- Cut into small diamond shapes for a traditional, elegant look.
- Use different colored sprinkles for different holidays—red and green for Christmas, pastels for Easter.
- Serve on a vintage cake stand for a beautiful afternoon tea spread.
- Pack individual pieces in small treat bags tied with ribbon for a charming bake sale item or party favor.
Healthier & Fun Beraouinse Cake Variations
Want to mix it up? Here are six delicious twists on the classic Beraouinse cake recipe.
- Lemon Zest Delight: Add the zest of two lemons to the batter for a bright, citrusy twist. It pairs wonderfully with the sweet pink icing.
- Almond Extract Swap: Replace the vanilla extract with almond extract (use just 1/2 teaspoon, it’s stronger!). It gives a lovely marzipan-like flavor.
- Whole Wheat Blend: Substitute half of the all-purpose flour with whole wheat flour. It adds a nutty depth and more fiber. You may need a touch more milk.
- Coconut Dream: Use coconut oil instead of vegetable oil and add a 1/2 cup of shredded unsweetened coconut to the batter. Top with toasted coconut instead of dragées.
- Yogurt for Moistness: Swap the milk for plain Greek yogurt. This makes the cake incredibly moist and adds a slight tang. You might need to bake it a few minutes longer.
- Chocolate Chip Surprise: Fold 1 cup of mini chocolate chips into the batter before baking. The pink icing over a chocolate chip cake is a stunning and tasty contrast.
Speaking of variations, if you love simple, beautiful cakes, you must explore our full collection of classic cake and cupcake recipes. You’ll find everything from a rich chocolate fudge cake to light vanilla bean cupcakes. For another great party treat, this lemon poppy seed bundt is always a hit, and our carrot cake with cream cheese frosting is a family favorite.
Common Mistakes to Avoid
Let’s avoid a few simple pitfalls to guarantee your cake is perfect every time.
Mistake 1: Adding Flour with the Mixer on High
This is the number one messy mistake! If you turn your mixer to high and dump in the flour, you’ll create a huge white cloud. Flour will cover your counter, your floor, and you. It also doesn’t mix well this way. How to avoid it: Always turn the mixer off before adding dry ingredients. Add them in batches and start on the lowest setting. This gives you control and a clean kitchen.
Mistake 2: Icing the Cake While It’s Warm
We get excited to see the finished product! But if you pour that beautiful pink icing on a warm cake, it will melt, soak in, and become a sticky, transparent mess. You’ll lose the lovely pink color and the definition. How to avoid it: Let the cake cool in the pan on a wire rack. Wait until the pan is completely cool to the touch. This can take a full hour. Patience gives you that perfect, set icing layer.
Mistake 3: Using Cold Eggs Straight from the Fridge
Cold eggs don’t emulsify as well with the oil and sugar. This can result in a denser, less fluffy cake. The batter might even look slightly curdled. How to avoid it: Plan ahead! Take your eggs out about 30 minutes before you start baking. If you forget, place the whole eggs (still in their shells) in a bowl of warm water for 5-10 minutes to take the chill off.
Mistake 4: Overbaking the Cake
It’s easy to leave the cake in “just to be sure.” But an overbaked Beraouinse cake becomes dry and crumbly. That lovely moist texture is lost. How to avoid it: Set a timer for 5 minutes before the recipe says it will be done. Check it with a toothpick. If it comes out with a few moist crumbs clinging to it, it’s done. The cake will continue to cook a little from residual heat as it cools.
Frequently Asked Questions
Can I make this Beraouinse cake recipe in a different pan?
Absolutely! A 9×13 inch pan is standard, but you can use two 8-inch round cake pans. Just reduce the baking time to about 20-25 minutes. You could also use a large sheet pan for a thinner cake, which would bake even faster. The key is to watch it and do the toothpick test. The cake is done when it springs back lightly to the touch and a tester comes out clean.
Why did my icing turn out too runny or too thick?
Icing consistency depends on humidity and how you measure the sugar. If it’s too runny, you added too much liquid. Whisk in more powdered sugar, a tablespoon at a time, until it thickens. If it’s too thick and pasty, add more liquid. But add water literally drop by drop! It thins out quickly. The goal is a thick syrup that slowly drips off your whisk.
Can I make the cake ahead of time?
Yes, you can! Bake the cake the day before, let it cool completely, and wrap it tightly in plastic wrap. Store it at room temperature. Make the icing and decorate it the day you plan to serve it. This actually helps the cake’s flavor develop and makes it moister. An unfrosted cake can be frozen for up to a month. Thaw it overnight before decorating.
What are dragées and where can I find them?
Dragées are small, hard sugar balls with a hard, shiny coating, often in silver or gold. They are purely decorative. You can find them in the baking aisle of craft stores, some supermarkets, or online. If you can’t find them, any sprinkle, jimmie, or nonpareil works perfectly. For a healthier approach, consider decorating with edible flowers or fresh berry slices.
Can I use a different type of sugar in the cake batter?
Granulated white sugar works best here for structure and texture. Brown sugar will change the flavor and color, making the cake darker and adding a molasses note. It will also make the cake more moist, which could affect the crumb. For your first time, stick with white sugar. Once you master the basic recipe, feel free to experiment!
Is there a way to make this cake without a mixer?
You can definitely make it by hand! It will just take a little more muscle. Use a large whisk to beat the eggs, oil, and sugar together vigorously until well combined and slightly frothy. Then, switch to a spatula to fold in the dry ingredients and milk alternately. Mix until just smooth. The key is to get enough air into the initial egg mixture.
My cake is browning too fast on top. What should I do?
If the top is getting dark brown but the inside isn’t cooked, your oven might run hot, or the rack is too high. Tent the cake loosely with a sheet of aluminum foil. This will shield the top from direct heat and allow the center to finish baking without burning. Oven thermometers are a cheap and invaluable tool to check your oven’s true temperature.
What’s the best way to cut the cake cleanly?
For super clean cuts, use a long, thin knife. Wipe the blade clean with a damp cloth after every single cut. This prevents icing and crumbs from building up and dragging through your beautiful pink topping. For squares or rectangles, use a ruler as a guide for the first few cuts to keep things even.
Can I flavor the icing with something other than food coloring?
Of course! A drop of rose water or orange blossom water would be divine and add a subtle flavor. You could also use a tiny bit of raspberry or strawberry extract. Just remember that extracts are strong, so start with 1/8 of a teaspoon. If you want to explore more about balancing flavors and ingredients for a healthy diet, the MyPlate guidelines are a fantastic resource for understanding food variety.
Why is my cake dense and not fluffy?
A dense cake usually comes from overmixing the batter after adding the flour, using too much flour, or using old baking powder. Always whisk your baking powder into the flour. Measure your flour carefully using the spoon-and-level method. And mix just until you no longer see dry streaks. Check your baking powder’s expiration date—it loses power over time.
I hope this guide helps you bake the most wonderful, pink, and perfect Beraouinse cake. It’s a recipe that holds so much joy in its simplicity. Seeing the happy faces when you bring out that pretty platter is the best reward. So go on, preheat that oven, and bake a little bit of sweet, shareable happiness for your family and friends. Happy baking
Equipment
- Grand bol
- Fouet
- Spatule
- Plaque à pâtisserie
- Papier sulfurisé
Ingredients
- 7 œufs
- 2.5 tasses sucre
- 3 tasses farine tout usage
- 0.75 tasse huile huile neutre comme l'huile de canola
- 3/4 tasse lait
- 1.5 cuillères à café poudre à lever
- 1 cuillère à café extrait de vanille
- 3 tasses sucre glace pour le glaçage
- 4 cuillères à café eau pour le glaçage
- 1 goutte colorant alimentaire rose pour le glaçage
- q.s. dragées ou vermicelles colorés pour la décoration
Instructions
- Mélangez le sucre, les œufs et l'huile dans un grand bol jusqu'à obtenir une texture pâle et lisse.
- Dans un autre bol, mélangez la farine et la poudre à lever.
- Éteignez le mélangeur, ajoutez le mélange de farine par tiers aux ingrédients humides et mélangez à basse vitesse.
- Ajoutez la vanille et le lait, mélangez jusqu'à obtenir une pâte lisse et homogène.
- Préparez votre moule à gâteau et versez la pâte en lissant le dessus.
- Faites cuire au four préchauffé à 180°C pendant 25-30 minutes.
- Laissez le gâteau refroidir complètement dans le moule.
- Pour le glaçage, mélangez le sucre glace, l'eau et le colorant alimentaire jusqu'à obtenir une consistance épaisse mais coulante.
- Versez le glaçage sur le gâteau refroidi et décorez avec des dragées ou des vermicelles.
- Coupez le gâteau en carrés ou en rectangles pour servir.
Notes
Nutrition

Hi, I’m Olivia Parker, the founder of BakingSecret.com and a lifelong lover of all things sweet and homemade. I grew up in a small town in Oregon, where the smell of fresh cookies in my family’s kitchen sparked my passion for baking. Over the years, I turned that passion into a mission: to help home bakers feel confident, inspired, and creative.
After studying food science and working in several artisan bakeries across the U.S., I decided to create a space where everyone from beginners to seasoned bakers can find reliable recipes, expert tips, and a warm, welcoming community. BakingSecret.com is my way of sharing the magic of baking with the world. When I’m not testing new recipes, you’ll find me exploring farmers’ markets, collecting vintage cookbooks, or perfecting my sourdough technique.