
The Dreamiest Iced Coconut Pudding You’ll Ever Make (No Cook!)
If you’ve ever wanted to magically turn a few pantry staples into pure tropical bliss, you’ve clicked on the right recipe. Picture this: a hot summer day, kids running in the yard, and you need a dessert that won’t heat up the kitchen. That was me last Thursday! I opened my cupboard, saw a can of condensed milk and some coconut milk, and had a lightbulb moment. This no-cook Iced Coconut Pudding was born out of sheer desperation for something cool, creamy, and incredibly easy. Spoiler alert: it was a total hit. The whole pan vanished before I could even take a decent photo for my food blog!
A Little Story Behind This Tropical Treat
This recipe is my own little twist on the classic Latin American “cocada” or Filipino “maja blanca”—creamy coconut desserts often set with cornstarch and cooked on the stove. But let’s be honest, who wants to stand over a hot pot in July? My version uses unflavored gelatin for that perfect, cool set without any cooking at all. It’s the modern, lazy (and I mean that in the best way!) take on a traditional favorite. It reminds me of the coconut candies my grandmother used to buy, but creamier and dreamier, straight from my fridge.
Why You’ll Fall in Love With This Easy Pudding
First, it’s no-bake and no-cook. That’s a win right there. Second, the texture is magical—silky smooth, rich from the condensed milk, with a lovely chew from the grated coconut. Third, it’s wildly versatile. Serve it plain, with fresh fruit, or drizzled with chocolate. It’s the kind of dessert that looks like you fussed for hours, but your secret is safe with me. It’s foolproof, family-friendly, and always brings a smile.
When to Whip Up This Iced Coconut Pudding
This pudding is your new go-to for almost any gathering! It’s perfect for summer barbecues, baby showers, or potluck dinners. I love making it for birthdays when the oven is already occupied with a cake. It’s also a wonderful make-ahead dessert for busy weeks. Just slice a piece after a long day for a sweet, cool escape. It’s even kid-approved for lunchbox treats (just cut it into squares!).
Gathering Your Iced Coconut Pudding Ingredients
Here’s what you’ll need for this simple, delicious treat:
- 1 can (14 oz) sweetened condensed milk
- 200 ml (about 3/4 cup + 2 tbsp) coconut milk
- 1 box (8 oz) of cream, at room temperature
- 1 packet (about 1 cup) of grated coconut
- 1/2 cup cold water
- 1 package (about 1 tbsp) unflavored gelatin
No Stress Ingredient Swaps
Don’t have something? No worries! This recipe is very forgiving.
- Coconut Milk: You can use light coconut milk for a less rich version, or even coconut cream for an ultra-indulgent texture.
- Grated Coconut: Use unsweetened for less sugar, or toasted coconut for a deeper, nutty flavor. If you only have coconut flakes, just pulse them in a food processor a few times.
- Cream: Full-fat cream gives the best texture, but you can use a cream cheese block for a tangier, denser pudding.
- Gelatin: For a vegetarian option, agar-agar powder works, but follow the package instructions for setting liquid amounts.
Creating Your No-Cook Coconut Masterpiece
Let’s make some magic happen. This process is so simple and satisfying. You’ll watch these simple ingredients transform into a creamy, set dessert right before your eyes. The smell alone is heavenly!
Step 1: Wake Up the Gelatin
Sprinkle the unflavored gelatin over the 1/2 cup of cold water in a small pan. Let it sit for about 5 minutes. You’ll see it get thick and spongy—this is called “blooming” and it helps it dissolve smoothly later. Then, place the pan over the lowest heat possible. Warm it gently, swirling the pan, just until the gelatin liquefies completely. The key is to never let it boil. Boiling can ruin its setting power. Pro tip: You can also do this in a microwave-safe bowl in 10-second bursts, stirring in between.
Step 2: The Creamy Blend
Now for the fun part! Pour the condensed milk, creamy coconut milk, box of cream, and your now-liquid gelatin into the blender. The colors are gorgeous—creamy white and golden. Secure the lid tightly and blend on medium-high for a good minute or two. You want a perfectly smooth, homogeneous, and slightly frothy mixture. The sound changes as it all comes together. Stop and scrape the sides once to make sure everything is incorporated.
Step 3: Fold In the Coconut
Pour your smooth, fragrant blend into a large mixing bowl. Now, add the entire packet of grated coconut. Grab a sturdy spatula or a large spoon and gently fold the coconut in. You’ll love watching the snowy flakes swirl into the creamy base. Don’t use the blender here—we want to keep that wonderful texture of the coconut shreds. Fold just until it’s evenly distributed; no need to overmix.
Step 4: Set it and Forget it
Take your favorite mold or pan (an 8×8 inch square pan works perfectly) and give it a very light grease with cooking spray or a dab of oil on a paper towel. This little step makes unmolding so much easier later. Slowly pour the coconut pudding mixture into the prepared pan. Give it a little tap on the counter to release any air bubbles. Now, the hardest part: patience. Carefully place it in the refrigerator to set. Let it chill undisturbed for at least 5 hours, or better yet, overnight. The wait is worth it for that perfect, sliceable firmness.
Step 5: The Grand Unmolding
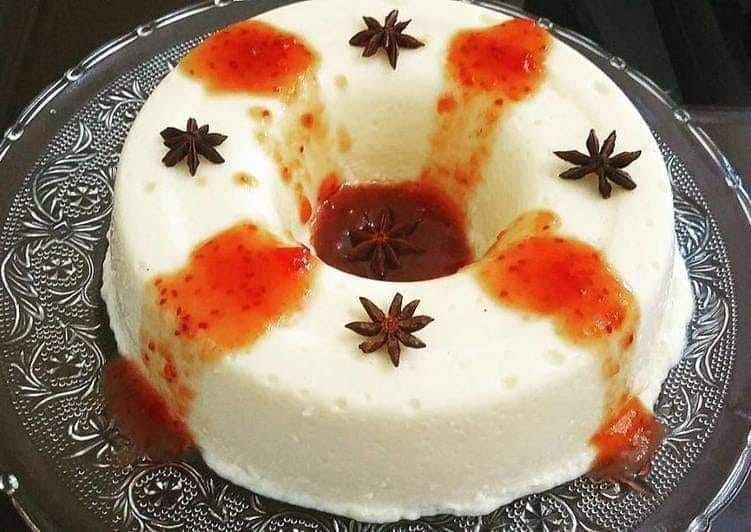
When your pudding is fully set, it’s showtime! Run a thin, sharp knife under hot water and dry it. Gently slide the warm knife along all the inner edges of the pan to loosen the pudding. If your pan is flexible, you can gently pull the sides away. Place a serving plate upside down over the top of the pan. With confidence (and maybe a deep breath!), flip the whole thing over. The pudding should slide out beautifully with a soft *plop*. Chef’s tip: For extra insurance, you can dip the bottom of the pan in warm water for just 10 seconds before attempting to flip.
Your Iced Coconut Pudding Timeline
Planning is easy with this no-cook dessert!
- Prep Time: 15 minutes
- Cook Time: 2 minutes (just for dissolving gelatin)
- Chill Time: 5 hours minimum
- Total Time: About 5 hours 20 minutes (mostly hands-off!)
A Secret for Silky Perfection
Here’s my little secret: make sure all your cold ingredients (the cream, coconut milk, condensed milk) are at room temperature before blending. Why? Cold liquids can cause the just-dissolved gelatin to start setting into little lumps as soon as it hits them. Room-temperature ingredients blend into a flawlessly smooth mixture every single time. It makes all the difference in the texture.
Fun Fact: The Magic of Condensed Milk
That can of condensed milk is a kitchen superhero! It was invented in the 19th century as a way to preserve milk without refrigeration. Its thick, sweet, cooked-milk flavor is irreplaceable in desserts worldwide, from Vietnamese iced coffee to Brazilian brigadeiros. In this pudding, it provides the perfect sweetness and creamy body without any extra sugar or cooking on your part. It’s the ultimate shortcut to deliciousness.
What You’ll Need to Make It
You don’t need any fancy equipment!
- Blender or food processor
- Small saucepan or microwave-safe bowl
- Mixing bowl and spatula
- 8×8 inch square pan or a decorative mold
- Measuring cups
- Sharp knife for unmolding
Keeping Your Pudding Fresh
This Iced Coconut Pudding stores beautifully. Always keep it covered in the refrigerator. Press a piece of plastic wrap directly onto the surface of the pudding if it’s still in the pan. This prevents a rubbery skin from forming on top.
Once unmolded and sliced, store the pieces in an airtight container. They will stay fresh and delicious for up to 5 days. The texture remains perfect—creamy and firm.
I do not recommend freezing this pudding. Freezing can cause the gelatin to break down and become watery when thawed. This can make the texture grainy and separate. It’s best enjoyed fresh from the fridge.
My Best Tips for Flawless Results
- For a super clean slice, dip your knife in hot water and wipe it dry between each cut.
- If you’re in a humid climate, use a heaping tablespoon of gelatin for a firmer set.
- Toasting the grated coconut before adding it gives an amazing depth of flavor.
- Let the pudding sit at room temperature for 5-10 minutes before serving. It softens just enough for the perfect melt-in-your-mouth feel.
Make It Look Like a Million Bucks
Presentation is half the fun!
- Serve individual squares in mini mason jars with a dollop of whipped cream and a cherry.
- Garnish with fresh berries, mint leaves, and a sprinkle of toasted coconut or crushed pistachios.
- Drizzle plates with melted chocolate or a passion fruit coulis before placing the pudding on top.
- For a party, use a fancy gelatin mold for a stunning shape. Just remember to grease it well!
6 Delicious Ways to Mix It Up
Once you master the base, try these yummy twists:
- Tropical Mango: Blend in 1/2 cup of mango puree with the liquid ingredients. Top with fresh mango chunks.
- Chocolate Coconut: Add 1/4 cup of cocoa powder to the blender. Layer with chocolate shavings.
- Pina Colada: Replace half the coconut milk with crushed pineapple (well-drained). It’s a vacation in a pan!
- Matcha Green Tea: Whisk 2 tsp of matcha powder into the coconut milk first for a beautiful green hue and earthy flavor.
- Berry Swirl: After pouring into the pan, dollop with raspberry jam and swirl with a knife for a marbled effect.
- Vegan Delight: Use coconut condensed milk, full-fat coconut cream instead of dairy cream, and agar-agar. It’s just as creamy!
If you’re looking for more fantastic no-fuss treats, you have to try my silky no-bake cheesecake. For another coconut favorite, this coconut dream bars recipe is always a crowd-pleaser. And when mangoes are in season, my mango panna cotta is a must-make. For a chocolatey contrast, these 3-ingredient chocolate mousse cups are pure magic.
Common Mistakes to Avoid
Avoid these simple pitfalls for pudding perfection every time.
Mistake 1: Boiling the Gelatin
This is the biggest culprit for a pudding that won’t set. Gelatin loses its thickening power when boiled. When you heat the bloomed gelatin, keep the flame very low. Just warm it until the last tiny crystal disappears into a clear liquid. If you see steam or bubbles, it’s too hot. Let it cool for a minute before adding it to the blender mix.
Mistake 2: Using Ice-Cold Ingredients
Pouring your dissolved gelatin into a blender full of cold condensed milk and cream is asking for trouble. The temperature shock can make the gelatin solidify into little rubbery strands as it hits the cold liquid. Always let your dairy ingredients sit on the counter for 20-30 minutes before you start. Room temperature is your friend here for a silky texture.
Mistake 3: Not Greasing the Pan
It seems like a small, skip-able step, but it’s crucial. An ungreased pan can leave you with a broken, crumbly pudding when you try to unmold it. A quick spray of cooking oil or a swipe of neutral oil with a paper towel creates a non-stick barrier. It allows the pudding to release cleanly and smoothly for that perfect presentation.
Mistake 4: Not Chilling Long Enough
Impatience can lead to a soupy mess. Five hours is the *minimum* chilling time. Gelatin needs several hours in a cold environment to form a full, firm network. If you try to unmold it too early, it might not hold its shape. For the absolute best results, make it the day before you need it. Overnight chilling guarantees a flawless, sliceable dessert.
Mistake 5: Over-blending After Adding Coconut
Once you’ve added the grated coconut, put the blender away! If you blend again, you’ll break down the lovely shreds into a pasty texture. You’ll lose that wonderful bit of chew that makes this pudding so special. Gently fold the coconut in with a spoon or spatula by hand. This preserves the perfect texture contrast in every bite.
Exploring different ingredients is part of the joy of cooking. For reliable information on nutritional content and food safety, you can always check resources like the USDA’s guides on food variety and quality.
This Iced Coconut Pudding is just one of many wonderful no-bake desserts you can make to beat the heat without turning on your oven.
Your Iced Coconut Pudding Questions, Answered
Can I use flavored gelatin instead of unflavored?
I don’t recommend it. Flavored gelatin (like Jell-O) already contains sugar, flavoring, and coloring. It also sets to a much firmer, jiggly texture. Using it would completely change the sweet, creamy, and rich coconut flavor profile of this dessert. It would likely make it overly sweet and taste artificial. Stick with plain, unflavored gelatin powder or sheets. They act as a neutral setting agent so the beautiful coconut and condensed milk flavors can shine through without any competition.
My pudding didn’t set. What went wrong?
This is usually due to one of three issues. First, the gelatin may have been boiled, which destroys its setting power. Always heat it gently until just dissolved. Second, the ratio of liquid to gelatin might be off if you used a larger can of coconut milk or condensed milk. Always use standard 14 oz and 200 ml sizes. Third, it might not have chilled long enough. The refrigerator needs to be cold enough (below 40°F), and the pudding needs a full 5+ hours. If it’s still soupy, you can try re-melting it gently with a bit more bloomed gelatin, but prevention is easier!
How do I know when the gelatin is properly “bloomed”?
You’ll know it’s ready when the powder has completely absorbed the water and transformed. After sprinkling it over the cold water, let it sit undisturbed for 5 to 10 minutes. It will change from a fine powder into a wrinkled, solid, sponge-like mass on top of the water. It should look thick and clumped together. If you still see dry powder floating, give it a gentle stir and wait a few more minutes. Proper blooming ensures the gelatin will dissolve smoothly and evenly into your mixture without any grainy lumps.
Can I make this recipe dairy-free or vegan?
Absolutely! You can create a delicious vegan version with a few smart swaps. Use a can of coconut sweetened condensed milk (available at most health food stores). Replace the box of cream with a can of full-fat coconut cream that’s been chilled (use the solid part only). For the gelatin, use an equal amount of agar-agar powder. Important note: Agar-agar needs to be simmered for a few minutes to activate, so follow the package instructions. The texture will be slightly different but still wonderfully creamy and set.
What’s the best type of grated coconut to use?
For the best texture and flavor, I recommend using medium-shred, unsweetened dried coconut. Sweetened shredded coconut will work but will make the final pudding much sweeter. Avoid using very finely desiccated coconut, as it can make the pudding feel a bit sandy. If you like a stronger coconut flavor and more chew, use the thicker, long-shred variety. For a special touch, toast your coconut in a dry pan over medium heat until golden before folding it in. It adds an incredible nutty aroma!
How far in advance can I make this?
This pudding is an excellent make-ahead dessert. You can prepare it up to two days in advance. In fact, I often think it tastes even better on the second day because the flavors have more time to meld together. Just make sure it’s tightly covered with plastic wrap in the refrigerator. If you need to make it further ahead, I wouldn’t go past three days for the best texture and freshness. The coconut may start to soften more and lose its distinct chew beyond that point.
Can I use a different size or shape of pan?
Yes, you can use different pans, but it will change the thickness of your pudding slices. An 8×8 inch square pan or a 9-inch round pie plate gives a perfect, sliceable thickness. If you use a larger pan (like 9×13), the pudding layer will be much thinner and will set faster, but it’s better for cutting into small squares for a party. If you use a tall, decorative mold or Bundt pan, make sure to grease it very thoroughly. The setting time may be slightly longer for a very thick mold.
Why do my ingredients need to be at room temperature?
This tip is all about temperature control. Your dissolved gelatin liquid is warm. When it hits very cold dairy ingredients, it can start to set immediately upon contact. This causes little rubbery strands or lumps in your pudding instead of a smooth, even gel throughout. Letting the condensed milk, coconut milk, and cream sit out takes the chill off. It allows the gelatin to blend in smoothly and distribute evenly before it begins the setting process in the fridge. It’s a simple step for a flawless texture.
Can I add fruit to this pudding?
You can, but you need to be careful with fresh fruit. Some fruits like pineapple (fresh), kiwi, papaya, and figs contain enzymes (bromelain and actinidin) that break down gelatin. They will prevent your pudding from setting firmly. If you want fruit, use canned pineapple (which is cooked, deactivating the enzyme), or add fruit as a topping after it’s set. You can also use fruit purees that have been briefly cooked, like the mango variation suggests. Berries folded in fresh are usually fine.
What’s the difference between this and coconut panna cotta?
They are similar creamy, gelatin-set desserts, but there are key differences. Traditional panna cotta is Italian, usually made with cream, milk, sugar, and gelatin, and has a very delicate, silken texture. This Iced Coconut Pudding uses sweetened condensed milk as the sweetener and base, which gives it a richer, sweeter, more distinctive “cooked milk” flavor. It also includes grated coconut for texture, which panna cotta typically does not. This pudding is denser and more substantial, while panna cotta is often lighter and served unmolded with a sauce.
Ready for a Taste of Paradise?
So there you have it—my secret to the easiest, creamiest, most delightful no-cook dessert. This Iced Coconut Pudding is more than just a recipe; it’s a little escape to the tropics you can keep in your fridge. It has saved my sanity on busy days and wowed my friends at countless gatherings. I hope it brings as much joy to your table as it has to mine. Now go grab that can of condensed milk and make some magic! Don’t forget to share a picture with me—I love seeing your creations.
Equipment
- Mixeur
- Petite casserole
- Grand bol
- Plaque carrée de 8x8 pouces
- Couteau aiguisé
Ingredients
- 1 boîte lait concentré sucré (14 oz)
- 200 ml lait de coco (environ 3/4 tasse + 2 c. à soupe)
- 1 boîte crème (8 oz, à température ambiante)
- 1 paquet coco râpé (environ 1 tasse)
- 1/2 tasse eau froide
- 1 paquet gélatine non aromatisée (environ 1 c. à soupe)
Instructions
- Saupoudrez la gélatine non aromatisée sur l'eau froide et laissez reposer environ 5 minutes pour qu'elle gonfle.
- Chauffez doucement la gélatine gonflée jusqu'à ce qu'elle soit complètement liquéfiée sans ébullition.
- Dans un mixeur, combinez le lait concentré sucré, le lait de coco, la crème et la gélatine liquéfiée. Mixez jusqu'à obtenir un mélange lisse et mousseux.
- Versez le mélange dans un grand bol et incorporez délicatement le coco râpé.
- Graissez légèrement un moule carré de 8x8 pouces, versez le mélange et réfrigérez au moins 5 heures, ou toute la nuit, pour qu'il prenne.
- Pour démouler, passez un couteau chaud le long des bords du moule, puis retournez le pudding sur un plat de service.
Notes
Nutrition

Hi, I’m Olivia Parker, the founder of BakingSecret.com and a lifelong lover of all things sweet and homemade. I grew up in a small town in Oregon, where the smell of fresh cookies in my family’s kitchen sparked my passion for baking. Over the years, I turned that passion into a mission: to help home bakers feel confident, inspired, and creative.
After studying food science and working in several artisan bakeries across the U.S., I decided to create a space where everyone from beginners to seasoned bakers can find reliable recipes, expert tips, and a warm, welcoming community. BakingSecret.com is my way of sharing the magic of baking with the world. When I’m not testing new recipes, you’ll find me exploring farmers’ markets, collecting vintage cookbooks, or perfecting my sourdough technique.