
Get Ready to Indulge in These Decadent Snickers Peanut Butter Muffins!
There’s nothing quite like a warm, gooey muffin to kick off a cozy weekend. And if you’re anything like me, you can never resist the combination of peanut butter and chocolate. That’s why I created these Snickers Peanut Butter Muffins, a delightful treat that will make your taste buds dance with joy. These muffins are not just a snack; they’re a sweet escape into a world of rich flavors and soft, fluffy textures. Let’s dive into this scrumptious recipe and see why it’s become a favorite among my family and friends.
History and Background: A Sweet Journey
These Snickers Peanut Butter Muffins are a modern twist on a classic flavor combo. Inspired by the iconic Snickers bar, these muffins bring together all the best parts—creamy peanut butter, rich chocolate, and a hint of caramel. When I first tried this recipe, I was transported back to my childhood, remembering the days when a Snickers bar was the ultimate treat. Now, I get to relive those memories and share them with my loved ones through these delectable muffins.
Why You’ll Absolutely Love This Recipe
These Snickers Peanut Butter Muffins are a true delight for any dessert lover. The combination of creamy peanut butter and luscious chocolate is utterly irresistible. Plus, the caramel sauce adds a touch of sweetness that takes these muffins to the next level. Best of all, this recipe is simple and easy to follow, making it perfect for bakers of all skill levels. Whether you’re whipping up a batch for a special occasion or just treating yourself, these muffins are sure to become a new favorite.
Perfect Occasions to Prepare This Recipe
Snickers Peanut Butter Muffins are perfect for any occasion where you want to impress and delight. They make a fantastic addition to a Sunday brunch, a birthday party, or even a casual coffee date with friends. Imagine the look on your guests’ faces when they bite into one of these heavenly treats! Trust me, they’ll be asking for the recipe in no time.
Ingredients: What You’ll Need
- For the Dough:
- 50 g peanut chocolate bar
- 130 g soft butter
- 50 g peanut butter
- 100 g sugar
- 70 g brown sugar
- A pinch of salt
- 2 eggs (size M)
- 170 g wheat flour (type 405)
- 3 tbsp baking cocoa
- 2 tsp baking powder
- 50 ml milk (or coffee as an alternative)
- 250 g mascarpone
- 50 g peanut butter
- 3 tbsp caramel sauce
- 150 g cream
- 1 pack of cream stiffener
- 50 g whole milk chocolate coating
- 100 g peanut chocolate bar
- Some caramel sauce for garnishing
Substitution Options: Get Creative!
If you don’t have all the ingredients on hand, don’t worry! You can substitute some of them with what you have. For example, if you don’t have mascarpone, you can use cream cheese. If you’re out of peanut butter, try almond butter or another nut butter. And if you prefer a different type of chocolate, go for it—just make sure it’s a good quality one.
Preparation: Step-by-Step Guide
Step 1: Preheat and Prep
Start by preheating your oven to 180 degrees (top/bottom heat) or 160 degrees if you have a fan oven. Line a muffin tray with 12 paper cases. Next, cut the peanut chocolate bars into very small cubes and set them aside. This step is crucial as it ensures the chocolate melts evenly throughout the muffins, giving them a delicious, gooey texture.
Step 2: Mix the Dough
In a large mixing bowl, beat the butter, peanut butter, sugar, brown sugar, and salt with the whisk attachment of a hand mixer on the highest setting until the mixture is light and fluffy. Add the eggs one at a time, beating well after each addition. In a separate bowl, mix the flour, cocoa, and baking powder. Gradually stir this dry mixture into the wet ingredients, alternating with the milk. This method helps to ensure a smooth and well-combined dough.
Step 3: Bake the Muffins
Using an ice cream scoop or two tablespoons, fill the paper cases with the dough, making sure to spread it evenly. Place the muffin tray in the preheated oven and bake for about 25 minutes, or until a toothpick inserted into the center comes out clean. The smell of fresh-baked muffins will fill your kitchen, making it hard to wait for them to cool!
Chef’s Tip: Perfect Texture
To get the perfect texture, make sure not to overmix the batter. Overmixing can lead to tough and dense muffins. Also, using room temperature ingredients helps to achieve a more consistent and even bake.
Timing: How Long It Takes
Prep Time: 15 minutes
Cooking Time: 25 minutes
Total Time: 40 minutes
This recipe is pretty straightforward and doesn’t require a lot of hands-on time. The hardest part is waiting for the muffins to cool before you can dig in!
Chef’s Secret: The Magic Ingredient
The secret to these Snickers Peanut Butter Muffins is the caramel sauce. It adds a subtle sweetness and a gooey, sticky texture that makes every bite a little bit magical. Don’t skimp on the caramel—it’s what ties all the flavors together!
Extra Info: A Fun Fact
Did you know that the Snickers bar was named after the favorite horse of the Mars family? It’s a fun little tidbit that adds to the charm of this recipe. Every time I make these muffins, I feel a little bit of that history and nostalgia.
Necessary Equipment: Tools You’ll Need
- Muffin tray
- Paper cases
- Hand mixer
- Mixing bowls
- Ice cream scoop or tablespoons
- Piping bag with a perforated nozzle (approx. Ø 11 mm)
Having the right tools makes the process much smoother and more enjoyable. Make sure you have everything ready before you start to avoid any last-minute scrambles.
Storage: Keep Them Fresh
Once your Snickers Peanut Butter Muffins are cooled, store them in an airtight container at room temperature. They will stay fresh for about 3 days. If you want to keep them longer, you can refrigerate them. Just make sure to bring them to room temperature before serving for the best texture. For long-term storage, you can freeze the muffins for up to 2 months. Thaw them at room temperature before enjoying.
Tips and Advice: Enhance Your Baking Skills
Make sure to use high-quality ingredients, especially the chocolate and peanut butter. The better the ingredients, the better the final product. Also, don’t overfill the muffin cases. Filling them about 2/3 full allows enough room for the muffins to rise and gives them a lovely, domed top. Lastly, let the muffins cool completely before adding the cream. This prevents the cream from melting and sliding off.
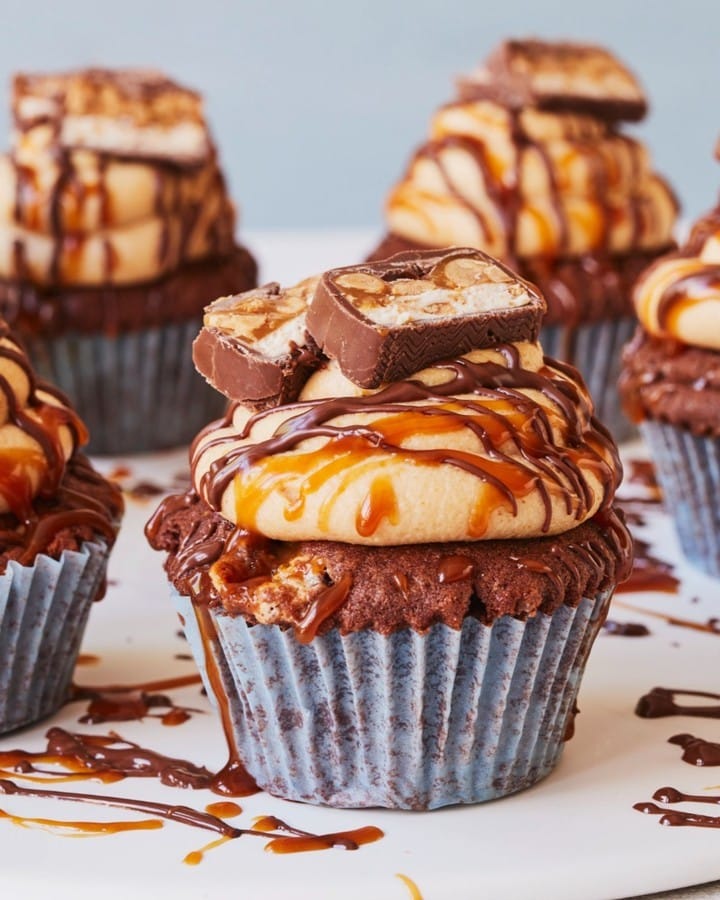
Presentation Tips: Make Them Look Irresistible
- Garnish with a drizzle of caramel sauce and a sprinkle of sea salt for a touch of elegance.
- Add a few chopped peanuts on top for extra crunch and a nice visual contrast.
- Use a piping bag to create a professional-looking swirl of cream on each muffin.
These little details can make a big difference in how your muffins look and how they are received by your guests. Presentation is key, especially when it comes to desserts!
Healthier Alternative Recipes: For Mindful Bakers
Here are six possible variations of this recipe, each with its own unique twist:
- Gluten-Free Snickers Peanut Butter Muffins: Swap the wheat flour for a gluten-free blend. This way, even those with dietary restrictions can enjoy these delicious treats.
- Low-Sugar Snickers Peanut Butter Muffins: Use a natural sweetener like honey or maple syrup instead of sugar. This version is perfect for those watching their sugar intake.
- Vegan Snickers Peanut Butter Muffins: Replace the butter and eggs with vegan alternatives like coconut oil and flax eggs. The result is just as delicious and satisfying.
- Keto Snickers Peanut Butter Muffins: Use almond flour and a low-carb sweetener like stevia. This variation is ideal for those following a ketogenic diet.
- Protein-Packed Snickers Peanut Butter Muffins: Add a scoop of your favorite protein powder to the batter. This version is great for a post-workout snack or a healthy breakfast option.
- Mini Snickers Peanut Butter Muffins: Bake the muffins in a mini muffin tin for a cute and portable treat. These are perfect for parties or as a quick snack on the go.
Feel free to experiment with these variations and find the one that suits your needs and preferences. Happy baking!
Common Mistakes to Avoid: Perfect Your Baking Skills
Mistake 1: Overmixing the Batter
Overmixing the batter can lead to tough and dense muffins. To avoid this, mix the ingredients just until they are combined. A few lumps are okay and will help keep the muffins light and fluffy. Pro tip: Use a spatula to gently fold in the last of the dry ingredients to prevent overmixing.
Mistake 2: Not Preheating the Oven
Failing to preheat the oven can result in unevenly baked muffins. Make sure to preheat your oven to the correct temperature and let it reach that temperature before placing the muffins inside. This ensures that the muffins bake evenly and rise properly.
Mistake 3: Overfilling the Muffin Cases
Filling the muffin cases too full can cause the muffins to overflow and create a mess. Fill each case about 2/3 to 3/4 full. This allows enough room for the muffins to rise and form a nice, domed top. Pro tip: Use an ice cream scoop to portion the batter evenly and neatly.
Mistake 4: Not Letting the Muffins Cool
Trying to add the cream to the muffins while they are still hot can cause the cream to melt and slide off. Let the muffins cool completely on a wire rack before adding the cream. This ensures that the cream stays in place and maintains its texture.
Mistake 5: Using Cold Ingredients
Using cold butter and eggs can affect the texture of the muffins. Room temperature ingredients mix more easily and create a smoother, more consistent batter. Take the butter and eggs out of the fridge at least 30 minutes before starting the recipe to let them come to room temperature.
FAQ: Your Questions Answered
Can I use a different type of nut butter?
Absolutely! While peanut butter is traditional, you can use other nut butters like almond, cashew, or even sunflower seed butter if you have a nut allergy. Just make sure to use a creamy variety for the best texture.
How do I store the muffins?
Store the cooled muffins in an airtight container at room temperature for up to 3 days. For longer storage, you can refrigerate them for up to a week or freeze them for up to 2 months. Thaw frozen muffins at room temperature before serving.
Can I make these muffins gluten-free?
Yes, you can make these muffins gluten-free by using a gluten-free flour blend. Just make sure to use a blend that includes xanthan gum or add it separately to help with the texture.
What if I don’t have a piping bag?
No problem! You can use a Ziploc bag instead. Fill the bag with the cream, seal it, and snip off a corner to create a makeshift piping bag. Alternatively, you can simply spread the cream on top of the muffins with a knife or spatula.
Can I use regular chocolate chips instead of a chocolate bar?
Yes, you can use chocolate chips instead of a chocolate bar. Just make sure to use a good quality chocolate to get the best flavor. Mini chocolate chips also work well and distribute evenly in the batter.
Is there a dairy-free version of this recipe?
Yes, you can make a dairy-free version by using dairy-free butter, milk, and a plant-based cream alternative. Just make sure to check the labels of your ingredients to ensure they are dairy-free.
Can I make these muffins ahead of time?
Absolutely! You can make the muffins a day or two in advance and store them in an airtight container. Add the cream just before serving for the best texture and flavor.
Can I use a different type of caramel sauce?
Yes, you can use any type of caramel sauce you like. Just make sure it’s thick enough to hold its shape when piped onto the muffins. You can also make your own caramel sauce for a homemade touch.
Do I need to use a cream stiffener?
While a cream stiffener helps to stabilize the cream and make it easier to pipe, it’s not strictly necessary. You can use whipped cream without a stabilizer, but it may not hold its shape as well over time. If you don’t have a cream stiffener, you can use a bit of powdered sugar to help thicken the cream.
Are these muffins suitable for a beginner baker?
Absolutely! This recipe is straightforward and easy to follow, making it perfect for bakers of all skill levels. Just follow the steps carefully and you’ll end up with delicious Snickers Peanut Butter Muffins.
Now that you’ve mastered the art of making Snickers Peanut Butter Muffins, why not explore more delightful recipes? Check out our Homemade Bread Delight for a heartwarming treat, or if you’re in the mood for something sweet, try our Chocolate Chip Donuts. And if you’re looking for a simpler bread recipe, give our Easy Bread Recipe a try. Happy baking!
Remember, the key to a successful bake is in the basic food prep. With the right techniques and a little practice, you’ll be turning out perfect muffins in no time. Enjoy the process and the delicious results!
For more delightful recipes and baking inspiration, visit our main category.
Equipment
- Muffin tray
- Paper cases
- Hand mixer
- Mixing bowls
- Ice cream scoop or tablespoons
Ingredients
- 50 g peanut chocolate bar
- 130 g soft butter
- 50 g peanut butter
- 100 g sugar
- 70 g brown sugar
- a pinch salt
- 170 g wheat flour type 405
- 3 tbsp baking cocoa
- 2 tsp baking powder
- 50 ml milk or coffee as an alternative
- 250 g mascarpone
- 50 g peanut butter for the cream
- 3 tbsp caramel sauce
- 150 g cream
- 1 pack cream stiffener
- 50 g whole milk chocolate coating
- 100 g peanut chocolate bar also
- some caramel sauce for garnishing
Instructions
- Preheat the oven to 180 degrees (top/bottom heat) or 160 degrees for a fan oven. Line a muffin tray with 12 paper cases and set aside small cut pieces of the peanut chocolate bar.
- In a large mixing bowl, beat the butter, peanut butter, sugar, brown sugar, and salt until light and fluffy. Add the eggs one at a time, beating well after each addition.
- In a separate bowl, mix the flour, cocoa, and baking powder. Gradually stir this dry mixture into the wet ingredients, alternating with the milk.
- Using an ice cream scoop or two tablespoons, fill the paper cases with the dough evenly. Bake for about 25 minutes or until a toothpick inserted comes out clean.
Notes
Nutrition

Hi, I’m Olivia Parker, the founder of BakingSecret.com and a lifelong lover of all things sweet and homemade. I grew up in a small town in Oregon, where the smell of fresh cookies in my family’s kitchen sparked my passion for baking. Over the years, I turned that passion into a mission: to help home bakers feel confident, inspired, and creative.
After studying food science and working in several artisan bakeries across the U.S., I decided to create a space where everyone from beginners to seasoned bakers can find reliable recipes, expert tips, and a warm, welcoming community. BakingSecret.com is my way of sharing the magic of baking with the world. When I’m not testing new recipes, you’ll find me exploring farmers’ markets, collecting vintage cookbooks, or perfecting my sourdough technique.