
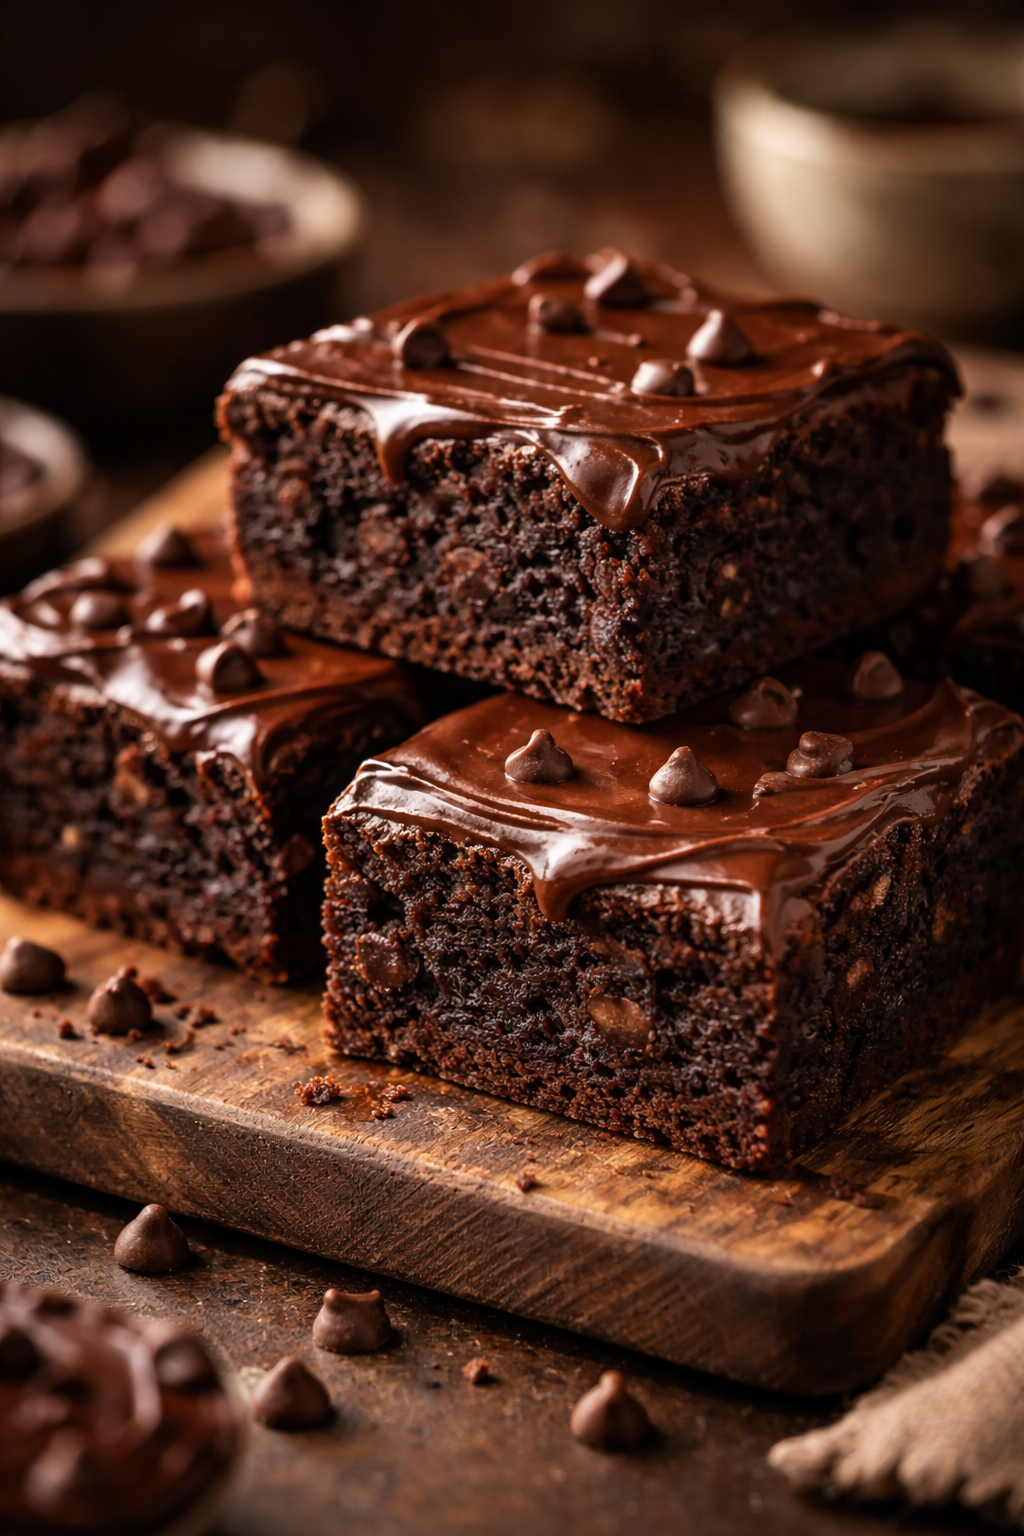
Imagine a deep, dark chocolate brownie. It’s rich and fudgy right out of the pan. Now, picture a final, glossy layer of creamy chocolate icing melting into it. That’s not just a brownie. It’s an experience.
That rich combination has always been my ultimate comfort food. I remember sneaking slices as a kid, always picking the corner piece with the most icing. It turned a simple treat into a celebration. These chocolate brownies with chocolate icing are a favorite for good reason. They combine a chewy, moist base with a silky-smooth top. Every bite is pure joy.
If you want to create that joy in your own kitchen, you’re in the right place. This guide will walk you through my favorite recipe step-by-step. You’ll learn how to bake the perfect fudgy brownies. Then, you’ll finish them with a simple, incredible chocolate icing. Let’s get started.
Ingredients You’ll Need for Chocolate Brownies with Chocolate Icing
Great desserts start with great ingredients. This is especially true for something as simple as a brownie. Each ingredient plays a key role. Using high-quality items makes a huge difference.
Here is everything you’ll need. I’ve separated them for the brownies and the icing for clarity.
For the Brownie Base:
- Unsalted Butter (1 cup): This adds flavor and helps create that perfect, tender crumb. Melt it before you start.
- Granulated Sugar (2 cups): Sweetens the brownies and helps form that crackly top we all love.
- Large Eggs (4): Use room-temperature eggs. They bind everything together and add structure.
- Vanilla Extract (2 teaspoons): A flavor booster that makes the chocolate taste even richer.
- All-Purpose Flour (1 cup): The main structure of the brownie. Don’t over-measure. Spoon it into the cup and level it off.
- Unsweetened Cocoa Powder (1 cup): This is the heart of the chocolate flavor. I prefer a natural cocoa powder for a classic taste.
- Salt (1 teaspoon): A tiny bit of salt makes all the sweet flavors pop. Don’t skip it.
- Optional: Chocolate Chunks (1 cup): I love adding these for extra melty pockets of chocolate. Semi-sweet or dark work best.
For The Chocolate Icing:
- Unsalted Butter (6 tablespoons): Soften this at room temperature. It will cream smoothly with the sugar.
- Unsweetened Cocoa Powder (6 tablespoons): This gives the icing its deep chocolate color and flavor.
- Powdered Sugar (2 cups): Also called confectioners’ sugar. It dissolves easily and makes the icing smooth.
- Milk or Heavy Cream (5-6 tablespoons): Adjust this to get your perfect spreading consistency. Heavy cream makes it extra rich.
- Vanilla Extract (1 teaspoon): Just like in the brownie, it balances and enhances.
- A Pinch of Salt: Trust me on this. It cuts the sweetness perfectly.
Few notes before you run to the store. Quality matters here. A good cocoa powder is non-negotiable for depth of flavor.
You can also make a few simple substitutions. For an even richer brownie, swap half a cup of the granulated sugar for brown sugar. It adds moisture and a slight caramel note. If you don’t have unsweetened cocoa powder for the icing, you could melt dark or semi-sweet chocolate. Just let it cool a bit before mixing. The texture will be a little different, but still amazing.
Do You Put Chocolate Icing on Brownies?
This is a great question. I hear it all the time. The short answer? You absolutely can, and often should.
Some people love a bare, dense brownie. That’s fine. But adding chocolate icing takes it to another level. It adds a creamy texture that contrasts with the chewy cake. It also intensifies the chocolate experience in the best way. Think of it as putting on the perfect finishing touch.
I have a rule in my house. Plain brownies are for weeknights. Brownies with chocolate icing are for birthdays, potlucks, or just a tough Tuesday that needs sweetening up. It signals something special. The icing acts like a shiny, delicious blanket. It keeps the brownies moist longer, too.
Choosing the type of icing is important. A thick buttercream is classic. But for a truly fudgy, glossy finish, a simple cocoa-based icing like the one in this recipe is the winner. It’s not too sweet. It spreads like a dream. And it sets just enough to slice cleanly.
So, does icing work on brownies? In my book, it’s the perfect match. If you’re ready to make your brownies the star of the show, let’s move on to the first step: preparing your brownie batter.

Now that we’ve got our ingredients lined up and we’re all on board the icing train, it’s time to actually make the magic happen. The batter comes together in just one bowl, which is my kind of baking. It means less cleanup and more time to, you know, lick the spoon later. Funny enough, the “one-bowl” method is actually a key player in achieving that perfect, dense texture we’re after.
Step-by-Step Guide to Baking the Perfect Chocolate Brownies
First things first, preheat your oven to a nice and even 350°F (175°C). While that’s warming up, line a 9×13 inch baking pan with parchment paper or foil, leaving a little overhang on the sides. This isn’t just for tidy removal—it’s a lifeline. Trust me, wrestling a hot pan of brownies is no one’s idea of a good time. Grease the lining lightly, too.
Here’s where we make the batter. It’s a straightforward process, but a few little tricks make all the difference.
Step 1: The Melted Butter & Sugar Mix Grab a large, microwave-safe bowl and melt your 1 cup of butter. I zap it for about 60-90 seconds, keeping an eye on it. You want it completely liquid, but not boiling hot. Immediately, pour in your 2 cups of granulated sugar and whisk it in really, really well. You’ll whisk for a good minute or two—until the mixture looks glossy and the sugar isn’t grainy on the bottom of the bowl. This step helps create that classic shiny, crackly top. It’s a bit of an arm workout, but it’s worth it.
Step 2: Bringing in the Eggs & Vanilla Let the butter-sugar mix cool for a couple minutes—you don’t want to scramble the eggs. Then, whisk in your four large eggs, one at a time. Make sure each one is fully incorporated before adding the next. This builds structure gradually. After the last egg, whisk in the 2 teaspoons of vanilla. Your mixture should now be thick, pale, and ribbony.
Step 3: The Dry Ingredients Now, we sift. I know, it feels like an extra dish, but for brownies, it’s non-negotiable. Sift your 1 cup of flour, 1 cup of cocoa powder, and 1 teaspoon of salt right over the wet ingredients. Sifting breaks up lumps in the cocoa and aerates the flour, which helps it incorporate more gently. Use a spatula to fold everything together. Stop the moment you see the last trace of dry flour. Do NOT overmix. Overmixing is the number one enemy of a fudgy brownie, as it develops gluten and leads to a cakey, tougher texture.
Step 4: The Chocolate Chunks (Optional, but highly recommended) This is where you fold in that cup of chocolate chunks. They’ll create those incredible melty pockets that send these brownies over the top. Pour the thick, luscious batter into your prepared pan and spread it into an even layer.
Step 5: Bake & The Toothpick Test Slide the pan into the center of your preheated oven. Bake for about 25-30 minutes. Here’s the secret: start checking at 25 minutes. The goal is to pull them out when a toothpick inserted into the center comes out with a few moist crumbs clinging to it. If it comes out completely clean, they’re overbaked. You want them just *barely* set in the middle. They’ll continue to cook a bit as they cool in the pan.
Let the brownies cool completely in the pan on a wire rack. I know, the waiting is agony. It fills the whole house with that warm chocolate smell. But icing a warm brownie is a recipe for a melted, messy glaze. Patience pays off with clean slices later.
What Type of Icing is Best for Brownies?
Okay, so your brownies are cooling and you’re staring at your icing ingredients. But wait—there are so many options out there. Which one is truly the champion for a chocolate brownie with chocolate icing? Let’s break down the usual suspects.
Ganache: This is just chocolate and heavy cream melted together. It’s super luxurious and glossy—almost like a truffle topping. It’s fantastic for a fancy touch, but it can be very rich and sometimes a bit too soft, making slicing tricky unless you chill it.
Buttercream Frosting: Your classic birthday cake frosting. It’s sweet, fluffy, and holds its shape. For brownies, a thick American buttercream can be a bit too sugary and stiff next to the dense fudge, in my opinion. It creates more of a “layer cake” experience.
Cream Cheese Frosting: Oh, this is a good one. The tang of the cream cheese cuts through the sweetness beautifully. If you’re a fan of that sweet-and-tangy combo, like in some cherry bars, it can be a stellar choice for brownies too.
But for me, the absolute best icing for a classic brownie is a simple cocoa powder glaze. Like the one in our ingredient list. Why? It’s quick, no-cook, and it has the perfect balance. It’s not as heavy as ganache, not as sweet as buttercream, and it sets to a soft, slightly firm finish that slices like a dream. It’s also the texture I remember from the brownies of my childhood—that simple, shiny, fudgy layer that seems to melt right into the crumb.
Here’s my quick recipe for it while your brownies are cooling:
In a medium bowl, sift together 6 tablespoons of cocoa powder and 2 cups of powdered sugar. Add in the 6 tablespoons of softened butter, 1 teaspoon of vanilla, and that pinch of salt. Start mixing—it’ll look dry and crumbly at first. Begin adding your milk or cream, one tablespoon at a time, until it becomes smooth and spreadable. You’re aiming for a thick but pourable consistency, like a very thick cake batter. Usually, 5 tablespoons does the trick. Taste it! This is your moment to adjust. Want it richer? Add a touch more cocoa. Sweeter? A bit more powdered sugar. This is your secret to fudgy brownie icing: getting that spreadable, not-runny consistency right.
Does Icing Work on Brownies?
I touched on this earlier, but let’s get real about it. Does icing work on brownies? I mean, physically? Of course. Aesthetics? Absolutely. But on a deeper, more important level… heck yes it does.
Here’s how I see it. A plain brownie is a fantastic, self-contained treat. It’s the reliable friend who’s always there. But a brownie with a layer of icing? That’s a celebration. It’s an event. The icing adds a whole new textural dimension—a creamy, smooth contrast to the chewy, dense base. It amplifies the chocolate flavor without just making it sweeter. It turns a humble square into a dessert that feels complete and special.
Think about it this way: you wouldn’t ask if icing works on a cupcake, right? It’s part of the package. For me, a frosted brownie is just as logical. It’s perfect for when you want to impress at a potluck (they disappear faster than you can say “seconds”), or when you need a little extra comfort. Plus, that icing layer actually acts as a barrier, sealing in moisture and keeping the brownies soft for days.
Now, are there times to skip it? Sure. If you’re baking for someone who truly prefers the unadulterated, deep chocolate hit of a bare brownie, respect that. Or if you’re making a brownie that’s already loaded with mix-ins—like a peanut caramel crunch bar—the topping might be overkill. And sometimes, when you’re making something like a chocolate brownie pie, the brownie itself is the star filling, and a dollop of whipped cream on the side is all you need.
But for your standard, from-scratch pan of brownies? I’m team icing all the way. It’s the final, glorious step that takes them from great to unforgettable. Just like a unique twist from the classic, say, adding a soda like in Dr. Pepper brownies, the icing is your signature. It tells people you went the extra mile for pure, chocolatey joy.
So, once your brownies are completely cool, pour that gorgeous icing over the top. Use an offset spatula or the back of a spoon to spread it into every corner. Let it set for about 30 minutes to an hour before you slice. Then, grab a glass of milk, cut a big square, and take that first bite. You’ve just created the ultimate chocolate brownies with chocolate icing experience.
The Secret to Fudgy Brownie Icing
Alright, so you’ve got your perfect pan of brownies cooling on the rack. The hard part is over, right? Well, sort of. This next step is where the magic really gets dialed up. Making the icing is simple, but there’s a fine line between a good glaze and a legendary, fudgy blanket that makes people close their eyes in bliss. I’ve had my share of icing disasters—too runny and it just soaks in, too thick and it tears the brownie apart when you spread it. Not fun.
The secret isn’t one single thing. It’s a little trio of factors: ingredient temperature, mixing technique, and patience. Get these right, and you’ll have an icing that’s rich, spreadable, and sets to a soft, sliceable finish.
First up, let’s talk butter. Your butter needs to be truly softened. Not melted, not cold. Think “cool room temperature.” If you press your finger into it, it should leave a deep indent without sinking all the way through. This is crucial because it creams perfectly with the dry ingredients, creating a stable base that won’t separate or get greasy. If you’re in a rush, you can cut it into small cubes and let it sit for 15 minutes. But honestly, planning ahead is your best bet here.
Now, the mixing. Here’s my goof-proof method that I learned the hard way. Always, always sift your cocoa powder and powdered sugar together. I know we sifted for the brownies, and I’m asking you to do it again. But cocoa powder is notorious for clumping, and a single tiny lump can ruin the silky texture of your icing. Sifting ensures everything is light and airy and will combine smoothly.
Add your softened butter, vanilla, and salt to the sifted powders. Start mixing on low with a hand mixer, or just go at it with a sturdy spatula. It’s going to look like a dry, crumbly mess. Don’t panic! This is exactly what you want. It means the butter is fully coating the sugar and cocoa particles. This initial “sandy” stage is what gives the icing body and prevents it from being just a sugary syrup.
Now, here’s the real trick: add your liquid one single tablespoon at a time. After each addition, mix until it’s fully incorporated before adding the next. You’re looking for a specific consistency: thick but pourable, like a very decadent chocolate pudding or a slow-moving lava. It should mound on itself for a second before settling. If you lift your spatula, the icing should drizzle off and leave a ribbon on the surface that holds for a few seconds before melting back in. That’s the sweet spot.
Why does this work? By adding the liquid slowly, you’re giving the sugar and fat time to form an emulsion. This is a fancy way of saying they’re binding together into a cohesive, smooth mixture instead of a grainy, separated one. It’s a fundamental part of the cooking process for so many sauces and frostings, and it’s what makes this icing so fudgy instead of just sweet.
Troubleshooting Your Chocolate Icing
Even with the best plans, things can go sideways. Here’s a quick guide to fixing common icing woes.
Issue: My icing is too runny.
This usually means too much liquid or butter that was too soft/melty. The fix is easy! Just sift in a bit more powdered sugar, a quarter cup at a time, and mix until it thickens up. You can also pop the whole bowl in the fridge for 10-15 minutes to let the butter firms up a bit, then re-mix.
Issue: My icing is too thick and pasty.
Don’t just dump in more milk. Add liquid literally a teaspoon at a time, mixing thoroughly after each addition. Sometimes, the mixture just needs a little more agitation to come together. A splash of extra vanilla can also help loosen it while adding flavor.
Issue: My icing is grainy.
This means your powdered sugar wasn’t fully dissolved, often because you added the liquid too fast or didn’t mix the initial butter-sugar stage enough. You can try beating it for a full 2-3 minutes on medium speed. If that doesn’t work, it’s a bit of a hack, but you can gently warm the whole bowl over a pot of simmering water for a few seconds while whisking, then let it cool back down. This often melts the sugar crystals just enough.
Issue: The icing soaks into the brownies and disappears.
This is almost always a temperature problem. Your brownies must be completely cool. Not warm, not slightly warm. Cool. If they’re even a little warm, the heat will melt the butter in the icing and it will vanish into the crumb. Wait it out. I promise it’s worth it.
Once you’ve nailed the consistency, pour that gorgeous, glossy icing over your cooled brownies. Spread it gently to the edges. Then, and this is the final secret, let it set for at least an hour before you even think about cutting. This allows the icing to firm up just enough so your knife glides through cleanly, giving you those picture-perfect squares with a distinct, beautiful layer on top.
Your Chocolate Brownies with Chocolate Icing Questions, Answered
I get a lot of questions about this classic combo. Here are the ones that pop up most often, with my straight-from-the-kitchen answers.
1. Do you put chocolate icing on brownies?
You can, and I often do! It’s a matter of occasion and personal taste. A plain brownie is a fantastic, pure chocolate experience. But adding icing transforms it into a more celebratory, decadent dessert. The icing adds a creamy texture and intensifies the chocolate flavor in a different way. Think of it as the difference between a great t-shirt and your favorite dressed-up outfit—both are wonderful, but one signals something special.
2. What type of icing is best for brownies?
For a classic, fudgy result, a simple cocoa-powder-based icing (like the one in this recipe) is my top pick. It’s not too sweet, spreads easily, and sets to a perfect sliceable texture. Ganache is luxurious but can be very rich and soft. Buttercream is delicious but often sweeter and fluffier, which can overshadow the brownie’s density. The cocoa icing is the Goldilocks “just right” option.
3. Does icing work on brownies?
Absolutely, yes—both practically and deliciously. Physically, a properly made icing will sit beautifully on a cooled brownie. Flavor-wise, it creates an amazing contrast between the chewy, dense base and the smooth, creamy top. It also acts as a moisture barrier, keeping the brownies softer for longer. It works so well that it’s become a standard for a reason!
4. What’s the secret to fudgy brownie icing?
The secret is in the emulsion. Using room-temperature butter, sifting your dry ingredients, and adding the milk or cream very slowly allows the fats and sugars to bind into a smooth, cohesive, and fudgy mixture instead of a greasy or grainy one. Letting it set on completely cool brownies is the final, non-negotiable step for a clean layer.
5. Can I make the icing ahead of time?
You can, but with a caveat. You can mix the dry ingredients and have your butter ready, but I’d recommend mixing the icing fresh when you need it. If you must make it ahead, store it in an airtight container at room temperature for a few hours. If it separates, just give it a quick re-mix. Avoid refrigerating it, as it will harden and be difficult to spread smoothly.
6. My icing cracked when I cut the brownies. What happened?
This usually means the icing set too hard, often because it was over-mixed or had too much powdered sugar. Next time, aim for that “thick but pourable” consistency I mentioned. Also, using a sharp, hot knife (run it under hot water and dry it between cuts) will slice through any icing like a dream, preventing cracks.
7. Can I use melted chocolate instead of cocoa powder for the icing?
You can, but it changes the game completely. You’ll get a richer, more ganache-like topping. Melt high-quality dark or semi-sweet chocolate, let it cool slightly, and then beat it into your softened butter and powdered sugar mixture. You’ll likely need less liquid. It’s delicious, but it’s a different, more intense beast.
8. How do I store iced brownies?
Store them in an airtight container at room temperature for up to 3 days. Layering them with parchment paper is a good idea. You can refrigerate them if your kitchen is very warm, but know that the brownie base will firm up. Let them come to room temp before serving for the best texture. They also freeze beautifully for up to 3 months—just thaw at room temperature.
9. Can I add flavors to the chocolate icing?
Oh, please do! A teaspoon of instant espresso powder amplifies the chocolate flavor amazingly. A splash of orange extract or a little zest makes it a “chocolate-orange” dream. For a fun twist, a pinch of cinnamon or even a tablespoon of bourbon or rum (reduce the milk a bit) can create a whole new experience.
10. Is this icing too sweet for already-sweet brownies?
That’s a great concern. The beauty of this specific recipe is that the unsweetened cocoa powder and the pinch of salt do a ton of work to balance the sweetness from the powdered sugar. It’s designed to be rich and chocolatey first, sweet second. If you’re sensitive to sweetness, you can reduce the powdered sugar by 1/4 cup and add a touch more cocoa. Taste as you go!
Baking, especially with classics like these, is such a joyful journey. Every time I make a batch, I remember why I fell in love with it—the smell, the process, the shared smiles. If you’re looking for more inspiration for bar cookies and squares that bring people together, you’ll find a treasure trove of ideas in our full collection of dessert bar and brownie recipes.
So there you have it—everything I know about achieving that perfect, fudgy union of chocolate brownies with chocolate icing. It’s more than just a recipe; it’s a little act of creating comfort and joy. I hope you give it a try in your own kitchen. When you do, I’d love to hear about it. Did you add a secret ingredient? Did your family fight over the corner piece? That’s the best part. Happy baking, friends.
Equipment
- Microwave-safe bowl
- Whisk
- Spatula
- 9x13 inch baking pan
- Parchment paper
- Wire rack
- Medium bowl
Ingredients
- 1 cup Unsalted Butter, melted
- 2 cups Granulated Sugar
- 4 Large Eggs, at room temperature
- 2 teaspoons Vanilla Extract
- 1 cup All-Purpose Flour
- 1 cup Unsweetened Cocoa Powder
- 1 teaspoon Salt
- 1 cup Chocolate Chunks (semi-sweet or dark) Optional
- 6 tablespoons Unsalted Butter, softened
- 6 tablespoons Unsweetened Cocoa Powder
- 2 cups Powdered Sugar
- 5-6 tablespoons Milk or Heavy Cream Adjust for consistency
- 1 teaspoon Vanilla Extract
- a pinch Salt
Instructions
- Preheat the oven to 350°F (175°C) and line a 9x13 inch baking pan with parchment paper, greasing lightly.
- In a large bowl, melt 1 cup of butter. Mix in 2 cups of granulated sugar until glossy.
- Let the butter-sugar mixture cool slightly, then whisk in 4 eggs one at a time, followed by 2 teaspoons of vanilla extract.
- Sift in 1 cup of flour, 1 cup of cocoa powder, and 1 teaspoon of salt over the wet mixture and fold together until just combined.
- If using, fold in 1 cup of chocolate chunks.
- Pour the batter into the prepared pan and spread evenly.
- Bake for 25-30 minutes, checking for doneness with a toothpick when the center has a few moist crumbs.
- Let the brownies cool completely in the pan on a wire rack before icing.
- For the icing, sift together 6 tablespoons of cocoa powder and 2 cups of powdered sugar in a medium bowl.
- Mix in the softened butter, 1 teaspoon of vanilla, and a pinch of salt.
- Gradually add milk or cream, one tablespoon at a time, until the icing reaches a thick but pourable consistency.
- Once the brownies are cool, pour the icing over and spread evenly. Let set for 30 minutes to 1 hour before slicing.
Notes
Nutrition

Hello! I’m Sarah Mitchell, and I’m passionate about bringing creativity and innovation to baking. My love for baking started in high school when I first tried my hand at decorating cupcakes for a class project. What began as a fun hobby quickly became a full-time passion. I’ve spent the past decade working in bakeries and dessert shops, honing my skills in everything from simple cookies to intricate wedding cakes.
After working in some of the top bakeries across the country, I realized that baking was about more than just following recipes — it was about infusing your personality into each creation. At BakingSecret.com, I love creating recipes that push boundaries while staying true to the heart of classic baking. I specialize in creating delicious and visually stunning pastries that will wow your guests.
When I’m not baking, I enjoy teaching baking classes, trying out new cake decoration techniques, and traveling to find inspiration in global dessert traditions. I’m so excited to share my tips and tricks with you to help elevate your baking game!