
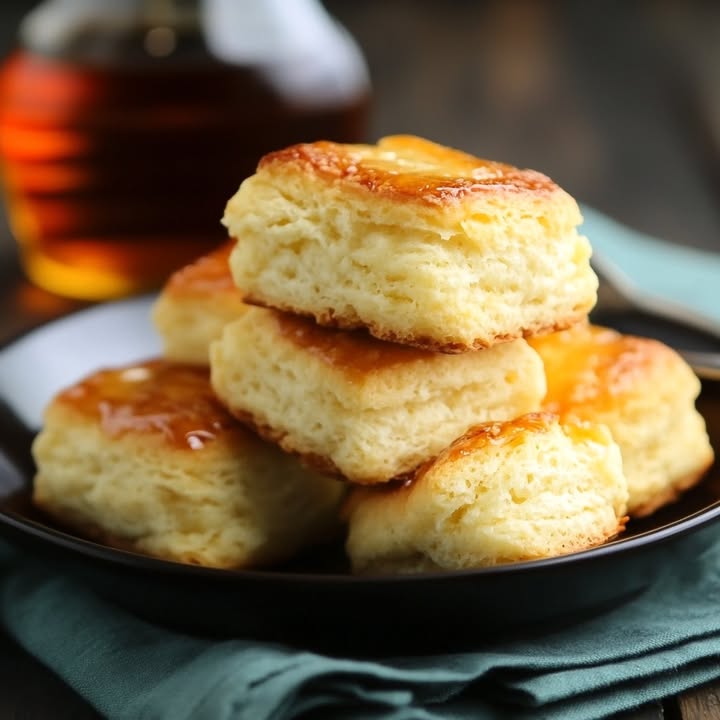
My Secret to the Fluffiest Biscuits Ever? A Can of Soda!
Can you keep a kitchen secret? I’ve made more buttermilk biscuits than I can count. Some were hockey pucks, some were just okay. Then my Aunt Sue whispered a magic word over the phone: “7-Up.” I was skeptical, but one bite of those impossibly light, buttery pillows changed everything. Now, these Fluffy 7-Up Biscuits are my not-so-secret weapon for making everyone at my table smile. They’re the easiest, most crowd-pleasing bread I know.
The Curious & Delicious History of 7-Up Biscuits
This recipe feels like a page from a clever, thrifty home cook’s playbook. While its exact origin is a bit of a mystery, it’s a classic example of “Depression-era” or “desperation” cooking ingenuity. When buttermilk or yeast wasn’t on hand, carbonated beverages like 7-Up or Sprite became a brilliant shortcut. The soda provides acidity and bubbles, which react with the baking mix to create that amazing rise and tender crumb. It’s a piece of American culinary resourcefulness that’s just as delicious today as it was back then.
Why You’ll Absolutely Adore This Recipe
If you’ve ever been intimidated by cutting cold butter into flour, relax. This recipe is your free pass. Using baking mix and soda streamlines the process beautifully. The result? Biscuits that are incredibly soft, with a slight sweetness and a golden, buttery bottom that’s to die for. They come together in under 20 minutes, bake quickly, and fill your kitchen with a warm, welcoming aroma that says “home” louder than anything else.
Perfect Occasions for Your Batch of Biscuits
These biscuits are the ultimate social butterflies of the food world. They’re perfect for:
- Sunday Gravy or Soup Night: Sopping up sauce or stew is their divine purpose.
- Potlucks and Picnics: They travel well and always disappear first.
- Holiday Breakfast Spreads: Imagine them next to scrambled eggs and bacon.
- A Simple Weeknight Dinner: Elevating a basic meal from “fine” to “fabulous.”
- Just Because: Sometimes, a warm biscuit is the best kind of self-care.
Ingredients for Fluffy 7-Up Biscuits
Here’s the beautifully short list you’ll need:
- 2 cups baking mix (like Bisquick)
- 1/2 cup sour cream
- 1/2 cup 7-Up soda (or similar lemon-lime soda)
- 1/4 cup unsalted butter, melted
Handy Substitution Options
Out of something? No panic. Here are some easy swaps:
- Baking Mix: Use a homemade “Bisquick” mix of flour, baking powder, salt, and a bit of shortening.
- Sour Cream: Full-fat plain Greek yogurt is an excellent 1:1 substitute.
- 7-Up: Sprite, Sierra Mist, or even plain club soda will work. The lemon-lime flavor just adds a nice hint.
- Unsalted Butter: Salted butter is fine; just omit any extra salt from your baking mix if you’ve added it.
How to Make Your Own Fluffy 7-Up Biscuits
Let’s get baking! This process is so satisfying.
Step 1: Prep Your Pan and Oven
First things first, get that oven going. Preheat it to a hot 425°F (218°C). This high heat is key for a good, quick rise. While it heats, grab your 9×9-inch baking dish. A quick coat of non-stick spray or a thin smear of butter will ensure your biscuits don’t stick. Have your melted butter ready to go—I just zap mine in a microwave-safe bowl for 30-second bursts until it’s fully liquid and fragrant.
Step 2: Mix the Dough Base
In a large, cozy-looking mixing bowl, plop in your two cups of baking mix. Add the half-cup of cool, creamy sour cream right on top. Using a sturdy spoon or a fork, start to mix them together. It will look crumbly at first, like large peas. That’s perfect! You’re just building the foundation for your dough. Pro tip: Don’t overmix here; you just want the sour cream evenly distributed.
Step 3: The Magcial Pour: Adding the 7-Up
Now for the fun part! Open your cold 7-Up and pour that half-cup right into the bowl. You’ll hear it fizz immediately. This is where the magic starts. Gently stir with your spoon, using a folding motion. You’ll see a soft, shaggy, and slightly sticky dough come together almost instantly. It’s a beautiful thing! Don’t worry about a few lumps; they’ll bake out.
Step 4: Shape and Cut Your Biscuits
Lightly dust a clean countertop or a large cutting board with a tablespoon of extra baking mix or all-purpose flour. Turn your soft dough out onto it. With floured hands, gently pat the dough—don’t roll it—into a rough rectangle about 1/2-inch to 3/4-inch thick. Then, dip a biscuit cutter or the rim of a drinking glass in flour and press straight down to cut your biscuits. Aim for 8 lovely rounds. Re-pat the scraps to cut the last few.
Step 5: Butter Bath and Bake!
Take your prepared baking dish and pour that glorious melted butter right into the bottom. It should coat the dish in a thin, golden layer. Now, place each cut biscuit directly into the butter, then flip it over so both sides get coated. This creates that irresistible, crispy, buttery crust. Pop the dish into your hot oven. Bake for 10-12 minutes. Watch for tops that are a beautiful, even golden brown.
Step 6: Serve and Enjoy the Praise
Once out of the oven, let them sit for just a minute in the pan—the butter will be sizzling hot! Then, use a spatula to transfer them to a wire rack or a plate. Serve them warm with extra butter, a drizzle of honey, or your favorite jam. The praise from your family and friends will be immediate. Chef’s Tip: For extra flavor, brush the tops with a little more melted butter as soon as they come out of the oven. It gives them a gorgeous shine.
Timing Your 7-Up Biscuit Success
- Prep Time: 10 minutes
- Cook Time: 12 minutes
- Total Time: 22 minutes
- Yields: 8 delicious biscuits
My Chef’s Secret for Ultimate Fluffiness
Handle the dough with a light touch! The more you knead or re-roll it, the tougher the gluten becomes, leading to denser biscuits. Pat it gently, cut firmly, and don’t twist your cutter. A straight up-and-down press gives you the best rise. Think of the dough as a delicate cloud you’re just shaping, not working.
A Little Extra Info: Why Soda Works
The carbonation in the 7-Up is a powerhouse. Those tiny bubbles get trapped in the dough. In the hot oven, they expand rapidly, acting as an extra leavening agent to push the biscuits up high. The citric acid in the soda also tenderizes the gluten, making the crumb extra soft. It’s a simple kitchen science trick that yields fantastic results.
Necessary Equipment
You don’t need fancy gear! Just gather:
- Large mixing bowl
- 9×9-inch baking dish
- Measuring cups and spoons
- Fork or wooden spoon for mixing
- Biscuit cutter or a 2.5-3 inch round glass
- Wire rack for cooling (optional but helpful)
Storing Your Fluffy 7-Up Biscuits
These biscuits are always best the day they are made, especially when served warm. If you have leftovers, let them cool completely to room temperature. Then, place them in an airtight container or a resealable plastic bag. They will keep at room temperature for 1-2 days.
For longer storage, you can freeze them. Wrap each cooled biscuit individually in plastic wrap, then place them all in a freezer bag. They can be frozen for up to 2 months. This is a great trick for having homemade biscuits on hand anytime!
To reheat, simply place a room-temperature biscuit in the microwave for 15-20 seconds, or wrap it in foil and warm it in a 350°F oven for about 10 minutes. The oven method will help restore a bit of the exterior crispness.
Tips and Advice for Biscuit Brilliance
- Make sure your 7-Up is cold from the fridge. Cold soda holds its carbonation better when mixed.
- Don’t skip flipping the biscuit in the butter. That double coating is what creates the iconic flavor and texture.
- If your dough feels too sticky to handle, dust your hands with a little more baking mix. A light touch is key.
- For taller biscuits, pat your dough to a 3/4-inch thickness.
Presentation Tips to Impress Your Guests
We eat with our eyes first! Try these ideas:
- Serve them stacked high on a rustic wooden board or a pretty ceramic plate.
- Offer a selection of toppings in small jars: flavored honey, homemade jam, apple butter, and softened butter.
- For a brunch, tuck them into a cloth-lined basket to keep them warm and cozy.
- Dust the tops with a light sprinkle of powdered sugar for a sweet version.
Healthier & Creative Recipe Variations
Love the base recipe? Mix it up! Here are six fun twists:
- Herb & Cheese Delight: Fold 1/2 cup of shredded sharp cheddar and 1 tablespoon of chopped fresh chives into the dry mix before adding the wet ingredients.
- Garlic Parmesan Twist: Add 1 teaspoon of garlic powder and 1/4 cup of grated Parmesan cheese to the baking mix. Brush with garlic butter after baking.
- Sweet Lemon Blueberry: Gently fold 1/2 cup of fresh blueberries into the dough. Use lemon-lime soda and add a teaspoon of lemon zest to the mix.
- Whole Wheat Version: Substitute half of the baking mix with a whole wheat baking mix for added fiber and a nuttier flavor.
- Everything Bagel Biscuits: Before baking, brush the tops with an egg wash and sprinkle generously with everything bagel seasoning.
- Mini Biscuit Bites: Use a small 1-inch cutter to make perfect party appetizers. Reduce baking time by 2-3 minutes.
If you’re looking for more inspiration beyond biscuits, our collection of bread and muffin recipes has tons of quick-bread ideas that use similar simple techniques.
Common Mistakes to Avoid
Avoid these little pitfalls for perfect biscuits every single time.
Mistake 1: Over-Mixing the Dough
This is the most common error and the biggest culprit behind tough biscuits. When you mix the dough too vigorously or for too long, you develop the gluten in the flour. This makes the biscuits chewy and dense instead of light and flaky. The moment the dough comes together, stop mixing. It’s okay if it looks a little shaggy and uneven. A few dry spots will incorporate as you pat it out.
Mistake 2: Twisting the Biscuit Cutter
It feels natural to give the glass or cutter a little twist to cleanly release the dough. Resist the urge! Twisting pinches the edges of the dough together, sealing them and preventing the biscuit from rising freely during baking. You’ll get lopsided or shorter biscuits. Instead, press straight down firmly, then lift straight up. If the dough sticks, dip your cutter in flour between each cut.
Mistake 3: Using Warm or Flat Soda
The carbonation in the 7-Up is a critical leavening agent. If your soda is warm or has been open and gone flat, it won’t provide those lively bubbles that help the biscuits puff up. Always use a freshly opened, cold can from the refrigerator. Pour it in right before you’re ready to mix, and work quickly to get the dough into the oven to trap those bubbles.
Mistake 4: Skipping the Butter Flip
It might seem like an extra, messy step to place the biscuit in the butter and then flip it, but it’s essential. This double-butter coating ensures every surface gets a kiss of fat. It creates that irresistible golden, slightly crispy bottom and flavorful sides. If you just pour butter over the top, you miss out on that full, rich flavor and texture.
Frequently Asked Questions
Can I use a different soda?
Absolutely! Sprite or Sierra Mist work perfectly as a 1:1 substitute for 7-Up. The lemon-lime flavor is classic. You could even experiment with ginger ale for a different subtle flavor. The key is using a carbonated beverage. Plain water won’t give you the same lift or tenderness.
My dough is super sticky. What did I do wrong?
You likely did nothing wrong! This dough is meant to be softer and stickier than a traditional biscuit dough. That’s part of what keeps it so tender. Don’t be tempted to add lots of extra flour. Just be sure your hands and your work surface are well-floured before you turn the dough out. A bench scraper can also help handle the sticky dough without over-working it.
Why use sour cream? Can I use milk instead?
Sour cream adds richness, tang, and moisture that plain milk can’t match. The fat content and acidity contribute to a tender crumb and flavorful biscuit. If you must substitute, full-fat plain Greek yogurt is the best alternative. Using milk will result in a drier, less flavorful, and less tender biscuit, so I don’t recommend it for this specific recipe.
Can I make these biscuits ahead of time?
You can prepare the dough, cut the biscuits, and arrange them in the buttered pan. Then, cover the pan tightly with plastic wrap and refrigerate for up to 2 hours before baking. You may need to add a minute or two to the bake time since you’re starting with a cold pan. For longer prep, I recommend freezing the unbaked biscuits on a sheet pan, then bagging them, and baking from frozen (adding a few extra minutes).
My biscuits didn’t rise very high. Why?
A few things can stunt their growth: 1) Your baking powder in the mix might be old (check the date!). 2) You over-mixed the dough. 3) You twisted the cutter. 4) Your oven wasn’t fully preheated. A hot, quick bake is essential for a good “oven spring,” where the heat makes the gases expand rapidly before the structure sets.
Can I use homemade baking mix?
Yes, you can! A simple homemade mix is 2 cups flour, 1 tablespoon baking powder, 1 teaspoon salt, and 1/4 cup cold shortening (cut in). Using this will give you more control over the salt and fat. The method and other ingredients remain exactly the same. The texture might be slightly different, but still delicious.
Are these biscuits sweet?
They have a very, very subtle sweetness from the soda—more of a background note than an overt sugary taste. It beautifully balances the tang of the sour cream and the richness of the butter. Most people describe them as “buttery” first. The sweetness becomes more pronounced if you serve them with jam or honey, which is a classic pairing.
What’s the best way to reheat leftovers?
The microwave (10-15 seconds) is fastest but can make them a bit soft. For a better texture, wrap them in aluminum foil and warm in a 350°F oven for 8-10 minutes. You can also split them and toast them in a toaster oven for a crispier edge. A quick brush of butter after reheating brings back that fresh-baked taste.
Can I make these without a biscuit cutter?
Of course! The rim of a drinking glass is the most common substitute. Just dip it in flour between cuts. You can also use a sharp knife to cut the patted-out dough into squares. This is actually a great method because you have no scraps to re-roll, which can make the last biscuits tougher. “Drop biscuits” are another option—just drop spoonfuls of the sticky dough right into the buttered pan.
Can I add other flavors to the dough?
Definitely! Get creative. Before adding the wet ingredients, whisk in 1/2 cup of shredded cheese, a few tablespoons of fresh herbs, a teaspoon of garlic powder, or even some crispy cooked bacon bits. Just keep any add-ins dry and fairly small so they don’t disrupt the dough structure or make it too wet. Understanding how ingredients affect your final dish is part of the joy of home cooking and making a recipe your own.
Go Bake a Memory!
There you have it—my foolproof path to the fluffiest, most talked-about biscuits. This recipe is more than just a list of steps; it’s a little piece of kitchen magic, a shortcut to comfort, and a guaranteed way to make any meal feel special. So grab that can of soda, don’t be afraid of the sticky dough, and get ready for the compliments to roll in. Happy baking!
Equipment
- Grand bol
- Fouet
- Spatule
- Plat de cuisson 9x9 pouces
- Papier sulfurisé
Ingredients
- 2 tasses Mélange de pâtisserie comme Bisquick
- 1/2 tasse Crème aigre
- 1/2 tasse Soda 7-Up ou similaire
- 1/4 tasse Beurre non salé fondu
Instructions
- Préchauffez le four à 218°C (425°F) et préparez un plat de cuisson de 9x9 pouces avec un spray antiadhésif ou du beurre.
- Dans un grand bol, combinez 2 tasses de mélange de pâtisserie et 1/2 tasse de crème aigre; mélangez jusqu'à ce que le mélange devienne granuleux.
- Versez 1/2 tasse de soda 7-Up froid et mélangez doucement jusqu'à ce qu'une pâte souple se forme.
- Sur une surface farinée, étalez la pâte en un rectangle d'environ 1 à 2 cm d'épaisseur.
- Utilisez un emporte-pièce ou un verre pour découper des biscuits, en re-étalant les chutes si nécessaire.
- Versez le beurre fondu dans le plat de cuisson préparé, puis enrobez chaque biscuit de beurre avant de les placer dans le plat.
- Faites cuire les biscuits au four pendant 10-12 minutes jusqu'à ce qu'ils soient dorés.
- Laissez refroidir les biscuits pendant une minute dans le plat avant de les transférer sur une grille ou une assiette pour servir chaud.
Notes
Nutrition

Hi, I’m Olivia Parker, the founder of BakingSecret.com and a lifelong lover of all things sweet and homemade. I grew up in a small town in Oregon, where the smell of fresh cookies in my family’s kitchen sparked my passion for baking. Over the years, I turned that passion into a mission: to help home bakers feel confident, inspired, and creative.
After studying food science and working in several artisan bakeries across the U.S., I decided to create a space where everyone from beginners to seasoned bakers can find reliable recipes, expert tips, and a warm, welcoming community. BakingSecret.com is my way of sharing the magic of baking with the world. When I’m not testing new recipes, you’ll find me exploring farmers’ markets, collecting vintage cookbooks, or perfecting my sourdough technique.