
My Secret Weapon: The No-Bake Strawberry Speculoos Tart
Ever stared at a bunch of fresh strawberries and a pack of cookies, thinking dessert is a faraway dream? I have, especially on those sweltering summer days when turning on the oven feels like a punishable crime. Then, my friend Sophie (a genius of lazy gourmet cooking) whispered the secret of this No-Bake Strawberry Tart. It changed my life. Seriously. Now, when I need a stunning, crowd-pleasing dessert in 20 minutes, I know exactly what to do. This recipe is my kitchen superhero.
From Belgian Cafes to Your Kitchen: A Speedy Tale
This dessert is a wonderful mash-up of traditions. The speculoos (or speculaas) are those spiced Belgian cookies, often enjoyed with coffee. They’re crunchy and fragrant with cinnamon, ginger, and brown sugar. The French have their classic Tarte aux Fraises, a delicate pastry cream and fresh fruit delight. This recipe marries them in the most modern, no-fuss way. It’s a modern twist that honors both, skipping the fuss of pastry dough and oven-baking for pure, instant gratification. My version came about one hectic afternoon before a last-minute picnic. It was a hit, and it’s been my go-to ever since.
Why You’ll Fall in Love With This Easy No-Bake Tart
You’ll love it because it’s unbelievably simple. No baking, no tricky techniques. The flavors are a perfect dance: the spicy, crunchy cookie base, the creamy, rich mascarpone layer, and the juicy, sweet fresh strawberries. It looks like you spent hours, but you only need minutes. It’s forgiving, fun to make, and kids can help crush the cookies or arrange the berries. It’s the dessert that makes you look like a pro while keeping you cool and calm.
When This Speedy Tart Steals the Show
This is your secret for almost any occasion! Think of:
- Last-minute dinners: Guests arriving in an hour? No sweat.
- Summer BBQs and picnics: No oven needed, and it travels well.
- Potlucks and office parties: It’s always the prettiest dish on the table.
- Weeknight treat: Why wait for weekend baking? Happiness is now.
- Mother’s Day or birthdays: A homemade, beautiful dessert says “I love you” without the stress.
Gathering Your Stars: The Ingredients List
Here’s what you’ll need. Everything is simple and likely in your pantry or easy to find.
For the Crunchy Base:
- 200g Speculoos cookies (about 7 ounces)
- 80g Unsalted butter, melted (about 5.5 tablespoons)
For the Creamy Filling:
- 250g Mascarpone cheese (about 8.8 ounces)
- 250ml Heavy whipping cream (about 1 cup)
- 50g Powdered sugar (about 1/4 cup)
- 1 teaspoon Vanilla extract (optional, but lovely)
For the Fruity Crown:
- 400g Fresh strawberries (about 14 ounces)
- A few extra speculoos crumbs for garnish (optional)
Smart Swaps: Ingredient Substitutions
Don’t worry if you’re missing something! Cooking is about creativity.
- Speculoos: Use graham crackers, digestive biscuits, or even ginger snaps. The spice profile will change, but it’ll still be delicious.
- Mascarpone: Full-fat Greek yogurt or a mix of cream cheese and a bit of heavy cream can work. The texture will be slightly less rich but still creamy.
- Heavy whipping cream: For a lighter version, you could use well-chilled whipping cream, but heavy cream gives the best, stable texture.
- Strawberries: In other seasons, try raspberries, blueberries, or sliced peaches. This No-Bake Tart is a blank canvas for fruit.
Crafting Your Masterpiece: The Step-by-Step Guide
Follow these easy steps. I promise, it’s more fun than work!
Step 1: Create the Crunchy Cookie Crust
First, let’s make the foundation. Place your speculoos cookies in a large zip-top bag or a bowl. Grab a rolling pin or a sturdy glass and crush them into fine crumbs. You want a texture like coarse sand. Listen to that lovely crunch! Now, pour the melted butter over the crumbs. Mix it all together with a spoon or your hands until every crumb is coated and looks glossy. It should feel like wet sand. Press this mixture firmly and evenly into the bottom of a tart pan (with a removable bottom is ideal) or a pie dish. Use the back of a spoon to make it smooth and compact. This base is what holds your whole tart together.
Pro tip: If you have a food processor, pulse the cookies a few times for super-fast, even crumbs.
Step 2: Whip Up the Dreamy Cream Layer
This is the magic cloud! In a large, clean bowl, pour your cold heavy whipping cream. Using a hand mixer or a whisk, whip it until it forms soft peaks. It should look fluffy and hold its shape when you lift the whisk. Now, add the mascarpone, powdered sugar, and vanilla extract (if using) to the whipped cream. Gently fold everything together with a spatula until it’s smooth, creamy, and uniformly blended. Don’t overmix! You want to keep that airy lightness. The color will be a lovely pale ivory. Smell that sweet, vanilla scent? Heavenly.
Pro tip: Make sure your cream and mascarpone are cold. This helps the cream whip faster and stay stable.
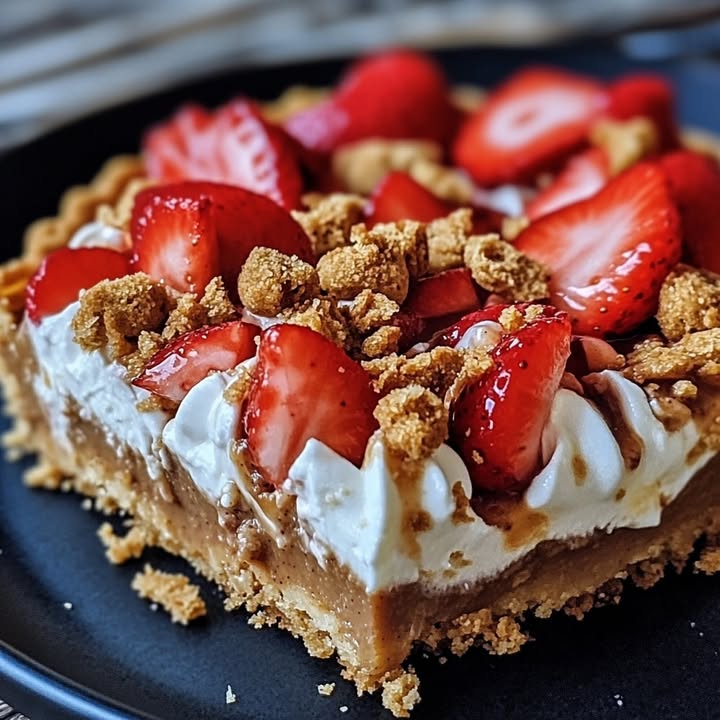
Step 3: Assemble and Crown with Berries
Time to build! Scoop your creamy mascarpone mixture onto the prepared cookie base in your pan. Spread it out evenly with a spatula, creating a smooth, inviting layer. Now, wash your strawberries and pat them dry. Hull them (remove the green top). You can slice them, leave them whole, or half them—whatever you fancy. Arrange them artfully over the cream. I like to start from the outside and work in, creating a beautiful pattern. The red berries against the white cream and brown base is simply stunning.
Chef’s tip: For extra flair, sprinkle a few reserved speculoos crumbs around the edge of the tart or on top of some berries for texture and color contrast.
Step 4: The Final Touch – Chill and Serve!
Patience is the final ingredient! Place your assembled tart in the refrigerator. Let it chill for at least 1-2 hours. This resting time is crucial. It allows the cookie base to set firmly with the butter, and the cream layer to become perfectly cold and sliceable. When you take it out, the flavors will have married beautifully. Run a knife around the edge if using a tart pan, lift out the base, and slide the tart onto a serving plate. Slice and serve proud smiles.
Timekeeper’s Guide: How Long This Really Takes
Let’s be real about timing:
- Prep Time: 20 minutes (that’s crushing, mixing, whipping, and arranging).
- “Cooking” Time: 0 minutes! (The oven is off-duty).
- Chilling Time: Minimum 1 hour (ideally 2 hours for perfect set).
- Total Time: About 1 hour 20 minutes to enjoy.
It’s a true quick-fix dessert.
Chef’s Secret: The Power of Cold
My absolute secret? Cold everything. Use cold mascarpone, cold cream, and even chill your mixing bowl for the cream if you can. This makes the whipping process faster and gives you a sturdier, less likely to weep cream filling. The butter for the base should be melted but not hot—just warm. This contrast of temperatures ensures a perfect texture in every layer.
A Cookie with a Story: The Speculoos Extra
Those speculoos cookies aren’t just tasty; they have history! Traditionally, they were made for Saint Nicholas’ day in Belgium and the Netherlands. The spices (cinnamon, nutmeg, cloves) were expensive treasures in the past, making these cookies a festive treat. Now, we get to enjoy them year-round, and using them as a crust is a fun, modern nod to that tradition. It adds a layer of flavor that plain crusts just can’t match.
Your Kitchen Tools: The Simple Arsenal
You don’t need fancy gear. Just gather:
- A tart pan (approx. 9-inch) or pie dish
- A rolling pin, glass, or food processor for crushing cookies
- A mixing bowl
- A hand mixer or whisk
- A spatula
- A measuring scale or cups
Simple tools for grand results!
Keeping the Delight Fresh: Storage Tips
This tart is best enjoyed fresh, but you can store it nicely. Cover it loosely with plastic wrap or place it in a cake carrier. Keep it in the refrigerator. It will hold well for up to 2 days. The base will soften a bit over time as it absorbs moisture from the cream, but it will still taste wonderful.
For longer keeping, I wouldn’t recommend freezing the whole tart. The cream layer can separate and become grainy upon thawing. However, you can freeze the leftover speculoos crumbs or unbaked cookie base mixture in a bag for future use.
If you need to make it ahead, prepare the base and cream layer, store them separately in the fridge, and assemble with berries just a few hours before serving. This keeps the berries perky and the base crispier.
My Little Pearls of Wisdom: Tips and Advice
- Dry your strawberries well after washing. Extra water can make the cream soggy.
- Press the cookie base REALLY firmly. A compact base won’t crumble when sliced.
- If your cream seems soft, chill the filled tart for an extra hour. Cold is your friend.
- For a sweeter cream, add a touch more powdered sugar. Taste as you go!
- Play with presentation! Use different sized berries or add mint leaves for a pop of green.
Making It Picture-Perfect: Presentation Ideas
How to serve this beauty?
- The Classic Slice: On a plain white plate, a slice with a dollop of extra cream.
- Individual Mini-Tarts: Use small jars or glasses to make personal portions.
- With a Dusting: A light sprinkle of powdered sugar or cocoa over the berries.
- Herb Accent: A few fresh mint or basil leaves beside each slice.
- Sauce Drizzle: A tiny drizzle of melted chocolate or strawberry coulis on the plate.
Keep Exploring: Six Fun Variations to Try
Once you master this, the world of No-Bake Desserts opens up! Here are six twists:
- Chocolate Berry Bliss: Swap speculoos for chocolate cookies. Use a chocolate cream layer by adding melted chocolate to the mascarpone mix. Top with mixed berries.
- Lemon Zest Delight: Add the zest of one lemon to the cream filling. Top with blueberries. It’s a bright, tangy summer version.
- Tropical Escape: Use ginger snaps for the base. Add a tablespoon of rum or coconut extract to the cream. Top with sliced mango and kiwi.
- Peanut Butter & Jam: Crush peanut butter cookies for the base. Keep the mascarpone cream plain. Top with strawberries and a drizzle of raspberry jam.
- Cheesecake Style: Add a tablespoon of lemon juice to the cream for a cheesecake tang. Use graham cracker crumbs for the base. Top with strawberry compote.
- Kid-Friendly Fun: Use colorful sprinkles mixed into the cookie crumbs for the base. Let the kids decorate the top with strawberries and their favorite candy.
Each variation is a new adventure in your no-bake journey. For more inspiration, check out our collection of easy no-bake desserts that are perfect for any season.
Common Mistakes to Avoid
Even easy recipes have tiny pitfalls. Let’s steer clear of them!
Mistake 1: A Soggy, Weak Cookie Base
This happens when you don’t press the crumbs firmly enough, or if the butter isn’t evenly mixed. A loose base will crumble when you cut the tart and won’t hold its shape. To avoid it, mix the butter and crumbs until no dry crumbs remain. Then, really press and compact the mixture into the pan. Use the back of a spoon or even a small glass to smooth and firm it up. Think of making a solid, thin cookie floor.
Mistake 2: Overwhipping or Underwhipping the Cream
Whipping cream is a balance. Underwhipped cream will be runny and won’t hold the mascarpone well, making a sloppy filling. Overwhipped cream becomes grainy and buttery, losing its smooth texture. Watch for soft peaks. When the cream holds its shape on the whisk but still looks smooth and glossy, stop mixing. Add the mascarpone and then fold gently, not whip aggressively.
Mistake 3: Using Warm Ingredients for the Cream Layer
If your cream, mascarpone, or bowl is warm, the cream won’t whip properly. It might stay liquid or collapse quickly. Always use cold ingredients. You can even chill your mixing bowl in the fridge for 10 minutes before starting. Cold = fluffy, stable cream. This is a game-changer for the texture of your No-Bake Strawberry Tart.
Mistake 4: Adding Wet Strawberries
Placing damp strawberries on the cream invites water to seep into the creamy layer. This can make it watery and dilute the flavor. After washing your strawberries, pat them dry thoroughly with a clean kitchen towel or paper towels. Let them air-dry for a few minutes if possible. Dry berries mean a pristine, firm cream layer.
Mistake 5: Skipping the Chilling Time
The tart needs time in the fridge to set. If you serve it immediately, the base will be too crumbly, and the cream might not slice neatly. Respect the chill! At least one hour, ideally two. This allows the butter in the base to re-solidify and bind everything, and the cream to firm up. It makes all the difference in presentation and ease of eating.
Answering Your Curious Questions: FAQ
Can I make this No-Bake Strawberry Tart ahead of time?
Absolutely! You can prepare the cookie base and the cream filling separately a day ahead. Keep them covered in the refrigerator. Assemble the tart with the fresh strawberries just a few hours before you plan to serve it. This ensures the base stays crisp and the berries look fresh. The full assembled tart can also be made and chilled for up to 24 hours, though the base will soften slightly after about 12 hours. It’s still delicious, but for optimal texture, last-minute berry placement is best.
What can I use instead of mascarpone?
If you can’t find mascarpone, a good substitute is full-fat, very cold Greek yogurt. The texture will be slightly tangier and less rich. Another option is to blend 200g of full-fat cream cheese with 50ml of heavy cream to loosen it. The flavor profile will change a bit, leaning more towards a cheesecake taste, but it will still work beautifully in this No-Bake Dessert. Avoid low-fat versions as they might not provide the needed stability and creaminess.
My cream didn’t whip, what went wrong?
The most common reason is that the cream (or your bowl/utensils) was not cold enough. Cream whips best when everything is chilled. Also, ensure you’re using heavy whipping cream, not half-and-half or light cream. They have less fat and won’t whip to stable peaks. If it’s a hot day, chill your bowl and beaters in the fridge first. If it still fails, you can stabilize it with a tiny bit of powdered sugar added at the start, which helps the fat molecules hold air.
Can I use frozen strawberries?
I wouldn’t recommend frozen strawberries for the top of this tart. They release a lot of juice as they thaw, which will waterlog your beautiful cream layer. Frozen strawberries are great for sauces or compotes, but for this fresh, no-bake tart, always use fresh, ripe strawberries. If fresh aren’t available, consider switching to another fresh fruit like raspberries, blueberries, or sliced peaches that are in season.
How do I get a perfectly smooth cream layer?
After spreading the mascarpone cream with a spatula, dip the spatula in hot water and then dry it quickly. Use the warm, smooth spatula to gently glide over the surface of the cream. This little trick helps smooth out any ridges or bumps, giving you a professional, sleek finish. Also, spread from the center outward in gentle strokes to avoid creating peaks.
Is this recipe suitable for kids to help with?
It’s a fantastic recipe for kids! They can help crush the cookies in a bag (a fun, noisy task), mix the crumbs and butter, and most delightfully, arrange the strawberries on top. It’s a safe, no-cook recipe that teaches them about layering desserts and presentation. Just supervise the whipping of the cream if using a mixer. Making food together is a great way to encourage healthy cooking habits at home from a young age.
Can I make this in a springform pan instead of a tart pan?
Yes, you can! A 9-inch springform pan works well. Just press the cookie base into the bottom of the pan. When ready to serve, you can remove the sides neatly. It might look more like a cheesecake then. A pie dish is also perfectly fine; you’ll just serve it directly from the dish. The removable bottom of a tart pan is nice for a clean transfer to a plate, but it’s not a must.
The speculoos cookies themselves are quite sweet and spiced. If you want a less sweet base, you could mix in a handful of plain, unsweetened crushed nuts (like almonds) with the cookie crumbs. For a sweeter base, add a tablespoon of brown sugar to the crumb mixture before adding the butter. Taste the crumbs as you go—remember, the cream and fruit also add sweetness.
What’s the best way to hull strawberries?
The easiest way is to use a small paring knife. Insert the tip at an angle near the green leaves, cut around the stem in a small cone shape, and pop it out. You can also use a special strawberry huller tool, or even a sturdy straw! Push the straw through the bottom of the strawberry up through the top; it often pushes the hull out cleanly. Keeping the berries intact after hulling makes for prettier arrangement.
Can I add gelatin to the cream to make it firmer?
You can, but it’s not necessary if you chill properly. Adding gelatin moves this recipe closer to a chiffon or mousse style. If you want to try, dissolve 1 teaspoon of gelatin in 2 tablespoons of cold water, then melt it gently. Cool it slightly and fold it into the cream-mascarpone mixture before spreading. This will give a very firm, sliceable texture even at room temperature, but it changes the pure, fresh feel of the original recipe.
The Sweet Finale
So there you have it! My beloved, foolproof, show-stopping No-Bake Strawberry Speculoos Tart. It’s the recipe that never fails to bring smiles and “You made this?” looks. It celebrates fresh fruit, embraces clever shortcuts, and delivers pure joy. I hope it becomes your secret weapon too, ready for any surprise celebration or simple weeknight treat. Happy no-bake baking!
Equipment
- Grand bol
- Fouet
- Spatule
- Plaque à tarte
- Rouleau à pâtisserie
Ingredients
- 200 g biscuits speculoos
- 80 g beurre doux, fondu
- 250 g fromage mascarpone
- 250 ml crème épaisse
- 50 g sucre glace
- 1 cuillère à café extrait de vanille optionnel, mais agréable
- 400 g fraises fraîches
- q.s. miettes de speculoos supplémentaires pour la décoration
Instructions
- Écrasez les biscuits speculoos en miettes fines et mélangez-les avec le beurre fondu jusqu'à ce qu'ils soient enrobés.
- Appuyez fermement sur le mélange de biscuits au fond d'un moule à tarte ou d'un plat à tarte.
- Dans un grand bol, fouettez la crème épaisse bien froide jusqu'à obtenir des pics doux.
- Incorporez délicatement le fromage mascarpone, le sucre glace et l'extrait de vanille jusqu'à obtenir un mélange homogène.
- Étalez uniformément le mélange crémeux sur la croûte de biscuits.
- Préparez les fraises en les lavant, en les séchant et en les équeutant, puis disposez-les sur la couche de crème.
- Réfrigérez la tarte assemblée pendant au moins 1 à 2 heures avant de servir.
Notes
Nutrition

Hi, I’m Olivia Parker, the founder of BakingSecret.com and a lifelong lover of all things sweet and homemade. I grew up in a small town in Oregon, where the smell of fresh cookies in my family’s kitchen sparked my passion for baking. Over the years, I turned that passion into a mission: to help home bakers feel confident, inspired, and creative.
After studying food science and working in several artisan bakeries across the U.S., I decided to create a space where everyone from beginners to seasoned bakers can find reliable recipes, expert tips, and a warm, welcoming community. BakingSecret.com is my way of sharing the magic of baking with the world. When I’m not testing new recipes, you’ll find me exploring farmers’ markets, collecting vintage cookbooks, or perfecting my sourdough technique.