
The Most Moist Italian Cake You’ll Ever Bake (I Promise!)
Have you ever baked a cake that was so deliciously moist, it felt like a hug from an Italian nonna? I have a funny story. I once brought a cake to a potluck that was, well, a bit dry. Let’s just say it spent the evening next to the fruit platter, looking lonely. That cake was my motivation to master the art of moistness. And friends, this Moist Italian Cake is my triumph. It’s not just any cake. It’s a rum-soaked, syrup-infused masterpiece that stays juicy for days. It whispers of old-world bakeries and tastes like pure celebration. Let me show you how to make it.
A Slice of Sweet History: From Italy to Your Table
This cake travels straight from the heart of Italian home baking. While many know tiramisu or panettone, this simple yet genius Italian rum cake is a classic. Its magic lies in the technique. In Italy, soaking simple cakes in syrup is a tradition born from thrift. It transforms humble ingredients into something spectacularly tender. My version blends the rich, buttery crumb of a classic torta with the adult kick of a rum syrup. It’s both traditional and perfectly modern. Every bite tells a story of comfort and care.
Why You’ll Fall in Love With This Moist Cake Recipe
You will adore this recipe because it works! It delivers that restaurant-quality moist texture every single time. The process is straightforward, and the reward is huge. The aroma of baking butter and vanilla is heavenly. Then, drenching the warm cake in sweet, boozy syrup is pure kitchen joy. It’s also incredibly versatile. Serve it plain, with fresh berries, or a dollop of whipped cream. Plus, it gets even better the next day as the flavors meld. It’s the reliable superstar dessert you’ll make again and again.
Perfect Occasions for Your Italian Dessert
This cake is your secret weapon for so many events! It’s elegant enough for a dinner party, sturdy enough to travel for a picnic, and comforting enough for a simple Sunday family treat. Think birthdays, holidays, or as the grand finale for an Italian-themed feast. It’s a fantastic “bring-a-dessert” option because it doesn’t need frosting and slices beautifully. I love making it for my book club – it pairs perfectly with coffee and conversation.
What You’ll Need: Moist Italian Cake Ingredients
Gathering your ingredients is the first step to success. Here’s your shopping list for this incredible Italian rum cake:
For the Cake:
- 5 large eggs, at room temperature
- 3 tablespoons of granulated sugar
- 100 ml (about 7 tablespoons) whole milk
- 8 grams (1 packet) instant yeast OR 100 g of active sourdough starter
- 300 grams (about 2 ½ cups) all-purpose flour
- 100 grams (1 stick) unsalted butter, softened
- 1 generous pinch of fine sea salt
For the Rum Syrup:
- 1 liter (about 4 ¼ cups) water
- 380 grams (about 2 cups) granulated sugar
- 280 ml (about 1 ¼ cups) dark rum (the good stuff!)
Easy Swaps: Substitution Options
Don’t panic if you’re missing something! Baking is about creativity.
- Milk: Any milk you have works—2%, almond, or oat milk.
- Yeast/Sourdough: Use one or the other. Instant yeast is easiest for beginners. If using sourdough, ensure it’s bubbly and active.
- Rum: No rum? Use a mix of 1 cup orange juice and ¼ cup amaretto for a non-alcoholic twist. Or try brandy or a coffee liqueur.
- Butter: A high-quality European-style butter will give you an even richer flavor, but standard butter is just fine.
Step-by-Step: How to Make Moist Italian Cake
Ready to create some magic? Follow these steps for a perfectly soaked, unbelievably moist cake. Let’s get our hands buttery!
Step 1: Creating the Cake Base
First, grab your food processor or a stand mixer fitted with the paddle. Crack in those five beautiful eggs. They’ll give our cake wonderful structure and color. Add the sugar, milk, and your yeast (or sourdough). Blitz everything together until it’s a smooth, pale yellow liquid that’s lightly frothy. You’ll hear the whirl of the machine blending these friends together. This step wakes up the yeast and starts the party. Pro tip: Using room-temperature eggs helps them blend smoothly with the other ingredients, creating a more uniform batter.
Step 2: Adding the Flour
Now, with the motor running on low, slowly spoon in the flour. Watch as the cloud of white powder gets swallowed up by the wet mix. The texture will change dramatically, thickening from a liquid to a very soft, shaggy dough. It might cling to the sides of the bowl. That’s perfect! This flour is building the cake’s body. Don’t rush this step; a slow add prevents those pesky flour lumps. The scent is clean and comforting, like a bakery shelf.
Step 3: Incorporating the Butter and Salt
Here comes the richness! Cut your soft butter into small cubes. With the mixer still on low, drop in one piece of butter at a time. Listen for the soft slap as each piece is incorporated. Wait until one piece disappears into the dough before adding the next. This patience ensures a silky, emulsified dough. Finally, toss in that pinch of salt. Salt is a flavor superhero; it makes the sweet taste sweeter and balances everything out beautifully.
Step 4: The Final Knead and Fold
Lightly butter your hands—this dough is sticky! Turn the soft dough out onto a very lightly floured surface. Gently knead it for just a minute, then fold it over itself a few times. You’re not aiming for bread-like gluten development here. You just want a smooth, cohesive ball. The warmth of your hands will soften the butter further, making the dough shiny and pliable. It should feel tender and alive.
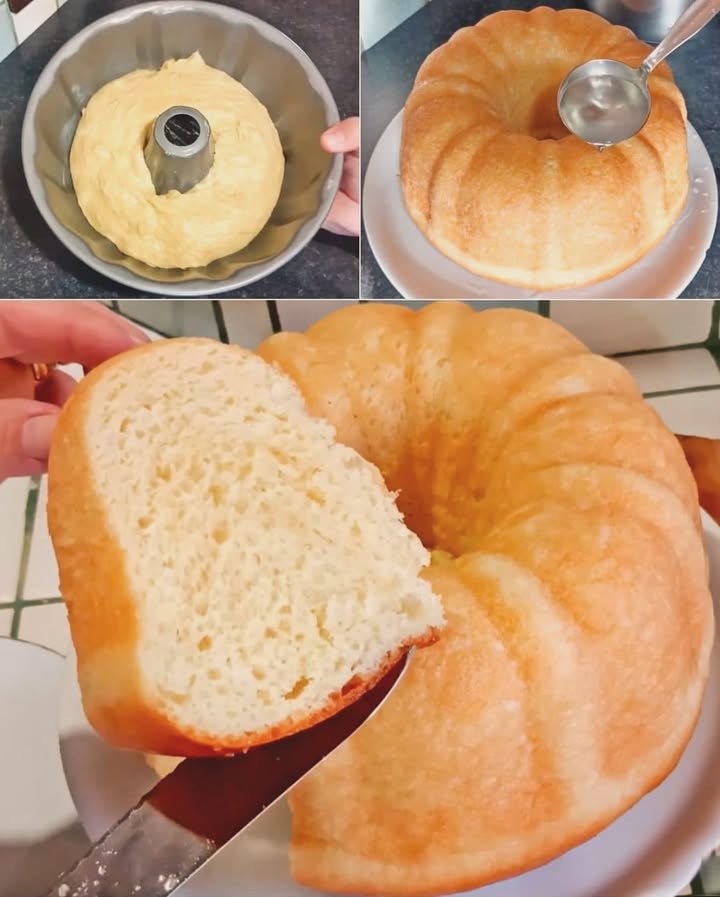
Step 5: First Proof in the Pan
Take a standard loaf pan or round cake pan and give it a good butter coating. Place your dough ball in the center. Now, cover it with a piece of plastic wrap or a clean, damp kitchen towel. This creates a cozy, humid mini-greenhouse. The yeast (or sourdough) will get to work here, feeding on the sugars and creating little bubbles of gas. This is what will make our cake light and airy, not dense.
Step 6: The Patient Wait for Rising
Find a warm, draft-free spot for your pan. On top of the fridge or near the preheating oven are great spots. Now, walk away! Let the dough rest until it doubles in size. This could take 1 to 2 hours, depending on your kitchen’s warmth. Peeking is tempting, but try not to! Trust the process. When it’s puffy and jiggles slightly when you tap the pan, it’s ready.
Step 7: Baking to Golden Perfection
While your dough rises, preheat your oven to 180°C (350°F). A steady, moderate heat is key. Once the dough is doubled, place the pan in the center of the oven. Bake for 20-25 minutes. You’ll know it’s done when the top is a deep, golden brown and the sides pull away from the pan. A skewer inserted in the center should come out clean. Your kitchen will smell incredible—buttery and warm.
Step 8: The Soaking Ritual for Ultimate Moistness
While the cake bakes, make the syrup. Combine water and sugar in a pot. Bring to a simmer, stirring until the sugar dissolves. Let it cool completely, then stir in the rum. Chef’s tip: The cake MUST be completely cool, and the syrup must be at room temp or cooler before soaking. This prevents a soggy mess. Once both are cool, use a skewer to poke holes all over the cake. Slowly pour or brush the rum syrup over the top, letting it soak in. Be generous! This is the soul of your moist Italian cake.
Your Baking Timeline
Plan ahead for this labor of love!
- Prep Time: 25 minutes (plus syrup making)
- Rising Time: 1.5 – 2 hours
- Cook Time: 25 minutes
- Cooling & Soaking Time: 1.5 hours
- Total Time: About 4 hours (mostly hands-off!)
My Secret for an Unforgettable Cake
My number one chef’s secret is in the syrup soak. Use a pastry brush for the first half of the syrup, gently brushing it into the holes. Then, for the second half, use a spoon to pour it slowly, letting gravity do the work. This two-method approach ensures deep, even moisture from top to bottom without making the top mushy.
A Little Extra for the Food Curious
That rum in the syrup? It’s doing more than adding flavor. Alcohol doesn’t freeze solid, so it helps keep the cake’s texture soft and prevents it from drying out, even in the fridge. It’s science and deliciousness in one! Also, while baking, if you want a deeper color on top, you can use a quick broiling technique for the last minute or two, but watch it like a hawk to prevent burning.
Gear You’ll Need
- Food processor or stand mixer
- Loaf pan or 9-inch round cake pan
- Small saucepan for syrup
- Pastry brush or spoon for soaking
- Cooling rack
How to Store Your Masterpiece
This cake is a dream to store because it just gets better. Once the syrup has fully absorbed, wrap the cake tightly in plastic wrap. You can do this right in the pan if it has a lid, or transfer it to an airtight container.
It will keep wonderfully at room temperature for up to 2 days. The rum syrup acts as a preservative and keeps the crumb beautifully moist. Just store it in a cool, dark spot in your kitchen.
For longer storage, you can refrigerate it for up to a week. The cold will firm it up slightly. Let a slice come to room temperature for 30 minutes before serving to restore that perfect, tender texture. You can also freeze the whole cake (wrapped in plastic and then foil) for up to 3 months.
Tips and Advice for Guaranteed Success
- Temperature is Key: Room temperature ingredients (eggs, milk, butter) blend together much more smoothly, creating a better emulsion and a more even rise.
- Test for Doneness: Ovens vary. Start checking at 20 minutes. The cake is done when it’s golden, springs back when lightly touched, and a skewer comes out clean.
- Syrup Savvy: If you’re out of rum or prefer no alcohol, a syrup flavored with citrus zest, vanilla bean, or even a strong espresso is fantastic.
- Slice Neatly: For the cleanest slices, use a sharp, thin-bladed knife. Wipe it clean between cuts.
Beautiful Ways to Present Your Cake
- Dust the top with a snowy layer of powdered sugar just before serving.
- Serve with a bowl of macerated berries—their juices will mingle with the rum syrup on the plate.
- Add a dollop of freshly whipped cream or a scoop of vanilla bean ice cream.
- For a festive look, garnish with a twist of orange zest or a sprig of fresh mint.
6 Delicious Variations to Try
Once you’ve mastered the classic, have fun with these twists on your moist Italian cake!
- Lemon Rosemary: Add the zest of 2 lemons to the cake batter. Infuse the syrup with a few sprigs of fresh rosemary instead of rum for a fragrant, herbal twist.
- Chocolate Chip: Fold 1 cup of mini chocolate chips into the dough after mixing. The chips will create little pockets of melty chocolate throughout.
- Orange Blossom & Almond: Replace the rum in the syrup with orange blossom water. Add ½ teaspoon of almond extract to the cake batter and sprinkle sliced almonds on top before baking.
- Spiced Coffee: Add 1 teaspoon of cinnamon to the flour. Soak the cooled cake with a syrup made from strong brewed coffee and a splash of Kahlua instead of rum water.
- Tropical Coconut: Replace half the milk with coconut milk. Soak the cake with a syrup made with coconut water and a splash of Malibu rum. Top with toasted shredded coconut.
- Berry Swirl: Before the second rise, gently press a handful of fresh raspberries or chopped strawberries into the top of the dough. As it bakes, they’ll create a lovely jammy swirl.
If you love this kind of classic, from-scratch baking project, you’ll find so much inspiration in our full collection of delicious cake recipes.
Common Mistakes to Avoid
Let’s sidestep common pitfalls to ensure your cake is perfect every time.
Mistake 1: Using Cold Ingredients Straight From the Fridge
This is the number one reason doughs don’t come together nicely. Cold butter won’t blend smoothly, and cold eggs can hinder the rise. Always plan to take your eggs, milk, and butter out at least an hour before you start baking. The dough will be smoother, and the yeast will activate more reliably, giving you that perfect, airy texture.
Mistake 2: Rushing the Syrup Soak
Pouring warm syrup on a warm cake is a recipe for a soggy, gummy disaster. The cake needs to be completely cool to absorb the syrup properly without turning to mush. Likewise, your syrup should be at room temperature or cool. Patience here makes the difference between a moist cake and a wet one. Let both components cool completely for at least an hour.
Mistake 3: Not Letting the Dough Double in Size
Baking the cake before it has fully risen will give you a dense, sad brick. The first rise is non-negotiable. Don’t eyeball it; make sure it has truly doubled. If your kitchen is cool, place the pan in an oven with just the light on to create a warm environment. The wait is worth it for that light, tender crumb.
Mistake 4: Underbaking or Overbaking
A shiny, golden-brown top is your best visual clue. An underbaked cake will sink and be gluey inside. An overbaked cake will be dry, even with syrup. Use a toothpick or skewer. It should come out with just a few moist crumbs, not wet batter. Set a timer and trust the test.
Frequently Asked Questions (FAQs)
Can I make this Moist Italian Cake without a food processor?
Absolutely! You can use a stand mixer with a paddle attachment, or even a large bowl and a sturdy wooden spoon. It will require a bit more arm power, especially when incorporating the butter, but it’s totally doable. Just make sure to mix thoroughly after each addition to develop the dough’s structure properly. The key is to achieve a smooth, well-combined batter before the first rise.
What’s the difference between using yeast and sourdough starter?
Instant yeast gives a quicker, more predictable rise and a slightly more neutral flavor. Using an active sourdough starter will add a very subtle tang and complexity to the cake’s flavor. It also often results in a slightly denser, more rustic crumb. If using sourdough, ensure it’s recently fed and bubbly. The rising time with sourdough may be a bit longer as well. Both methods are excellent; it’s just a matter of personal taste and what you have on hand.
My cake is very dense. What did I do wrong?
A dense cake is usually due to one of three things. First, the dough may not have risen enough before baking. Ensure it’s in a warm spot and has truly doubled. Second, over-measuring the flour is a common culprit. Fluff your flour with a spoon before scooping and level it off with a knife. Third, over-kneading after adding the flour can develop too much gluten, leading to a tough, dense texture. Gentle folding is all that’s needed.
Can I make this cake ahead of time?
Yes, and it’s actually better that way! This cake is a fantastic make-ahead dessert. Bake and soak it the day before you need it. Wrap it tightly and let it sit at room temperature overnight. This allows the syrup to distribute evenly and the flavors to deepen beautifully. It simplifies party planning and guarantees a stress-free, impressive dessert.
Is there a non-alcoholic version of the rum syrup?
Of course! For a family-friendly version, you can simply omit the rum. The sugar-water syrup alone will add plenty of moisture and sweetness. To boost flavor, try adding a teaspoon of vanilla extract, the zest of an orange or lemon, or a cinnamon stick to the simmering syrup. Let it cool completely with the flavoring agent in it, then strain before using.
How do I know when the syrup has been fully absorbed?
You’ll see it! When you first pour the syrup, it will pool on the surface and in the holes. As it absorbs, the cake will darken in color slightly, and the surface will look uniformly moist, not wet. If you gently press the top with a finger, it should feel tender and yielding, not like there’s liquid underneath. It usually takes 15-30 minutes for full absorption.
Can I freeze the Moist Italian Cake?
You certainly can. Once the cake is completely cooled and soaked, wrap it tightly in two layers: first plastic wrap, then aluminum foil. Freeze for up to 3 months. To serve, thaw it overnight in the refrigerator, then bring it to room temperature on the counter for a few hours. The texture holds up remarkably well to freezing.
What pan size is best for this recipe?
A standard 9×5-inch loaf pan or a 9-inch round cake pan works perfectly. The goal is to have the dough fill the pan by about half after you place it in, so it has plenty of room to double in size. If your pan is smaller, the dough might overflow; if it’s larger, the cake might be a bit flat. Stick to these standard sizes for the best results.
Why is my syrup not soaking in?
This usually means the cake is still too warm or the syrup is too warm, creating a seal on the surface. Make sure both are completely cooled. Also, don’t be shy with poking holes! Use a skewer or a fork to create plenty of channels for the syrup to travel down into the heart of the cake. Pour slowly and give it time between additions.
Can I add flavors like citrus or spices to the cake batter itself?
Please do! This cake is a wonderful canvas. Adding the zest of a lemon or orange to the wet ingredients is a fantastic idea. You could also add a teaspoon of ground cinnamon, cardamom, or nutmeg to the flour. Just remember that the dominant flavor will come from the soaking syrup, so pair your batter additions with a complementary syrup flavor for a harmonious dessert.
And there you have it! Your guide to baking a truly unforgettable, syrup-drenched, Moist Italian Cake. This isn’t just a recipe; it’s a little piece of baking tradition you can share. It’s the cake that turns an ordinary Tuesday into a celebration and makes guests ask for the recipe every single time. So, preheat that oven, soften that butter, and get ready for the applause. Happy baking!
Equipment
- Robot culinaire ou batteur sur socle
- Moule à cake ou moule rond de 9 pouces
- Petite casserole
- Grille de refroidissement
- Pinceau à pâtisserie ou cuillère
Ingredients
- 5 oeufs
- 3 cuillères à soupe sucre cristallisé
- 100 ml lait entier
- 8 g levure instantanée ou 100 g de levain actif
- 300 g farine tout usage
- 100 g beurre non salé, ramolli
- 1 pincée sel fin
- 1 l eau
- 380 g sucre cristallisé
- 280 ml rhum brun
Instructions
- Dans un robot culinaire ou un batteur sur socle, mélangez les œufs, le sucre, le lait et la levure (ou le levain) jusqu'à obtenir un mélange lisse et mousseux.
- Ajoutez progressivement la farine tout en mélangeant à basse vitesse jusqu'à obtenir une pâte épaisse et souple.
- Incorporez le beurre par petits morceaux, puis ajoutez une pincée de sel jusqu'à ce que le mélange soit homogène.
- Pétrissez légèrement la pâte pendant une minute sur un plan de travail fariné pour former une boule lisse.
- Placez la pâte dans un moule beurré et couvrez-la avec du film plastique ou un torchon humide.
- Faites lever la pâte dans un endroit chaud jusqu'à ce qu'elle double de volume (1 à 2 heures).
- Préchauffez le four à 180°C. Faites cuire la pâte levée pendant 20-25 minutes jusqu'à ce qu'elle soit dorée.
- Pour le sirop, faites chauffer l'eau et le sucre jusqu'à dissolution, laissez refroidir, puis incorporez le rhum.
- Une fois le gâteau refroidi, percez des trous et imbibez-le de sirop, en vous assurant d'une absorption uniforme.
Notes
Nutrition

Hi, I’m Olivia Parker, the founder of BakingSecret.com and a lifelong lover of all things sweet and homemade. I grew up in a small town in Oregon, where the smell of fresh cookies in my family’s kitchen sparked my passion for baking. Over the years, I turned that passion into a mission: to help home bakers feel confident, inspired, and creative.
After studying food science and working in several artisan bakeries across the U.S., I decided to create a space where everyone from beginners to seasoned bakers can find reliable recipes, expert tips, and a warm, welcoming community. BakingSecret.com is my way of sharing the magic of baking with the world. When I’m not testing new recipes, you’ll find me exploring farmers’ markets, collecting vintage cookbooks, or perfecting my sourdough technique.