
A Slice of Sunshine: My Secret to the Most Delicious Fit Carrot Cake
You know those cravings that hit right when you’re trying to be good? That’s exactly why this fit carrot cake 凌 became my kitchen hero. I wanted something sweet, moist, and comforting, but I didn’t want to undo all my healthy efforts. This recipe is like a little victory dance in cake form. It’s packed with real carrot goodness, feels indulgent, and leaves you feeling fantastic. Let’s bake a cake that loves you back!
From Classic Comfort to Healthy Whimsy
The classic carrot cake is a beloved American tradition, often rich with spices, walnuts, and a thick layer of cream cheese frosting. My version is a friendly, modern spin on that comfort food. It swaps in oats for structure, uses a smart amount of natural sugar, and relies on the magic of grated carrots for moisture and sweetness. It’s a cake that bridges generations—it has the soul of grandma’s recipe but the energy of a healthy, active lifestyle.
Why You’ll Absolutely Adore This Fit Carrot Cake
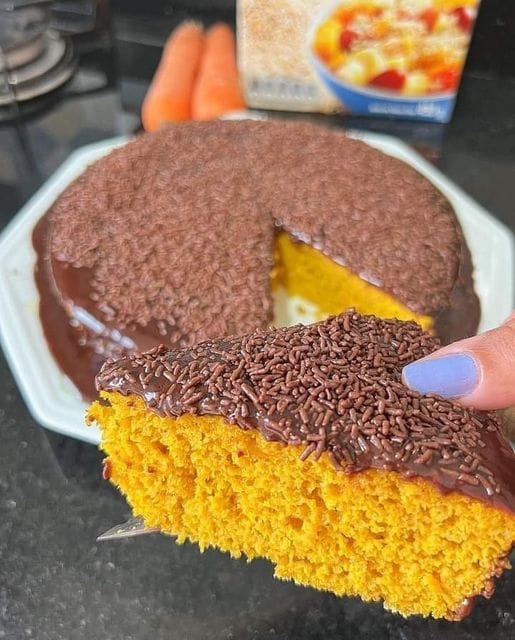
This isn’t just another “healthy” recipe that tastes like cardboard. This fit carrot cake is genuinely delicious. The carrots keep it incredibly moist, the oats give it a satisfying texture, and the simple cocoa topping is like a happy little surprise. It’s also surprisingly simple. You basically blend everything together! No fancy techniques, no mountain of bowls. It’s the kind of recipe you can whip up on a lazy Sunday or a busy Wednesday when you need a wholesome treat.
Perfect Occasions for Your Wholesome Cake
- Post-workout coffee break with friends.
- A light dessert after a family dinner.
- Healthy snack boxes for kids (they love the sweet carrot flavor!).
- Birthday celebration for someone who prefers cleaner eating.
- Simply as a “I deserve something nice today” moment.
Gathering Your Ingredients for Fit Carrot Cake
Here’s what you need to create this sunny, wholesome delight:
- For the Cake:
- 2 gratings of raw carrots (about 2 medium carrots)
- 5 large eggs
- 4 tablespoons of coconut oil (or other neutral oil)
- 1/2 cup demerara sugar (or your preferred sugar)
- 2 cups of oats (rolled oats work perfectly)
- 1 spoon (tablespoon) of baking powder
- For the Cocoa Coverage:
- 2 cups of milk
- 1 spoon (tablespoon) of butter
- 1 spoon (tablespoon) of cocoa powder
- 3 tablespoons of demerara sugar (or your preferred sugar)
Smart Substitution Options
Don’t stress if you’re missing something! Baking is adaptable.
- Oil: Coconut oil gives a faintly sweet aroma. You can use melted butter, avocado oil, or even a light olive oil.
- Sugar: Demerara has a lovely molasses hint. Brown sugar, coconut sugar, or even maple syrup work well.
- Oats: If you only have quick oats, use them! The texture will be a bit finer but still great.
- Milk for Topping: Any milk you have—whole, skim, almond, or oat milk—will create a delicious coverage.
How to Make Your Perfect Fit Carrot Cake
Step 1: Create Your Carrot Base
Start by grating your carrots. I love the bright orange shreds! Pop them into your blender along with the eggs, oil, and sugar. Let it blend for a good minute or two. You want it to become a smooth, almost juice-like liquid. This ensures the carrots are fully incorporated and will distribute their moisture and sweetness evenly throughout the cake. The color becomes a beautiful sunny orange hue.
Step 2: Bring in the Body
Now, add the oats little by little while the blender is running on a low setting. I add about half a cup at a time. This prevents clumping and helps the batter become smooth and homogeneous. Watch as it transforms from a liquid to a thick, creamy, and lovely batter. The aroma starts to change here, smelling wholesome and slightly sweet.
Step 3: The Final Lift
Lastly, add the baking powder and blend for just 10-15 seconds to mix it in thoroughly. Pro tip: Don’t over-blend after adding the yeast. We just want it evenly mixed to give our cake that perfect rise.
Step 4: Bake to Golden Perfection
Pour your beautiful batter into a greased pan (I use a classic round cake pan). Place it in a preheated oven at 210°C (about 410°F) for 30 to 35 minutes. The high initial heat helps the cake rise quickly. You’ll know it’s done when the top is golden and a toothpick inserted comes out clean. The smell filling your kitchen is absolutely divine!
Step 5: Make the Simple Cocoa Coverage
While the cake cools a bit, make the topping. In a small pan, combine the milk, butter, cocoa powder, and sugar. Bring it to a gentle boil, stirring often. Let it simmer until it thickens nicely and reaches a coating consistency—like a thin pudding. It will be glossy and rich. Pour it over your cooled cake for a decadent yet simple finish.
Chef’s tip: For an extra smooth coverage, you can sift your cocoa powder before adding it to the milk to avoid any tiny lumps.
Timing Your Fit Carrot Cake Adventure
- Prep Time: 10 minutes
- Cooking/Baking Time: 35 minutes
- Topping Prep Time: 10 minutes
- Total Time: About 55 minutes
- Resting Time: Let cake cool for 20 minutes before topping.
A Little Chef’s Secret
The secret to the super moist texture? The raw, grated carrots. They release their natural juices and sugars during baking, creating pockets of tenderness. Don’t cook them beforehand! This keeps the cake light and fresh. It’s a technique similar to how some chefs use blanching to preserve texture and nutrients in vegetables, but here, raw is perfect for moisture.
A Fun Fact About Carrots in Cake
Using carrots in sweet cakes dates back centuries! In times when sugar was scarce or expensive, cooks used sweet vegetables like carrots and parsnips to add natural sweetness and bulk to their desserts. So, our fit carrot cake is actually connecting us to a very clever, old baking tradition.
What You’ll Need in Your Kitchen
- A good blender or food processor
- A grater
- A round cake pan (about 9-inch)
- A small saucepan for the coverage
- Measuring cups and spoons
- A spatula
Storing Your Wholesome Treat
Once cooled and topped, your fit carrot cake can be covered and stored at room temperature for the day. It’s best enjoyed fresh!
For longer storage, place it in the refrigerator. The coverage will firm up a bit, but the cake will stay moist for up to 3 days. Just cover it well with plastic wrap or keep it in a cake container.
You can also freeze the cake (without the topping for best results). Wrap individual slices or the whole cake tightly in plastic wrap and freeze for up to a month. Thaw at room temperature and make fresh coverage when ready to serve.
Tips and Advice for Cake Success
- Ensure your baking powder is fresh for the best rise.
- Grease your pan well, or use parchment paper for easy release.
- Let the cake cool completely before adding the warm coverage if you want a thicker, more defined layer.
- For a nutty twist, add a handful of chopped walnuts or pecans to the batter before baking.
Presentation Tips to Make it Special
- Serve on a bright, colorful plate to contrast with the cake’s golden color.
- Top with a few extra grated carrot strands for a fun, rustic look.
- Add a sprinkle of cinnamon or extra cocoa powder over the coverage.
- Slice into small squares for a party or keep whole for a family-style dessert.
6 More Healthy Baking Adventures to Try
If you loved this fit carrot cake, you might enjoy exploring other wholesome treats. For more inspiration, check out my other healthy baking recipes where flavor and nutrition go hand-in-hand.
- Protein-Packed Banana Bread: Use ripe bananas, oats, and a scoop of your favorite protein powder for a powerful snack.
- Zucchini Chocolate Muffins: Sneak in grated zucchini for moisture in a chocolatey, muffin form. Perfect for kids!
- Apple Cinnamon Oat Bars: Layer diced apples with your oat mixture for a bar that tastes like fall.
- Pumpkin Spice Loaf (Light): Use pure pumpkin puree and reduce sugar for a seasonal treat that’s not too heavy.
- Chia Seed & Berry Cake: Add chia seeds to the batter and fold in fresh berries for bursts of flavor and extra fiber.
- Dark Chocolate & Avocado Cake: Replace some oil with avocado puree for a creamy, rich chocolate cake with healthy fats.
I often pair this cake with a cup of my homemade spiced chai latte for a cozy afternoon. It’s also a great follow-up to a light lunch like my rainbow quinoa salad. For another sweet but healthy option, try my no-bake energy bites, and if you’re into fruity desserts, this cake pairs beautifully with my simple berry compote as an alternative topping.
Common Mistakes to Avoid with Fit Carrot Cake
Mistake 1: Not Blending the Carrot Mixture Enough
If you don’t blend the carrots, eggs, oil, and sugar into a smooth, liquid-like base, you might end up with stringy carrot bits in your finished cake. This affects the texture. Blend for a full minute or two until it’s completely smooth. This ensures even moisture distribution and a uniform cake.
Mistake 2: Adding All the Oats at Once
Dumping all two cups of oats into the blender at once can cause clumping. The blender might struggle, and you could get a lumpy batter instead of a smooth one. Add the oats little by little, letting each addition incorporate fully. This guarantees a homogeneous dough that bakes evenly.
Mistake 3: Overbaking the Cake
This cake is moist because of the carrots. Overbaking can dry it out. At 210°C, 30-35 minutes is usually perfect. Start checking at 30 minutes with a toothpick. If it comes out clean, it’s done. If you wait too long, the cake loses its lovely moistness.
Mistake 4: Making the Coverage Too Thin or Too Thick
The coverage needs to boil until it thickens. If you stop too early, it will be thin and runny. If you cook it too long, it can become too thick like a paste. Aim for a consistency that coats the back of a spoon nicely. Stir constantly near the end to control the thickening.
Mistake 5: Using Old Baking Powder
Baking powder loses its power over time. If yours is old, your cake might not rise properly, resulting in a dense loaf. Always test your baking powder or make sure it’s fresh. Your cake should have a nice, gentle lift, giving it a light texture.
Your Fit Carrot Cake Questions Answered
Can I make this fit carrot cake gluten-free?
Absolutely! This recipe is naturally gluten-free if you use certified gluten-free oats. Oats are often processed in facilities that also handle wheat, so to be strictly gluten-free, check the label. The rest of the ingredients are naturally gluten-free. It’s a fantastic option for those with sensitivities.
What can I use if I don’t have a blender?
You can use a food processor. If you don’t have either, you can grate the carrots very finely and whisk the eggs, oil, and sugar together vigorously in a bowl. Then, stir in the oats and baking powder. The texture will be a bit more rustic, but it will still be delicious. Just ensure the carrots are finely grated.
Can I make this cake without the coverage?
Yes, you can! The cake is sweet and satisfying on its own. You could also top it with a light dusting of powdered sugar, a dollop of Greek yogurt, or a sprinkle of cinnamon. The coverage is a nice indulgence, but the cake stands alone beautifully.
Why is the oven temperature so high (210°C)?
The high initial heat helps the cake rise quickly and set its structure, creating a nice golden top. It’s like giving it a boost at the start. Then, it cooks through in the relatively short time. Make sure your oven is properly preheated to get this effect.
Can I add spices like cinnamon or nutmeg?
Please do! Adding a teaspoon of cinnamon or a pinch of nutmeg to the batter would be wonderful. It enhances the carrot flavor and gives it that classic spice cake warmth. Just add them when you’re blending the initial carrot mixture.
Is demerara sugar much better than regular sugar?
Demerara sugar has a slight molasses flavor and tiny bit more trace minerals than fully refined white sugar. It adds a nice depth. But the recipe works with any sugar you have. The difference in taste is subtle, so use what’s in your pantry.
How do I know when the coverage is ready?
The coverage will thicken as it boils. Dip a spoon in it and run your finger across the back. If the line holds and the coverage doesn’t immediately run back, it’s ready. It should be like a thin gravy or pudding. It will also coat the cake nicely without being runny.
Can I use steel-cut oats instead of rolled oats?
I wouldn’t recommend steel-cut oats for this recipe. They are much harder and won’t blend into a smooth batter. Rolled oats (or old-fashioned oats) soften and break down perfectly in the blender. Quick oats are a fine substitute if you have them.
My cake didn’t rise much. What happened?
This could be due to old baking powder, not preheating the oven fully, or opening the oven door too early during baking. Check your baking powder’s freshness, ensure the oven is hot before putting the cake in, and try not to open the door for the first 25 minutes.
Can I add raisins or other dried fruit?
Yes, you can add a handful of raisins, chopped dates, or even dried cranberries! Fold them into the batter after blending, just before pouring into the pan. They add little bursts of sweetness and texture. Just be mindful they add extra sugar.
Go Bake Your Sunshine!
This fit carrot cake is more than a recipe. It’s a little promise that eating well can still be full of joy and flavor. It’s simple, honest, and made with ingredients you can feel good about. I hope it brings a slice of sunshine to your table and becomes a regular in your kitchen, just like it is in mine. Happy baking, and enjoy every moist, delicious bite!
Equipment
- Blender
- Râpe
- Moule rond environ 9 pouces
- Casserole
- Tasses à mesurer
Ingredients
- 2 moyennes carottes crues
- 5 grandes œufs
- 4 cuillères à soupe huile de coco ou autre huile neutre
- 1/2 tasse sucre demerara ou votre sucre préféré
- 2 tasses flocons d'avoine
- 1 cuillère à soupe poudre à lever
- 2 tasses lait
- 1 cuillère à soupe beurre
- 1 cuillère à soupe cacao en poudre
- 3 cuillères à soupe sucre demerara pour la garniture
Instructions
- Râpez les carottes et mélangez-les avec les œufs, l'huile et le sucre jusqu'à obtenir un mélange lisse.
- Ajoutez progressivement les flocons d'avoine en laissant le mélangeur tourner à basse vitesse pour éviter les grumeaux.
- Ajoutez la poudre à lever et mélangez brièvement jusqu'à ce que tout soit combiné.
- Versez la pâte dans un moule à gâteau rond graissé et faites cuire dans un four préchauffé à 210°C (410°F) pendant 30-35 minutes ou jusqu'à ce qu'un toothpick en ressorte propre.
- Pour la garniture, combinez le lait, le beurre, le cacao en poudre et le sucre dans une casserole, portez à ébullition douce, puis laissez mijoter jusqu'à épaississement.
- Versez la garniture au cacao sur le gâteau refroidi.
Notes
Nutrition

Hi, I’m Olivia Parker, the founder of BakingSecret.com and a lifelong lover of all things sweet and homemade. I grew up in a small town in Oregon, where the smell of fresh cookies in my family’s kitchen sparked my passion for baking. Over the years, I turned that passion into a mission: to help home bakers feel confident, inspired, and creative.
After studying food science and working in several artisan bakeries across the U.S., I decided to create a space where everyone from beginners to seasoned bakers can find reliable recipes, expert tips, and a warm, welcoming community. BakingSecret.com is my way of sharing the magic of baking with the world. When I’m not testing new recipes, you’ll find me exploring farmers’ markets, collecting vintage cookbooks, or perfecting my sourdough technique.