
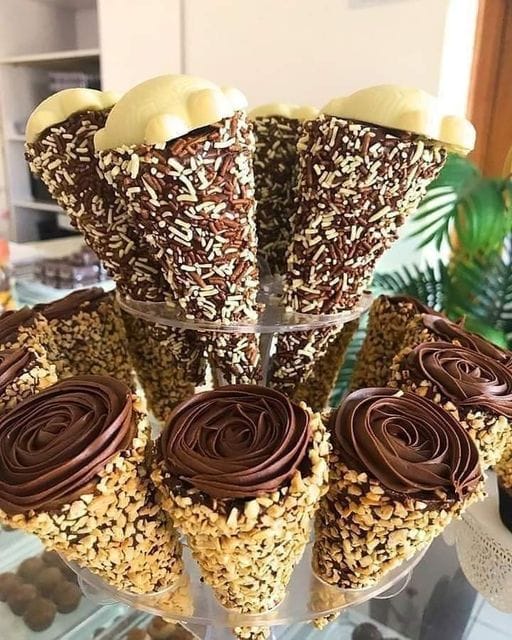
A Sweet Treat That’s Perfect for Any Occasion: Chocolate Truffle Cones
Remember the joy of opening an ice cream cone and savoring that first sweet bite? Well, I’ve got a delicious twist on that classic treat: Chocolate Truffle Cones. These cones are not just any dessert; they’re a delightful fusion of crispy cookie cones, rich chocolate, and a variety of fillings that will make your taste buds dance with delight. Whether you’re hosting a party or just craving something indulgent, this recipe is sure to be a hit!
The Story Behind the Recipe
Chocolate Truffle Cones have a unique history that blends tradition and innovation. Originating from the love of both ice cream and truffles, this dessert combines the best of both worlds. Traditionally, truffles are small, rich, and filled with a luscious center, while ice cream cones are a summertime favorite. By merging these two, we create a treat that’s perfect year-round. In my family, we’ve been making these cones for special occasions, and they always bring a smile to everyone’s face.
Why You’ll Adore This Recipe
This recipe is all about simplicity and flavor. The combination of milk and semi-sweet chocolate creates a balanced, rich, and creamy texture that coats the crispy cookie cones perfectly. The filling, whether it’s brigadeiro, beijinho, or dulce de leche, adds a burst of sweetness and variety. Best of all, this dessert is easy to make, requiring minimal kitchen skills and time. Plus, it’s highly customizable, so you can get creative with your favorite fillings and toppings.
Perfect Occasions to Prepare This Recipe
Chocolate Truffle Cones are incredibly versatile and perfect for various events. They make a fantastic addition to birthday parties, holiday gatherings, or even as a special treat for a cozy night in. Kids and adults alike will love the playful presentation and the rich, decadent flavors. Imagine serving these at your next family gathering or as a surprise for your loved ones—pure joy on a plate!
Ingredients You’ll Need
- 15 sweet cookie ice cream cones
- 500 g of milk chocolate
- 200 g semi-sweet chocolate
- Filling to taste, such as brigadeiro, beijinho, dulce de leche, etc.
- M&Ms type confectionery for decoration
Substitution Options
- If you don’t have cookie ice cream cones, you can use waffle bowls or even mini tart shells.
- For the chocolate, you can use dark chocolate or white chocolate based on your preference.
- Feel free to experiment with different fillings like peanut butter, Nutella, or even a fruit compote.
- Use any colorful candies or sprinkles for decoration if M&Ms are not available.
Detailed Preparation Steps
Step 1: Prepare Your Ingredients
Start by gathering all your ingredients. Make sure your chocolate is chopped into small, manageable pieces. Choose your favorite fillings and have them ready to go. The beauty of this recipe is in its flexibility, so feel free to mix and match to create your perfect cone.
Step 2: Melt the Chocolate
Place the chopped milk and semi-sweet chocolate in a heatproof bowl. Set it over a pot of simmering water (make sure the bottom of the bowl doesn’t touch the water). Stir gently until the chocolate is completely melted and smooth. The aroma of melting chocolate will fill your kitchen, making it feel extra cozy and inviting.
Step 3: Coat the Cones
Holding each cone by the tip, dip it into the melted chocolate, making sure to coat the inside and outside generously. Let the excess chocolate drip back into the bowl. Place the coated cones on a sheet of parchment paper to set. The chocolate will start to harden and give the cones a glossy, professional look.
Step 4: Add the Filling
Once the chocolate has set, it’s time to add the filling. Spoon your chosen filling into the cones, filling them about three-quarters of the way up. The filling should be thick enough to stay in place but still soft enough to ooze out when you take a bite. The combination of the creamy filling and the crunchy cone is simply divine.
Step 5: Decorate and Serve
Sprinkle the tops of the cones with M&Ms or your choice of confectionery for a fun, festive touch. You can also add a drizzle of extra chocolate or a dollop of whipped cream if you like. Once decorated, let the cones sit for a few minutes to set. Now, they’re ready to serve and enjoy!
Chef’s Tip: Enhance the Flavor
For an extra burst of flavor, try adding a pinch of sea salt to the chocolate before coating the cones. The salt will enhance the richness of the chocolate, making each bite even more delectable.
Timing Breakdown
Prep Time: 15 minutes
Cooking Time: 10 minutes (for melting the chocolate)
Resting Time: 30 minutes (for the chocolate to set)
Total Time: 55 minutes
Chef’s Secret: A Pro Tip to Elevate Your Dessert
To make your Chocolate Truffle Cones even more irresistible, try adding a small amount of espresso powder to the chocolate. The subtle coffee flavor will complement the chocolate beautifully, giving your dessert a sophisticated, gourmet touch.
Extra Info: A Fun Fact About Chocolate
Did you know that chocolate contains natural compounds that can boost your mood? It’s true! The little bits of bliss in each bite of your Chocolate Truffle Cones aren’t just a treat for your taste buds—they’re a treat for your soul too.
Necessary Equipment
- Heatproof bowl
- Pot for simmering water
- Spatula or spoon for stirring
- Parchment paper
- Baking tray
Storage Tips
Store your Chocolate Truffle Cones in an airtight container at room temperature for up to a week. If you live in a warmer climate, you might want to store them in the refrigerator to keep the chocolate from melting. Just make sure to let them come to room temperature before serving to avoid any brittleness. For long-term storage, you can freeze the cones for up to a month. Just wrap them individually in plastic wrap and place them in a freezer bag to maintain their freshness.
Tips and Advice
- Make sure the chocolate is well-melted and smooth to avoid any lumps in the coating.
- Use a piping bag or a Ziploc bag with a corner cut off to fill the cones neatly and efficiently.
- Experiment with different toppings and decorations to make each batch unique and exciting.
Presentation Tips
- Arrange the cones on a platter with a variety of colors and textures from the fillings and toppings.
- Create a themed display by using different types of cones, such as waffle bowls or mini tart shells.
- Add a personal touch by handwriting a small tag for each cone, indicating the filling used.
Healthier Alternative Recipes
Here are six possible variations for a healthier twist on the classic Chocolate Truffle Cones:
- Dark Chocolate and Raspberry Cones: Use dark chocolate and a raspberry puree filling for a rich, antioxidant-packed treat.
- Coconut and White Chocolate Cones: Replace the milk and semi-sweet chocolate with white chocolate and coconut shreds for a tropical twist.
- Nut Butter and Banana Cones: Fill the cones with a homemade nut butter and banana mixture for a protein-rich and naturally sweet option.
- Almond Milk Chocolate and Avocado Cones: Use almond milk chocolate and a creamy avocado filling for a dairy-free, nutrient-dense dessert.
- Matcha and White Bean Cones: Mix matcha powder with a white bean paste for a unique, earthy, and healthy filling.
- Oat Milk and Caramel Cones: Use oat milk chocolate and a homemade date caramel for a vegan and gluten-free alternative.
Common Mistakes to Avoid
Mistake 1: Overcooking the Chocolate
One common mistake is overcooking the chocolate, which can make it grainy and difficult to work with. To avoid this, make sure the water in the pot is just simmering, and stir the chocolate continuously until it’s fully melted. The key is to be patient and gentle with the heat.
Mistake 2: Not Allowing the Chocolate to Set Properly
Another common issue is not allowing enough time for the chocolate to set. If the chocolate isn’t fully set, it can become messy and hard to handle. Make sure to let the cones rest for at least 30 minutes at room temperature, or place them in the refrigerator for 10-15 minutes to speed up the process.
Mistake 3: Using Too Much Filling
Overfilling the cones can cause them to overflow and become a mess. Fill the cones about three-quarters of the way up, leaving enough room for the topping. This will ensure a neat and tidy presentation, and the perfect balance of chocolate, filling, and cone.
Mistake 4: Using Low-Quality Ingredients
The quality of your ingredients can make a big difference in the final product. Use good-quality chocolate and fresh, flavorful fillings for the best results. Cheap or low-quality ingredients can result in a less satisfying and less delicious treat.
Mistake 5: Not Storing the Cones Properly
Proper storage is crucial for keeping your Chocolate Truffle Cones fresh and tasty. Store them in an airtight container at room temperature or in the refrigerator if needed. Exposure to air can cause the chocolate to develop a white, chalky appearance, known as “chocolate bloom,” which is caused by foodborne bacteria. Proper storage will help prevent this and keep your cones looking and tasting great.
FAQ
Yes, you can use other types of cones, such as waffle bowls or mini tart shells. Just make sure they are sturdy enough to hold the chocolate and filling without getting soggy.
What if I don’t have milk chocolate and semi-sweet chocolate?
You can use dark chocolate or even white chocolate if you prefer. Just make sure to use high-quality chocolate for the best results.
Can I use different fillings?
Absolutely! Feel free to get creative with the fillings. Peanut butter, Nutella, fruit compote, and even jams can be great alternatives. The possibilities are endless!
How do I melt the chocolate without a double boiler?
If you don’t have a double boiler, you can use a heatproof bowl set over a pot of simmering water. Just make sure the bottom of the bowl doesn’t touch the water. Alternatively, you can microwave the chocolate in short bursts, stirring between each, until it’s fully melted.
Can I make these cones ahead of time?
Yes, you can make the cones ahead of time. Store them in an airtight container at room temperature for up to a week. If you need to store them longer, you can freeze them for up to a month, just make sure to wrap them well to prevent freezer burn.
Are there any tips for decorating the cones?
Get creative with your decorations! Use M&Ms, sprinkles, or even a drizzle of additional chocolate or caramel. You can also add a dollop of whipped cream or a sprinkle of sea salt for an extra touch of flavor.
How do I prevent the chocolate from sticking to the bowl?
Before you start, you can lightly grease the bowl with a neutral oil or use a non-stick silicone mat. This will help the chocolate slide right off, making cleanup easier.
Can I use a piping bag to fill the cones?
Yes, using a piping bag or a Ziploc bag with a corner cut off can make filling the cones much easier and neater. This method allows you to control the amount of filling and distribute it evenly.
Are there any healthy versions of this recipe?
Absolutely! You can use dark chocolate, which is higher in antioxidants, and fill the cones with healthier options like nut butter, avocado, or even a fruit puree. Check out some of the healthier alternatives mentioned in the recipe section, and get creative with your fillings and toppings.
What if I don’t have M&Ms for decoration?
If you don’t have M&Ms, you can use any colorful candies, sprinkles, or even crushed nuts for decoration. The goal is to add a fun and festive touch, so feel free to use what you have on hand.
Final Thoughts
There you have it, a delightful and delicious way to enjoy a classic treat with a modern twist. Whether you’re making these Chocolate Truffle Cones for a special occasion or just because, they are sure to be a hit. Don’t forget to explore more delectable desserts in our desserts section for more inspiration. Happy baking and enjoy!
Equipment
- Heatproof bowl
- Pot for simmering water
- Spatula or spoon for stirring
- Parchment paper
- Baking tray
Ingredients
- 15 cones sweet cookie ice cream cones
- 500 g milk chocolate
- 200 g semi-sweet chocolate
- to taste filling, such as brigadeiro, beijinho, dulce de leche, etc.
- to taste M&Ms type confectionery for decoration
Instructions
- Gather all the ingredients and chop the chocolate into small pieces.
- Place the chopped milk and semi-sweet chocolate in a heatproof bowl over a pot of simmering water and stir until melted and smooth.
- Dip each cone into the melted chocolate, coating the inside and outside, then place them on parchment paper to set.
- Once the chocolate has set, add your chosen filling into the cones about three-quarters full.
- Decorate the tops of the cones with M&Ms and let them set for a few minutes before serving.
Notes
Nutrition

Hi, I’m Olivia Parker, the founder of BakingSecret.com and a lifelong lover of all things sweet and homemade. I grew up in a small town in Oregon, where the smell of fresh cookies in my family’s kitchen sparked my passion for baking. Over the years, I turned that passion into a mission: to help home bakers feel confident, inspired, and creative.
After studying food science and working in several artisan bakeries across the U.S., I decided to create a space where everyone from beginners to seasoned bakers can find reliable recipes, expert tips, and a warm, welcoming community. BakingSecret.com is my way of sharing the magic of baking with the world. When I’m not testing new recipes, you’ll find me exploring farmers’ markets, collecting vintage cookbooks, or perfecting my sourdough technique.