
A Divine No-Bake Pineapple Cheesecake Dessert
Imagine a creamy, dreamy dessert that’s as easy to make as it is delightful to eat. That’s exactly what this No-Bake Pineapple Heaven Cheesecake Dessert is all about. This recipe has been a hit at my family gatherings and summer parties, and I’m excited to share it with you.
A Brief History of the No-Bake Pineapple Cheesecake Delight
My grandma used to tell me stories about how no-bake desserts were a clever way to enjoy something sweet without turning on the oven—a blessing in the sweltering summer months. This No-Bake Pineapple Cheesecake Delight is a modern twist on the classic cheesecake, combining the tropical flavors of pineapple with a smooth, creamy texture. It’s a perfect blend of tradition and innovation.
Why You’ll Love This Recipe
This Pineapple Cheesecake Delight is not just a treat for your taste buds but also a joy to prepare. The combination of tangy pineapple and rich cream cheese is simply divine. Plus, there’s no baking involved, making it a stress-free and mess-free option. Perfect for busy days or when you just don’t want to heat up the kitchen.
Perfect Occasions to Prepare This Recipe
This dessert is a star at any event, from backyard barbecues to elegant dinner parties. It’s especially popular during the summer, but it’s versatile enough to be enjoyed year-round. Serve it at a potluck, a birthday celebration, or even a casual weekend get-together. Your guests will be asking for the recipe!
Ingredients
- 2 cups graham cracker crumbs
- 1/2 cup melted butter
- 2 cups cream cheese, softened
- 1 cup powdered sugar
- 2 cups heavy whipping cream
- 1 can (20 oz) crushed pineapple, drained
- 1 can (20 oz) pineapple rings, drained
- Fresh raspberries for garnish
- Whipped cream for topping
Substitution Options
- Graham cracker crumbs: You can use digestive biscuit crumbs or even cookie crumbs if you prefer.
- Cream cheese: Substitute with mascarpone for a richer flavor.
- Heavy whipping cream: Use whipped topping if you’re short on time or don’t have an electric mixer.
- Pineapple: Fresh, chopped pineapple works just as well, or you can try other fruits like mango or kiwi.
Preparation Section
Step 1: Create the Crust
In a medium bowl, mix together the graham cracker crumbs and melted butter until they are well combined. The mixture should resemble wet sand. Press this mixture into the bottom of a 9×13-inch baking dish, making sure it’s evenly distributed and compact. This will form the base of your crust.
Step 2: Mix the Cream Cheese Filling
In a large bowl, beat the cream cheese and powdered sugar until the mixture is smooth and creamy. This step is crucial to achieve that silky texture. The cream cheese should be at room temperature for the best results. As you mix, you’ll notice the mixture becoming light and fluffy—perfect for a heavenly dessert.
Step 3: Whip the Heavy Cream
In a separate bowl, whip the heavy cream until stiff peaks form. This takes a few minutes, so be patient. Once you have those beautiful, firm peaks, gently fold the whipped cream into the cream cheese mixture. This step adds airiness and richness to your filling, making it perfectly light and creamy.
Step 4: Layer the Filling and Pineapple
Spoon half of the cream cheese mixture over the prepared crust, spreading it out evenly. Next, sprinkle the drained crushed pineapple over the cream cheese layer. This adds a burst of tropical flavor. Spread the remaining cream cheese mixture on top of the pineapple, creating a smooth, even surface.
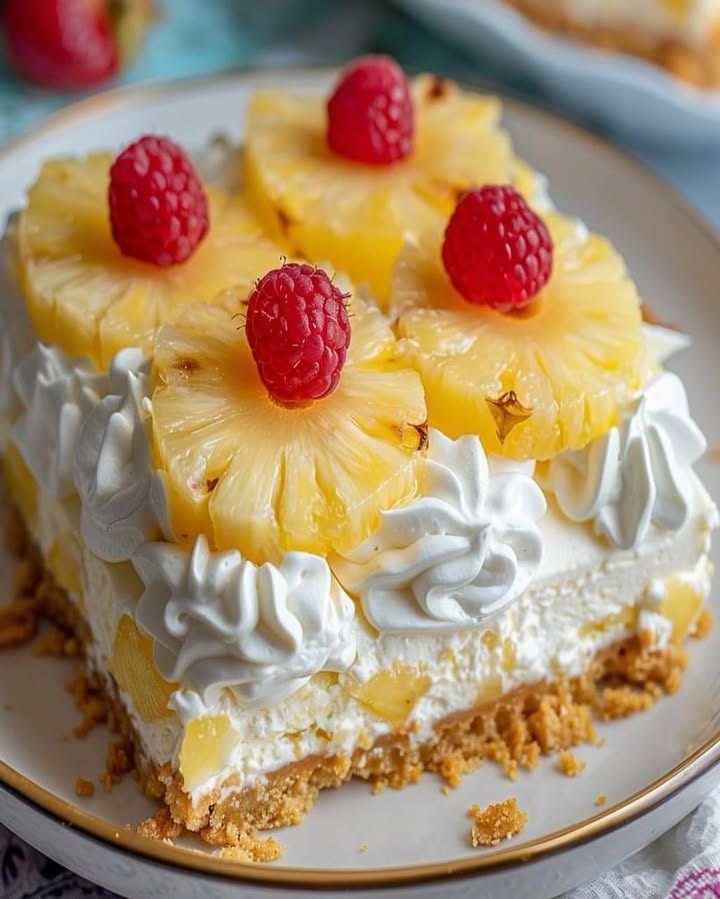
Step 5: Garnish with Pineapple Rings and Raspberries
Place the pineapple rings on top of the cream cheese layer, arranging them in a decorative pattern. Garnish with fresh raspberries for a pop of color and a lovely, fresh touch. Add dollops of whipped cream around the pineapple rings for extra zing. The visual appeal of this dessert is as good as its taste.
Step 6: Chill and Serve
Refrigerate the No-Bake Pineapple Heaven Cheesecake Dessert for at least 4 hours, or until it’s set. This chilling time allows the flavors to meld and the dessert to firm up. When ready, serve chilled and watch as your guests’ faces light up with delight.
Chef’s Tip
To enhance the flavor, you can add a teaspoon of vanilla extract to the cream cheese mixture. This subtle addition brings out the sweetness and adds a touch of warmth.
Timing
Prep Time: 20 minutes
Cook Time: None
Total Time: 4 hours 20 minutes (including chilling time)
Storage
This No-Bake Pineapple Heaven Cheesecake Dessert is best stored in the refrigerator. Make sure to cover it tightly with plastic wrap or store it in an airtight container. It will stay fresh for up to 5 days. If you need to store it longer, you can freeze it for up to 2 months. Just make sure to let it thaw in the refrigerator before serving.
For optimal freshness, avoid storing it in the freezer for too long, as the texture may change. When you’re ready to serve, let it come to room temperature for about 15-20 minutes to bring out the full flavor and creamy texture.
Tips and Advice
- Make sure all ingredients, especially the cream cheese, are at room temperature before starting. This ensures a smooth and creamy texture.
- Use a spatula to spread the layers evenly, which helps in achieving a professional-looking finish.
- If you’re short on time, you can use pre-made graham cracker crusts or whipped topping from the store.
Presentation Tips
- Add a sprinkle of cinnamon or a dash of lemon zest on top for an extra burst of flavor.
- Create a border of fresh fruit, like strawberries and blueberries, around the edges for a colorful and festive look.
- Use a piping bag to add decorative swirls of whipped cream for a more elegant presentation.
Healthier Alternative Recipes
For those who are looking for a lighter version, here are some healthier alternatives to the No-Bake Pineapple Heaven Cheesecake Delight:
- Low-Fat Version: Use low-fat cream cheese and replace the heavy whipping cream with Greek yogurt. This cuts down on the fat content without sacrificing the creamy texture.
- Vegan Version: Substitute the cream cheese with vegan cream cheese and use coconut cream instead of heavy whipping cream. For the crust, use vegan cookies or nuts.
- Reduced Sugar Version: Use a natural sweetener like stevia or honey instead of powdered sugar. This reduces the sugar content while still maintaining the sweet taste.
- Gluten-Free Version: Use gluten-free graham cracker crumbs or almond flour for the crust. This makes it suitable for those with gluten sensitivities.
- Keto Version: Replace the graham cracker crumbs with a mixture of almond flour and butter. Use a keto-friendly sweetener and full-fat cream cheese to keep it low-carb.
- Fruit-Based Version: Add a variety of fresh fruits like strawberries, blueberries, and kiwi to the layers. This increases the nutritional value and adds a burst of freshness.
For more delicious and creative dessert ideas, check out these recipes:
– Chocolate Truffle Cones
– Creamy Chocolate Pudding
– Three Chocolate Mousse
– Strawberry Banana Popsicles
Common Mistakes to Avoid
Mistake 1: Using Cold Ingredients
One of the most common mistakes is using cold ingredients. Cold cream cheese and whipping cream can result in a lumpy, unappealing texture. Make sure to take the cream cheese out of the fridge at least 30 minutes before you start. This allows it to soften and mix smoothly.
Mistake 2: Overmixing the Whipped Cream
Overmixing the heavy cream can turn it into a grainy, almost butter-like consistency. To avoid this, stop mixing once you see stiff peaks forming. This will give you a light and airy whipped cream that folds perfectly into the cream cheese mixture.
Mistake 3: Not Draining the Pineapple
Not draining the crushed pineapple and pineapple rings properly can make your dessert soggy. Make sure to drain the pineapple thoroughly, preferably by pressing it through a fine-mesh sieve. This removes excess liquid and keeps the dessert from becoming watery.
Mistake 4: Not Chilling Long Enough
Not letting the dessert chill long enough can result in a runny, unset filling. The minimum chilling time is 4 hours, but I recommend letting it chill overnight for the best results. This allows the flavors to meld and the dessert to set properly.
Mistake 5: Overloading with Toppings
While toppings can make the dessert visually appealing, adding too many can overwhelm the flavors. Keep it simple with a few strategically placed pineapple rings and fresh raspberries. A little goes a long way in enhancing both the taste and the appearance.
FAQ
Can I use fresh pineapple instead of canned?
Absolutely! Fresh, chopped pineapple can be a great alternative. Just make sure to drain it well to remove excess liquid. This will help prevent the dessert from becoming too watery. Fresh pineapple also adds a vibrant, natural flavor that complements the cream cheese perfectly.
How do I know if the whipped cream is at the right consistency?
The whipped cream should form stiff peaks, meaning it holds its shape when you lift the whisk. If the peaks flop over, it’s not stiff enough. If it starts to look grainy, you’ve gone too far. Stop mixing once you see the stiff peaks forming to ensure a light and airy texture.
Can I use a different type of crust?
Yes, you can use a different type of crust. Digestive biscuits, cookie crumbs, or even a mix of nuts can work well. Just make sure the crumbs are finely ground and mixed well with the melted butter. This will help the crust hold together and provide a nice, crunchy base for your dessert.
Is this dessert suitable for a lactose-intolerant person?
Traditional cream cheese and heavy cream are dairy products, which can be problematic for those who are lactose intolerant. However, you can make a lactose-free version by using lactose-free cream cheese and coconut cream instead of heavy cream. This way, everyone can enjoy the dessert without any issues.
Can I make this dessert ahead of time?
Absolutely! This dessert is perfect for making ahead of time. You can prepare it up to a day in advance and store it in the refrigerator. Just make sure to cover it tightly with plastic wrap or store it in an airtight container to keep it fresh. This makes it a stress-free option for any occasion.
What if I don’t have powdered sugar?
If you don’t have powdered sugar, you can make a substitute by blending granulated sugar in a blender or food processor until it becomes a fine powder. Alternatively, you can use a natural sweetener like honey or maple syrup, but be aware that these will add a different flavor profile to the dessert.
Can I use a different size baking dish?
Yes, you can use a different size baking dish, but keep in mind that the thickness of the layers will vary. If you use a smaller dish, the layers will be thicker, and if you use a larger dish, the layers will be thinner. Adjust the chilling time accordingly, as thicker layers may need more time to set.
How do I store leftovers?
Leftovers should be stored in the refrigerator, covered tightly with plastic wrap or in an airtight container. They will stay fresh for up to 5 days. If you need to store it longer, you can freeze it for up to 2 months. Just make sure to let it thaw in the refrigerator before serving.
Can I add other fruits to this dessert?
Yes, you can add other fruits to this dessert. Mango, kiwi, and strawberries are excellent choices. Just make sure to drain any excess liquid from the fruits to prevent the dessert from becoming too watery. Adding a variety of fruits can also make the dessert more colorful and flavorful.
Is this dessert kid-friendly?
Yes, this dessert is very kid-friendly. The creamy texture and sweet, fruity flavors make it a hit with children. You can even get the kids involved in the preparation, such as helping to mix the crust or decorating the top with fresh fruits. It’s a fun and delicious way to spend time together in the kitchen.
For more delightful and easy-to-make dessert recipes, visit our Desserts section. Whether you’re a seasoned baker or a beginner, you’ll find plenty of inspiration and delicious treats to make your next gathering a success.
Conclusion
There you have it, a No-Bake Pineapple Heaven Cheesecake Dessert that’s not only a feast for the eyes but also a treat for the taste buds. This recipe is a perfect blend of simplicity and flavor, making it a go-to for any occasion. Whether you’re hosting a party or just craving something sweet, this dessert will never disappoint. Give it a try and enjoy the compliments that come your way!
Equipment
- Medium bowl
- Large bowl
- Whisk
- Spatula
- 9x13-inch baking dish
- Electric mixer
Ingredients
- 2 cups graham cracker crumbs
- 1/2 cup melted butter
- 2 cups cream cheese, softened
- 1 cup powdered sugar
- 2 cups heavy whipping cream
- 1 can (20 oz) crushed pineapple, drained
- 1 can (20 oz) pineapple rings, drained
- q.s. fresh raspberries for garnish to taste
- q.s. whipped cream for topping to taste
Instructions
- In a medium bowl, mix together the graham cracker crumbs and melted butter until well combined.
- Press this mixture into the bottom of a 9x13-inch baking dish to form the crust.
- In a large bowl, beat the cream cheese and powdered sugar until smooth and creamy.
- In a separate bowl, whip the heavy cream until stiff peaks form, then gently fold it into the cream cheese mixture.
- Spoon half of the cream cheese mixture over the prepared crust and spread it evenly.
- Sprinkle the drained crushed pineapple over the cream cheese layer.
- Spread the remaining cream cheese mixture on top of the pineapple.
- Arrange the pineapple rings on top and garnish with fresh raspberries and whipped cream.
- Refrigerate for at least 4 hours or until set before serving.
Notes
Nutrition

Hi, I’m Olivia Parker, the founder of BakingSecret.com and a lifelong lover of all things sweet and homemade. I grew up in a small town in Oregon, where the smell of fresh cookies in my family’s kitchen sparked my passion for baking. Over the years, I turned that passion into a mission: to help home bakers feel confident, inspired, and creative.
After studying food science and working in several artisan bakeries across the U.S., I decided to create a space where everyone from beginners to seasoned bakers can find reliable recipes, expert tips, and a warm, welcoming community. BakingSecret.com is my way of sharing the magic of baking with the world. When I’m not testing new recipes, you’ll find me exploring farmers’ markets, collecting vintage cookbooks, or perfecting my sourdough technique.