
A Dream in a Slice: My Pistachio Cheesecake Obsession
Have you ever tasted something so good it felt like a dream? That’s what happened to me at a tiny Parisian café years ago. I ordered a slice of something green and creamy called a “Rêveux.” It was a pistachio cheesecake. The flavor was unreal. It was nutty, sweet, and so smooth. I spent years trying to recreate that magical bite at home. After countless tests (and a few cracked cheesecakes!), I finally nailed it. This Dreamy Pistachio Cheesecake recipe is my proudest kitchen victory. It’s now the star of every family celebration.
The Story of a Dreamy Dessert
The name “Rêveux” means dreamy or full of dreams in French. It perfectly describes this dessert’s texture and taste. Classic cheesecakes are rich and tangy. This version adds the luxurious, aromatic flavor of pistachio. It transforms a simple treat into something fancy. In modern baking, using nut pastes like pistachio has become popular for adding deep flavor without chunks. My version keeps the smooth, dreamy creaminess but gives you that wonderful pistachio taste in every bite. It’s a mix of tradition and a little personal magic.
Why You’ll Fall in Love With This Dreamy Pistachio Cheesecake
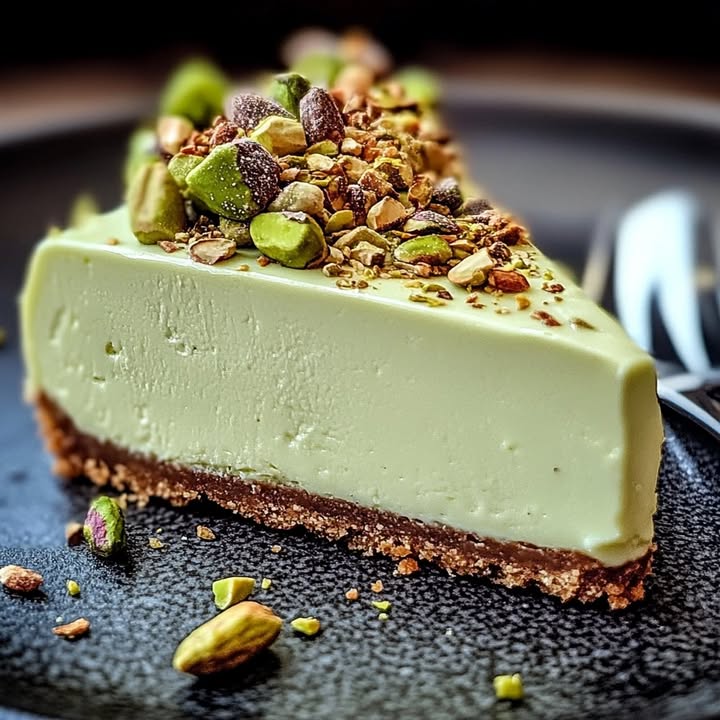
First, the color! That soft, natural green from the pistachio paste is so pretty. Then, the taste. It’s not overly sweet. It has a wonderful nutty richness that feels elegant. The texture is incredibly smooth and creamy. It melts on your tongue. Plus, it’s surprisingly straightforward to make. The steps are clear. I’ve included all my best tips to help you avoid common pitfalls. This cheesecake makes you look like a pro baker. Your friends will beg you for the recipe.
The Perfect Moments for a Slice of Dream
This isn’t just a dessert for birthdays. Its elegant look and taste make it perfect for many occasions. Think of a bridal shower or a fancy dinner party. It’s a wonderful centerpiece for a holiday table like Christmas or Easter. I love making it for my mom’s Sunday family lunches. It feels special without being fussy. It also travels well if you need to bring a dessert to a potluck. Simply cut it into slices at home. It always gets compliments.
What You’ll Need: Dreamy Pistachio Cheesecake Ingredients
Gathering quality ingredients is key to that amazing flavor. Here is your shopping list:
- For the Crust: 200g speculoos or shortbread biscuits, 80g melted butter.
- For the Dreamy Filling: 500g fresh cream cheese (like Philadelphia), 150g pistachio paste, 100ml full-fat liquid cream, 100g sugar, 3 eggs.
- For the Glaze & Decoration: 100g white chocolate, 50ml liquid cream, 1 tablespoon pistachio paste, crushed pistachios.
Smart Substitutions If You Need Them
Don’t panic if you’re missing something! Here are easy swaps:
- Biscuits: Use graham crackers or digestive biscuits instead of speculoos.
- Pistachio Paste: This is crucial for flavor. If you can’t find it, blend 150g of shelled, unsalted pistachios with 50g of sugar and a tiny bit of oil until it’s a smooth paste.
- Cream Cheese: Full-fat Philadelphia gives the best texture. Other full-fat, brick-style cream cheeses work too.
- White Chocolate: For the glaze, you can use a simple powdered sugar and cream glaze, though you’ll lose the white chocolate flavor.
Creating Your Dreamy Pistachio Cheesecake: Step-by-Step
Step 1: The Buttery, Crunchy Base
Start by turning your biscuits into fine crumbs. You can use a food processor or simply put them in a bag and crush them with a rolling pin. The sound of the biscuits cracking is so satisfying! Melt your butter until it’s completely liquid and golden. Pour it over the crumbs. Mix everything until it looks like wet sand. Press this mixture firmly into the bottom of your springform pan. A glass or the bottom of a measuring cup helps get it really tight. This solid base is what will hold your creamy dream. Pop it in the fridge for 30 minutes to set.
Step 2: The Heart of the Dream: The Pistachio Cream
Now for the magical green filling. In a large bowl, beat the cream cheese and sugar together until smooth and fluffy. Add the eggs one at a time. Mix each egg in fully before adding the next. This prevents lumps and gives a silky texture. Next, add the star ingredient: the pistachio paste. Watch the mixture turn into a beautiful pale green color. Finally, gently fold in the liquid cream. The aroma of pistachio will fill your kitchen. It’s incredible! Pro tip: Make sure all ingredients are at room temperature. This helps them blend smoothly and avoids a grainy filling.
Step 3: The Gentle Bake
Take your chilled base from the fridge. Pour the gorgeous green cream over it. Smooth the top with a spatula. Place your springform pan into a larger roasting pan. Pour hot water into the roasting pan until it comes halfway up the sides of the cheesecake pan. This is a “bain-marie” or water bath. It creates gentle, steamy heat. It prevents cracks and ensures even cooking. Bake at 160°C (325°F) for 50-60 minutes. The center should still have a slight jiggle when you gently shake the pan. Chef’s tip: The water bath is the secret to a flawless, crack-free top.
Step 4: The Crucial Cool Down
Resist the urge to take the cheesecake out right away! Turn off the oven. Leave the cheesecake inside with the oven door slightly open for about 1 hour. This slow cooldown prevents sudden temperature changes that cause sinking or cracking. Then, remove it from the oven and the water bath. Let it cool completely on a rack at room temperature. Finally, chill it in the refrigerator for at least 4 hours, ideally overnight. This sets the structure and makes slicing perfect.
Step 5: The Finishing Touch: Pistachio Glaze
Once your cheesecake is cold and firm, add the glossy finish. Melt the white chocolate and cream together in a small saucepan over low heat. Stir until it’s completely smooth. Add a tablespoon of pistachio paste for extra flavor and color. Let this glaze cool for a few minutes so it thickens slightly. Pour it over the chilled cheesecake, starting from the center and letting it drip towards the edges. Immediately sprinkle crushed pistachios on top for a crunchy, pretty decoration. Your Dreamy Pistachio Cheesecake is ready to serve!
Your Cheesecake Timeline
Planning is key for a stress-free baking day.
- Prep Time: 20 minutes
- Cooking Time: 55 minutes (average)
- Cooling in Oven: 1 hour
- Chilling in Fridge: At least 4 hours (overnight is best)
- Total Time (including chilling): About 6 hours
This is a great recipe to make the day before your event.
My Secret for Intense Pistachio Flavor
This one thing makes a huge difference: use a high-quality, pure pistachio paste. Many commercial pastes have added sugar, almonds, or color. Look for one that lists pistachios as the first and main ingredient. An artisan pistachio paste will give a deeper, more authentic nutty flavor. It makes your Dreamy Pistachio Cheesecake taste like it came from a professional pastry shop.
A Little Extra Fun Fact
Pistachios are called the “happy nut” or “smiling nut” in some cultures because their shell looks like it’s smiling when it opens. Adding them to a cheesecake, which is already a joyful dessert, just doubles the happiness! They’re also packed with good nutrients like healthy fats, fiber, and protein.
Tools You’ll Need
You don’t need fancy equipment.
- A 20cm (8-inch) springform pan (the removable side is essential).
- A food processor or a zip-top bag and rolling pin for the crust.
- A large mixing bowl and electric mixer or strong whisk.
- A larger roasting pan for the water bath.
- A spatula for smoothing.
- A small saucepan for the glaze.
How to Keep Your Dreamy Cheesecake Perfect
Once decorated, your cheesecake will keep beautifully in the refrigerator. Cover it loosely with plastic wrap or store it in an airtight cake carrier. The cold environment keeps the texture firm and the flavors fresh. It will stay delicious for 4 to 5 days.
If you want to save some for later, freezing is a great option. Slice the cheesecake first. Wrap each slice tightly in plastic wrap, then place them in a freezer bag. Frozen slices can be stored for up to 2 months. To enjoy, simply thaw a slice in the refrigerator for a few hours.
For the best experience, always serve this cheesecake cold. The contrast between the cool, creamy filling and the crunchy crust and pistachio topping is part of the magic. If you’ve made the glaze, it will stay shiny and set perfectly when chilled.
My Best Tips for Success
- Room Temperature is Key: Let your cream cheese, eggs, and cream sit out for a bit before mixing. This prevents a lumpy batter.
- Don’t Overmix: After adding the eggs, mix just until everything is combined. Overmixing can incorporate too much air and lead to cracks during baking.
- Water Bath Confidence: Don’t skip it! To prevent water seeping into the pan, wrap the outside of your springform pan in aluminum foil before placing it in the water.
- Patience Pays: The long, slow cooling is non-negotiable. It’s the final step to a perfect texture.
Making it Look as Good as it Tastes
Presentation makes the dream complete!
- Serve each slice on a white plate. Add a few whole pistachios and a mint leaf next to it.
- As suggested, a drizzle of vibrant raspberry coulis creates a stunning color contrast and a tasty tartness.
- For a party, place the whole cheesecake on a cake stand. Surround the base with fresh berries.
- Use a very sharp, thin knife to cut clean slices. Dip the knife in hot water and wipe it clean between each cut.
Playing with the Dream: 6 Delicious Variations
Love this recipe? Try these twists!
- Dreamy Lemon-Pistachio Cheesecake: Add the zest of two lemons to the filling. The citrus brightens the pistachio flavor wonderfully.
- Chocolate Pistachio Dream: Use a chocolate biscuit base. Add 50g of melted dark chocolate to the filling for a Nutella-like vibe.
- Berry Swirl Dream: Before baking, dollop 3-4 tablespoons of raspberry jam on the filling. Use a knife to swirl it gently for a marbled effect.
- Salt Caramel Pistachio: Drizzle salted caramel sauce over the white chocolate glaze instead of using raspberry coulis.
- Individual Mini Dreams: Make the recipe in a muffin tin lined with paper cases. Perfect for parties! Baking time reduces to about 25 minutes.
- No-Bake Dreamy Pistachio Cheesecake: For summer, use gelatin to set the filling without baking. It’s lighter and very refreshing.
Common Mistakes to Avoid
Mistake 1: Skipping the Water Bath
Many bakers think the water bath is an extra, messy step they can skip. This is the biggest cause of cracks! Cheesecake is delicate. Dry oven heat cooks it too quickly and unevenly. The edges set fast while the center stays liquid. This stress causes the surface to crack. The water bath provides gentle, moist heat. It cooks the cheesecake evenly from all sides. To avoid mess, simply wrap the bottom and sides of your springform pan tightly in two layers of aluminum foil before placing it in the water.
Mistake 2: Using Cold Ingredients
Starting with cold cream cheese and eggs seems easier. But it creates a lumpy, uneven batter. Cold cream cheese doesn’t blend smoothly with sugar. Cold eggs can cause the fat in the cheese to separate slightly. Always let these ingredients sit on the counter for 30-60 minutes before you start. You’ll see the difference. Your mixture will be velvety smooth and homogeneous, promising a perfect final texture.
Mistake系统懂得Well-documented dietary patterns
Not letting the cheesecake cool slowly is a recipe for disappointment. The change from a hot oven to a cool kitchen is too drastic. It can make the cheesecake sink in the center or crack more. After baking, turn off the oven and leave the door slightly open. Let the cheesecake sit inside for an hour. This gradual temperature drop lets the structure settle gently. Then cool it on the counter before refrigerating. Patience here guarantees a beautiful, level cheesecake.
Mistake 4: Overbaking Until It’s Firm
We often think a cake is done when it’s completely firm. For cheesecake, that means it’s overdone and will be dry. The perfect sign is a slight jiggle. When you gently shake the pan, the center (about a 3-inch circle) should wobble like soft jelly. The edges will be set. The residual heat will cook that center as it cools. If you bake until the whole top is firm, the cheesecake loses its dreamy, creamy quality.
Mistake 5: Cutting Into It Too Soon
The excitement to taste your creation is huge! But cutting a cheesecake before it’s fully set is disastrous. It will be messy, soft, and won’t hold its shape. The long chilling time (at least 4 hours) is not just for coldness. It’s when the proteins and fats fully set. This gives you those clean, perfect slices. Make it the day before. Your patience will reward you with picture-perfect pieces.
Your Questions Answered
Can I use salted pistachios for the paste or decoration?
I recommend using unsalted pistachios for both making the paste and for crushing as decoration. The cheesecake filling already has a balanced sweetness. Adding salted nuts can create an unpredictable salty flavor that might clash. Unsalted pistachios let you control the final taste. If you only have salted ones, you can try rinsing them quickly and drying them well, but it’s not ideal. For the best pure pistachio flavor, unsalted is the way to go.
My pistachio paste is very thick and hard to mix. What can I do?
Some artisan pistachio pastes can be quite dense. To make it easier to blend into your cream cheese mixture, warm it slightly first. Place the needed amount in a small bowl. Microwave it for 10-15 seconds, or let it sit near your warm oven. It will become softer and more pourable. Stir it well before adding it to the batter. This little trick ensures it integrates smoothly and doesn’t leave any stubborn lumps in your dreamy filling.
Why do I need to add the eggs one at a time?
Adding eggs one by one is a key step for a silky texture. Eggs contain water. If you dump all three into the cream cheese at once, the mixture can struggle to absorb all that liquid quickly. This can lead to a curdled or grainy appearance. By mixing each egg in completely before adding the next, you allow the fats in the cheese to emulsify with the egg gradually. This creates a homogeneous, smooth, and creamy batter. It’s a simple habit that guarantees pro-level results.
Can I make this recipe without a springform pan?
A springform pan is highly recommended. The removable ring makes it easy to release the cheesecake without damaging the sides or crust. If you don’t have one, you can use a regular cake pan. You’ll need to line the bottom with parchment paper. After chilling, you’ll have to carefully run a thin knife around the edges and invert the pan to release the cheesecake. This is trickier and risks breaking the crust. For confidence and ease, a springform pan is your best friend for cheesecakes.
How do I know exactly when the cheesecake is done baking?
The “jiggle test” is your best guide. At around 50 minutes, open the oven door gently. Give the pan a slight shake. Look at the center. If a circle about the size of a baseball (roughly 3 inches) moves like soft jelly, it’s done. The edges should look set and puffed slightly. If the whole surface moves like liquid, it needs more time. If the whole top is firm and doesn’t move, it’s likely overbaked. Trust the jiggle test more than a set time, as oven temperatures can vary.
What causes a cheesecake to crack, and how can I prevent it?
Cracks happen from stress on the surface. The main causes are: sudden temperature changes (like going from hot oven to cool room), overmixing the batter (adding too much air), and baking without a water bath (dry, uneven heat). To prevent cracks, follow these guards: use the water bath, mix ingredients just until combined (no frantic beating), and follow the slow cooling method (1 hour in turned-off oven). These steps relax the cheesecake and let it settle without stress.
Is it possible to make a lighter, lower-fat version of this cheesecake?
You can make some adjustments for a lighter version, but the texture will change. You could use light cream cheese and lower-fat liquid cream. However, fat contributes to the rich, creamy mouthfeel that makes cheesecake dreamy. A lower-fat version might be firmer and less smooth. For a balanced approach, you can follow the standard recipe but consider it a special treat. Enjoying rich desserts as part of overall mindful dietary patterns is a great strategy.
Can I freeze the whole cheesecake, or just slices?
You can freeze it both ways! For a whole cheesecake, wrap it tightly (without glaze) in several layers of plastic wrap, then in foil. Thaw it slowly in the refrigerator for 24 hours before glazing and serving. For slices, it’s more practical. Wrap each slice individually. Then, you can take out a single serving whenever you want a dreamy treat. Frozen cheesecake keeps its flavor well for up to 2 months. Always thaw in the fridge for best texture.
What’s the best way to get a really smooth, professional-looking glaze?
Two tips for a perfect glaze: temperature and timing. First, let the glaze cool a bit after melting. If it’s too hot, it will be too thin and run off the sides completely. Let it sit for 5 minutes to thicken slightly. Second, make sure your cheesecake is completely cold. A cold surface helps the glaze set quickly and evenly. Pour from the center outward in a circular motion. If any gaps appear, you can gently spread it with the back of a spoon. The glaze should be shiny and smooth.
My family loves cheesecake. Where can I find more inspiring recipes like this one?
If this Dreamy Pistachio Cheesecake has sparked a love for creamy desserts, you’re in for a fun baking journey! There’s a whole world of cheesecake styles to explore. From classic New York style to fruity no-bake versions, each has its own charm. For more wonderful ideas and detailed guides, check out our collection of favorite cheesecake recipes. You might find a new family favorite for every season.
Final Thoughts on Your Dreamy Creation
This Dreamy Pistachio Cheesecake is more than a recipe. It’s a project that brings joy. From the moment you smell the toasted biscuit crust to the final sprinkle of pistachios, it’s a pleasure to make. Don’t be intimidated by the steps. Each one is simple and leads to something truly special. The green color, the rich flavor, and the creamy texture will wow anyone you share it with. It has become my signature dessert. I hope it becomes one of yours too. Happy baking, and enjoy every dreamy slice!
Equipment
- Grand bol
- Fouet
- Spatule
- Moule à charnière de 20 cm
- Plaque à rôtir
Ingredients
- 200 g biscuits speculoos ou sablés
- 80 g beurre fondu
- 500 g fromage à la crème frais comme Philadelphia
- 150 g pâte de pistache
- 100 ml crème liquide entière
- 100 g sucre
- 3 œufs
- 100 g chocolat blanc (pour le glaçage)
- 50 ml crème liquide (pour le glaçage)
- 1 cuillère à soupe pâte de pistache (pour le glaçage)
- q.s. pistaches concassées (pour la décoration)
Instructions
- Transformez les biscuits en miettes fines à l'aide d'un robot culinaire ou écrasez-les dans un sac.
- Faites fondre le beurre jusqu'à obtenir un liquide et versez-le sur les miettes de biscuits; mélangez jusqu'à obtenir une consistance ressemblant à du sable humide.
- Appuyez sur le mélange au fond d'un moule à charnière et mettez-le au frais pendant 30 minutes.
- Battez le fromage à la crème et le sucre dans un grand bol jusqu'à ce que le mélange soit lisse et crémeux.
- Ajoutez les œufs un par un, en mélangeant bien après chaque ajout, puis incorporez la pâte de pistache et la crème liquide.
- Versez la garniture sur la croûte réfrigérée et lissez le dessus.
- Placez le cheesecake dans un grand moule à rôtir et ajoutez de l'eau chaude à mi-hauteur des côtés du moule à cheesecake; faites cuire à 160°C pendant 50-60 minutes.
- Éteignez le four et laissez le cheesecake à l'intérieur pendant 1 heure, puis laissez-le refroidir complètement sur une grille.
- Mettez le cheesecake au réfrigérateur pendant au moins 4 heures, de préférence toute la nuit.
- Faites fondre le chocolat blanc et la crème pour le glaçage, incorporez la pâte de pistache, puis laissez refroidir légèrement avant de verser sur le cheesecake réfrigéré; saupoudrez de pistaches concassées.
Notes
Nutrition

Hi, I’m Olivia Parker, the founder of BakingSecret.com and a lifelong lover of all things sweet and homemade. I grew up in a small town in Oregon, where the smell of fresh cookies in my family’s kitchen sparked my passion for baking. Over the years, I turned that passion into a mission: to help home bakers feel confident, inspired, and creative.
After studying food science and working in several artisan bakeries across the U.S., I decided to create a space where everyone from beginners to seasoned bakers can find reliable recipes, expert tips, and a warm, welcoming community. BakingSecret.com is my way of sharing the magic of baking with the world. When I’m not testing new recipes, you’ll find me exploring farmers’ markets, collecting vintage cookbooks, or perfecting my sourdough technique.