
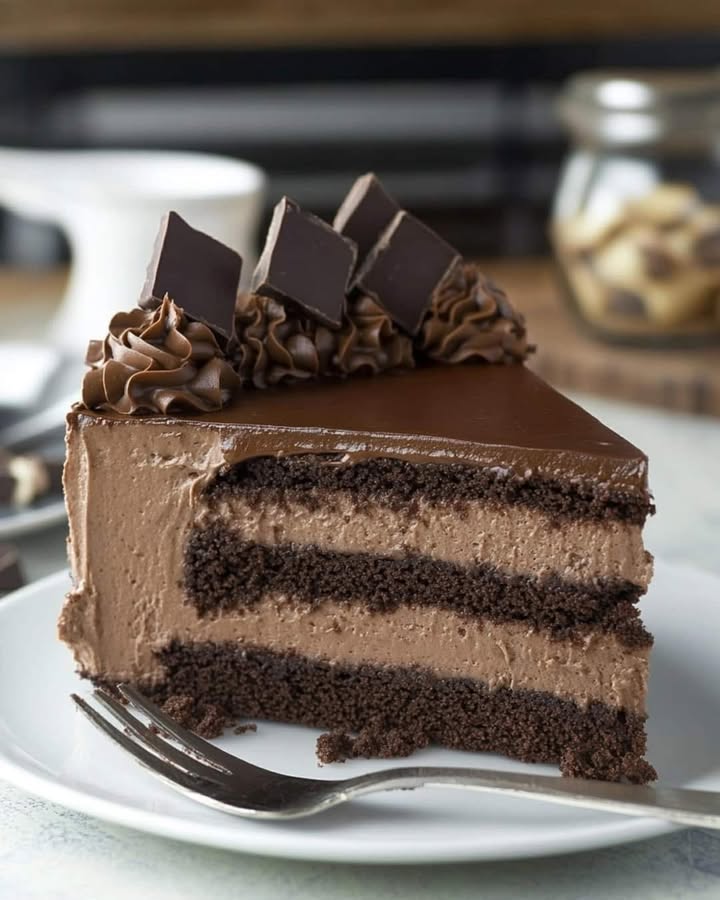
A Slice of Pure Joy: My Ultimate Hershey Chocolate Cake
You know that moment when a deep, soul-satisfying chocolate craving hits? I certainly do. It’s usually on a Sunday afternoon when my family is lounging around, and someone inevitably sighs, “I wish we had something chocolate.” That’s when I disappear into the kitchen and whip up this magic. This Hershey’s Chocolate Delight isn’t just a cake; it’s a warm hug, a celebration, and the solution to every sweet tooth emergency in my house. With its cloud-like frosting and impossibly moist crumb, this recipe has earned its permanent spot in my family’s “most requested” file.
The Story Behind My Go-To Chocolate Cake
This recipe feels like an old friend. It’s based on the classic Hershey’s “Perfectly Chocolate” cake, a formula that’s been bringing people together for generations. I remember my grandmother making a version of it for every birthday, the scent of cocoa filling her tiny kitchen. My twist is using hot coffee in the batter—it sounds strange, but trust me, it doesn’t make the cake taste like coffee. Instead, it awakens the cocoa, creating a richer, deeper chocolate flavor that is simply unbelievable. It’s the perfect blend of a timeless tradition and a little modern baking know-how.
Why This Hershey’s Chocolate Delight Will Be Your New Favorite
You will fall in love with this cake for three big reasons. First, the texture is pure bliss—incredibly tender and moist. Second, it’s surprisingly simple to make with pantry staples. No fancy techniques required! And third, that frosting. It’s fluffy, silky, and chocolaty without being overly sweet. It’s a one-bowl wonder that comes together in minutes and spreads like a dream. This recipe is a reliable workhorse for busy bakers who don’t want to compromise on incredible flavor.
When to Bake This Chocolate Masterpiece
This cake is your secret weapon for so many occasions! It’s a birthday showstopper, a potluck hero (you’ll never bring leftovers home), and the perfect centerpiece for a holiday table. I’ve baked it for “just because” Tuesdays, bake sales that raised the most money, and even as a sympathy gift that spoke more than words could. It’s a universal symbol of comfort and joy. A slice with a glass of cold milk after school turns an ordinary day into a sweet memory.
Gathering Your Ingredients for Hershey Chocolate Cake
Let’s gather your simple, high-quality ingredients. Using good cocoa powder is key here—it’s the star of the show!
For the Cake:
- 2 cups granulated sugar
- 1 cup + 2 tbsp all-purpose flour
- 3/4 cup unsweetened cocoa powder
- 1 1/2 tsp baking powder
- 1 1/2 tsp baking soda
- 1 tsp salt
- 2 large eggs
- 1 cup buttermilk
- 1/2 cup vegetable or canola oil
- 2 tsp vanilla extract
- 1 cup boiling water or hot coffee
For the Chocolate Frosting:
- 1/2 cup melted butter
- 2/3 cup unsweetened cocoa powder
- 3 cups powdered sugar
- 1/3 cup milk
- 1 tsp vanilla extract
Easy Swaps: Ingredient Substitutions
No buttermilk? No problem! Make your own by adding 1 tablespoon of white vinegar or lemon juice to a cup of milk. Let it sit for 5 minutes until it curdles. Out of vegetable oil? An equal amount of melted coconut oil or even applesauce works beautifully. For the hot liquid, you can use all boiling water, but I highly recommend trying strong hot coffee for an incredible depth of flavor. Don’t worry, your cake won’t taste like a latte!
Baking Your Hershey’s Chocolate Delight: A Step-by-Step Guide
Step 1: Preheat and Prep
First, get your oven heating to a cozy 350°F (175°C). This gives it plenty of time to reach the perfect temperature. While it warms up, get your cake pans ready. I always line my two 8-inch round pans with parchment paper circles. Then, I give them a light spray with non-stick cooking spray. This double-protection system is my foolproof guarantee that my beautiful cake layers will slide right out without a crumb left behind. It saves so much frustration!
Step 2: Mix the Dry Team
Grab your biggest mixing bowl. We’re starting with the dry ingredients. In goes the fluffy white sugar, the snowy flour, and the rich, dark cocoa powder. Add the baking powder, baking soda, and salt. Now, take a whisk and give it a really good stir. You want to see a uniform, beautiful brown color with no white streaks. This step is crucial—it evenly distributes the leavening agents so your cake rises perfectly in the oven without any bitter soda spots.
Step 3: Bring in the Wet Ingredients
Time to bring the batter to life! Crack in the two eggs. Pour in the creamy buttermilk, the neutral oil, and that splash of fragrant vanilla. Using a hand mixer or a sturdy wooden spoon, blend everything together. At first, it will look thick and fudgy, like a brownie batter. That’s exactly what you want. Keep mixing until you have a smooth, glossy, and very thick mixture. Scrape the sides of the bowl to make sure everything is incorporated.
Pro tip: If your eggs and buttermilk are cold from the fridge, let them sit on the counter for 20 minutes before baking. Room-temperature ingredients blend more smoothly and help the cake rise better.
Step 4: The Secret Step: Hot Liquid
Here comes the magic! Carefully measure out one cup of boiling water or hot coffee. With the mixer on low speed, very slowly pour the hot liquid into the thick batter. Watch as it transforms before your eyes! The batter will become thin, loose, and almost soupy. Don’t panic—this is perfect. This hot liquid “blooms” the cocoa powder, intensifying its flavor, and creates the most incredibly moist cake texture. Pour the thin batter evenly into your two prepared pans.
Step 5: Bake to Perfection
Slide the pans into the center of your preheated oven. The smell that will start to float through your kitchen in about 20 minutes is pure happiness. Bake for 30-35 minutes. The cakes are done when the centers spring back lightly to the touch and a toothpick poked in the middle comes out with just a few moist crumbs (not wet batter). Let them cool in the pans on a wire rack for about 10 minutes. This lets them firm up just enough so they don’t break when you flip them out.
Step 6: Whip Up the Dreamy Frosting
While the cakes cool, make the frosting. In a medium bowl, combine the melted, slightly cooled butter with the cocoa powder. Stir it into a thick, glossy paste. Gradually add the powdered sugar, milk, and vanilla. Start mixing slowly unless you want a powdered sugar snowstorm! Once it’s combined, beat on medium-high speed for 1-2 minutes. You’ll see it lighten in color and become wonderfully fluffy and spreadable. If it’s too thick, add a teaspoon more milk. Too thin? Add a little more powdered sugar.
Step 7: Assemble Your Masterpiece
Time for the fun part! Place one completely cooled cake layer on your cake plate or stand. Scoop a generous amount of frosting onto the center. Use an offset spatula or butter knife to spread it evenly to the edges. Gently place the second layer on top, pressing down slightly. Now, cover the top and sides with the remaining frosting. Don’t worry about it looking perfectly smooth from a bakery—a rustic, swoopy look is charming and delicious!
Chef’s tip: For super-clean slices, pop the frosted cake into the fridge for 20 minutes before cutting. The frosting will firm up, giving you beautiful, sharp pieces.
Step 8: The Best Part: Serve and Savor
Finally, slice your gorgeous cake with a sharp knife. Admire the tender, dark crumb against the fluffy frosting. Serve it on your prettiest plate. This classic Hershey chocolate cake is best enjoyed with a glass of cold milk, a cup of hot coffee, and surrounded by happy people. Every rich, chocolatey bite is a celebration of simple, homemade goodness. Enjoy every last crumb!
Your Baking Timeline
Planning is part of the fun! Here’s a quick guide to how long this delicious project will take.
- Prep Time: 20 minutes
- Bake Time: 35 minutes
- Cooling Time: 1 hour (very important!)
- Frosting & Assembly: 15 minutes
- Total Time: About 2 hours 10 minutes
My #1 Secret for the Best Chocolate Cake
My absolute can’t-skip secret is using hot, strongly brewed coffee instead of plain boiling water. I promise, you won’t taste coffee in the final cake. The coffee acts as a flavor enhancer, much like salt does for savory food. It makes the chocolate taste richer, darker, and more complex. It’s the difference between a good chocolate cake and a truly spectacular, “what-is-your-secret?” Hershey’s Chocolate Delight. Try it once, and you’ll never go back.
A Sweet Little Fact
Did you know the process of adding hot liquid to cocoa is called “blooming”? Heating the cocoa powder helps release its full flavor compounds and dissolve any lumps, giving you a smoother batter and a more intense chocolate taste. So when you pour that hot water or coffee in, you’re not just making batter—you’re unlocking the deepest chocolate flavor possible!
Tools You’ll Need
You don’t need any fancy equipment for this recipe. Here’s the simple list:
- Two 8-inch round cake pans
- Parchment paper
- Mixing bowls (one large, one medium)
- Whisk and wooden spoon or hand mixer
- Measuring cups and spoons
- Wire cooling rack
- Offset spatula or butter knife for frosting
How to Store Your Chocolate Cake
If your cake has been frosted with this butter-based frosting, the best place to store it is in the refrigerator. Cover it loosely with a cake dome or place it in a large airtight container. The cold will keep the frosting firm and fresh. It will stay delicious for up to 5 days.
For short-term storage (if you plan to eat it within 24 hours), you can keep it at room temperature in a cool spot. Just be sure to cover it to protect it from dust and to keep it from drying out. A cake keeper is perfect for this.
You can also freeze this cake beautifully! Wrap unfrosted, cooled cake layers tightly in plastic wrap and then in foil. They can be frozen for up to 3 months. Thaw overnight in the fridge before frosting. You can even freeze individual slices for a quick future treat.
Tips for a Flawless Cake Every Time
- Measure flour correctly: Fluff the flour in the bag, spoon it lightly into your measuring cup, and level it off with a knife. Don’t scoop directly with the cup—this packs in too much flour and leads to a dry cake.
- Don’t overmix: Once you add the dry ingredients and the hot liquid, mix just until everything is combined. Overmixing can make the cake tough.
- Test for doneness early: Ovens vary. Start checking your cake with a toothpick at the 30-minute mark to prevent overbaking.
- Cool completely before frosting: I know it’s hard to wait! But if the cake layers are even slightly warm, the frosting will melt and slide right off.
Making It Pretty: Presentation Ideas
- Top with chocolate shavings, sprinkles, or a handful of fresh raspberries.
- Pipe little rosettes or swirls of extra frosting around the top edge.
- Dust the finished cake with a light sprinkle of cocoa powder or powdered sugar.
- Serve each slice with a scoop of vanilla ice cream or a dollop of whipped cream.
Love This Cake? Try These Tasty Variations!
Once you’ve mastered this classic, the world of chocolate cakes is your oyster! Here are six delicious spins on the theme.
- Chocolate Cherry Delight: Add a layer of cherry pie filling between the cake layers before frosting. It’s like a Black Forest cake in the best way! If you love the combo of fruit and chocolate, you must try this stunning Cherry Chocolate Roll Cake for another show-stopping dessert.
- Cookies and Cream Cake: Crush up about 15 Oreo cookies and fold them into the finished frosting before spreading it on the cake.
- Chocolate Peanut Butter Cake: Swirl 1/2 cup of creamy peanut butter into the chocolate frosting, or use peanut butter frosting between the layers with chocolate frosting on the outside.
- Mocha Latte Cake: Dissolve 1 tablespoon of instant espresso powder into the hot coffee or water for the batter. Add a teaspoon of espresso powder to the frosting, too.
- Chocolate Malt Cake: Replace 1/4 cup of the cocoa powder in the cake with malted milk powder. Frost as usual and top with crushed malted milk balls. For another malt-inspired treat, my Maltesers Loaf Cake is a super-easy, single-layer wonder.
- Orange Chocolate Cake: Add the zest of one orange to the cake batter. For the frosting, use orange juice instead of milk and add a bit of zest. The citrus brightens the rich chocolate beautifully. For a creamy, no-bake version of this flavor combo, my Orange Creamsicle Cheesecake is a total crowd-pleaser.
Common Mistakes to Avoid
Mistake 1: Using Cold Ingredients
This is a super common one. When you use eggs, buttermilk, or milk straight from the fridge, they don’t blend as smoothly into the batter. This can result in a denser, heavier cake that doesn’t rise to its full potential. The cold ingredients can also cause the butter in the frosting to seize up and look curdled. The fix is easy! Just set your refrigerated items on the counter for about 30 minutes before you start baking. Your batter will be smoother, and your cake will be lighter.
Mistake 2: Overbaking the Layers
It’s easy to get distracted and leave the cake in the oven a few minutes too long. Even a little overbaking can dry out this wonderfully moist cake. Remember, it continues to cook from residual heat as it cools in the pan. The cake is done when the top springs back when lightly touched and a toothpick inserted in the center comes out with a few moist crumbs attached—not wet batter, but not completely clean and dry either. Set a timer and check early!
Mistake 3: Frosting a Warm Cake
The excitement to finish your cake is real! But if you spread that fluffy frosting onto a cake layer that’s even slightly warm, you’ll have a mess. The heat will melt the butter in the frosting, causing it to slide off and become a thin, greasy glaze. It will also tear the tender cake crumbs. Patience is key. Let the layers cool completely in the pans, then on a wire rack. You can even pop them in the fridge for a bit to speed things up. A cool cake means perfect, spreadable frosting.
Mistake 4: Not Blooming the Cocoa
If you just use room-temperature liquid, you’re missing a huge flavor opportunity. The step of adding boiling water or hot coffee is non-negotiable for the best flavor. This “blooming” process wakes up the cocoa powder, releasing its full, rich chocolate essence. Skipping it or using cold liquid will give you a cake that tastes flat and one-dimensional in comparison. Embrace the thin batter—it’s the secret to an ultra-moist, deeply chocolaty crumb.
This cake is indulgent and wonderful for special occasions. When enjoying rich desserts, it’s good to be mindful of overall balance in your diet. For example, the butter and oil in this recipe contribute saturated fat, which is something experts suggest we limit for heart health. This just means savoring a slice as a special treat within a pattern of everyday, nutrient-rich meals.
Frequently Asked Questions
Can I make this Hershey Chocolate Cake in a different pan?
Absolutely! This batter is very versatile. For a classic 9×13-inch sheet cake, simply pour all the batter into a greased and floured 9×13 pan. You’ll need to increase the baking time to about 35-40 minutes. For cupcakes, line your muffin tin with papers and fill each about 2/3 full. They usually bake in 18-22 minutes. Just keep an eye on them and use the toothpick test to check for doneness. The frosting recipe makes enough to cover a 9×13 cake or about 24 cupcakes generously.
I don’t have buttermilk. What can I use?
No buttermilk is no problem at all! The easiest substitute is to make your own “soured milk.” For this recipe, place 1 tablespoon of white vinegar or fresh lemon juice in a liquid measuring cup. Then, add enough regular milk (whole or 2% works best) to reach the 1-cup line. Stir it and let it sit for 5-10 minutes. It will look curdled and thick—that’s perfect! Now you have a buttermilk substitute ready to use in your cake. This trick works like a charm every single time.
Why do you add boiling water or coffee? Won’t it make the cake watery?
It seems strange, but it’s the best trick in the book! The batter will look very thin and almost watery when you pour it into the pans—that’s normal. The hot liquid does two amazing things. First, it “blooms” the cocoa powder, which means it intensifies and deepens the chocolate flavor. Second, the extra liquid creates an incredibly moist and tender cake crumb as it bakes. It all bakes up perfectly, so don’t worry. You’ll be amazed by the rich, moist result.
Can I make this cake ahead of time?
Yes, you can, and it’s a great time-saver! The unfrosted cake layers can be baked, cooled completely, wrapped tightly in plastic wrap, and stored at room temperature for one day. For longer storage, freeze them. The frosted cake will keep well in the refrigerator for up to 5 days. The flavors actually meld and get even better after a day. If you refrigerate it, just let a slice sit at room temperature for 15-20 minutes before serving to let the frosting soften up for the best texture and flavor.
My frosting turned out too runny/thick. How can I fix it?
Frosting consistency is easy to adjust! If your frosting is too runny, it likely needs more powdered sugar. Add it 1/4 cup at a time, mixing well after each addition, until it reaches a spreadable, fluffy consistency. If it’s too thick and stiff, it needs more liquid. Add milk, one teaspoon at a time, and mix until it becomes smooth and fluffy. The ideal frosting is thick enough to hold its shape when you swirl it but soft enough to spread easily without tearing the cake.
What’s the difference between using hot water vs. hot coffee?
You can use either, and both will make a delicious cake. Plain boiling water works perfectly fine. However, using hot, strongly brewed coffee is my professional tip for the absolute best flavor. The coffee doesn’t make the cake taste like coffee. Instead, it enhances the chocolate flavor, making it taste richer, deeper, and more complex. It’s like adding a background note that makes the chocolate sing louder. I highly recommend trying it with coffee at least once!
How do I get my cake layers to be perfectly flat for stacking?
Sometimes cakes dome a little in the center. To get a flat top, you can use cake strips! These are fabric strips you soak in water and wrap around the outside of the cake pan. They insulate the edges, so the cake bakes evenly from edge to center. If you don’t have them, no worries. Once the cakes have cooled for about 10 minutes, you can gently press down any slight dome with the palm of your hand (while they’re still warm and flexible). Or, use a long serrated knife to carefully slice off the domed top to create a flat surface.
Can I use Dutch-process cocoa instead of natural unsweetened cocoa?
This is an important question! This specific recipe is formulated for natural unsweetened cocoa powder (like Hershey’s brand), which is acidic. The baking soda in the recipe reacts with that acid to help the cake rise. Dutch-process cocoa has been alkalized to neutralize its acidity. If you use it in this recipe, the chemical reaction will be off, and your cake might not rise properly and could taste bitter. Stick with natural cocoa for guaranteed perfect results every time.
Is there a way to make this recipe dairy-free?
You can make a very good dairy-free version. For the buttermilk, use your favorite unsweetened plant-based milk (like almond or oat) with the vinegar/lemon juice trick. For the frosting, use a dairy-free butter alternative and a plant-based milk. The texture might be slightly different, but the rich chocolate flavor will still be fantastic. Just be sure to check all your ingredient labels to confirm they are dairy-free if you have an allergy.
This made more frosting than I need. Can I save it?
Yes, extra chocolate frosting is a blessing, not a problem! You can store leftover frosting in an airtight container in the refrigerator for up to one week. Before using it again, let it come to room temperature and give it a good stir or a quick re-whip with your mixer to bring back its fluffy texture. It’s perfect for frosting cupcakes, spreading on graham crackers, or dipping strawberries. You can even freeze it for up to 3 months. Thaw in the fridge overnight before re-whipping.
I hope this Hershey’s Chocolate Delight becomes a beloved recipe in your home just like it is in mine. It truly is the king of all homemade cakes and cupcakes, proving that sometimes the simplest, most classic recipes are the ones that create the happiest memories. There’s nothing quite like the pride of serving a dessert made from scratch with love.
The Last, Delicious Bite
There you have it—my heart, my secrets, and my absolute favorite chocolate cake recipe all shared with you. This Hershey’s Chocolate Delight is more than just ingredients and steps. It’s the promise of a happy kitchen, a satisfied smile, and the simple joy of sharing something made by hand. Whether it’s for a big celebration or a quiet Tuesday treat, this cake delivers pure chocolate happiness every single time. So preheat that oven, gather your bowls, and get ready to bake something wonderful. Your people are going to love you for it
Equipment
- Deux moules à gâteau de 8 pouces
- Papier sulfurisé
- Grands bols
- Fouet et cuillère en bois ou mélangeur à main
- Mesures et cuillères
- Grille de refroidissement
- Spatule ou couteau à beurre
Ingredients
- 2 tasses sucre granulé
- 1 tasse farine tout usage
- 3/4 tasse cacao en poudre non sucré
- 1 1/2 cuil. à café poudre à lever
- 1 1/2 cuil. à café bicarbonate de soude
- 1 cuil. à café sel
- 1 tasse babeurre
- 1/2 tasse huile végétale ou de canola
- 2 cuil. à café extrait de vanille
- 1 tasse eau bouillante ou café chaud
Instructions
- Préchauffez le four à 175°C (350°F) et préparez deux moules à gâteau de 8 pouces en les tapissant de papier sulfurisé et en les vaporisant d'un spray de cuisson.
- Dans un grand bol, combinez le sucre, la farine, le cacao en poudre, la poudre à lever, le bicarbonate de soude et le sel, et fouettez jusqu'à obtenir un mélange homogène.
- Ajoutez les œufs, le babeurre, l'huile végétale et l'extrait de vanille aux ingrédients secs et mélangez jusqu'à obtenir une pâte lisse et brillante.
- Versez progressivement l'eau bouillante ou le café chaud tout en mélangeant à basse vitesse, ce qui va amincir la pâte.
- Divisez la pâte uniformément entre les moules préparés et faites cuire pendant 30-35 minutes ou jusqu'à ce qu'un cure-dent en ressorte avec quelques miettes humides.
- Laissez les gâteaux refroidir dans les moules pendant environ 10 minutes avant de les transférer sur une grille pour qu'ils refroidissent complètement.
- Pour le glaçage, combinez le beurre fondu et le cacao en poudre dans un bol moyen. Incorporez progressivement le sucre glace, le lait et la vanille jusqu'à obtenir un mélange léger et mousseux.
- Placez une couche de gâteau refroidie sur une assiette, étalez du glaçage sur le dessus, placez la deuxième couche par-dessus, puis glacez le dessus et les côtés du gâteau.
- Coupez et servez avec un verre de lait froid ou de café.
Notes
Nutrition

Hi, I’m Olivia Parker, the founder of BakingSecret.com and a lifelong lover of all things sweet and homemade. I grew up in a small town in Oregon, where the smell of fresh cookies in my family’s kitchen sparked my passion for baking. Over the years, I turned that passion into a mission: to help home bakers feel confident, inspired, and creative.
After studying food science and working in several artisan bakeries across the U.S., I decided to create a space where everyone from beginners to seasoned bakers can find reliable recipes, expert tips, and a warm, welcoming community. BakingSecret.com is my way of sharing the magic of baking with the world. When I’m not testing new recipes, you’ll find me exploring farmers’ markets, collecting vintage cookbooks, or perfecting my sourdough technique.