
My Favorite Cheesecake: The Pistachio Dream
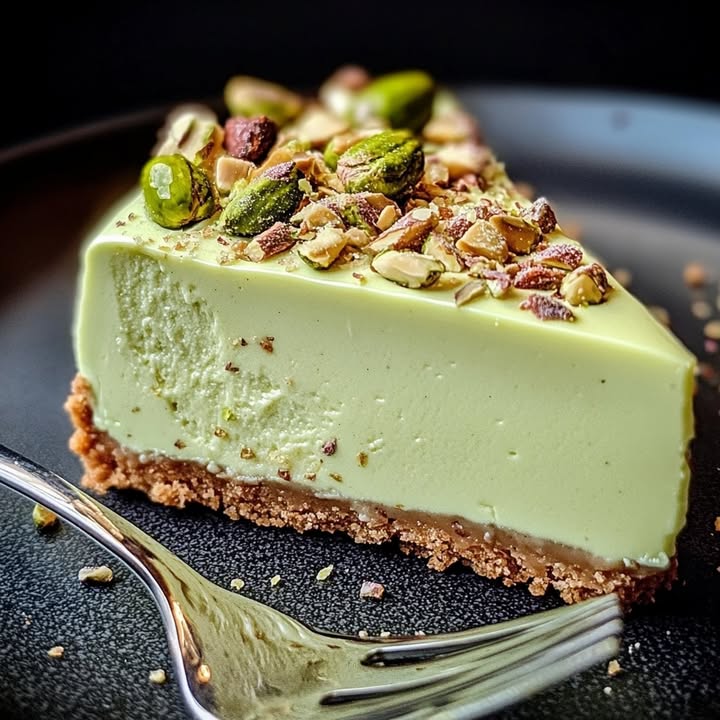
So, tell me, what’s your favorite cheesecake? Is it a classic New York style, or maybe a zesty lemon one? For me, and for my family, it’s always been this Pistachio Dream Cheesecake. It just hits differently. The moment it comes out of the fridge, with that stunning green hue and that speckled crust, everyone gathers around. It’s the perfect balance of crunch, creamy dreaminess, and just a touch of sweet. It never fails to make our weekends feel special.
The Story Behind My Dreamy Pistachio Cheesecake
This recipe came from a happy accident. I was trying to recreate a fancy dessert we had at a little Parisian-style café. Their pistachio dessert was stunning, but I wanted a cheesecake version for home. The first try was… a mess. The color wasn’t right, and it was too dense. But after tweaking it (and eating a lot of test batches!), I found the magic mix. Using pistachio paste gives that deep flavor and color, while the speculoos base adds a cozy, spiced crunch that feels both modern and traditional.
Why You’ll Absolutely Love This Pistachio Dream Cheesecake
You’ll love this recipe because it’s surprisingly simple for such an elegant result. The flavor is rich and nutty without being heavy. The texture is silky-smooth, and it’s visually stunning—a real showstopper. It’s also incredibly versatile. You can make it ahead, which is a lifesaver for busy hosts. Plus, it’s a fun way to use pistachios beyond just snacking!
Perfect Occasions for Serving This Dreamy Dessert
This cheesecake shines at so many events. Think spring brunches, Mother’s Day, or a fancy dinner party. It’s gorgeous for birthdays when you want something different from a standard cake. I also love bringing it to potlucks because it travels so well and always gets compliments. Honestly, any time you want to treat your loved people, this is the dessert.
Ingredients for Your Pistachio Dream Cheesecake
- For the Crust:
- 200g speculoos or shortbread biscuits (like petits-beurre)
- 80g melted butter
- For the Filling:
- 500g full-fat cream cheese, room temperature
- 150g granulated sugar
- 200g heavy cream
- 100g pistachio paste (the key ingredient!)
- 3 large eggs
- 1 tablespoon cornstarch
- 1 teaspoon vanilla extract
- A pinch of salt
- For the Topping (Optional):
- A handful of chopped pistachios
- A drizzle of melted white chocolate
Handy Ingredient Substitutions
Don’t fret if you’re missing something! For the crust, graham crackers work well too. If you can’t find pistachio paste, try blending 150g of shelled, unsalted pistachios with a little oil and sugar until very smooth. For a lighter option, you can use half heavy cream and half Greek yogurt in the filling, though the texture will be a bit firmer.
Step 1: Create the Crunchy Base
First, let’s make that wonderful crust. Put your biscuits into a food processor and pulse until you get fine crumbs. It should look like sandy, spiced dust. Pour the melted butter over the crumbs and mix until every bit is coated. It will smell like warm, buttery spices. Press this mixture firmly into the bottom of your springform pan. Use a glass or cup to get it really flat and even. This base is what holds our dreamy filling!
Step 2: Craft the Dreamy Pistachio Filling
Now for the magic. In a large bowl, beat the room-temperature cream cheese and sugar until perfectly smooth and creamy. No lumps allowed! Then, add the pistachio paste. Watch the color transform into that beautiful pale green. Beat in the heavy cream, then the eggs one at a time. Finally, mix in the cornstarch, vanilla, and salt. The batter will be silky, fragrant, and utterly inviting.
Pro tip: Make sure all ingredients, especially the cream cheese, are at room temperature. This prevents a lumpy filling and ensures a smooth bake.
Step 3: Bake to Perfection
Pour your gorgeous green filling over the prepared crust. Gently tap the pan on the counter to release any air bubbles. Place it in the preheated oven. The cheesecake will puff up slightly and turn a deeper gold-green at the edges while staying jiggly in the center. This jiggly center is key! It means it’s creamy and not overcooked.
Step 4: The Crucial Cool Down
Once baked, turn the oven off and let the cheesecake sit inside for about an hour. This gradual cooling prevents cracking. Then, move it to a wire rack to cool completely. Finally, refrigerate it for at least 6 hours, preferably overnight. This patience step is where the texture becomes firm and dreamy.
Step 5: The Final Dreamy Touches
Unlock your springform pan and admire your creation! For a simple garnish, sprinkle chopped pistachios around the edge. A light drizzle of white chocolate adds a sweet contrast. Sometimes I just leave it pure and simple—its natural beauty is enough.
Chef’s secret: For an extra smooth top, run a knife dipped in hot water around the edge of the cheesecake before unlocking the pan.
Timing Breakdown
- Prep Time: 25 minutes
- Cooking Time: 45-50 minutes
- Cooling/Resting Time: 1 hour (in oven) + 6 hours (in fridge)
- Total Time: About 8 hours (mostly hands-off chilling)
A Little Extra Fun Fact
Pistachios aren’t just tasty; they’re nutritious too! They’re packed with good fats and are considered a protein-rich food, adding a little wholesome boost to this indulgent treat. Their vibrant color comes naturally, making this dessert beautiful without any food coloring.
Equipment You’ll Need
- 9-inch springform pan
- Food processor or blender
- Large mixing bowl
- Electric hand mixer or stand mixer
- Rubber spatula
- Measuring cups and spoons
How to Store Your Pistachio Dream Cheesecake
This cheesecake stores beautifully. Keep it covered in the refrigerator for up to 5 days. The flavor actually deepens a bit after a day or two. Make sure it’s tightly covered with plastic wrap or in an airtight container to prevent it from drying out or absorbing other fridge odors.
For longer storage, you can freeze it. Wrap the whole cheesecake or individual slices tightly in plastic wrap, then in foil. Freeze for up to 2 months. Thaw it overnight in the refrigerator before serving. The texture remains wonderfully creamy.
Always serve it chilled. If you leave it out on the counter for too long, the filling can become too soft. For the best experience, slice it with a clean, sharp knife dipped in hot water for neat, pretty slices.
Tips For the Best Results
- Really press that crust down. A loose crust can crumble when slicing.
- Don’t overmix the filling after adding the eggs. Mix just until combined to avoid too much air.
- Use a water bath if you’re worried about cracks. Wrap the springform pan bottom in foil and place it in a larger pan with an inch of hot water.
- For the greenest color, use high-quality pistachio paste without too many additives.
Presentation Ideas to Wow Your Guests
- Serve on a plain white plate for a stunning color contrast.
- Add a small scoop of vanilla or white chocolate ice cream alongside.
- Dust the plate with a little powdered sugar or crushed pistachio powder.
- Pair with a cup of strong coffee or a dessert wine.
Healthier & Fun Variations
This Pistachio Dream Cheesecake recipe is wonderfully adaptable. Here are six twists you can try:
- Lighter Version: Use low-fat cream cheese and swap half the heavy cream for plain Greek yogurt. The texture stays creamy but with less fat.
- No-Bake Dream: Skip the eggs and cornstarch. Add stabilized whipped cream to the filling and just chill it. Perfect for summer when you don’t want to bake.
- Chocolate-Pistachio Twist: Add 50g of melted dark chocolate to the filling. You get a gorgeous marbled effect and a deeper flavor.
- Vegan Pistachio Dream: Use vegan cream cheese, coconut cream, and agar-agar as a stabilizer. It’s a plant-based wonder.
- Mini Cheesecakes: Make individual versions in a muffin tin with liners. They’re great for parties and kids love them.
- Seasonal Fruit Top: Top the chilled cheesecake with fresh raspberries or sliced strawberries. The fruity tartness pairs beautifully with the nutty sweetness.
Common Mistakes to Avoid
Mistake 1: Using Cold Ingredients
This is a big one. If your cream cheese, eggs, or cream are cold, they won’t blend smoothly. You’ll end up with a lumpy, uneven batter that can bake poorly. Always take the time to let your dairy ingredients sit out for 30-60 minutes before starting. It makes the mixing effortless and results in that silky texture we dream of.
Mistake 2: Overbaking the Cheesecake
A cheesecake should never be baked until it’s firm like a cake. The center should still have a slight jiggle when you take it out of the oven. If it’s fully set, it will be dry and dense, not dreamy. Follow the timing guide, but trust the jiggle test more than the clock. The residual heat will finish the cooking as it cools.
Mistake 3: Skipping the Slow Cool Down
Moving a hot cheesecake straight to the fridge is a sure way to get cracks. The sudden temperature change stresses the surface. Let it cool gradually in the turned-off oven first, then on the counter, then in the fridge. This gentle process helps the structure set without cracking, giving you that perfect, smooth top.
Mistake 4: Not Sealing the Springform Pan for a Water Bath
If you use a water bath to prevent cracks, you must seal the pan well. Simply wrapping the bottom in foil often leaks. Use a heavy-duty foil and double-wrap it, or use a special silicone seal. A leaky bath can ruin your crust and make the oven steamier than intended.
Frequently Asked Questions
Can I make this Pistachio Dream Cheesecake without a springform pan?
You can, but it’s trickier. A springform pan is designed to release the cheesecake easily without damaging it. If you use a regular cake pan, you’ll need to line it very carefully with parchment paper that overhangs the sides. Then, you can use those papers to lift the cheesecake out. It’s more work and can risk breaking the crust. For best results, I really recommend using a springform pan.
Where can I find pistachio paste?
Pistachio paste can be found in specialty baking stores, online gourmet food shops, or sometimes in the international aisle of large supermarkets. If you can’t find it, making your own is a good option. Blend shelled, unsalted pistachios with a neutral oil (like canola) and a touch of sugar until it becomes a smooth, spreadable paste. Homemade paste might be a bit grainier but will still taste amazing.
Why did my cheesecake crack on top?
Cracking usually happens from overbaking or a too-fast temperature change. The proteins in the eggs and cheese tighten too much and split the surface. To avoid this, don’t overmix (which adds too much air), don’t overbake, and always cool the cheesecake slowly as described in the steps. A small crack isn’t a disaster—you can cover it with toppings!
How do I know when the cheesecake is done baking?
The best test is the jiggle. The edges should look set and slightly puffed, but the center (about a 3-inch circle) should still jiggle softly when you gently shake the pan. It should not be liquid, but it should move like a soft jelly. It will firm up perfectly during the cooling phase. Trust this visual test more than any timer.
Can I freeze Pistachio Dream Cheesecake?
Yes, absolutely! Cheesecake freezes very well. Wrap the whole cooled cheesecake or individual slices tightly in plastic wrap, then in aluminum foil to prevent freezer burn. It can be frozen for up to 2 months. Thaw it overnight in the refrigerator before serving. The texture and flavor remain excellent.
What’s the difference between pistachio paste and pistachio butter?
Pistachio paste is often more concentrated and smoother, made specifically for baking and coloring. Pistachio butter might be more like a nut butter you’d spread on toast—sometimes with added oils or sugars. For this recipe, paste is preferred for its intense flavor and color. If you use butter, check that it’s smooth and not too oily.
Can I use a different nut for this recipe?
You can experiment! Almond paste would make a lovely “Almond Dream Cheesecake.” Hazelnut would be delicious too. The flavor will change, but the method stays the same. Just keep in mind that the color will be different. Pistachio gives that signature dreamy green that makes this recipe so special.
Is cornstarch necessary?
The cornstarch acts as a gentle stabilizer. It helps the filling set properly without being too heavy on eggs. You can substitute it with all-purpose flour in the same amount if needed. Some recipes omit it, but I find it gives a more reliable, creamy texture, especially when using the rich pistachio paste.
How long should I chill the cheesecake before serving?
At least 6 hours is crucial. I strongly recommend overnight chilling (8-12 hours). This long chill allows the flavors to meld and the texture to become firm and sliceable. A cheesecake served too soon can be too soft and might not hold its shape when cut. Patience is key for the dreamiest result.
Can I make this recipe gluten-free?
Yes, very easily. Simply use a gluten-free biscuit for the crust. Many gluten-free shortbread or cookie options work perfectly. The filling is naturally gluten-free as it contains no flour. Just ensure your pistachio paste and other ingredients are from gluten-free sources if you have severe allergies.
If you’re a cheesecake lover like me, you’ll find so many wonderful recipes to explore. For more inspiration, check out our entire collection of dreamy cheesecake recipes on the site.
A Final Sweet Word
This Pistachio Dream Cheesecake is more than just a dessert to me. It’s a little piece of joy I love to share. It turns a simple meal into a celebration and always brings smiles. I hope it becomes a favorite in your home too. Remember, baking is about love and fun—don’t stress over small cracks or perfect color. The taste is what dreams are made of. Happy baking!
Equipment
- Grand bol
- Fouet
- Spatule
- Moule à charnière de 9 pouces
- Robot culinaire ou mixeur
Ingredients
- 200 g biscuits speculoos ou sablés
- 80 g beurre fondu
- 500 g fromage à la crème entier
- 150 g sucre
- 200 g crème entière
- 100 g pâte de pistache
- 3 grands œufs
- 1 cuil. maïzena
- 1 cuil. extrait de vanille
- 1 pincée de sel
Instructions
- Écrasez les biscuits dans un robot culinaire jusqu'à obtenir de fines miettes, puis incorporez le beurre fondu.
- Appuyez fermement sur le mélange de miettes au fond d'un moule à charnière.
- Battez le fromage à la crème et le sucre dans un grand bol jusqu'à consistance lisse, puis ajoutez la pâte de pistache.
- Mélangez la crème entière, puis ajoutez les œufs un à un, suivis de la maïzena, de la vanille et du sel.
- Versez le mélange sur la croûte et tapotez le moule pour libérer les bulles d'air.
- Enfournez dans un four préchauffé jusqu'à ce que le gâteau soit gonflé avec un centre tremblant.
- Refroidissez dans le four pendant environ une heure, puis transférez sur une grille pour refroidir complètement.
- Réfrigérez pendant au moins 6 heures ou toute la nuit avant de servir.
- Garnissez de pistaches hachées et d'un filet de chocolat blanc si désiré.
Notes
Nutrition

Hi, I’m Olivia Parker, the founder of BakingSecret.com and a lifelong lover of all things sweet and homemade. I grew up in a small town in Oregon, where the smell of fresh cookies in my family’s kitchen sparked my passion for baking. Over the years, I turned that passion into a mission: to help home bakers feel confident, inspired, and creative.
After studying food science and working in several artisan bakeries across the U.S., I decided to create a space where everyone from beginners to seasoned bakers can find reliable recipes, expert tips, and a warm, welcoming community. BakingSecret.com is my way of sharing the magic of baking with the world. When I’m not testing new recipes, you’ll find me exploring farmers’ markets, collecting vintage cookbooks, or perfecting my sourdough technique.