
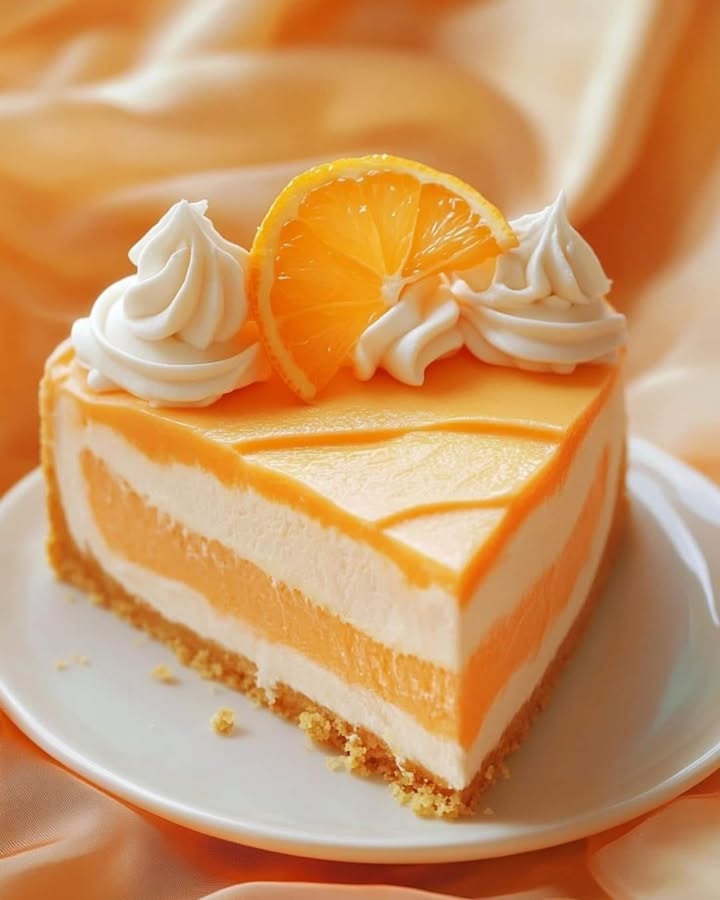
Sunshine and Nostalgia in Every Slice
Doesn’t a creamsicle take you right back? I’m talking about that perfect moment of a sunny summer day, the satisfying crack of the orange ice shell, and that rush of creamy vanilla. I wanted to bring that pure joy to my dessert table, but without turning on the oven. After a few afternoons of sweet experimentation (my taste-testing neighbors were thrilled), I perfected this No-Bake Orange Creamsicle Cheesecake. It’s a happy memory on a plate, and it’s about to become your new favorite lazy-day dessert.
The Story Behind the Orange Creamsicle Dream
That classic orange-and-vanilla popsicle has been a staple of American summers for over a century. It’s a simple idea that just *works*. I wanted to capture that same magical duo in a grown-up, shareable treat. This no-bake cheesecake is my homage to that tradition. It takes the familiar comfort of a creamy cheesecake filling and marries it with the bright, sunny flavor of orange. It’s like the dessert version of your favorite childhood treat, perfect for when you want something impressive but secretly easy.
Why You’ll Adore This No-Bake Cheesecake
You will love this recipe because it is a total crowd-pleaser that doesn’t heat up your kitchen. It’s wonderfully creamy, stunningly layered, and bursting with that iconic creamsicle flavor. The best part? It’s surprisingly simple. There’s no water bath to fuss with, no risk of cracking, and you can make it a day ahead. It’s the dessert that lets you relax and enjoy your own party.
The Perfect Occasion for a Creamsicle Treat
This cheesecake is your secret weapon for so many events! It’s a star at summer potlucks and 4th of July barbecues. It brings a ray of sunshine to baby showers and birthday parties. I love serving it after a big family dinner—it feels special but is light enough to enjoy after a meal. Honestly, any day that needs a little extra sweetness is the right day for this Orange Creamsicle Cheesecake.
What You’ll Need: Creamsicle Cheesecake Ingredients
For the Crust:
- 12 oz vanilla wafers (like Nilla Wafers)
- 1/2 cup granulated sugar
- 4 tbsp unsalted butter, melted
For the Cheesecake Filling:
- 2 packages (8 oz each) cream cheese, softened
- 1 cup granulated sugar
- 2 cups heavy cream, chilled
- 1 box (3 oz) orange Jello
- 1 cup boiling water
- 1/2 cup powdered sugar
- 1/2 tsp vanilla extract
- Zest of one orange
Smart Swaps: Ingredient Substitutions
No vanilla wafers? Graham cracker crumbs work beautifully—use about 2 1/2 cups mixed with the same sugar and butter. For a citrus twist, try lemon Jello or even a berry flavor. If you want a stronger orange punch, add a teaspoon of orange extract to the Jello mixture. For a slightly lighter version, you can use Neufchâtel cheese instead of full-fat cream cheese, but know the texture will be a bit softer.
Crafting Your Orange Creamsicle Masterpiece
Let’s make some magic! Follow these steps for a perfectly layered, creamy, and dreamy no-bake cheesecake.
Step 1: Build Your Sweet Foundation
Grab your food processor and pour in those golden vanilla wafers. Pulse them until you have fine, sandy crumbs that smell like cookie heaven. Pour these into a bowl and stir in the granulated sugar. Now, drizzle that melted butter all over the crumbs. Mix it until every last crumb is coated and the mixture holds together when you pinch it. This buttery, sweet base is the perfect crunch for our creamy filling. Pro tip: A flat-bottomed glass is perfect for pressing the crust firmly and evenly into the pan.
Step 2: Whip Up the Creamy Vanilla Heart
In a large bowl, beat your room-temperature cream cheese and the cup of granulated sugar together. Use a hand mixer on medium until it’s completely smooth, with no lumps in sight. You want it light and fluffy. Scrape down the sides of the bowl with a spatula to make sure everything is incorporated. Set this creamy dream aside while you work on the orange layer. The aroma is already promising something wonderful.
Step 3: Create the Sunny Orange Layer
This is where the creamsicle magic happens! Empty the box of orange Jello into a heat-proof bowl. Carefully pour the boiling water over it and immediately start whisking. Whisk for a full two minutes until the powder is completely dissolved and the liquid is clear and vibrant orange. Let this mixture sit aside to cool down for about 15-20 minutes. It needs to be cool to the touch but not set at all. This step is key for the perfect texture.
Step 4: Make the Orange Zest Whipped Cream
In a chilled bowl, pour your cold heavy cream. Add the powdered sugar, vanilla extract, and the freshly grated zest of one orange. The zest will fill your kitchen with the most incredible citrus perfume. Beat on medium-high speed until stiff peaks form. This means when you lift the beaters, the cream stands straight up and holds its shape. Be careful not to over-whip it into butter!
Step 5: Combine and Layer with Care
Now, we assemble! Take half of your beautiful orange whipped cream and gently fold it into the *cooled* orange Jello liquid until it’s one uniform, fluffy, orange cloud. Next, fold the remaining half of the whipped cream into the vanilla cream cheese mixture. You’ll have two gorgeous bowls: one bright orange and one creamy white. Chef’s tip: To create clean layers, spread the white cream cheese mixture carefully over the crust first. Then, gently pour and spread the orange mixture on top. The contrast is stunning!
Step 6: The Final Chill
Once your cheesecake is beautifully layered, cover it loosely with plastic wrap or foil. Place it in the refrigerator to set. This is the hardest part—waiting! It needs a minimum of 4 hours, but I strongly recommend letting it chill overnight. This gives all the flavors time to meld perfectly and allows the Jello to work its setting magic, giving you a sliceable, firm, and incredible dessert.
Your Creamsicle Cheesecake Timeline
- Prep Time: 30 minutes
- Chill Time: 4 hours (best overnight)
- Total Time: 4 hours 30 minutes
- Servings: 10-12 happy people
A Little Secret for the Best Texture
My secret weapon for a super smooth cheesecake filling? Make sure your cream cheese is truly at room temperature. I take it out of the fridge at least 2 hours before I start. Room-temperature cream cheese blends seamlessly with the sugar, preventing any lumpy texture. It also folds into the whipped cream much more easily, giving you a cloud-like consistency.
Fun Fact: More Than Just a Popsicle
Did you know the official name for a creamsicle is a “Creamsicle bar”? The original was invented all the way back in 1905. The combination of orange and vanilla is so beloved because it perfectly balances tart and sweet, creamy and icy. Our no-bake cheesecake version captures that same perfect balance in every creamy, no-fuss bite.
Gathering Your Kitchen Tools
- 9-inch springform pan
- Food processor
- Hand mixer or stand mixer
- Two large mixing bowls
- Medium mixing bowl
- Whisk and spatula
- Measuring cups and spoons
- Zester or fine grater
Keeping Your Cheesecake Fresh
Once you’ve enjoyed a slice (or two!), you’ll want to store the rest properly. Always keep the cheesecake covered in the refrigerator. I place a piece of plastic wrap directly on the surface of any leftover slice to prevent it from drying out. For the whole cheesecake, you can use the lid of the springform pan or cover the top tightly with foil.
This Orange Creamsicle Cheesecake will stay fresh and delicious in the fridge for up to 4 days. The flavors actually get better after the first day. I don’t recommend freezing this particular recipe, as the texture of the Jello and whipped cream layers can become watery and separate when thawed.
For serving leftovers, just take it straight from the fridge and slice. The cold temperature ensures perfect, clean slices. If you’re looking for more inspiration for easy, chilled desserts, be sure to explore our collection of other delightful no-bake recipes.
Friendly Advice for Cheesecake Success
- Chill Your Bowl: For the fastest, best whipped cream, chill your mixing bowl and beaters in the freezer for 15 minutes before you start.
- Easy Release: Run a thin knife under hot water, wipe it dry, and then slide it around the edge of the springform pan before unlocking it for a pristine release.
- Patience is Key: Don’t rush the chilling time. That overnight rest is what turns a good cheesecake into a great one.
Making it Pretty: Presentation Ideas
- Top each slice with a dollop of fresh whipped cream and a twist of orange zest.
- Arrange thin orange slices or mandarin segments around the edge of the cake.
- For a party, serve with a side of dark chocolate shavings for an “orange and chocolate” twist.
- Drizzle a little vanilla syrup or orange curd over the plate before placing the slice.
Mix It Up! Healthier & Fun Variations
Love the idea but want to try something different? Here are six tasty twists on the classic Orange Creamsicle Cheesecake:
- Yogurt Swap: Replace half the cream cheese with Greek yogurt for a tangier, protein-rich filling.
- Crust-Free Cups: Skip the crust entirely and layer the fillings in individual glasses or jars for a portion-controlled treat.
- Tropical Twist: Use pineapple Jello and add crushed pineapple (well-drained) to the whipped cream for a piña colada vibe.
- Berry Creamsicle: Swap the orange Jello for strawberry and layer with fresh sliced strawberries.
- Sugar-Free Version: Use sugar-free Jello and a sugar substitute approved for baking in the fillings.
- Chocolate Orange: Add a tablespoon of cocoa powder to the cream cheese layer and use a chocolate wafer crust.
Common Mistakes to Avoid
Even an easy recipe has its pitfalls. Avoid these common errors for the perfect no-bake cheesecake every time.
Mistake 1: Using Cold Cream Cheese
This is the number one reason for a lumpy cheesecake filling. Cold cream cheese will not blend smoothly with the sugar or fold into the whipped cream. It leaves tiny lumps that ruin the silky texture. Always plan ahead and let your cream cheese sit on the counter until it’s truly soft to the touch. This small step makes a huge difference in creating that dreamy, creamy consistency.
Mistake 2: Adding Warm Jello to the Whipped Cream
If your dissolved orange Jello is still warm or hot when you fold it into the whipped cream, you will melt the cream. This results in a runny orange layer that won’t set properly and can make the whole dessert weepy. Be patient! Let the Jello liquid cool until it’s just slightly warm or at room temperature. You should be able to comfortably touch the bowl.
Mistake 3: Not Letting it Chill Long Enough
Impatience is the enemy of no-bake desserts. Pulling the cheesecake out of the fridge after just an hour or two means it will be a soupy mess when you try to slice it. The Jello needs time to activate and set, and the whipped cream needs to firm up. Four hours is the bare minimum, but overnight is the gold standard. Trust me, the wait is worth it for perfect, clean slices.
Mistake 4: Over- or Under-Whipping the Cream
Whipped cream has stages. If you don’t whip it enough (soft peaks), it will be too loose and make your filling runny. If you whip it too much (beyond stiff peaks), it starts to turn grainy and will eventually become butter. Stop beating when the cream holds a firm peak that doesn’t droop when you lift the beater. This gives your cheesecake structure and a light, airy texture.
Your Orange Creamsicle Questions, Answered
Can I make this cheesecake ahead of time?
Absolutely! This is one of its best features. You can make the entire cheesecake up to two days before you plan to serve it. In fact, making it ahead allows the flavors to develop even more and guarantees it will be perfectly set. Just keep it covered in the refrigerator until you’re ready to add any final garnishes and serve. It’s the ultimate stress-free dessert for entertaining.
What can I use instead of orange Jello?
You have several great options. Lemon Jello makes a fantastic “lemon creamsicle” version. For a natural route, you can use unflavored gelatin and mix it with 1 cup of fresh orange juice and a little extra sugar, but know the color will be more pale. You could also experiment with other Jello flavors like strawberry or lime for a totally different fruity twist. The method remains exactly the same.
My crust is crumbly and won’t hold together. What did I do wrong?
A crumbly crust usually needs more “glue,” which is the melted butter. Make sure you are using the full 4 tablespoons (half a stick) of butter, and that it’s fully melted. Also, be sure to pulse your vanilla wafers into very fine crumbs. Coarse crumbs don’t bind as well. If you’ve mixed it and it still seems dry, you can add an extra half tablespoon of melted butter until the mixture holds together when pinched.
Can I use Cool Whip instead of whipping my own cream?
You can, but the texture and taste will be different. Using 8 ounces (one tub) of thawed Cool Whip will give you a sweeter, lighter result. Fold half into the Jello and half into the cream cheese mixture as directed. The cheesecake will set a bit faster but may have a slightly less rich and creamy mouthfeel compared to fresh whipped cream.
How do I get a clean slice without messing up the layers?
The secret is a hot, clean knife. For each slice, run a sharp, thin-bladed knife under very hot water. Wipe it completely dry with a towel. The heat will help the knife glide smoothly through the creamy layers without sticking or dragging. Clean and re-heat the knife between each cut for the most beautiful, picture-perfect slices.
Is there a way to make this recipe without gelatin?
For a gelatin-free version, you would need to rely on the whipped cream and cream cheese to set on their own, which will result in a much softer, mousse-like texture. You could try adding a stabilizer like a tablespoon of instant pudding mix to the orange layer, but it won’t slice as cleanly. It’s best served in cups or glasses if you skip the gelatin.
Can I use a different pan if I don’t have a springform?
Yes, you can use a 9×13 inch baking dish or a deep-dish pie plate. The presentation will be different, and it will be harder to remove neat slices, but it will taste just as delicious. Simply press the crust into the bottom of the dish, layer the fillings, and serve directly from the pan.
Why is my orange layer separating or watery?
Wateriness usually points to the Jello being too warm when mixed, the whipped cream being under-whipped, or the cheesecake not chilling long enough. It can also happen if the Jello wasn’t fully dissolved in the boiling water. Ensure each step is followed carefully: fully dissolve Jello, let it cool, whip cream to stiff peaks, and give it a full overnight chill.
Can I add real orange pieces to the filling?
I don’t recommend adding fresh orange segments or pieces directly to the filling, as their juice can make the cheesecake watery. However, you can finely chop candied orange peel or use a small amount of well-drained mandarin orange pieces from a can. The best way to incorporate fresh orange flavor is through the zest, which packs a punch without the extra liquid.
Where can I learn more about quality ingredients?
For anyone passionate about their kitchen creations, understanding where your ingredients come from can be rewarding. You can find great resources on making ethical food choices and selecting quality products from trusted sources, which can elevate your cooking and baking experience.
Ready to Create Some Sweet Memories?
I hope you’re as excited to make this No-Bake Orange Creamsicle Cheesecake as I was to share it with you. It’s more than just a dessert; it’s a bite of sunshine, a taste of nostalgia, and a guaranteed smile-maker. It proves that the most impressive treats can also be the simplest. So gather your ingredients, give yourself the gift of a little kitchen time, and get ready for the compliments to roll in. Don’t forget to check out our other show-stoppers like the gooey Caramel Fudge Cheesecake or the fresh Southern Pineapple Orange Swirl Cheesecake. If you’re in a savory mood before dessert, our Reuben Pastry Squares are the perfect start. Happy no-baking!
Equipment
- Grand bol
- Fouet
- Spatule
- Moule à charnière de 9 pouces
- Robot culinaire
Ingredients
- 12 oz biscuits vanillés type Nilla Wafers
- 1/2 tasse sucre granulé
- 4 cuil. à soupe beurre non salé fondu
- 16 oz fromage à la crème ramolli
- 1 tasse sucre granulé
- 2 tasses crème épaisse très froide
- 3 oz gelée à l'orange
- 1 tasse eau bouillante
- 1/2 tasse sucre glace
- 1/2 cuil. à café extrait de vanille
Instructions
- Mixez les biscuits vanillés pour obtenir de la chapelure fine et mélangez avec le sucre granulé et le beurre fondu jusqu'à ce que le tout soit homogène.
- Pressez le mélange de chapelure au fond d'un moule à charnière de 9 pouces pour former la croûte.
- Dans un bol, battez le fromage à la crème avec le sucre granulé jusqu'à obtenir un mélange lisse et crémeux.
- Dissolvez la gelée à l'orange dans l'eau bouillante, fouettez pendant 2 minutes et laissez refroidir pendant 15-20 minutes.
- Dans un autre bol, fouettez la crème épaisse avec le sucre glace, l'extrait de vanille et le zeste d'orange jusqu'à formation de pics fermes.
- Incorporez la moitié de la crème fouettée dans la gelée à l'orange refroidie jusqu'à homogénéité.
- Incorporez le reste de la crème fouettée dans le mélange de fromage à la crème jusqu'à ce que tout soit bien mélangé.
- Ajoutez le mélange de fromage à la crème sur la croûte, suivi de la couche d'orange.
- Couvrez le cheesecake et réfrigérez pendant au moins 4 heures, de préférence toute la nuit, pour qu'il prenne.
Notes
Nutrition

Hi, I’m Olivia Parker, the founder of BakingSecret.com and a lifelong lover of all things sweet and homemade. I grew up in a small town in Oregon, where the smell of fresh cookies in my family’s kitchen sparked my passion for baking. Over the years, I turned that passion into a mission: to help home bakers feel confident, inspired, and creative.
After studying food science and working in several artisan bakeries across the U.S., I decided to create a space where everyone from beginners to seasoned bakers can find reliable recipes, expert tips, and a warm, welcoming community. BakingSecret.com is my way of sharing the magic of baking with the world. When I’m not testing new recipes, you’ll find me exploring farmers’ markets, collecting vintage cookbooks, or perfecting my sourdough technique.